项目背景:
用 vue-cli + element-ui 开发的项目
方法一(不支持360兼容模式、IE):使用 mediaDevices.getUserMedia()
代码如下:
<template>
  <div class="take-photo">
    <!-- 拍照 -->
    <video id="videoCamera" :width="videoWidth" :height="videoHeight" autoPlay></video>
    <el-button size="small" type="primary" @click="takePhotoHandle">拍照</el-button>
    <!-- 预览 -->
    <canvas id="canvasCamera" :width="videoWidth" :height="videoHeight"></canvas>
    <el-button size="small" type="primary" :loading="loading" @click="uploadHandle">上传</el-button>
  </div>
</template>

<script>
export default {
  name: 'takePhoto',
  data () {
    return {
      loading: false, // 上传照片的loading
      imgSrc: "", // 照片地址
      photoVideo: null, // 拍照框
      photoContext: null, // canvas绘图环境
      photoCancas: null, // 预览框
      videoWidth: 306, // 拍照框宽度
      videoHeight: 378, // 拍照框高度
    }
  },
  mounted () {
    // 打开摄像头
    this.openCamera()
  },
  beforeDestroy() {
    if (this.photoVideo && this.photoVideo.srcObject) {
      // 停止视频流
      this.photoVideo.srcObject.getTracks()[0].stop();
    }
  },
  methods: {
    // 拍照处理
    takePhotoHandle () {
      // canvas画图
      this.photoContext.drawImage(this.photoVideo, 0, 0, this.videoWidth, this.videoHeight)
      // 获取图片base64链接
      this.imgSrc = this.photoCancas.toDataURL('image/png')
    },
    // 打开摄像头
    async openCamera() {
      this.photoVideo = document.getElementById('videoCamera')
      this.photoCancas = document.getElementById('canvasCamera')
      this.photoContext = this.photoCancas.getContext('2d')
      try {
        const constraints = {
          audio: false,
          video: {
             this.videoWidth,
            height: this.videoHeight
          }
        }
        const stream = await navigator.mediaDevices.getUserMedia(constraints)
        this.photoVideo.srcObject = stream
        this.photoVideo.play()
      } catch (error) {
        this.$message({
          title: '警告',
          message: '请确认摄像头能正常工作,必须使用谷歌浏览器或者360浏览器的极速模式,否则拍照不能正常使用',
          type: 'warning',
          duration: 8000
        });
      }
    },
    // 上传照片
    async uploadHandle () {
      this.loading = true
      try {
        const firstIndex = this.imgSrc.indexOf('base64,')
        const url = this.imgSrc.substr(firstIndex + 7)
        const params = {
          photo: url
        }
        // 发送接口
        await xxx(params)
        this.loading = false
      } catch (error) {
        this.loading = false
      }
    }
  }
}
</script>

<style lang="scss" scoped>
</style>
方法二(兼容360兼容模式、IE):使用 webcamjs
实现步骤:
1、安装适合浏览器的flash:https://www.flash.cn/download-wins
为了兼容IE,我下载的是下图版本:

2、将 webcam.min.js 和 webcam.swf 文件,放到根目录——>public目录中。
这两个文件可以在 webcamjs的github上拿到:https://github.com/jhuckaby/webcamjs
3、public目录下的index.html,在头部引入 webcam.min.js。
4、takePhoto.vue是拍照页,其中代码如下:
 <template>
   <div class="take-photo">
     <!-- 拍照 -->
     <div id="photoCamera"></div>
     <el-button size="small" type="primary" @click="takePhotoHandle">拍照</el-button>
     <!-- 预览 -->
     <div id="imageCamera"></div>
     <el-button size="small" type="primary" :loading="loading" @click="uploadHandle">上传</el-button>
   </div>
 </template>

 <script>
 export default {
   name: 'takePhoto',
   data () {
     return {
       loading: false, // 上传照片的loading
       imgSrc: "",
       videoWidth: 306,
       videoHeight: 378,
     }
   },
   mounted () {
     Webcam.set({
        this.videoWidth,
       height: this.videoHeight,
       image_format: 'jpeg',
       jpeg_quality: 100,
       swfURL: '../../webcam.swf', // 指定swf文件
     })
     Webcam.attach('#photoCamera')
   },
   methods: {
     // 拍照处理
     takePhotoHandle () {
       Webcam.snap(url => {
         this.imgSrc = url
         document.getElementById('imageCamera').innerHTML = `<img src="${url}">`
       })
     },
     // 上传照片
     async uploadHandle () {
       this.loading = true
       try {
         const firstIndex = this.imgSrc.indexOf('base64,')
         const url = this.imgSrc.substr(firstIndex + 7)
         const params = {
           photo: url
         }
         // 调接口
         await xxx(params)
         this.loading = false
       } catch (error) {
         this.loading = false
       }
     },
   }
 }
 </script>

 <style lang="scss" scoped>
 </style>
使用方法二时,注意 && 补充:
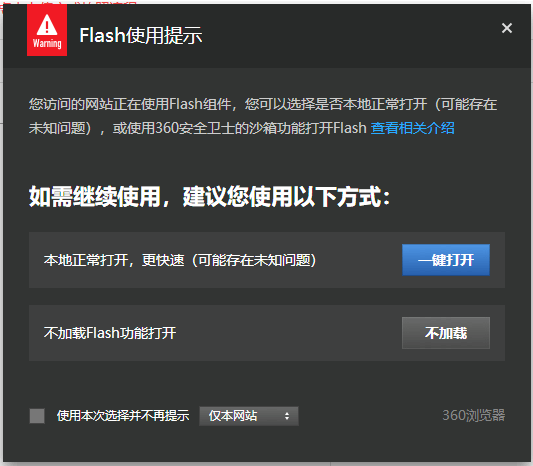
1、安装完 flash 后,当浏览器访问拍照页面时,会弹出下图提示,选择 一键打开。
2、前端框架开发的项目,Webcam.set 中的 swfURL 配置很重要。
swfURL:配置webcam.swf的文件路径。
测试是否设置成功:在浏览器中,要能访问到这个文件。
比如我把swf文件放在根目录——>public目录下,拍照的访问地址是 http://localhost/student/photo/takePhoto
那么swfURL设置为 "../../webcam.swf"。 当访问 http://localhost/webcam.swf,是可以访问到这个swf文件的。
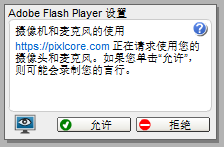
这个swf很重要,访问不到的话,就会出现:明明有了flash,但拍照框里一片空白。因为这个swf就是询问你是否愿意打开摄像头的,允许了才可以打开摄像头。
这个swf就是下面这个文件:
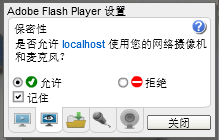
3、如何不用询问,直接打开摄像头呢?
拍照画面,鼠标右键——>设置,打开下图,勾选“允许”和“记住”。
想了解详细的话,可以点击弹窗右上角的 “?” 查看。
4、参考资料:
webcamjs的github地址:https://github.com/jhuckaby/webcamjs
webcamjs支持h5以及flash的方式调用摄像头:https://www.zybuluo.com/Fancy-Bai/note/725731
webcamjs的中文简介:https://crazyhuiliang.gitbooks.io/javascript/content/WebcamJS.html
背后心得:
现在解决了,便会觉得也没啥大不了。但遇到问题的当时,真的是很头疼。
每次听到要在IE上用,头都大了,白眼翻到九霄云外。
一开始以为是flash的问题,装了卸,卸了装,搞了一天。后来遇到空白的问题,都要放弃了,
后端小伙伴说放弃吧,换个方法吧,研究下ActiveX拍照控件。
What ? NONONO,花了这么久捯饬,不给个结果,对不起掉的头发。总感觉真相就隔着一层纸。
结果真的找到了swf这个原因,摄像头打开的时候,眼泪都要出来了。
测试容易走神:总是看到低画质无美颜的大脸,心情都糟了。
上一篇博客是两年多前,现在逼着自己把这个整理了,短短的文章,竟然也从1点多写到4点多 ==||