[教程]使用buildroot完全自定义自己的embedded linux系统(nand)
http://www.eeboard.com/bbs/thread-38377-1-1.html
[教程] [教程]使用buildroot完全自定义自己的embedded linux系统(nand)
ubuntu, fedora, debian太过庞大了,你是否想完完全全的构建自己的embedded linux系统?本篇文章教你如何实现
编译环境:
ubuntu 12.04(x86_64)
目标环境:
1) linux-3.4内核
2) buildroot 2013-02
3)系统运行在nand上
固件制作步骤说明:
步骤一:创建自己的工作目录
$mkdir ~/mylinux
$cd ~/mylinux
步骤二:获取源代码
$git clone git://github.com/cubieboard/sunxi-tools.git tools
$git clone git://github.com/cubieboard/u-boot-sunxi.git u-boot
$git clone git://github.com/cubieboard/buildroot-sunxi.git buildroot
$git clone git://github.com/cubieboard/linux-sunxi.git linux-3.4
步骤三:切换到sunxi-3.4-cb分支
$cd tools
$git checkout -b sunxi-3.4-cb origin/sunxi-3.4-cb
$cd -
$cd u-boot
$git checkout -b sunxi-3.4-cb origin/sunxi-3.4-cb
$cd -
$cd buildroot
$git checkout -b sunxi-3.4-cb origin/sunxi-3.4-cb
$cd -
$cd linux-3.4
$git checkout -b sunxi-3.4-cb origin/sunxi-3.4-cb
$cd -
步骤四:编译并生成固件
$cd ~/mylinux
$tools/build.sh
漫长的编译完成后,在toosl/pack下面生成了一个100多M的固件
步骤五:
1)启动livesuit,并选中刚生成的固件
2)准备好一块cubieboard,按住micro USB口下面的烧写键,然后插入usb线,等3秒左右,松开按键,进入烧写模式
简易教程已经写完,后续里面各个部分如何定制,以及相关的原理会不断的补充上来,欢迎大家尝试并提出意见
教程二. 定制buildroot
$cd ~/mylinux/buildroot
$make cubieboard_defconfig
$make menuconfig
进入了如下的界面
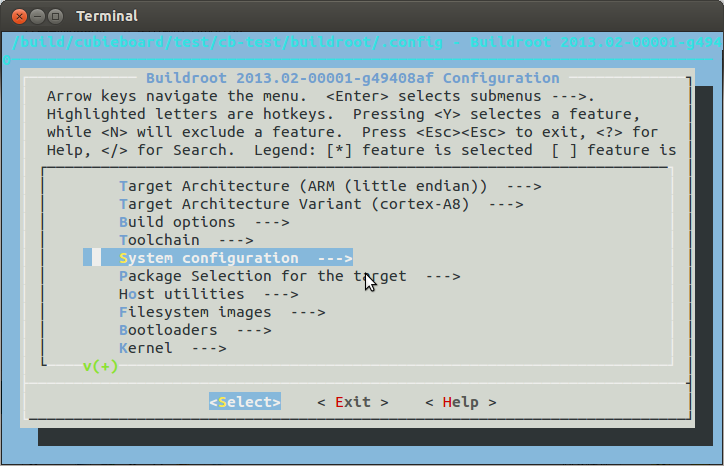
通过上下左右,空格+返回选中要增加的软件包,定制完成后退出
把新的配置保存下来
$cp .config configs/cubieboard_defconfig
做完后就可以重新运行tools/build.sh重新生成固件了。有一点需要注意的,不要进到tools目录下运行build.sh脚本,必须在~/mylinux目录下,运行tools/build.sh
如果你还想进一步的定制你的文件系统,可以研究下board/cubieboard下面的skel以及scripts脚本,也可以上buildroot的官方网站查看他们的帮助文档
教程三 定制nand分区
1)当前分区情况说明
我们知道, cubieboard上的nandflash的容量是4GB。
当前nand的分区情况可以看~/mylinux/tools/pack/chips/sun4i/configs/linux/default/下面的sys_config.fex文件,如下面所示
[part_num]
num = 4
[partition0]
class_name = DISK
name = bootloader
size_hi = 0
size_lo = 32768
user_type = 0
ro = 0
[partition1]
class_name = DISK
name = env
size_hi = 0
size_lo = 16384
user_type = 0
ro = 0
[partition2]
class_name = DISK
name = boot
size_hi = 0
size_lo = 16384
user_type = 0
ro = 0
[partition3]
class_name = DISK
name = rootfs
size_hi = 0
size_lo = 524288
user_type = 0
ro = 0
num=
4表示分为4个分区,每个分区的容量由size_lo指定,以1KB为单位。需要注意的是,如果4个分区的容量没有用完4GB(我们的nandflash
是4GB),则烧写的时候会自动添加一个分区,用完所有的nand容量。我们进入linux系统,看一下系统中的分区,如下:
[root@linux ~]# ls -l /dev/nand*
brw------- 1 root root 93, 0 Jan 1 1970 /dev/nand
brw------- 1 root root 93, 1 Jan 1 1970 /dev/nanda
brw------- 1 root root 93, 2 Jan 1 1970 /dev/nandb
brw------- 1 root root 93, 3 Jan 1 1970 /dev/nandc
brw------- 1 root root 93, 4 Jan 1 1970 /dev/nandd
brw------- 1 root root 93, 5 Jan 1 1970 /dev/nande
其中/dev/nand表示的是整个nand设备,容量是4GB,nanda,nandb,nandc,nandd是sys_config.fex中配置
的分区,nande是系统计算剩余容量自动创建的。在使用livesuit烧写的时候,每个用户分区要烧写的镜像也是在sys_config.fex中指
定的,如下
[down_num]
down_num = 4
[download0]
part_name = bootloader
pkt_name = BOOTLOADER_00000
encrypt = 0
[download1]
part_name = env
pkt_name = ENVIROMENT_00000
encrypt = 0
[download2]
part_name = boot
pkt_name = KERNEL_000000000
encrypt = 0
[download3]
part_name = rootfs
pkt_name = ROOTFS_000000000
encrypt = 0
比如前面的bootloader分区,它的索引名是BOOTLOADER_00000,在相同目录下的image.cfg中找到下面一行
{filename = "bootloader.fex", maintype = ITEM_ROOTFSFAT16, subtype = "BOOTLOADER_00000",},
从上面我们可以发现,bootloader区下载的是bootloader.fex文件,我们可以仔细研究tools/pack/pack脚本,发现
bootloader.fex是fsbuild命令工具创建的一个fat16的文件镜像,它们内容来源于~/mylinux/tools/pack
/chips/sun4i/wboot/bootfs。同理,其他的分区文件也可以这样分析。
2)修改指定分区容量大小
这里举个简单的例子,把nandd(也就是我们linux的根分区)容量从原来的512MB调整到2GB
,只需要在sys_config.fex的
[partition3]
class_name = DISK
name = rootfs
size_hi = 0
size_lo = 524288
user_type = 0
ro = 0
改为
[partition3]
class_name = DISK
name = rootfs
size_hi = 0
size_lo = 2057152
user_type = 0
ro = 0
然后重修执行tools/build.sh,烧写完进入系统,nandd的容量就变成2GB了。
教程四 裁剪linux内核
其实同裁剪buildroot。命令如下
$cd ~/mylinux/linux-3.4
$cp arch/arm/configs/cubieboard_defconfig .config
$make ARCH=arm menuconfig (注意:不要漏了ARCH=arm)
执行完上面的命令后,则进入经典的NCURSE界面,选上自己喜欢的驱动后,退出,再把新的配置文件保存
$cp .config arch/arm/configs/cubieboard_defconfig
最后在回到mylinux目录,执行tools/build.sh即可。如果需要增加自己的驱动,建议加入到kernel的目录树中,可以参考
linux-3.4/Documentation/kbuild/kconfig-language.txt,有时间研究的话,可以学到很多东西。同时建
议新人好好看一看linux-3.4/Documentation/CodingStyle。
教程五 红外控制例子
在做好自己的系统后,下面我们写一个简单的红外控制计算机的例子(具体控制需要自己实现,这里是一个demo)
a)烧写完linux,上电
b)使用root(密码cubieboard)登录
c)连上以太网线
d)挂载开发机
$udhcpc (自动配置ip)
$mount.cifs //192.168.1.2/share /mnt -o user=build (假设我的开发主机是192.168.1.2,并有一个共享目录share
e)写一段小代码,如下
//ir-demo.c,我直接放到share目录下
//arm-linux-gnueabihf-gcc -static -o ir-demo ir-demo.c
#include <stdio.h>
#include <stdint.h>
#include <linux/input.h>
#include <string.h>
#include <fcntl.h>
#include <unistd.h>
#include <sys/types.h>
#include <sys/inotify.h>
#include <sys/stat.h>
#include <limits.h>
#include <sys/errno.h>
#ifndef EV_SYN
#define EV_SYN 0
#endif
#define BITS_PER_LONG (sizeof(long) * 8)
#define NBITS(x) ((((x)-1)/BITS_PER_LONG)+1)
#define OFF(x) ((x)%BITS_PER_LONG)
#define BIT(x) (1UL<<OFF(x))
#define LONG(x) ((x)/BITS_PER_LONG)
#define EVENT_SIZE ( sizeof (struct inotify_event) )
int main (int argc, char **argv)
{
int fd, rd, i;
struct input_event ev[64];
int version;
unsigned short id[4];
unsigned long bit[EV_MAX][NBITS(KEY_MAX)];
char name[256] = "Unknown";
int abs[5];
if (argc < 2) {
printf("Usage: ir-runner /dev/input/eventX
");
return 1;
}
if ((fd = open(argv[argc - 1], O_RDONLY)) < 0) {
perror("evtest");
return 1;
}
ioctl(fd, EVIOCGNAME(sizeof(name)), name);
printf("Input device name: "%s"
", name);
daemon(0, 1);
while (1) {
rd = read(fd, ev, sizeof(struct input_event) * 64);
if (rd < (int) sizeof(struct input_event)) {
perror("
ir: error reading");
return 1;
}
for (i = 0; i < rd / sizeof(struct input_event); i++) {
printf("code=%d, type=%d, value=%d
", ev.code,
ev.type, ev.value); //可以在这里根据不同的code值执行不同的程序,可以用system系统调用
}
}
close(fd);
return 0;
}
f) 运行测试程序
#insmod /lib/modules/3.4.29+/kernel/drivers/input/keyboard/sun4i-ir.ko
此时打印提示是event1设备。
#/mnt/ir-demo /dev/input/event1
这个时候按遥控键就有反应了。如果配上LED灯或者GPIO就更佳了。
简化了下前面红外测试代码,并提交到github.com/cubieboard/buildroot-sunxi.git
commit 9d0aaa64c5bd034f1f53dd5889f7a77af0da40fd
Author: matson <matson@cubietech.com>
Date: Sat Apr 27 11:20:55 2013 +0800
cubieboard: add cb_tools package
Add ir-daemon example program. This allow you to trigger some other program via IR module. The instructions to do this are:
1. After system startup, insmod sunxi-ir.ko module
2. run 'ir-daemon'
3. Add a hook script or program, and the full name should be '/tools/ir-hook'
when you push the IR key, ir-daemon will start '/tools/ir-hook', pass the keycode and value to '/tools/ir-hook'
diff --git a/configs/cubieboard_defconfig b/configs/cubieboard_defconfig
index 82deac0..68bcb41 100644
--- a/configs/cubieboard_defconfig
+++ b/configs/cubieboard_defconfig
@@ -1,6 +1,6 @@
#
# Automatically generated make config: don't edit
-# Buildroot 2013.02-dirty Configuration
+# Buildroot 2013.02-00001-g49408af-dirty Configuration
#
BR2_HAVE_DOT_CONFIG=y
BR2_HOSTARCH_NEEDS_IA32_LIBS=y
@@ -988,6 +988,7 @@ BR2_PACKAGE_UTIL_LINUX_LIBBLKID=y
# BR2_PACKAGE_UTIL_LINUX_LOGIN_UTILS is not set
# BR2_PACKAGE_UTIL_LINUX_WRITE is not set
# BR2_PACKAGE_DSP_TOOLS is not set
+BR2_PACKAGE_CB_TOOLS=y
#
# Text editors and viewers
diff --git a/package/Config.in b/package/Config.in
index faee5c3..6aba157 100644
--- a/package/Config.in
+++ b/package/Config.in
@@ -800,6 +800,7 @@ source "package/supervisor/Config.in"
source "package/systemd/Config.in"
source "package/util-linux/Config.in"
source "package/dsp-tools/Config.in"
+source "package/cb_tools/Config.in"
endmenu
menu "Text editors and viewers"
diff --git a/package/cb_tools/Config.in b/package/cb_tools/Config.in
new file mode 100644
index 0000000..67943e9
--- /dev/null
+++ b/package/cb_tools/Config.in
@@ -0,0 +1,5 @@
+config BR2_PACKAGE_CB_TOOLS
+ bool "cb_tools"
+ help
+ tools for cubieboard
+
diff --git a/package/cb_tools/cb_tools.mk b/package/cb_tools/cb_tools.mk
new file mode 100644
index 0000000..20a7ffe
--- /dev/null
+++ b/package/cb_tools/cb_tools.mk
@@ -0,0 +1,28 @@
+CB_TOOLS_DIR := $(BUILD_DIR)/cb_tools
+
+$(CB_TOOLS_DIR)/.source :
+ mkdir -pv $(CB_TOOLS_DIR)
+ cp -rf package/cb_tools/src/* $(CB_TOOLS_DIR)
+ touch $@
+
+$(CB_TOOLS_DIR)/.configured : $(CB_TOOLS_DIR)/.source
+ touch $@
+
+
+cb_tools-binary: $(CB_TOOLS_DIR)/.configured
+ $(MAKE) CC="$(TARGET_CC)" -C $(CB_TOOLS_DIR)
+
+
+cb_tools: cb_tools-binary
+ $(MAKE) DESTDIR="$(TARGET_DIR)" -C $(CB_TOOLS_DIR) install
+ rm -rf $(CB_TOOLS_DIR)/.source $(CB_TOOLS_DIR)/.configured
+
+
+##############################################################
+#
+# Add our target
+#
+#############################################################
+ifeq ($(BR2_PACKAGE_CB_TOOLS),y)
+TARGETS += cb_tools
+endif
diff --git a/package/cb_tools/src/Makefile b/package/cb_tools/src/Makefile
new file mode 100644
index 0000000..f70f181
--- /dev/null
+++ b/package/cb_tools/src/Makefile
@@ -0,0 +1,26 @@
+
+#CROSS_COMPILE?=arm-linux-gnueabihf-
+#CC=$(CROSS_COMPILE)gcc
+#LD=$(CROSS_COMPILE)ld
+
+#ifneq "CROSS_SYSROOT" ""
+#CROSS_SYSROOT=$(shell cd ../../../../out/br/staging; pwd)
+#endif
+
+#CFLAGS+=--sysroot=$(CROSS_SYSROOT)
+
+ir-daemon:ir-daemon.c
+ $(CC) $(CFLAGS) -o ir-daemon -lsysfs ir-daemon.c
+
+
+all: ir-daemon
+
+install:
+ install ir-daemon $(DESTDIR)/bin
+
+clean:
+ rm -rf *.o ir-daemon
+
+.PHONY: all clean
+
+
diff --git a/package/cb_tools/src/ir-daemon.c b/package/cb_tools/src/ir-daemon.c
new file mode 100644
index 0000000..76a58c9
--- /dev/null
+++ b/package/cb_tools/src/ir-daemon.c
@@ -0,0 +1,106 @@
+#include <stdio.h>
+#include <stdint.h>
+#include <linux/input.h>
+#include <string.h>
+#include <fcntl.h>
+#include <unistd.h>
+#include <sys/types.h>
+#include <sys/inotify.h>
+#include <sys/stat.h>
+#include <limits.h>
+#include <sys/errno.h>
+#include <sysfs/dlist.h>
+#include <sysfs/libsysfs.h>
+
+#define SUNXI_IR_NAME "sun4i-ir"
+#define HOOK_PROGRAM "/tools/ir-hook"
+
+int get_sunxi_ir_device(char *buf_name, size_t buf_len)
+{
+ struct sysfs_class *input_class = NULL;
+ struct dlist *input_devices = NULL;
+ struct sysfs_class_device *cls_dev = NULL;
+ struct sysfs_device *tdev = NULL;
+ struct sysfs_attribute *tattr = NULL;
+ int ret = -1;
+
+ input_class = sysfs_open_class("input");
+ input_devices = sysfs_get_class_devices(input_class);
+
+ dlist_for_each_data(input_devices, cls_dev, struct sysfs_class_device) {
+ tdev = sysfs_get_classdev_device(cls_dev);
+ if (tdev != NULL) {
+ tattr = sysfs_get_device_attr(tdev, "name");
+ if (tattr == NULL)
+ continue;
+ if (tattr->value == NULL)
+ continue;
+
+ if (strncmp(tattr->value, SUNXI_IR_NAME, 8)) {
+ continue;
+ }
+ memset(buf_name, buf_len, 0);
+ strncpy(buf_name, cls_dev->name, buf_len - 1);
+ ret = 0;
+
+ }
+ }
+
+ sysfs_close_class(input_class);
+ return ret;
+}
+
+
+int main (int argc, char **argv)
+{
+ int fd, rd, i, ret;
+ struct input_event ev[64];
+ char name_buf1[128];
+ char name_buf2[128];
+
+ ret = get_sunxi_ir_device(name_buf1, sizeof(name_buf1));
+ if (ret) {
+ printf("Please insmod sunxi-ir.ko
");
+ return -1;
+ }
+
+ memset(name_buf2, sizeof(name_buf2), 0);
+ snprintf(name_buf2, sizeof(name_buf2), "/dev/input/%s", name_buf1);
+
+ printf("ir: %s
", name_buf2);
+
+ if ((fd = open(name_buf2, O_RDONLY)) < 0) {
+ perror("evtest");
+ return 1;
+ }
+
+ daemon(0, 1);
+
+ while (1) {
+ rd = read(fd, ev, sizeof(struct input_event) * 64);
+
+ if (rd < (int) sizeof(struct input_event)) {
+ perror("read");
+ return 1;
+ }
+
+ for (i = 0; i < rd / sizeof(struct input_event); i++) {
+ if (ev.type == 1) {
+ if (ev.value == 1) {
+ printf("IR: %d DOWN
", ev.code);
+ } else {
+ printf("IR: %d UP
", ev.code);
+ }
+ if (!access(HOOK_PROGRAM, X_OK)) {
+ memset(name_buf1, sizeof(name_buf1), 0);
+ snprintf(name_buf1, sizeof(name_buf1), "%s %d %d",
+ HOOK_PROGRAM, ev.code, ev.value);
+ system(name_buf1);
+ }
+ }
+ }
+ }
+
+ close(fd);
+ return 0;
+}
编出固件后,在/tools/下面添加ir-hook程序或者脚本就可以了。ir-daemon在收到信号后,会启动/tools/ir-hook,并把code, value作为$1 $2参数传递给它。这样就可以通过红外控制各种东西了。
刚刚更新了linux-sunxi和tools-sunxi,把ir,
leds默认编译进linux内核,gpio编译成模块。所以现在取最新的代码,然后添加下面的脚本,就可以红外控制灯了。理论上控制gpio也是一样
的,但记得要加载驱动,并且运行ir-daemon
cat /tools/ir-hook
#!/bin/bash
if [ "$2" -eq "1" ]; then
if cat /sys/class/leds/blue:ph21:led2/brightness|grep 1
then
echo 0 > /sys/class/leds/blue:ph21:led2/brightness
else
echo 1 > /sys/class/leds/blue:ph21:led2/brightness
fi
fi
使用红外控制gpio灯的例子。用了cubieboard的面包板
脚本如下
cat /tools/ir-hook
#!/bin/bash
if [ "$2" -eq "0" ]; then
exit 0
fi
if ! ls /sys/class/gpio |grep gpio30
then
echo "export 30, 31"
echo 30 > /sys/class/gpio/export
echo 31 > /sys/class/gpio/export
echo out > /sys/class/gpio/gpio30_pd2/direction
echo out > /sys/class/gpio/gpio31_pd1/direction
fi
if cat /sys/class/gpio/gpio31_pd1/value |grep 1
then
echo 0 > /sys/class/gpio/gpio30_pd2/value
echo 0 > /sys/class/gpio/gpio31_pd1/value
else
echo 0 > /sys/class/gpio/gpio30_pd2/value
echo 1 > /sys/class/gpio/gpio31_pd1/value
fi
gpio映射可以看:
1) http://linux-sunxi.org/Cubieboard
2)tools/pack/chips/sun4i/configs/linux/cubieboard/sys_config1.fex
其中的gpio_para段
3)http://linux-sunxi.org/GPIO

原文作者:matson
原文链接:http://forum.cubietech.com/forum.php?mod=viewthread&tid=352&extra=&page=1