目录
一、快速入门
1.1、引入依赖
1.2、第一个示例
1.3、注意事项
1.4、约定俗成的规则
1.5、打印输出与断言
2.1、抛出问题
2.2、junit AOP
三、其他拓展
3.1、超时设置
3.2、忽略某个单元测试
3.3、预期异常
四、总结
一、快速入门
本文内容以Junit4为主。
1.1、引入依赖
下面是junit4最新的jar包依赖
<!-- https://mvnrepository.com/artifact/junit/junit -->
<dependency>
    <groupId>junit</groupId>
    <artifactId>junit</artifactId>
    <version>4.13</version>
    <scope>test</scope>
</dependency>
1.2、第一个示例
最简单的示例,就是使用一个@Test注解
package cn.ganlixin.junit;

import org.junit.Test;

public class FirstExample {

    @Test
    public void sayHello() {
        System.out.println("hello world");
    }
}
运行上面的sayHello方法,会输出:hello world。
1.3、注意事项
当我们进行测试的时候,只需要使用@Test注解需要测试的方法即可,但是被注解的方法必须要满足一下几个要求:
1、访问级别为public;
2、返回类型为void;
3、方法名随意,但是不能接收参数;
4、可以在在方法签名上抛出异常,比如下面的这个:
package cn.ganlixin.junit;

import org.junit.Test;

public class FirstExample {

    /**
     * 可以抛出异常
     */
    @Test
    public void testThrowException() throws InterruptedException {
        Thread.sleep(1000);
    }
}
1.4、约定俗成的规则
1、测试类的类名:要测试的类加上Test,比如有UserMapper类,如果要测试UserMapper类,那么对应的测试类名应该为UserMapperTest;
2、测试的方法名:test加上要测试的方法,比如测试UserMapper的addUser方法,那么测试方法名为testAddUser。
1.5、打印输出与断言
平时我们在写代码的时候,如果需要测试某个步骤中的某个变量值,那么通常的做法就是控制台打印这个变量即可。
同样的,在进行写单元测试的时候,我们也是可以使用控制台打印的,比如上面的第一个例子,输出hello world。
但是我们做单元测试,目标不是看他的输出结果,而是看运行结果是否和我们的预期一致!!
package cn.ganlixin.junit;

import org.junit.Test;

public class FirstExample {

    @Test
    public void testExample() {
        int a = 10 / 3;

        System.out.println(a);  // 打印计算结果的值

        System.out.println(a == 2); // 判断结果结果是否为2
        // 等价于下面这种判断
        if (a == 2) {
            System.out.println(true);
        } else {
            System.out.println(false);
        }
    }
}
其实上面的运行结果是否和我们预期相符合,程序都会运行成功,且不会出现警告或者报错。
但其实我在计算10 / 3的时候,我的预期是2,但是如果不是2,应该证明单元测试未通过,此时应该有提示才对(而不是输出一个false来提示)。
这个就需要用到“断言”了,断言其实和if else判断是一样的,只不过语义上有点区别,上面使用断言来改写,就是下面这样:
package cn.ganlixin.junit;

import org.junit.Assert;
import org.junit.Test;

public class FirstExample {

    @Test
    public void testExample() {
        int a = 10 / 3;
        Assert.assertEquals(a, 2);
    }
}
当我运行测试后,结果如下图所示,一下就能看出我的测试其实是未通过的,因为实际的结果和预期的结果是不同的。

一般来说,没有强制要求使用断言,那么就可以根据自己的喜好来选择是使用断言,还是控制台输出,我一般就是使用控制台输出,测试是否通过,完全靠自己人眼去分辨;况且,有时候我只是想要运行一段代码,对于结果并不关注,那么就不需要使用断言了。
二、单元测试的“AOP”
2.1、抛出问题
假设有下面这么一段代码,目的很简单,就是在两个测试方法的主要逻辑执行前,先执行before方法,然后在测试方法的主要逻辑执行完成后,再执行after方法。
package cn.ganlixin.junit;

import org.junit.Test;

public class JunitSecondTest {

    @Test
    public void testAOP111111() {
        before();
        System.out.println("real logic code 1111111111111");
        after();
    }

    @Test
    public void testAOP22222() {
        before();
        System.out.println("real logic code 22222222222");
        after();
    }

    public void before() {
        System.out.println("before");
    }

    public void after() {
        System.out.println("after");
    }
}
运行代码中的所有测试,输出结果如下:
before
real logic code 1111111111111
after
before
real logic code 22222222222
after
其实这个就和Java里面广泛应用的AOP是一样的场景,junit也有几个注解来实现这个功能。
2.2、junit AOP
@Before,@After、@BeforeClass,@AfterClass这四个注解,依次介绍:
@Before:在每个测试方法执行前,先执行@Before注解的方法;
@After:在每个测试方法执行后,再执行@After注解的方法;
@BeforeClass:在整个单元测试执行过程中,最先执行,且只执行一次,一般用来加载资源(只需要加载一次,比如数据库连接,资源初始化);
@AfterClass:在所有单元测试执行完毕后,最后再执行@AfterClass注解的方法,只执行一次,一般用来释放资源。
先看下面使用示例:
package cn.ganlixin;

import org.junit.*;

public class JunitFlow {

    @BeforeClass
    public static void beforeClass(){
        System.out.println("this is @BeforeClass");
    }

    @Before
    public void before() {
        System.out.println("this is @Before");
    }

    @Test
    public void test11111() {
        System.out.println("this is @Test test1111111");
    }

    @Test
    public void test22222() {
        System.out.println("this is @Test test222222");
    }

    @After
    public void after() {
        System.out.println("this is @After");
    }

    @AfterClass
    public static void afterClass() {
        System.out.println("this is @AfterClass");
    }
}
运行上面的所有测试方法,结果如下:
this is @BeforeClass
this is @Before
this is @Test test1111111
this is @After
this is @Before
this is @Test test222222
this is @After
this is @AfterClass
三、其他拓展
3.1、超时设置
如果我们对执行的测试代码有时间限制,比如要求测试的代码必须在1秒内执行完毕,那么如果1秒内没有执行完毕,就代表测试失败;反之,如果测试的代码在规定时间内执行完毕,那么就认为在时间方面通过了要求。
设置单元测试的执行时间限制(超时),只需要在@Test注解中,设置timeout属性即可,单位为毫秒:
package cn.ganlixin.junit;

import org.junit.Test;

/**
 * 设置测试超时时间
 */
public class JunitTime {

    @Test(timeout = 1000)
    public void testNormal() throws InterruptedException {
        Thread.sleep(500);
    }

    @Test(timeout = 1000)
    public void testTimeOut() throws InterruptedException {
        Thread.sleep(2000);
    }
}
上面测试中
1、testNormal要求在1秒内执行完毕才认为是通过的,因为只休眠了500毫秒,所以肯定是没问题的;
2、testTimeOut要求在1秒内执行完,但是实际上需要2秒才能执行完,所以当运行1秒后,就不会继续运行,因为此时已经可以判定为测试未通过了。
运行上面的所有测试,结果如下:

另外,设置超时时间,可以防止程序无休止的运行,在设置的时间内未知性完毕,就立即终止。
3.2、忽略某个单元测试
一般情况下,我们一个测试类中,会有多个测试方法,这些测试方法可以一次性执行,也可以每次指定要执行某个方法,暂且不考虑这个问题;
忽略某个单元测试,是针对一次运行多个测试方法的那种情况,比如下面这样:
package cn.ganlixin.junit;
import org.junit.Ignore;
import org.junit.Test;
/**
* 忽略某个单元测试
*/
public class JunitIgnore {
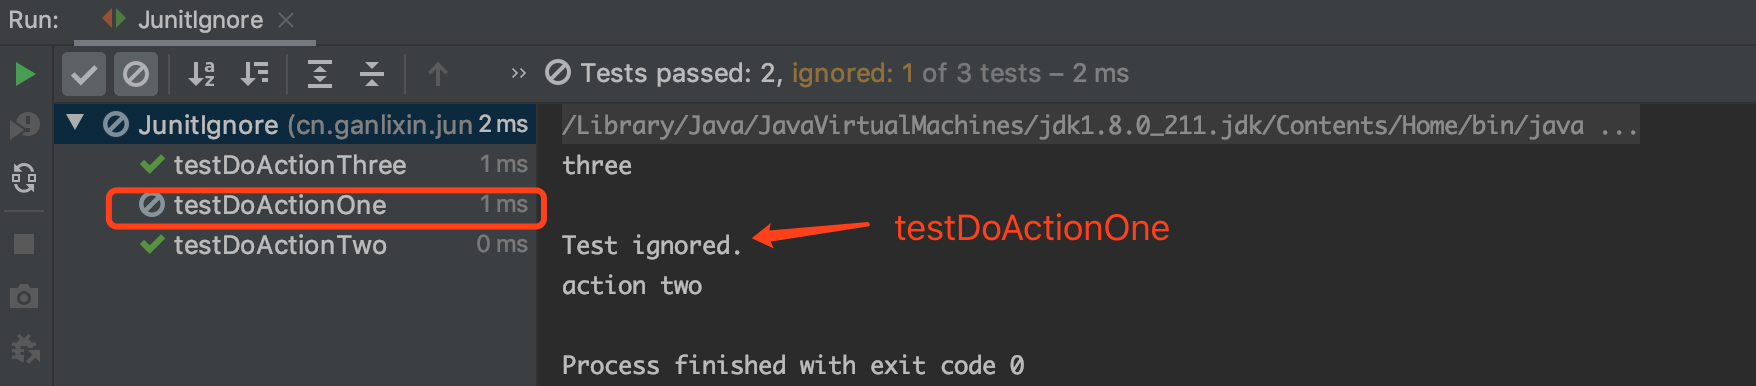
@Ignore // 增加@Ignore注解,该测试中的代码不会真的执行,只会输出一行Ignored
@Test
public void testDoActionOne() {
System.out.println("action one");
}
@Test
public void testDoActionTwo() {
System.out.println("action two");
}
@Test
public void testDoActionThree() {
System.out.println("three");
}
}
一次性运行上面的所有测试,输出的结果如下:
3.3、预期异常
异常虽然是我们不希望看到的,但是我们可以制造一些测试数据,对于这些数据,程序运行时就应该抛出一些异常,这个时候我们才认为测试是通过的;否则,原本应该处理出现异常的,但是却没有没有发生异常,反而正常执行完了,证明我们的代码是存在问题,那么测试就是不通过的。
比如一个数组,只有2个元素,尝试访问第3个元素,就应该出现数组越界的异常;一个整数除以0,应该出现抛出算数异常....
package cn.ganlixin.junit;

import org.junit.Test;

import java.io.IOException;

/**
 * 测试异常
 */
public class JunitException {

    @Test(expected = IndexOutOfBoundsException.class)
    public void testArray() {
        int[] arr = {1, 2};

        // 尝试获取第三个元素,会抛出下标越界异常
        int b = arr[3];
    }

    @Test(expected = ArithmeticException.class)
    public void testCompute() {
        int a = 10 / 0; // 抛出算数异常
        System.out.println();
    }

    @Test(expected = IOException.class)
    public void testNormal() {
        int a = 10;

        // 执行正常,不会抛出异常,但是被认为是测试未通过,因为预期希望捕获到IOException
    }
}
四、总结
一般来说,每开发一个功能模块,为其编写单元测试是一个比较推荐的做法,比如为DAO层的每一个操作DB的接口编写单元测试,需要注意的是:单元测试只对结果进行判断,而不能对处理逻辑正确性进行测试,所以当测试的结果和预期相同,只能说明结果正确,不代表处理流程没有错。