Maven的多模块可以让项目结构更明确,提高功能的内聚,降低项目的耦合度,真正的体现出分层这一概念。
我们在操作中,要明白为什么这样做,要了解到更深的层次,这样,我们就不限于个别软件了。
话不多说,直入主题:
如果对Maven还不够熟悉,请看该博客:Maven基础
整个项目做完之后的结构是这样的:
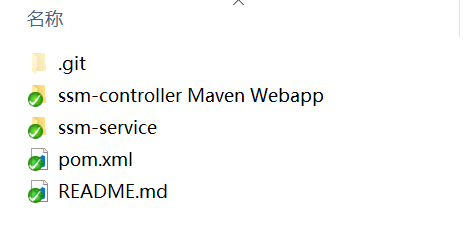

在开始之前我放出这两张图是maven多模块项目做完后的目录结构,以免大家被eclipse的结构迷惑了。
首先,新建一个maven项目,如图:
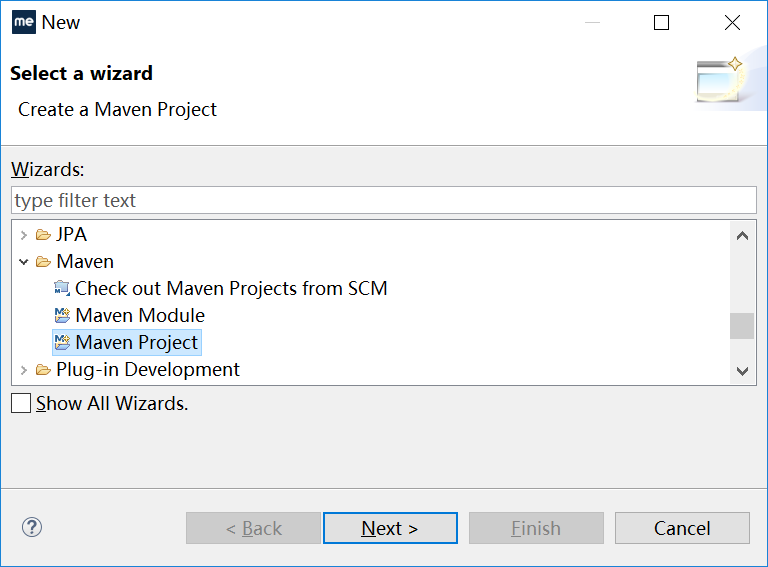
选project,注意是Create a simple project,然后特别注意,root目录的聚合模块的packing是pom!!!
完后在该maven项目上新建模块:
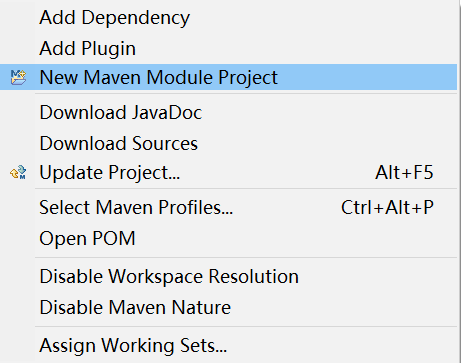
在这里,service层使用简单的maven-archetype-quickstart即可,packing使用jar类型,web层则使用maven-archetype-webapp的web项目,packing使用war类型。在这里,jar类型是为了让其他项目引用更方便,而war类型是为了能在服务器部署它。
结构说明
到了这一步,我们已经将这些模块建好了,接下来我要深入一下项目结构,以及多模块的原理,然后我们再配置pom文件。
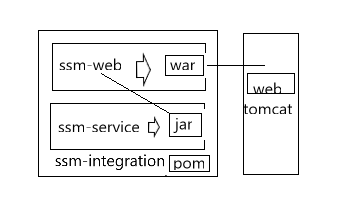
这是一个项目大概运行机制,ssm-integration作为聚合父级项目,就是为了管理其他子项目(模块),多模块就是基于聚合父级项目的。子模块service是对数据处理的模块,在这里是ssm框架,那么它负责完成对数据库的操作的封装(大概结构,具体不细说),然后对外暴露一个接口供web模块调用即可。也就是当web模块引用了ssm-service.jar之后,供web项目调用的只有你对外暴露的接口,这就真正实现分层。而web模块,只负责servlet、视图模型、前端页面和一些简单的逻辑,需要时调用ssm-service.jar的接口方法就行了。当对项目进行部署时,只需部署ssm-web即可,因为ssm-integration仅仅负责管理,你可以将它理解为承载着多模块的大框架,而ssm-service已经打包给ssm-web了(ssm-web里面已经有ssm-service了)。
pom.xml分析
在这之前,我声明一下,聚合和继承是可以分开的,只是大家想方便一下,所以统称为父项目。
我们开始看pom的配置,首先时父项目的pom.xml(这里只截取一部分,了解方法为重点):
父类pom.xml分析
1 <?xml version="1.0" encoding="UTF-8"?> 2 <project xmlns="http://maven.apache.org/POM/4.0.0" xmlns:xsi="http://www.w3.org/2001/XMLSchema-instance" 3 xsi:schemaLocation="http://maven.apache.org/POM/4.0.0 http://maven.apache.org/xsd/maven-4.0.0.xsd"> 4 <modelVersion>4.0.0</modelVersion> 5 <groupId>cn.zuoyu.ssm</groupId> 6 <artifactId>ssm-integration</artifactId> 7 <version>0.0.1-SNAPSHOT</version> 8 <packaging>pom</packaging> 9 <name>ssm-integration</name> 10 <description>spring&springMVC&mybatis的整合</description> 11 12 <modules> 13 <module>ssm-service</module> 14 <module>ssm-controller Maven Webapp</module> 15 </modules> 16 17 <properties> 18 <project.build.sourceEncoding>UTF-8</project.build.sourceEncoding> 19 <spring.version>4.3.8.RELEASE</spring.version> 20 </properties> 21 22 <build> 23 <pluginManagement> 24 <plugins> 25 <!-- 编译插件 --> 26 <plugin> 27 <groupId>org.apache.maven.plugins</groupId> 28 <artifactId>maven-compiler-plugin</artifactId> 29 <version>2.3.2</version> 30 <configuration> 31 <source>1.8</source> 32 <target>1.8</target> 33 </configuration> 34 </plugin> 35 36 <!-- 用UTF-8编码处理资源文件 --> 37 <plugin> 38 <groupId>org.apache.maven.plugins</groupId> 39 <artifactId>maven-resources-plugin</artifactId> 40 <version>2.6</version> 41 <configuration> 42 <encoding>UTF-8</encoding> 43 </configuration> 44 </plugin> 45 </plugins> 46 </pluginManagement> 47 <!-- <resources> 48 <!--资源位置配置--> 49 <resource> 50 <directory>src/main/java</directory> 51 <includes> 52 <include>**/*.xml</include> 53 </includes> 54 </resource> 55 <!--指定资源的位置--> 56 <resource> 57 <directory>src/main/resources</directory> 58 </resource> 59 </resources> --> 60 </build> 61 62 63 <dependencyManagement> 64 <dependencies> 65 <!-- 单元测试 --> 66 <dependency> 67 <groupId>junit</groupId> 68 <artifactId>junit</artifactId> 69 <version>4.12</version> 70 <scope>test</scope> 71 </dependency> 72 <!-- spring核心包 --> 73 <dependency> 74 <groupId>org.springframework</groupId> 75 <artifactId>spring-core</artifactId> 76 <version>${spring.version}</version> 77 </dependency> 78 79 <!-- 扫描用包 --> 80 <dependency> 81 <groupId>org.springframework</groupId> 82 <artifactId>spring-context</artifactId> 83 <version>${spring.version}</version> 84 </dependency> 85 86 <!-- 缓存扫描用包 --> 87 <dependency> 88 <groupId>org.springframework</groupId> 89 <artifactId>spring-context-support</artifactId> 90 <version>${spring.version}</version> 91 </dependency> 92 93 <!-- bean支持 --> 94 <dependency> 95 <groupId>org.springframework</groupId> 96 <artifactId>spring-beans</artifactId> 97 <version>${spring.version}</version> 98 </dependency> 99 </dependencyManagement> 100 </project>
在这里,<modules>xxx<modules>是将需要管理的模块放进去,放进去的模块归该聚合项目管理。例如<pluginManagement>xxx</pluginManagement>或<dependencyManagement>xxx</dependencyManagement>是父类里独有的,为的是统一资源包,方便管理。
子类pom.xml分析
看一下子类的代码,以web模块为例
 1 <?xml version="1.0"?>
 2 <project
 3     xsi:schemaLocation="http://maven.apache.org/POM/4.0.0 http://maven.apache.org/xsd/maven-4.0.0.xsd"
 4     xmlns="http://maven.apache.org/POM/4.0.0" xmlns:xsi="http://www.w3.org/2001/XMLSchema-instance">
 5     <modelVersion>4.0.0</modelVersion>
 6     <parent>
 7         <groupId>cn.zuoyu.ssm</groupId>
 8         <artifactId>ssm-integration</artifactId>
 9         <version>0.0.1-SNAPSHOT</version>
10     </parent>
11     <artifactId>ssm-controller</artifactId>
12     <packaging>war</packaging>
13     <name>ssm-controller</name>
14     <url>http://maven.apache.org</url>
15
16
17     <dependencies>
18
19         <dependency>
20             <groupId>junit</groupId>
21             <artifactId>junit</artifactId>
22         </dependency>
23         <!-- springMVC核心包 -->
24         <dependency>
25             <groupId>org.springframework</groupId>
26             <artifactId>spring-webmvc</artifactId>
27         </dependency>
28
29         <!-- jstl支持 -->
30         <dependency>
31             <groupId>jstl</groupId>
32             <artifactId>jstl</artifactId>
33         </dependency>
34
35         <dependency>
36             <groupId>org.apache.taglibs</groupId>
37             <artifactId>taglibs-standard-impl</artifactId>
38         </dependency>
39
40         <dependency>
41             <groupId>org.apache.taglibs</groupId>
42             <artifactId>taglibs-standard-spec</artifactId>
43         </dependency>
44
45         <!-- 对service的依赖 -->
46         <dependency>
47             <groupId>${project.groupId}</groupId>
48             <artifactId>ssm-service</artifactId>
49             <version>${project.version}</version>
50         </dependency>
51     </dependencies>
52     <build>
53         <plugins>
54             <!-- 编译插件 -->
55             <plugin>
56                 <groupId>org.apache.maven.plugins</groupId>
57                 <artifactId>maven-compiler-plugin</artifactId>
58             </plugin>
59
60             <!-- 编码设置 -->
61             <plugin>
62                 <groupId>org.apache.maven.plugins</groupId>
63                 <artifactId>maven-resources-plugin</artifactId>
64             </plugin>
65         </plugins>
66         <finalName>ssm-controller</finalName>
67     </build>
68 </project>
你会发现多了<parent></parent>标签,这里面写的就是它要继承的父项目。你还会发现项目没有声明groupId和version,因为它已经有父项目了,父项目已经管理了它的来源和版本号。你还会发现plugin插件和dependency依赖没有声明version,这就是父项目里写pluginManagement和dependencyManagement的优点,父项目里的这个如果子项目没有声明则不会导入该依赖或插件,如果需要,只需声明groupId和artifactId即可,方便管理。另外,必须将该项目依赖的其他项目的pack引用过来,不然多模块就失去了意义,根本运行不起来。
注意:
在maven多模块项目里,子项目的classpath共用的。
部署:
在IntelliJ IDEA里部署MavenWeb项目和MyEclipse部署是有差异的,MyEclipse要很简单:
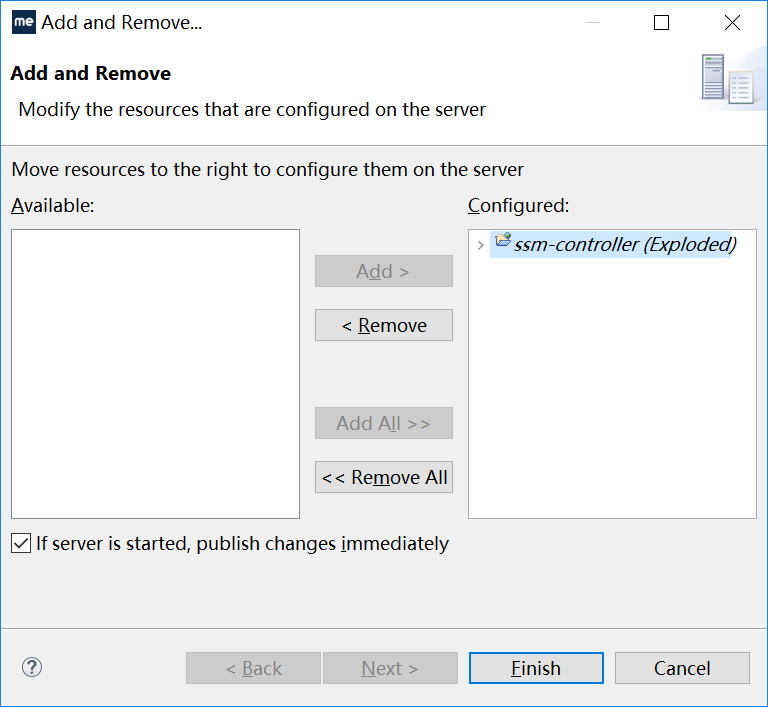
就好了,只部署ssm-web即可。
到了这一步,还差很关键的一部,就是在你运行之前,要保证你的maven仓库有ssm-service,就是你service层的jar包,不然ssm-web根本找不到ssm-service.jar,所以,我们要这样:
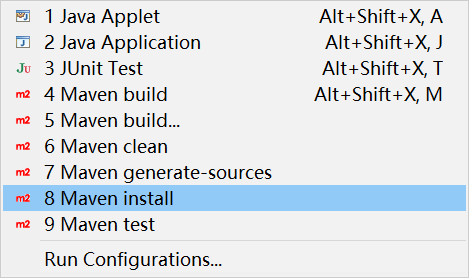
否则无法运行。
然后...
看一下整体结构:
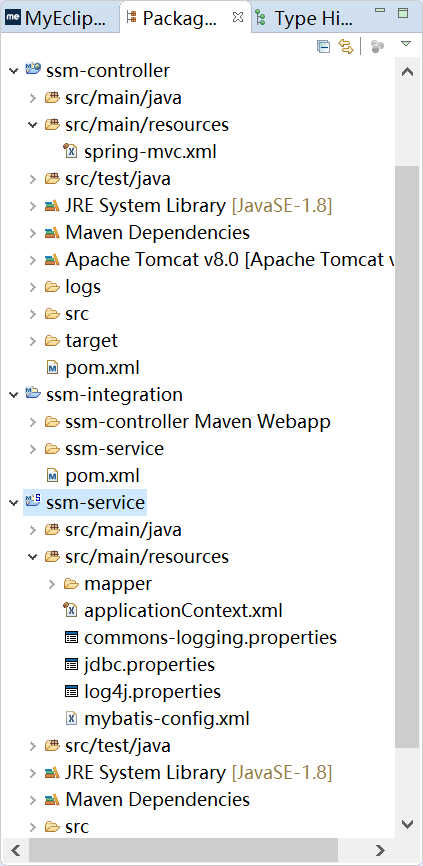
就可以运行了...
若有不对的地方欢迎+感谢评论指出或邮件我 zuoyuip@qq.com
共同进步