在360上面上线了一个月,下载量上千余次。这里把代码都分享出来,供大家学习哈!还包括教大家如何接入广告,赚点小钱花花,喜欢的帮忙顶一个,大神见了勿喷,小学僧刚学Android没多久。
首先介绍这款应用:APP是一款二维码生成器,虽然如何制作二维码教程网上有很多,我这里再唠叨一下并把我的所有功能模块代码都分享出来。
既然是二维码生成器那么我们如何制作二维码呢?
这里主要用到了Google的Zxing开源包,可以到网上下载,也可以到我的csdn上面去下载http://download.csdn.net/detail/u014132820/8223437
在这里我们需要一个辅助类RGBLuminanceSource,这个类Google也提供了,我们直接粘贴过去就可以使用了
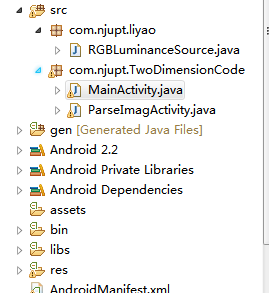
下面是我的代码组织结构:
package com.njupt.liyao;

import com.google.zxing.LuminanceSource;

import android.graphics.Bitmap;
import android.graphics.BitmapFactory;

import java.io.FileNotFoundException;

/**
 * This class is used to help decode images from files which arrive as RGB data
 * from Android bitmaps. It does not support cropping or rotation.
 *
 * @author dswitkin@google.com (Daniel Switkin)
 */
public final class RGBLuminanceSource extends LuminanceSource {

    private final byte[] luminances;

    public RGBLuminanceSource(String path) throws FileNotFoundException {
        this(loadBitmap(path));
    }

    public RGBLuminanceSource(Bitmap bitmap) {
        super(bitmap.getWidth(), bitmap.getHeight());

        int width = bitmap.getWidth();
        int height = bitmap.getHeight();
        int[] pixels = new int[width * height];
        bitmap.getPixels(pixels, 0, width, 0, 0, width, height);

        // In order to measure pure decoding speed, we convert the entire image
        // to a greyscale array
        // up front, which is the same as the Y channel of the
        // YUVLuminanceSource in the real app.
        luminances = new byte[width * height];
        for (int y = 0; y < height; y++) {
            int offset = y * width;
            for (int x = 0; x < width; x++) {
                int pixel = pixels[offset + x];
                int r = (pixel >> 16) & 0xff;
                int g = (pixel >> 8) & 0xff;
                int b = pixel & 0xff;
                if (r == g && g == b) {
                    // Image is already greyscale, so pick any channel.
                    luminances[offset + x] = (byte) r;
                } else {
                    // Calculate luminance cheaply, favoring green.
                    luminances[offset + x] = (byte) ((r + g + g + b) >> 2);
                }
            }
        }
    }

    @Override
    public byte[] getRow(int y, byte[] row) {
        if (y < 0 || y >= getHeight()) {
            throw new IllegalArgumentException(
                    "Requested row is outside the image: " + y);
        }
        int width = getWidth();
        if (row == null || row.length < width) {
            row = new byte[width];
        }

        System.arraycopy(luminances, y * width, row, 0, width);
        return row;
    }

    // Since this class does not support cropping, the underlying byte array
    // already contains
    // exactly what the caller is asking for, so give it to them without a copy.
    @Override
    public byte[] getMatrix() {
        return luminances;
    }

    private static Bitmap loadBitmap(String path) throws FileNotFoundException {
        Bitmap bitmap = BitmapFactory.decodeFile(path);
        if (bitmap == null) {
            throw new FileNotFoundException("Couldn't open " + path);
        }
        return bitmap;
    }

}
下面这段代码可以利用Zxing包将文本信息比如网址,文章生成一张照片,我这里返回一个Bitmap对象,因为后面还要将其写入SD卡里面和显示在ImageView上面。
public Bitmap getTwoDimensionPicture(String text,int width,int height) throws WriterException{
        if(text.equals(""))
        {
            text=" ";
        }
        Hashtable<EncodeHintType, String> hints = new Hashtable<EncodeHintType, String>();
        hints.put(EncodeHintType.CHARACTER_SET, "utf-8");
        BitMatrix bitMatrix = new QRCodeWriter().encode(text,
                BarcodeFormat.QR_CODE, width, height, hints);
        int []pixels = new int[width*height];
        for(int y=0;y<height;y++){
            for(int x=0;x<width;x++){
                if (bitMatrix.get(x, y))
                {
                    pixels[y * width + x] = BLACK;
                }
                else
                {
                    pixels[y * width + x] = WHITE;
                }
            }
        }
        Bitmap bitmap=Bitmap.createBitmap(width, height,Bitmap.Config.ARGB_8888);
        bitmap.setPixels(pixels, 0,width, 0, 0, width, height);

        return bitmap;
    }
通过上面这段代码其实我们已经得到了存储文本信息的二维码图片了,下面我们在二维码写到SD卡里面并且添加到系统相册里面方便用户调用(因为如果你只是写入到SD卡里面是不能再系统相册里面及时看到的)
在App启动之前我们应该在SD卡里面创建一个文件夹保存这些二维码:
	public void createDirctoryToSaveImage(){
		String dirPath=Environment.getExternalStorageDirectory()+File.separator+"TowDimensionCode";
		File dirFile=new File(dirPath);
		if(!dirFile.exists()){
			dirFile.mkdir();
		}
	}
接下来是把图片写入到SD卡已及如何加入到系统图库里面(如何把图片添加到系统相册的几种方法可以看我的这篇博客:http://www.cnblogs.com/BasilLee/p/4082450.html ):
	public void writeBitMapToSDCard(Bitmap bitmap) throws IOException{
		String fname = DateFormat.format("yyyyMMddhhmmss", new Date()).toString()+".jpg";
		String filePath=Environment.getExternalStorageDirectory()+File.separator+"TowDimensionCode"
						+File.separator+fname;
		File file=new File(filePath);
		FileOutputStream fileOutputStream=new FileOutputStream(file);
		bitmap.compress(Bitmap.CompressFormat.JPEG, 100, fileOutputStream);
		fileOutputStream.flush();
		fileOutputStream.close();
		//把图片加入到系统图库里面
		MediaStore.Images.Media.insertImage(getApplicationContext().getContentResolver(),
				file.getAbsolutePath(), fname, null);
		//uri得到的是文件的绝对路径
		getApplicationContext().sendBroadcast(new Intent(Intent.ACTION_MEDIA_SCANNER_SCAN_FILE,
				Uri.parse("file://"+file.getAbsolutePath())));
		edtText.setText(file.getAbsolutePath());
		Toast.makeText(this, "生成成功", Toast.LENGTH_LONG).show();
	}
到了这一步我们已经完成了二维码的生成已经保存,下面就是我们怎么点击Button打开系统图库要用户来选择他所需解析的二维码了:
点击按钮打开系统相册我主要是通过以下两个方法来实现的:
//打开相册
        private void setImage() {
            //使用intent调用系统提供的相册功能,使用startActivityForResult是为了获取用户选择的图片
            Intent getAlbum = new Intent(Intent.ACTION_GET_CONTENT);
            getAlbum.setType(IMAGE_TYPE);
            startActivityForResult(getAlbum, IMAGE_CODE);
        }

        @Override
        protected void onActivityResult(int requestCode, int resultCode, Intent data){
                if (resultCode != RESULT_OK) {        //此处的 RESULT_OK 是系统自定义得一个常量
                    Log.e("TAG->onresult","ActivityResult resultCode error");
                    return;
                }
                Bitmap bm = null;
                //外界的程序访问ContentProvider所提供数据 可以通过ContentResolver接口
                ContentResolver resolver = getContentResolver();
                //此处的用于判断接收的Activity是不是你想要的那个
                if (requestCode == IMAGE_CODE) {
                    try {
                        Uri originalUri = data.getData();        //获得图片的uri
                        bm = MediaStore.Images.Media.getBitmap(resolver, originalUri);
                        //显得到bitmap图片
                        imgView.setImageBitmap(bm);
                        //这里开始的第二部分,获取图片的路径:
                        String[] proj = {MediaColumns.DATA};
                        //好像是android多媒体数据库的封装接口,具体的看Android文档
                        Cursor cursor = managedQuery(originalUri, proj, null, null, null);
                        //按我个人理解 这个是获得用户选择的图片的索引值
                        int column_index = cursor.getColumnIndexOrThrow(MediaColumns.DATA);
                        //将光标移至开头 ,这个很重要,不小心很容易引起越界
                        cursor.moveToFirst();
                        //最后根据索引值获取图片路径
                        String path = cursor.getString(column_index);
                        edtText.setText(path);
                        btnOpen.setText(R.string.recognitionTwoCode);
                    }catch (IOException e) {
                        Log.e("TAG-->Error",e.toString());
                    }
                }
            }
到了现在我们要做的就是把二维码里面的内容解析出来了,要我们来看看如何解析的:
 /**
         * 解析二维码图片里的内容
         * @param filePath 二维码图片的位置
         * @throws IOException
         * @throws NotFoundException
         */
        private String readImage(ImageView imageView) {
            String content = null;
            Map<DecodeHintType, String> hints = new HashMap<DecodeHintType, String>();
            hints.put(DecodeHintType.CHARACTER_SET, "utf-8");
            // 获得待解析的图片
            Bitmap bitmap = ((BitmapDrawable) imageView.getDrawable()).getBitmap();
            RGBLuminanceSource source = new RGBLuminanceSource(bitmap);
            BinaryBitmap bitmap1 = new BinaryBitmap(new HybridBinarizer(source));
            QRCodeReader reader = new QRCodeReader();
            try {
                Result result = reader.decode(bitmap1, hints);
                // 得到解析后的文字
                content = result.getText();
            } catch (Exception e) {
                e.printStackTrace();
            }
            return content;
        }
这个函数返回一个String类型也就是二维码里面所含的文本信息了。
现在功能基本上已经完成了,现在可能大家会想着如何接入广告赚点小钱了,毕竟程序猿没妹子喜欢只能努力赚钱了,嘿嘿!下面我来介绍360的广告平台的接入,其实代码很简单就几行,但是呢,首先你得下载360的SDK还有创建广告位,这里就以我的代码里面为例了!
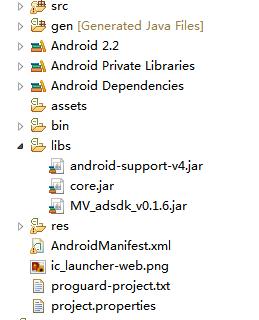
首先是360的SDK,就是MV_adsdk_v0.1.6.jar包
导入进去以后呢加入这几行代码就OK了:
  //ad布局部分
   private RelativeLayout adContainer = null;
   private IMvBannerAd bannerad = null;
final String adSpaceid = "这是你申请的广告ID号";
        adContainer=(RelativeLayout)findViewById(R.id.adcontent);
        bannerad = Mvad.showBanner(adContainer, this, adSpaceid, false);
        bannerad.showAds(this);
这里面RelativeLayout容器是你想要广告显示的位置,记得上线时候把Mvad.showBanner最后置为false这样才能显示商业广告这样才能有收入啊,嘿嘿!
说了这么多,那到底是个什么效果呢?下面拿出你的手机扫一扫下面的二维吧下载试试吧~~~~~~大家下载后帮忙给个好评哈~~~程序猿何苦难为程序猿呢是吧~~嘿嘿

http://zhushou.360.cn/detail/index/soft_id/2212352 (微信扫描不能下载直接到360官网链接去下吧)
如果你和我一样是学生党还在考四六级那么我还有一款小app大家也可以下载使用,相信对大家四六级考试还是有帮助的:

http://zhushou.360.cn/detail/index/soft_id/2300203 (微信扫描不能下载直接到360官网链接去下吧)