一 xutils框架引入到AndroidStudio工程,最简单的方法:
① 在APP的build.gradle里面加入 compile 'org.xutils:xutils:3.3.36'。
② 一定要自定义一个application.class
在自定义的application里的onCreate方法里面初始化xutils:
x.Ext.init(this);//初始化XUtils
x.Ext.setDebug(BuildConfig.DEBUG);//是否输出debug日志
③ 在manifest文件里面加入自己的application
<application
android:name=".application.GlobalApplication"
android:allowBackup="true"
android:icon="@mipmap/ic_launcher"
android:label="@string/app_name"
android:supportsRtl="true"
android:theme="@style/AppTheme">
④ 加入权限
<uses-permission android:name="android.permission.INTERNET" />
<uses-permission android:name="android.permission.WRITE_EXTERNAL_STORAGE" />
其他的方法比如引入jar包引入lib自行百度。
二 xutils框架的注解
注解框架很好用,直接在activity或者fragment里面加入
@ViewInject(R.id.xxx)
private TextView mTvText;
注意,注解的时候一定要在onCreate之前,像声明属性和变量一样。然后偶就好奇注解框架是怎么完成了用viewInject去完成findViewById这个操作的。就顺便了解了一下注解是怎么一回事。
2.1 注解机制 其实就是java的反射实现的,我不在这里掉书袋解释反射是啥,自行百度。下面就自己实现了一下用反射实现findViewById
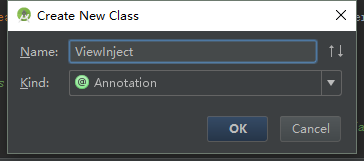
① 新建一个@annotation类型的class ,如图 ,

我们看到ViewInject的创建和接口差不多,但是别忘了前面的@和前面的声明@Target和@Retention
@Target(ElementType.FIELD)
@Retention(RetentionPolicy.RUNTIME)
public @interface ViewInject {
int id () default -1;//控件ID,在某一个控件上面使用注解标注其ID
}
然后就是反射类InjectView的创建。类里面只有一个方法injectView(Activity activity)
public class InjectView {
    public static void injectView(Activity activity) {
       try {
           Class clazz = activity.getClass();
           Field[] fields = clazz.getDeclaredFields();//得到传入的activity的所有字段
           for(Field field:fields){
               if(field.isAnnotationPresent(ViewInject.class)){
                   ViewInject inject = field.getAnnotation(ViewInject.class);
                   int id  = inject.id();
                   if(id > 0 ){
                       field.setAccessible(true);
                       field.set(activity,activity.findViewById(id));
                   }

               }
           }
       }catch (IllegalAccessException e){
           e.printStackTrace();
       }catch (IllegalArgumentException e){
           e.printStackTrace();
       }

    }
}
然后再在我的activity中使用我自己定义的注解
public class MainActivity extends AppCompatActivity {

    @ViewInject(id = R.id.tv_text)
    private TextView mTvText;

    @Override
    protected void onCreate(Bundle savedInstanceState) {
        super.onCreate(savedInstanceState);
        setContentView(R.layout.activity_main);
        InjectView.injectView(this);
        mTvText.setText("ssssss");
    }
}
可以看到我先注解声明我的TextView,完成注解声明后再利用InjectView.injectView(this),来完成整个注解。类里面用到了一个Field的类,就又好奇这个是干啥的(好奇宝宝),在刚接触java的时候书上看到过Field就是对象的属性,当时觉得就这么回事吧,但素,后面学习的时候又见过几回,那时候没怎么去真正的去深入了解,只知道跟反射有点关系,在网络编程和数据库挂钩的一些代码编写里面出现的频率太大!!!当时正年少轻狂,什么都是只是浅尝辄止。如今追悔莫及!!扼腕长叹!!!不废话了,接下来熟悉Field
2.2 Field类的学习
在查看了一些文档并自己写了一个测试类之后,才明白,Field说白了其实就是类的属性,是啊说的很在理(书上说的是没错的所以不能说书糊弄了你我)。通过它可以得到一个类的所有属性的类型,父类型以及属性值等等。
下面就是我写的那个测试类:首先写一个Student的实体
package bean;

import java.util.Date;


public class Students {

    private String name ;
    private String address;
    private long id;
    private Date birthday;
    public String nickName;


    @Override
    public String toString() {
        return "Students [name=" + name + ", address=" + address + ", id=" + id
                + ", birthday=" + birthday + ", nickName=" + nickName + "]";
    }
    public Date getBirthday() {
        return birthday;
    }
    public void setBirthday(Date birthday) {
        this.birthday = birthday;
    }
    public String getName() {
        return name;
    }
    public void setName(String name) {
        this.name = name;
    }
    public String getAddress() {
        return address;
    }
    public void setAddress(String address) {
        this.address = address;
    }
    public long getId() {
        return id;
    }
    public void setId(long id) {
        this.id = id;
    }
    public String getNickName() {
        return nickName;
    }
    public void setNickName(String nickName) {
        this.nickName = nickName;
    }


}
然后就是针对这个实体进行Field的测试
package main;

import java.lang.reflect.Field;
import java.util.Date;

import bean.Students;

public class TestField {

    public static void main(String[] args) {
        Students student = new Students();
        student.setName("John");
        student.setNickName("pumpKing");
        student.setBirthday(new Date());
        student.setId(3501197405300359L);

        try {
            Field property1 = student.getClass().getDeclaredField("name");
            Field property2 = student.getClass().getField("nickName");
            Field property3 = student.getClass().getDeclaredField("birthday");
            System.err.println(property1);
            System.err.println(property2);
            System.err.println(property3);
            System.out.println("the superClass of Student is: "+student.getClass().getSuperclass());
            System.out.println("the superClass of String is: "+property1.getClass().getSuperclass());
            System.out.println("the superClass of Date is: "+property3.getClass().getSuperclass());
            System.out.println("the classLoader of student is: "+student.getClass().getClassLoader().getClass().getName());
            Field[] fields = student.getClass().getDeclaredFields();
            for(Field field : fields){
                field.setAccessible(true);
                System.out.println(field.get(student));
                System.out.println(field);
            }
            System.out.println("origin = "+student.toString());
            property2.set(student, "egg");//利用反射操作类的属性
            System.out.println("then = "+student.toString());
        } catch (NoSuchFieldException e) {
            e.printStackTrace();
        } catch (SecurityException e) {
            e.printStackTrace();
        } catch (IllegalArgumentException e) {
            e.printStackTrace();
        } catch (IllegalAccessException e) {
            e.printStackTrace();
        }
    }
}
下面是测试的结果
private java.lang.String bean.Students.name
public java.lang.String bean.Students.nickName
private java.util.Date bean.Students.birthday
the superClass of Student is: class java.lang.Object
the superClass of String is: class java.lang.reflect.AccessibleObject
the superClass of Date is: class java.lang.reflect.AccessibleObject
the classLoader of student is: sun.misc.Launcher$AppClassLoader
John
private java.lang.String bean.Students.name
null
private java.lang.String bean.Students.address
3501197405300359
private long bean.Students.id
Tue Jun 14 14:45:45 CST 2016
private java.util.Date bean.Students.birthday
pumpKing
public java.lang.String bean.Students.nickName
origin = Students [name=John, address=null, id=3501197405300359, birthday=Tue Jun 14 14:45:45 CST 2016, nickName=pumpKing]
then = Students [name=John, address=null, id=3501197405300359, birthday=Tue Jun 14 14:45:45 CST 2016, nickName=egg]
okay,XUTils的注解就说到这里,毕竟这并不是它的重头戏。