Spring Security + OAuth2 + JWT 基本使用
前面学习了 Spring Security 入门,现在搭配 oauth2 + JWT 进行测试。
1、什么是 OAuth2
OAuth 是一个关于授权(authorization)的开放网络标准,使得第三方应用可以使用该令牌在限定时间、限定范围访问指定资源。在全世界得到广泛应用,目前的版本是2.0版。
1.1、关于 OAuth2 的几个重要概念:
resource owner: 拥有被访问资源的用户user-agent: 一般来说就是浏览器client: 第三方应用Authorization server: 认证服务器,用来进行用户认证并颁发tokenResource server:资源服务器,拥有被访问资源的服务器,需要通过token来确定是否有权限访问
1.2、握手流程
明确概念后,就可以看 OAuth2 的协议握手流程,摘自RFC6749
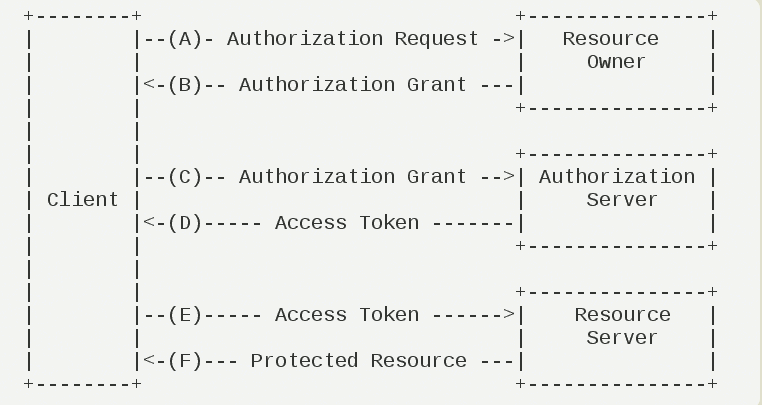
(A)用户打开客户端以后,客户端要求用户给予授权。
(B)用户同意给予客户端授权。
(C)客户端使用上一步获得的授权,向认证服务器申请令牌。
(D)认证服务器对客户端进行认证以后,确认无误,同意发放令牌。
(E)客户端使用令牌,向资源服务器申请获取资源。
(F)资源服务器确认令牌无误,同意向客户端开放资源
1.3、授权模式
oauth2根据使用场景不同,分成了4种模式
- 授权码模式(authorization code)
- 简化模式(implicit)
- 密码模式(resource owner password credentials)
- 客户端模式(client credentials)
授权码模式使用到了回调地址,是最为复杂的方式,通常网站中经常出现的微博,qq第三方登录,都会采用这个形式。简化模式不常用。
2、配置
使用oauth2保护你的应用,可以分为简易的分为三个步骤
- 配置资源服务器
- 配置授权服务器
- 配置spring security
2.1、maven 依赖配置
这里直接引入 spring-cloud oauth2,更加方便之后的拓展。
<!--spring boot-->
<parent>
    <groupId>org.springframework.boot</groupId>
    <artifactId>spring-boot-starter-parent</artifactId>
    <version>2.2.13.RELEASE</version>
    <relativePath/> <!-- lookup parent from repository -->
</parent>

<dependencies>
    <!--spring cloud oauth2-->
    <dependency>
        <groupId>org.springframework.cloud</groupId>
        <artifactId>spring-cloud-starter-oauth2</artifactId>
    </dependency>
    <!--spring cloud security-->
    <dependency>
        <groupId>org.springframework.cloud</groupId>
        <artifactId>spring-cloud-starter-security</artifactId>
    </dependency>

    <!--JWT-->
    <dependency>
        <groupId>io.jsonwebtoken</groupId>
        <artifactId>jjwt</artifactId>
        <version>0.9.1</version>
    </dependency>
</dependencies>

<!--spring cloud-->
<dependencyManagement>
    <dependencies>
        <dependency>
            <groupId>org.springframework.cloud</groupId>
            <artifactId>spring-cloud-dependencies</artifactId>
            <version>Greenwich.SR2</version>
            <type>pom</type>
            <scope>import</scope>
        </dependency>
    </dependencies>
</dependencyManagement>
2.2、配置授权服务器
这里需要进行访问客户端的配置,并配置授权类型和access_token转jwtToken。
@Configuration
@EnableAuthorizationServer
public class AuthorizationServerConfig extends AuthorizationServerConfigurerAdapter {

    @Autowired
    private BCryptPasswordEncoder bCryptPasswordEncoder;
    @Autowired
    private AuthenticationManager authenticationManager;
    @Autowired
    private UserDetailServiceImpl userDetailService;
    @Autowired
    @Qualifier("jwtTokenStore")
    private TokenStore tokenStore;
    @Autowired
    private JwtAccessTokenConverter jwtAccessTokenConverter;
    @Autowired
    private JwtTokenEnhancer jwtTokenEnhancer;

    /**
     * 配置授权类型
     *
     * @param endpoints
     * @throws Exception
     */
    @Override
    public void configure(AuthorizationServerEndpointsConfigurer endpoints) throws Exception {
        //设置Jwt内容增强
        TokenEnhancerChain tokenEnhancerChain = new TokenEnhancerChain();
        List<TokenEnhancer> list = new ArrayList<>();
        list.add(jwtTokenEnhancer);
        list.add(jwtAccessTokenConverter);
        tokenEnhancerChain.setTokenEnhancers(list);

        endpoints
                //密码模式必须配置
                .authenticationManager(authenticationManager)
                //密码模式必须配置
                .userDetailsService(userDetailService)
                //accessToken转JwtToken
                .tokenStore(tokenStore)
                .accessTokenConverter(jwtAccessTokenConverter)
                //jwt内容增强
                .tokenEnhancer(tokenEnhancerChain);
    }

    /**
     * 配置客户端详情信息
     *
     * @param clients
     * @throws Exception
     */
    @Override
    public void configure(ClientDetailsServiceConfigurer clients) throws Exception {
        clients.
                //基于内存配置
                inMemory()
                //客户端ID
                .withClient("client")
                //密钥
                .secret(bCryptPasswordEncoder.encode("112233"))
                //重定向地址
                .redirectUris("http://www.baidu.com")
                //授权范围
                .scopes("all")
                //accessToken有效时间
                .accessTokenValiditySeconds(60)
                //refreshToken有效时间
                .refreshTokenValiditySeconds(3600)
                /**
                 * 授权类型
                 * authorization_code:授权码模式
                 * password:密码模式
                 * refresh_token:刷新令牌
                 */
                .authorizedGrantTypes("authorization_code", "password", "refresh_token");
    }
}
2.3、配置资源服务器
继承 ResourceServerConfigurerAdapter并添加 @EnableResourceServer注解
@Configuration
@EnableResourceServer
public class ResourceServerConfig extends ResourceServerConfigurerAdapter {
    @Override
    public void configure(HttpSecurity http) throws Exception {
        http.authorizeRequests()
                //拦截所有请求
                .anyRequest()
                .authenticated()
                .and()
                //spring secuity提供了requestMatchers接口,等价于http.authorizeRequests().anyRequest().access("permitAll");
                //提供资源,访问/user需要权限认证
                .requestMatchers()
                .antMatchers("/user/**");
    }
}
2.4、JWT 配置
2.4.1、accessToken 转 JwtToken 配置类
主要工作是创建 JwtAccessTokenConverter并设置密钥,并注入到 Bean 管理容器中。
/**
 * accessToken转JwtToken配置
 */
@Configuration
public class JwtTokenStoreConfig {

    @Bean
    public JwtTokenStore jwtTokenStore() {
        return new JwtTokenStore(jwtAccessTokenConverter());
    }

    @Bean
    public JwtAccessTokenConverter jwtAccessTokenConverter() {
        JwtAccessTokenConverter jwtAccessTokenConverter = new JwtAccessTokenConverter();
        //设置jwt密钥
        jwtAccessTokenConverter.setSigningKey("test_key");
        return jwtAccessTokenConverter;
    }

    @Bean
    public JwtTokenEnhancer jwtTokenEnhancer() {
        return new JwtTokenEnhancer();
    }
}
2.4.2、JwtToken内容拓展配置类
当 accessToken 转 jwtToken时,如果想往令牌中加入自定义用户信息,例如登录时间点,可以配置以下类:
/**
 * JwtToken内容拓展配置类
 * @author Lin
 */
public class JwtTokenEnhancer implements TokenEnhancer {
    @Override
    public OAuth2AccessToken enhance(OAuth2AccessToken oAuth2AccessToken, OAuth2Authentication oAuth2Authentication) {
        Map<String, Object> map = new HashMap<>();
        map.put("enhance", "enhance info");
        ((DefaultOAuth2AccessToken)oAuth2AccessToken).setAdditionalInformation(map);
        return oAuth2AccessToken;
    }
}
2.5、配置 spring security
/**
 * spring security配置类
 */
@Configuration
@EnableWebSecurity
public class SecurityConfig extends WebSecurityConfigurerAdapter {

    /**
     * 密码加密
     *
     * @return
     */
    @Bean
    public BCryptPasswordEncoder getPasswordEncode() {
        return new BCryptPasswordEncoder();
    }

    /**
     * 接口请求授权
     *
     * @param http
     * @throws Exception
     */
    @Override
    protected void configure(HttpSecurity http) throws Exception {
        http.authorizeRequests()
                .antMatchers("/oauth/**", "/login/**","/logout/**")
                .permitAll()
                .anyRequest()
                .authenticated()
                .and()
                .formLogin()
                .permitAll()
                .and()
                .csrf().disable();
    }

    @Override
    @Bean
    protected AuthenticationManager authenticationManager() throws Exception {
        return super.authenticationManager();
    }
}
2.6、实现 UserDetailsService
实现 UserDetailService 用于登录验证,以及密码模式下需要用到。
@Service
public class UserDetailServiceImpl implements UserDetailsService {

    @Autowired
    private BCryptPasswordEncoder bCryptPasswordEncoder;

    @Override
    public UserDetails loadUserByUsername(String username) throws UsernameNotFoundException {
        String password = bCryptPasswordEncoder.encode("123456");
        return new User(username, password, AuthorityUtils.commaSeparatedStringToAuthorityList("permission1"));
    }
}
创建 User实体类如下(非必须):
public class User implements UserDetails {

    private String username;
    private String password;
    private List<GrantedAuthority> authorities;

    public User(String username, String password, List<GrantedAuthority> authorities) {
        this.username = username;
        this.password = password;
        this.authorities = authorities;
    }

    @Override
    public Collection<? extends GrantedAuthority> getAuthorities() {
        return authorities;
    }

    @Override
    public String getPassword() {
        return password;
    }

    @Override
    public String getUsername() {
        return username;
    }

    @Override
    public boolean isAccountNonExpired() {
        return true;
    }

    @Override
    public boolean isAccountNonLocked() {
        return true;
    }

    @Override
    public boolean isCredentialsNonExpired() {
        return true;
    }

    @Override
    public boolean isEnabled() {
        return true;
    }
}
3、运行测试
3.1、获取授权码
直接访问 /oauth/authorize? 接口可以获得授权码
在我的项目中访问路径如下:
浏览器访问,跳转到http://localhost:8080/login.html默认登录页,点击登录,授权:
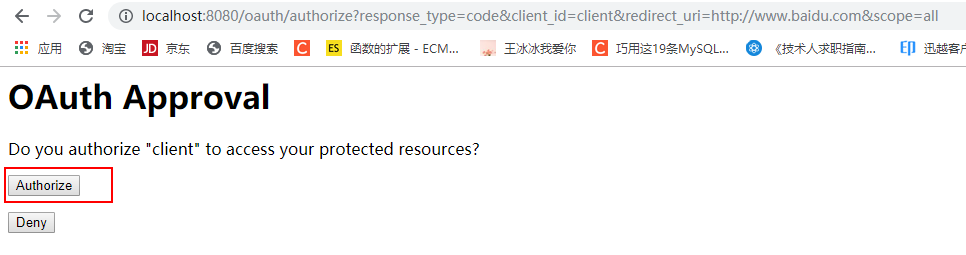
跳转到https://www.baidu.com/?code=XKee3V页面,XKee3v就是获得的授权码。
3.2、根据授权码模式获得令牌
利用 postman 测试,访问
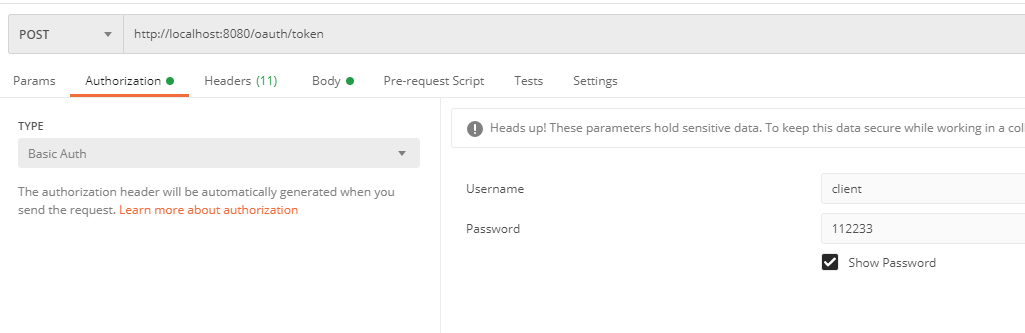
配置 Authorization 信息,即登录客户端的账号和密码;
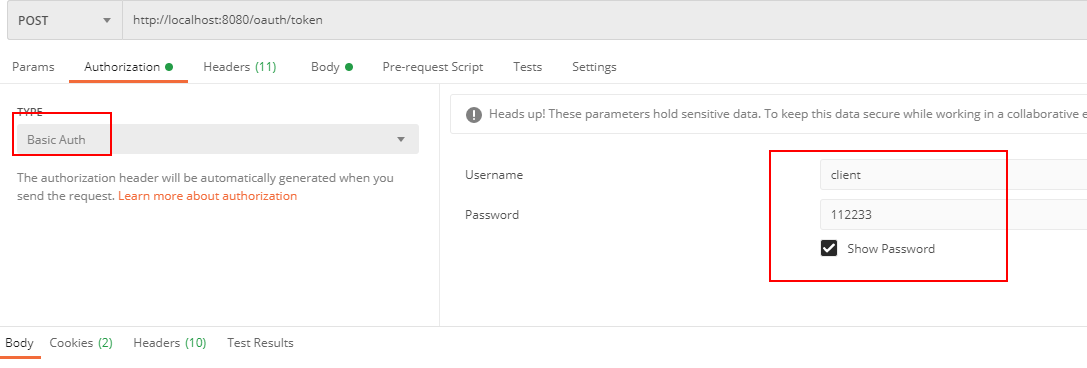
配置 Body 信息,grant_type的参数值是 authorization_code,authorization_code即为授权码模式,code即为上文获得的授权码。
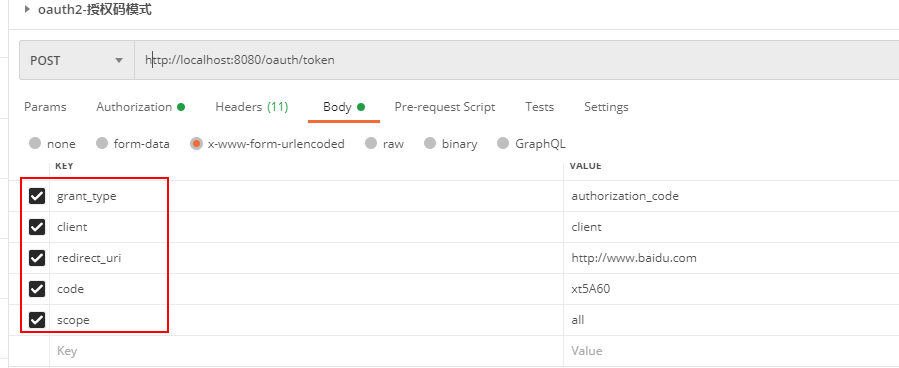
配置完后运行测试,返回 access_token和 refresh_token,看到 access_token成功转为JwtToken。

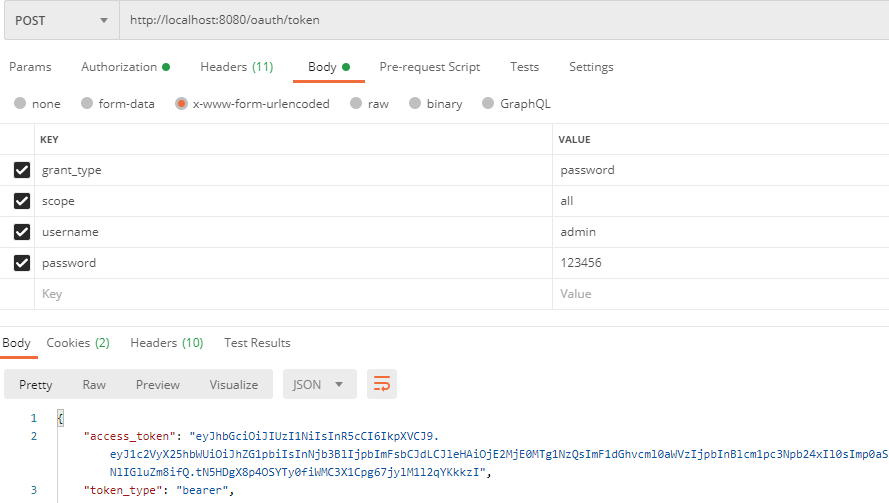
3.3、密码模式
密码模式比授权码模式简单一点,不需要获得授权码,直接忽略上文获取授权码的操作,只需稍微改动配置信息。
Authorization 信息无需改动,修改 Body 信息, grant_type的参数值改为 password,代表密码模式,填写登录 spring security 的账号和密码。
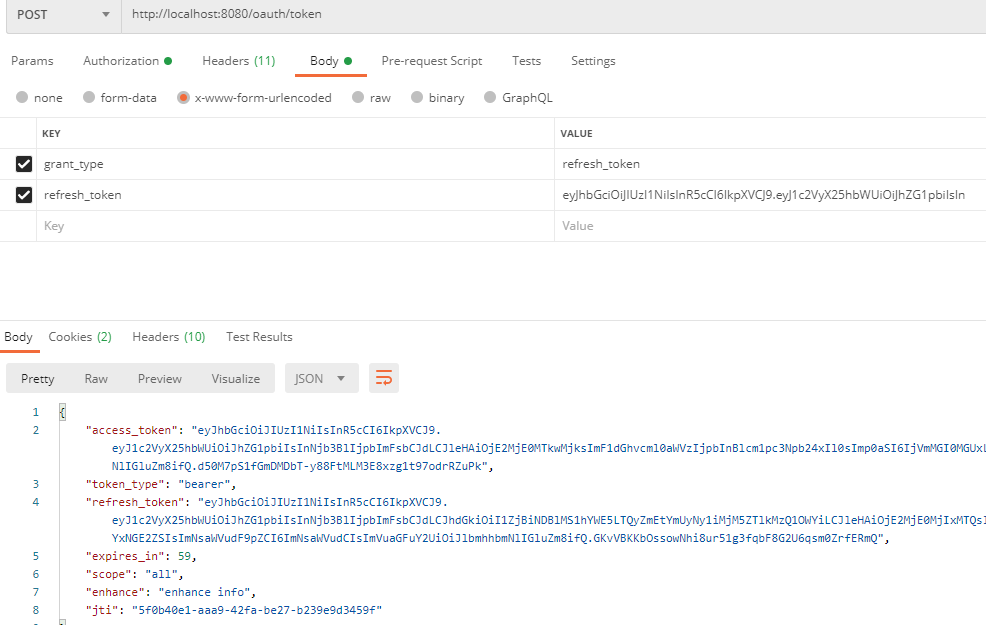
3.4、刷新令牌
在上文中我设置了 access_token的时效性为60秒,当access_token失效时,需要根据refresh_token获取新的令牌。
访问路径如下:
Authorization 配置信息如下:
Body 需要配置 grant_type的参数值为 refresh_token,代表刷新令牌,并填写refresh_token的参数值。访问后即可获得新的 access_token。
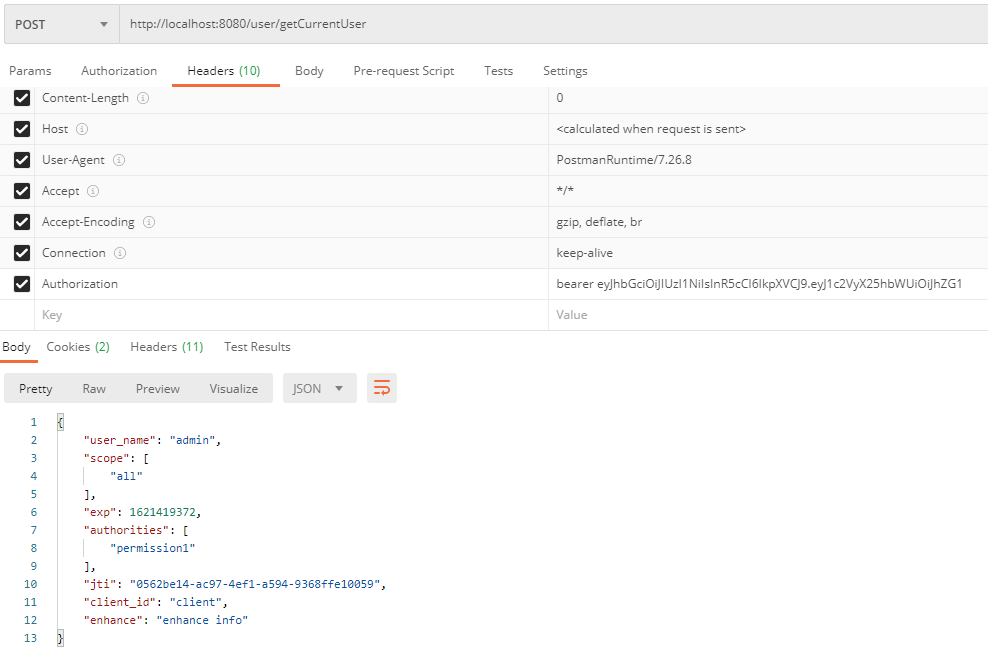
3.5、根据 access_token获得资源
访问路径如下:
Header 请求头添加 Authorization 参数,并设置参数值为 bearer+空格+ access_token,即可获得接口返回值。