SpringBoot + Shiro 入门
shiro 是一个比 spring security 轻量的安全框架。
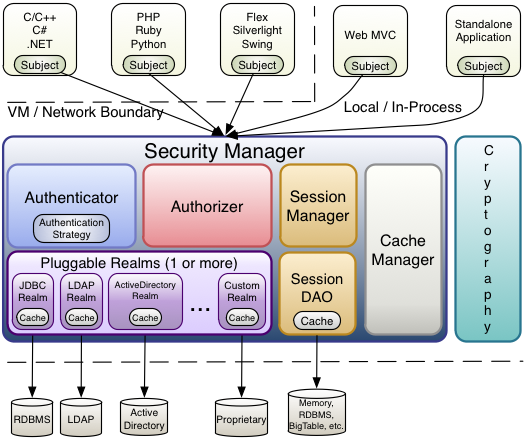
官方架构图如下:
1、shiro 核心模块
shiro 有三大核心组件,如下:
- Subject: 代表当前正在执行操作的用户,但 Subject 代表的可以是人,也可以是任何第三方系统帐号。当然每个 Subject 实例都会被绑定到 SercurityManger 上。
- SecurityManger: SecurityManager 是 Shiro 核心,主要协调 Shiro 内部的各种安全组件,这个我们不需要太关注,只需要知道可以设置自定义的 Realm。
- Realm: 用户数据和 Shiro 数据交互的桥梁。比如需要用户身份认证、权限认证。都是需要通过Realm来读取数据。
2、shiro 配置
先引入maven 依赖:
<dependency>
    <groupId>org.apache.shiro</groupId>
    <artifactId>shiro-spring</artifactId>
    <version>1.7.1</version>
</dependency>
shiro 配置只需要两个类,一个是 shiroConfig类,一个是 CustomRealm 类。
2.1、CustomRealm 类
自定义的 CustomRealm 继承AuthorizingRealm。并且重写父类中的doGetAuthorizationInfo(权限相关)、doGetAuthenticationInfo(身份认证)这两个方法。
package com.lin.config.shiro;

import org.apache.shiro.authc.AuthenticationException;
import org.apache.shiro.authc.AuthenticationInfo;
import org.apache.shiro.authc.AuthenticationToken;
import org.apache.shiro.authc.SimpleAuthenticationInfo;
import org.apache.shiro.authz.AuthorizationInfo;
import org.apache.shiro.authz.SimpleAuthorizationInfo;
import org.apache.shiro.realm.AuthorizingRealm;
import org.apache.shiro.subject.PrincipalCollection;
import java.util.HashSet;
import java.util.Set;
public class CustomRealm extends AuthorizingRealm {
    /**
     * 用户授权(checkRole、checkPermission用到)
     *
     * @param principalCollection
     * @return
     */
    @Override
    protected AuthorizationInfo doGetAuthorizationInfo(PrincipalCollection principalCollection) {
        String username = (String) principalCollection.getPrimaryPrincipal();
        //根据用户名查询权限
        Set<String> permission = new HashSet<>();
        permission.add("permission1");
        permission.add("permission2");
        SimpleAuthorizationInfo simpleAuthorizationInfo = new SimpleAuthorizationInfo();
        simpleAuthorizationInfo.setStringPermissions(permission);
        return simpleAuthorizationInfo;
    }

    /**
     *  用户认证
     *
     * @param authenticationToken
     * @return
     * @throws AuthenticationException
     */
    @Override
    protected AuthenticationInfo doGetAuthenticationInfo(AuthenticationToken authenticationToken) throws AuthenticationException {
        String username = (String) authenticationToken.getPrincipal();
        System.out.println("=====username:" + username);
        //实际根据用户名从数据库中查询密码
        String password;
        if (username.equals("user")) {
            password = "123456";
        } else {
            return null;
        }
        SimpleAuthenticationInfo simpleAuthenticationInfo = new SimpleAuthenticationInfo(username, password, getName());
        return simpleAuthenticationInfo;
    }
}
doGetAuthorizationInfo: 权限认证,即登录过后,每个身份不一定,对应的所能看的页面也不一样。
doGetAuthenticationInfo:身份认证。即登录通过账号和密码验证登陆人的身份信息。
2.2、ShiroConfig 类
顾名思义就是对 shiro 的一些配置,相对于之前的 xml 配置。包括:过滤的文件和权限,密码加密的算法,其用注解等相关功能。
@Configuration
public class ShiroConfig {

    //Filter工厂,设置对应的过滤条件和跳转条件
    @Bean(name = "shiroFilter")
    public ShiroFilterFactoryBean shiroFilter(SecurityManager securityManager) {
        ShiroFilterFactoryBean shiroFilterFactoryBean = new ShiroFilterFactoryBean();
        shiroFilterFactoryBean.setSecurityManager(securityManager);
        //登录页面,没有登录时将会自动跳转该页面,前后端分离时通过前端路由控制,后端返回json数据或抛出异常。
        shiroFilterFactoryBean.setLoginUrl("/lin/shiro/unauth");
        //没有权限默认跳转的页面
//        shiroFilterFactoryBean.setUnauthorizedUrl("/lin/shiro/error");
        Map<String, String> map = new LinkedHashMap<>();;
        //authc:所有url都必须认证通过才可以访问; anon:所有url都都可以匿名访问
        //登录接口
        map.put("/lin/shiro/login", "anon");
        map.put("/**", "authc");
        shiroFilterFactoryBean.setFilterChainDefinitionMap(map);
        return shiroFilterFactoryBean;
    }

    //将自己的验证方式加入容器
    @Bean
    public CustomRealm customRealm() {
        CustomRealm customRealm = new CustomRealm();
        return customRealm;
    }

    //权限管理,配置主要是Realm的管理认证
    @Bean
    public SecurityManager securityManager() {
        DefaultWebSecurityManager defaultSecurityManager = new DefaultWebSecurityManager();
        defaultSecurityManager.setRealm(customRealm());
        return defaultSecurityManager;
    }
}
3、运行测试
创建 ShiroTestController,定义登录接口
@RequestMapping("/lin/shiro")
@Controller
public class ShiroTestController {
    @RequestMapping(value = "/login", method = RequestMethod.POST)
    @ResponseBody
    public String login(@RequestParam("username") String username, @RequestParam("password") String password)
    {
        // 从SecurityUtils里边创建一个 subject
        Subject subject = SecurityUtils.getSubject();
        // 在认证提交前准备 token(令牌)
        UsernamePasswordToken token = new UsernamePasswordToken(username, password);
        // 执行认证登陆
        try {
            subject.login(token);
        } catch (UnknownAccountException uae) {
            return "未知账户";
        } catch (IncorrectCredentialsException ice) {
            return "密码不正确";
        } catch (LockedAccountException lae) {
            return "账户已锁定";
        } catch (ExcessiveAttemptsException eae) {
            return "用户名或密码错误次数过多";
        } catch (AuthenticationException ae) {
            return "用户名或密码不正确!";
        }
        if (subject.isAuthenticated()) {
            return "登录成功";
        } else {
            token.clear();
            return "登录失败";
        }
    }


    @RequestMapping("/unauth")
    public String LoginFailure(){
        throw new AuthenticationException("未登录");
    }
}
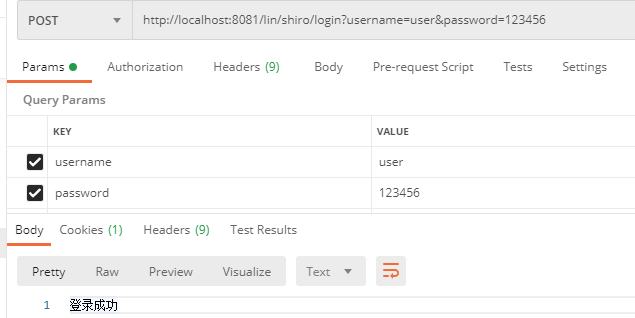
打开 postman, 访问登录接口
http://localhost:8081/lin/shiro/login?username=user&password=123456
可以发现登录成功
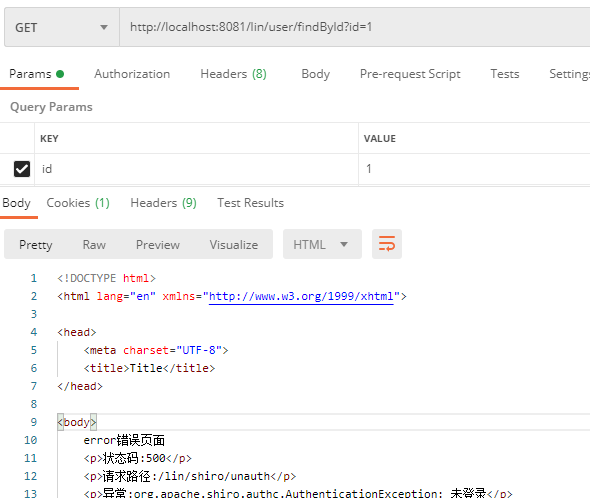
当未登录时,访问其他接口,会发现自动跳转到登录页面
4、密码加密验证
4.1、HashedCredentialsMatcher 配置
在 ShiroConfig 类添加 HashedCredentialsMatcher配置:
//密码加密
public HashedCredentialsMatcher hashedCredentialsMatcher() {
    HashedCredentialsMatcher hashedCredentialsMatcher = new HashedCredentialsMatcher();
    //散列算法:这里使用MD5算法;
    hashedCredentialsMatcher.setHashAlgorithmName("MD5");
    // 散列的次数,比如散列两次,相当于 md5(md5(""));
    hashedCredentialsMatcher.setHashIterations(2);
    // storedCredentialsHexEncoded默认是true,此时用的是密码加密用的是Hex编码;false时用Base64编码
    hashedCredentialsMatcher.setStoredCredentialsHexEncoded(true);
    return hashedCredentialsMatcher;
}
4.2、完善Realm配置
完善 ShiroConfig的 Realm配置:
//将自己的验证方式加入容器
@Bean
public CustomRealm customRealm() {
    CustomRealm customRealm = new CustomRealm();
    //密码加密
    customRealm.setCredentialsMatcher(hashedCredentialsMatcher());
    return customRealm;
}
并修改 CustomRealm 的用户认证接口:
@Override
protected AuthenticationInfo doGetAuthenticationInfo(AuthenticationToken authenticationToken) throws AuthenticationException {
    String username = (String) authenticationToken.getPrincipal();
    System.out.println("=====username:" + username);
    String password;
    if (username.equals("user")) {
        //实际根据用户名从数据库中查询加密的密码
        password = "b8c2d5b0a37cc51f91d5e8970347a3a3";
    } else {
        return null;
    }
    //用户名作为盐加密
    SimpleAuthenticationInfo simpleAuthenticationInfo = new SimpleAuthenticationInfo(username, password, ByteSource.Util.bytes(username), getName());
    return simpleAuthenticationInfo;
}
通过debug方式可以知道加密调用的是 HashedCredentialsMatcher下的 doCredentialsMatch方法:

这样密码的加密便配置完成了。
5、利用注解配置权限
shiro 支持通过注解在方法上来进行权限的控制,需要在 ShiroConfig上添加以下配置:
//开启cglib代理
@Bean
public DefaultAdvisorAutoProxyCreator defaultAdvisorAutoProxyCreator() {
    DefaultAdvisorAutoProxyCreator defaultAdvisorAutoProxyCreator = new DefaultAdvisorAutoProxyCreator();
    defaultAdvisorAutoProxyCreator.setProxyTargetClass(true);
    return defaultAdvisorAutoProxyCreator;
}

//开启shiro aop注解支持,使用代理方式;所以需要开启代码支持,@RequiresRoles,@RequiresPermissions注解在方法上
@Bean
public AuthorizationAttributeSourceAdvisor authorizationAttributeSourceAdvisor() {
    AuthorizationAttributeSourceAdvisor authorizationAttributeSourceAdvisor = new AuthorizationAttributeSourceAdvisor();
    authorizationAttributeSourceAdvisor.setSecurityManager(securityManager());
    return authorizationAttributeSourceAdvisor;
}
以上便配置完成了,现在方法上添加注解,用户没有权限访问将跑出UnauthorizedException异常。
@GetMapping(value = "/findById")
//没有权限将抛出UnauthorizedException异常
@RequiresPermissions("permission3")
@ResponseBody
public Result findById(@RequestParam(value = "id", required = true, defaultValue = "2") Long id) {
    User user = userService.findById(id);
    return ResultUtil.success(user);
}
以上基本的配置就完成了。
题外话:Shiro默认的 session 登录不提倡使用,会给服务端带来很大的压力,在分布式服务下也很难维护,因此可以禁用session,采用 jwt 实现无状态登录是更佳的选择。
参考资料: