作者:老段工作室
转自:http://www.rhce.cc/2868.html
当我们用docker创建容器的时候,docker最终是通过runc来完成容器管理的。
[root@vms101 c1]# docker info
Client:
    ...大量输出...
 Runtimes: io.containerd.runc.v2 io.containerd.runtime.v1.linux runc
 Default Runtime: runc
    ...大量输出...
[root@vms101 c1]#
从这里可以看到docker默认使用runc作为runtime的。那么什么是runtime(运行时)呢?
所谓的runtime说白了就是能管理容器的东西就叫做runtime。docker是runtime,runc是runtime,podman是runtime,lxc也是runtime。
但是刚才说,docker默认使用runc作为默认的runtime又是什么意思呢?这里就涉及到了两个概念low-level runtime和high-level runtime。
所谓的low-level runtime(低级别运行时)指的是只能单一的管理容器,不具备管理存储、镜像等能力,比如runc,lxc,gVisor,kata等都属于低级别runtime。
高级别runtime不仅能管理容器,还能管理存储、镜像等。而管理容器时需要调用低级别runtime来实现容器的管理。比如docker、podman、containerd都属于高级别runtime。
docker默认使用runc作为runtime,如果要使用其他低级别runtime的话,在创建容器时需要加上--runtime来指定使用哪个低级本runtime(前提要安装好对应的runtime),如下图: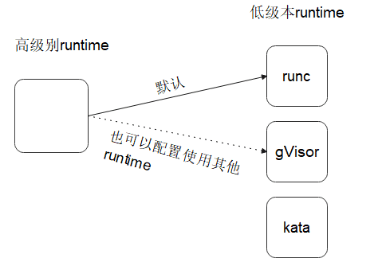
本节演示runc如何管理容器。
因为runc不具备镜像管理能力,所以先用docker把busybox镜像下载下来。
步骤1:下载镜像busybox
[root@vms101 ~]# docker pull busybox
Using default tag: latest
latest: Pulling from library/busybox
e5d9363303dd: Pull complete
Digest: sha256:c5439d7d...1d7596d2126dfb5b02bfd1f
Status: Downloaded newer image for busybox:latest
docker.io/library/busybox:latest
[root@vms101 ~]#
步骤2:使用docker创建一个容器出来
[root@vms101 ~]# docker run -dit --name=c1 busybox
c769a24823abb2271f78...552176d21f44e02397df0
[root@vms101 ~]#
步骤3:导出容器为c1.tar
[root@vms101 ~]# docker export c1 > c1.tar
[root@vms101 ~]# ls
anaconda-ks.cfg  c1.tar
[root@vms101 ~]
这个文件c1.tar里包含了运行一个容器所需要的所有数据,有了这些数据runc才能创建容器。
步骤4:创建一个目录/c1/rootfs
[root@vms101 ~]# mkdir -p  /c1/rootfs
[root@vms101 ~]#
注意这里/c1名字可以随意命名,rootfs这个名字是默认的名字,此处如果rootfs是其他名字的话需要在后续生成的config.json里指定。
步骤5:把c1.tar解档到/c1/rootfs里
[root@vms101 ~]# tar xf c1.tar -C /c1/rootfs
[root@vms101 ~]# ls /c1/rootfs
bin  dev  etc  home  proc  root  sys  tmp  usr  var
[root@vms101 ~]#
为了测试方便,在/c1/rootfs/里创建aa.txt
[root@vms101 ~]# touch /c1/rootfs/aa.txt
[root@vms101 ~]# ls /c1/rootfs/
aa.txt  bin  dev  etc  home  proc  root  sys  tmp  usr  var
[root@vms101 ~]#
步骤6:生成runc创建文件的config.json文件
[root@vms101 ~]# cd /c1/
[root@vms101 c1]# ls
rootfs
[root@vms101 c1]# runc spec
[root@vms101 c1]# ls
config.json  rootfs
[root@vms101 c1]#
修改config.json的内容
  1 {
  2         "ociVersion": "1.0.2-dev",
  3         "process": {
  4                 "terminal": false,
  5                 "user": {
  6                         "uid": 0,
  7                         "gid": 0
  8                 },
把第4行terminal: true改为terminal: false。
 53         "root": {
 54                 "path": "rootfs",
 55                 "readonly": true
第53行path设置的是rootfs,前面创建/c1/rootfs里的rootfs名字就是在这里定义的。
步骤7:使用runc创建容器
[root@vms101 c1]# runc create c1
[root@vms101 c1]# runc list
ID     PID     STATUS   BUNDLE   CREATED                       OWNER
c1     2741   created    /c1   2021-02-13T03:13:32.724746332Z   root
[root@vms101 c1]#
步骤8:进入到容器内部
[root@vms101 c1]# runc exec  -t  c1 /bin/sh
/ #
/ # ls /
aa.txt  bin   dev   etc   home  proc  root  sys   tmp   usr   var
/ # exit
[root@vms101 c1]#
步骤9:删除容器
[root@vms101 c1]# runc delete c1
[root@vms101 c1]# runc list
ID          PID         STATUS      BUNDLE      CREATED     OWNER
[root@vms101 c1]#