【前言和思路整理】
千呼万唤Shǐ出来!最近莫名被基友忽悠着进舰坑了,加上要肝LL活动,又碰上公司项目紧张经常加班,这一章发得比以往时候来得更晚一些,抱歉啊。
上一章我们实现了BeatObjectManager等几个类,让游戏可以播放预设好的谱面了。这一章我们给游戏加入用户输入和判定,并引入音频系统,最后部署到移动平台上,让游戏可以玩起来。
本章的难点是物件判定的流程设计,和对物件判定逻辑的理解。
关于音频系统,我采用了一个第三方的非开源库,严格意义上讲和Cocos2dx基本无关,可以选择性跳过。
关于部署,因为我的手机是诺基亚的,所以只能弄WP平台。想部署到其他平台请自行百度了。
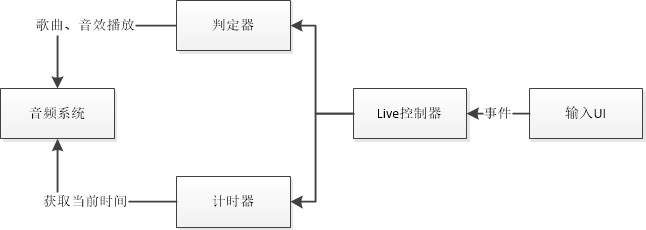
本章的模块设计简图如下:
【物件判定逻辑】
物件判定可以说是Live场景的核心逻辑,我认为在开始敲代码前应该先把思维理清,把过程想透。
执行物件判定功能的模块可以称为打击判定器。需要判定的时候,将物件输入模块,在输出端得到判定结果。通过第一章的分析可以知道,对于输入的任何的物件,模块的输出只能是如下几种情况:
·Perfect
·Great
·Good
·Bad
·Miss
·None
和第一章不同的是,这里我加上了一个None。None表示不对这个物件进行判定。什么时候会用到None呢?情况之一是长条在按住的时候,是不需要判定结果的;情况之二是判定触发时间早于物件时间太多(也就是按得太早)的时候也不需要结果。
那么什么时候才需要进行判定呢?
1、用户触发了九个圆形按钮的触摸事件时
2、控制器更新物件时
第一个很好理解,只要用户点击了按钮,就需要针对这次点击操作进行一次判定。第二个是嘛?
玩过LL的话就知道,如果开始游戏后不进行任何操作,物件飞过了按钮一定时间后,会报出Miss。而这个Miss的判定,就是在物件进行更新的时候触发的。上一章中我们设计的更新物件是放在LiveController类中,于是第二个判定操作也应当由LiveController发起。
那么什么操作会触发什么样的判定结果呢?我们知道这是一个音乐游戏,那么对于物件的判定可以理解为我打得准不准。这个“准不准”是通过时间来体现的。
如图所示,“准不准”遵循这个规则:

轴下方的时间表示触发判定的时间和物件时间的差值。数值刻度根据需求不一定线性变化,但一定是对称的。
还有一点需要注意的是,对于块物件,只要触发了非None判定,物件就会消失,而对于条物件,则稍微复杂一些:若头部判定为Miss,则物件消失;若头部点击过且为失Miss,则尾部判定(模式1)或长按判定(模式2)非None时物件消失。
光用文字描述还是不容易理解,画成流程图看看,先是模式1:

第二种模式的功能应当仅用于判定是否Miss:

其中,头部和尾部判定输出除Miss外的所有情况,Miss判定则仅输出Miss或None判定。
【判定器的实现】
大致的思路有了,可以开始编码了,先从关键部分开始做。从外部来说判定器的结构非常简单,而它内部的核心逻辑应该是这样的:

判定器对外有三个接口,分别用于判定块和条头、判定条尾、判定Miss。其中,判定块和条头在TouchBegan时调用(模式1),判定条尾在TouchEnded或TouchCanceled时调用(模式1),判定Miss每帧调用(模式2)。
如下是判定器的代码。因为判定等级是1-7,默认0档为无效值,而每一档有4个判定时间阈,故采用一个二维数组来存放。其实想透了代码还是不复杂的:
#ifndef __HIT_JUDGEMENT_H__
#define __HIT_JUDGEMENT_H__

#include "SongData.h"

enum HitJudgeType;

class HitJudger
{
public:
    HitJudger();
    ~HitJudger(){}

public:
    HitJudgeType JudgeHead(int pJudgementLevel, long pHitTime, const BeatObjectData* pObjData);
    HitJudgeType JudgeTail(int pJudgementLevel, long pHitTime, const BeatObjectData* pObjData);
    bool JudgeMiss(int pJudgementLevel, long pCurTime, const BeatObjectData* pObjData);

private:
    /*
     * 根据物件和点击的时间计算出判定
     * @param pJudgementLevel 判定等级
     * @param pTimeOffset 点击时间减去物件时间
     */
    HitJudgeType GetResult(int pJudgementLevel, long pTimeOffset);

private:
    int m_JudgeValue[8][4];
};


enum HitJudgeType
{
    Perfect,
    Great,
    Good,
    Bad,
    Miss,
    None
};
#endif // __HIT_JUDGEMENT_H__
实现:
#include "HitJudger.h"


HitJudger::HitJudger()
{
    // 列分别对应:Perfect, Great, Good, Bad
    // 大于Bad则为Miss
    //
    for (int i = 0; i < 4; i++)
    {
        this->m_JudgeValue[0][i] = -1;
    }
    for (int i = 1; i < 8; i++)
    {
        for (int j = 0; j < 4; j++)
        {
            this->m_JudgeValue[i][j] = 150 - 20 * i + 30 * j;
        }
    }
}


HitJudgeType HitJudger::JudgeHead(int pJudgementLevel, long pHitTime, const BeatObjectData* pObjData)
{
    return this->GetResult(pJudgementLevel, pHitTime - pObjData->StartTime);
}


HitJudgeType HitJudger::JudgeTail(int pJudgementLevel, long pHitTime, const BeatObjectData* pObjData)
{
    auto ret = this->GetResult(pJudgementLevel, pHitTime - pObjData->EndTime);
    // 若松手时间比miss还早,同样判定为miss
    //
    if (ret == HitJudgeType::None)
    {
        ret = HitJudgeType::Miss;
    }
    return ret;
}


bool HitJudger::JudgeMiss(int pJudgementLevel, long pCurTime, const BeatObjectData* pObjData)
{
    if (pObjData->HeadHitted)
    {
        return false;
    }

    auto timeOffset = pCurTime - pObjData->StartTime;

    if (abs(timeOffset) > this->m_JudgeValue[pJudgementLevel][3])
    {
        return timeOffset > 0;
    }

    return false;
}


HitJudgeType HitJudger::GetResult(int pJudgementLevel, long pTimeOffset)
{
    auto value = this->m_JudgeValue[pJudgementLevel];
    auto offsetABS = abs(pTimeOffset);

    if (offsetABS <= value[0])
    {
        return HitJudgeType::Perfect;
    }
    else if (offsetABS <= value[1])
    {
        return HitJudgeType::Great;
    }
    else if (offsetABS <= value[2])
    {
        return HitJudgeType::Good;
    }
    else if (offsetABS <= value[3])
    {
        return HitJudgeType::Bad;
    }
    else
    {
        return HitJudgeType::None;
    }
}
★这里的判定阈使用代码生成,实际应用中应当把这个值做成配置文件方便修改。
【用户输入UI的实现】
从视频中可以看出,Live场景中涉及到用户输入的部分很少,除开右上角的暂停按钮,就只有中间呈扇形分布的九个圆形按钮了。
极端情况下,如果有人做了全押的谱,在某一时刻可能需要9个按钮同时按下(虽然到目前LL已有的谱最多同时按俩)。Cocos2dx默认最多支持5个点,再多的话需要修改一下底层,让它支持9点触控。
修改很简单,只需要把这个常量的值改为9即可(CCEventTouch.h, 39行):
static const int MAX_TOUCHES = 9; //changed for EasyLive, default = 5;
UI的功能就是在每个按钮收到消息时向LiveController类发送消息。使用过DX SDK的人可能会觉得这里需要采用轮询方式获取触摸状态。但是,游戏是每秒60帧运行的=>每秒更新60次=>每两次更新间隔16ms,也就是说每次点击有16ms的误差,对音游来说比较大。虽然可以采用多线程来降低误差,但需要考虑异步啊死锁啊一大堆问题,麻烦。
于是就使用原生的事件触发机制来做这个功能,然后按钮的位置使用圆的参数方程计算得出。代码如下:
#ifndef __HIT_INPUT_H__
#define __HIT_INPUT_H__

#include "cocos2d.h"
#include "ui/CocosGUI.h"

USING_NS_CC;
using namespace cocos2d::ui;

class HitInputUI : public Node
{
public:
    ~HitInputUI(){}
    CREATE_FUNC(HitInputUI);

private:
    HitInputUI(){}
    bool init();

private:
    void CircleOnTouchEvent(Ref* sender, Widget::TouchEventType type);

private:
    Button* m_BeatCircles[9];
};

#endif // __HIT_INPUT_H__
实现:
#include "HitInputUI.h"
#include "Common.h"
#include "GameModule.h"


bool HitInputUI::init()
{
    if (!Node::init())
    {
        return false;
    }

    for (int i = 0; i < 9; i++)
    {
        std::ostringstream oss;
        oss << "BeatCircle_" << (i + 1) << ".png";
        auto rad = CC_DEGREES_TO_RADIANS(22.5f * i + 180);
        auto circle = Button::create(oss.str(), oss.str(), oss.str());
        circle->setPosition(Vec2(
            400 * cos(rad),
            400 * sin(rad)));

        this->addChild(circle);
        circle->addTouchEventListener(CC_CALLBACK_2(HitInputUI::CircleOnTouchEvent, this));
        this->m_BeatCircles[i] = circle;
    }

    return true;
}


void HitInputUI::CircleOnTouchEvent(Ref* sender, Widget::TouchEventType type)
{
    if (type == Widget::TouchEventType::MOVED)
    {
        return;
    }

    int touchedIndex = -1;
    for (int i = 0; i < 9; i++)
    {
        if (this->m_BeatCircles[i] == sender)
        {
            touchedIndex = i;
            break;
        }
    }

    WASSERT(touchedIndex != -1);

    switch (type)
    {
        case Widget::TouchEventType::BEGAN:
            GameModule::GetLiveController()->HitButtonsOnEvent(touchedIndex, true);
            break;

        case Widget::TouchEventType::ENDED:
        case Widget::TouchEventType::CANCELED:
            GameModule::GetLiveController()->HitButtonsOnEvent(touchedIndex, false);
            break;
    }
}
★需要将libGUI项目(位于解决方案目录\cocos2d\cocos\ui\下,根据目标平台选择)引入解决方案中,设为主项目的生成依赖项,并在主项目的属性——链接器——附加依赖项中加入“libGUI.lib”
【歌曲数据的修改】
上一章中我们设计的歌曲数据是在外部仅能访问,不能修改的。而在现在的情况下得做一下修改了。
删掉GetObjColumeInternal方法,统一使用GetObjColume来获取列数据的指针。同时,BeatObjectData结构中需要加入Enabled和HeadHitted两个bool型变量,用于指示物件是否可见,以及物件的头部是否已被点击(仅限于条):
class SongData
{
    //...
    //
public:
    std::vector<BeatObjectData>* GetObjColume(int pIndex);
    //
    //...
};


struct BeatObjectData
{
    //...
    //
    bool Enabled;
    bool HeadHitted;

    BeatObjectData()
    {
        //...
        //
        this->Enabled = true;
        this->HeadHitted = false;
    }
};

#endif // __SONG_DATA_H__
cpp:
std::vector<BeatObjectData>* SongData::GetObjColume(int pIndex)
{
    switch (pIndex)
    {
    case 0:return &this->m_Colume_1;
    case 1:return &this->m_Colume_2;
    case 2:return &this->m_Colume_3;
    case 3:return &this->m_Colume_4;
    case 4:return &this->m_Colume_5;
    case 5:return &this->m_Colume_6;
    case 6:return &this->m_Colume_7;
    case 7:return &this->m_Colume_8;
    case 8:return &this->m_Colume_9;

    default:
        WASSERT(false);
        return nullptr;
    }
}
★修改后其他调用SongData的部分也需要做修改,把常量引用改为指针。修改很简单,这里不细说了。
【音频系统的引入】
对于这个项目,我们需要音频引擎提供如下功能:
1、 音乐和音效分轨播放,即播放音乐的时候音效也可以播放出来,声音不冲突;
2、 相同音效分轨播放,即同一音效可以叠加播放;
3、 控制音乐播放、暂停、继续、停止
4、 获取当前音乐的播放时间,精确到ms
Cocos2dx自带一个SimpleAudioEngine,可以做到上面1和3的功能。要做到2和4则需要修改底层代码。是个Cocos2dx码农都知道这引擎是相当地不好用。当然本来这玩意的名字都说明了它是一个简单的音频引擎,图森破。
改这里的底层代码会遇到一个很蛋疼的问题:SimpleAudioEngine在不同平台上的实现都不一样,基本上是做哪个平台就得改一下对应的代码。我是懒逼,懒得去折腾这个。
所以这里隆重向大家安利一个灰常强大的第三方的音频库:FMOD。我最早是在解包LOL的语音的时候发现他们用了这玩意,然后查了一下卧槽通用API跨平台挺牛逼啊。据我所知目前国内不少手游使用了FMOD。
FMOD是什么这里不做解释了,有兴趣的自行百度百科吧。直接放出地址:FMOD Ex地址
请注意FMOD不是一个完全免费的库。商业项目中使用FMOD需要购买它的许可。
往下拉一点可以看到FMOD Ex Programmer’s API,下载对应平台的版本装上即可。装好后,目录下有个api文件夹,里面有C#接口、头文件、lib和dll。然后把FMOD的头文件拷贝到Classes下,引入到项目中。

如果要在其他平台使用FMOD(比如下文说的部署到WP上),只需要换一下lib和dll就行,代码层是不需要修改的,那是相当地方便(说实话我很希望Cocos2dx的音频引擎也能有这么牛逼啊,毕竟这玩意的商业许可证不便宜)。
然后在VS中打开项目属性,打开链接器项,把lib文件名加入到附加依赖项中。别忘了把lib文件和fmodex.dll文件拷贝到输出目录(Debug.win32或Release.win32)下。

然后我直接放代码了,FMOD怎么用不是这一系列文章的重点,自行看安装目录中的Sample吧:
#ifndef _SOUND_SYSTEM_H_
#define _SOUND_SYSTEM_H_

#include <string>
#include "HitJudger.h"
#include "fmod/fmod.hpp"
#include "fmod/fmod_errors.h"


using namespace FMOD;

class SoundSystem
{
public:
    SoundSystem();
    ~SoundSystem();

public:
    void SetSong(const std::string& pFilename);
    void PlaySong();
    void PauseSong();
    void ResumeSong();
    void StopSong();
    long GetCurPosition();
    void PlayHitSound(const HitJudgeType& pType, int pColume);

private:
    void PlaySound(Sound* pSound, bool pIsSong, int pColume);
    void CreateSound(Sound** pOutSound, const char* pFilename, bool pIsStream);
    void ERRCHECK(FMOD_RESULT result);

private:
    System  *m_pSystem;
    Sound   *m_pSong;
    Sound   *m_pSound_Prefect,
            *m_pSound_Great,
            *m_pSound_Good,
            *m_pSound_Bad,
            *m_pSound_Miss;
    Channel *m_pChannel_Song;
    Channel *m_Channel_HitSound[9];
};


#endif // _SOUND_SYSTEM_H_
实现:
#include "SoundSystem.h"
#include "Common.h"

USING_NS_CC;

#define SAFE_RELEASE_FMOD_COMPONENT(__COM__) { if((__COM__)) (__COM__)->release(); (__COM__) = nullptr; }


SoundSystem::SoundSystem()
    : m_pSong(nullptr)
    , m_pChannel_Song(nullptr)
{
    // 初始化系统
    //
    auto result = FMOD::System_Create(&this->m_pSystem);
    ERRCHECK(result);
    unsigned int version;
    result = this->m_pSystem->getVersion(&version);
    ERRCHECK(result);

    if (version < FMOD_VERSION)
    {
        log("Error!\r\nYou are using an old version of FMOD %08x.\r\nThis program requires %08x\n", version, FMOD_VERSION);
        WASSERT(false);
    }
    result = this->m_pSystem->init(32, FMOD_INIT_NORMAL, 0);
    ERRCHECK(result);
    // 初始化音轨
    //
    for (int i = 0; i < 9; i++)
    {
        this->m_Channel_HitSound[i] = nullptr;
    }
    // 创建打击音效
    //
    this->CreateSound(
        &this->m_pSound_Prefect,
        FileUtils::getInstance()->fullPathForFilename("perfect.wav").c_str(),
        false);
    this->CreateSound(
        &this->m_pSound_Great,
        FileUtils::getInstance()->fullPathForFilename("great.wav").c_str(),
        false);
    this->CreateSound(
        &this->m_pSound_Good,
        FileUtils::getInstance()->fullPathForFilename("good.wav").c_str(),
        false);
    this->CreateSound(
        &this->m_pSound_Bad,
        FileUtils::getInstance()->fullPathForFilename("bad.wav").c_str(),
        false);
    this->CreateSound(
        &this->m_pSound_Miss,
        FileUtils::getInstance()->fullPathForFilename("miss.wav").c_str(),
        false);
}


void SoundSystem::SetSong(const std::string& pFilename)
{
    SAFE_RELEASE_FMOD_COMPONENT(this->m_pSong);
    this->CreateSound(
        &this->m_pSong,
        FileUtils::getInstance()->fullPathForFilename(pFilename).c_str(),
        true);
}


void SoundSystem::PlaySong()
{
    WASSERT(this->m_pSong);
    this->PlaySound(this->m_pSong, true, -1);
}


void SoundSystem::PauseSong()
{
    WASSERT(this->m_pSong);
    auto result = this->m_pChannel_Song->setPaused(true);
    ERRCHECK(result);
}


void SoundSystem::ResumeSong()
{
    WASSERT(this->m_pSong);
    auto result = this->m_pChannel_Song->setPaused(false);
    ERRCHECK(result);
}


void SoundSystem::StopSong()
{
    WASSERT(this->m_pSong);
    auto result = this->m_pChannel_Song->stop();
    ERRCHECK(result);
}


long SoundSystem::GetCurPosition()
{
    WASSERT(this->m_pSong);
    unsigned int ret = -1;
    auto result = this->m_pChannel_Song->getPosition(&ret, FMOD_TIMEUNIT_MS);
    ERRCHECK(result);

    return ret;
}


void SoundSystem::PlayHitSound(const HitJudgeType& pType, int pColume)
{
    Sound* hitSound = nullptr;

    switch (pType)
    {
        case HitJudgeType::Perfect: hitSound = this->m_pSound_Prefect; break;
        case HitJudgeType::Great:   hitSound = this->m_pSound_Great;   break;
        case HitJudgeType::Good:    hitSound = this->m_pSound_Good;    break;
        case HitJudgeType::Bad:     hitSound = this->m_pSound_Bad;     break;
        case HitJudgeType::Miss:    hitSound = this->m_pSound_Miss;    break;
    }

    if (hitSound)
    {
        this->PlaySound(hitSound, false, pColume);
    }
}


void SoundSystem::PlaySound(Sound* pSound, bool pIsSong, int pColume)
{
    auto result = this->m_pSystem->playSound(
        pIsSong ? FMOD_CHANNEL_REUSE : FMOD_CHANNEL_FREE,
        pSound,
        false,
        pIsSong ? &this->m_pChannel_Song : &this->m_Channel_HitSound[pColume]);

    ERRCHECK(result);
}


void SoundSystem::CreateSound(Sound** pOutSound, const char* pFilename, bool pIsStream)
{
    FMOD_RESULT result;
    if (pIsStream)
    {
        result = this->m_pSystem->createStream(
            pFilename,
            FMOD_HARDWARE | FMOD_LOOP_OFF | FMOD_2D,
            0,
            pOutSound);
    }
    else
    {
        result = this->m_pSystem->createSound(
            pFilename,
            FMOD_HARDWARE | FMOD_CREATESAMPLE | FMOD_LOOP_OFF | FMOD_2D,
            0,
            pOutSound);
    }

    ERRCHECK(result);
}


void SoundSystem::ERRCHECK(FMOD_RESULT pResult)
{
    if (pResult != FMOD_OK)
    {
        log(FMOD_ErrorString(pResult));
        WASSERT(false);
    }
}


SoundSystem::~SoundSystem()
{
    SAFE_RELEASE_FMOD_COMPONENT(this->m_pSong);
    SAFE_RELEASE_FMOD_COMPONENT(this->m_pSound_Prefect);
    SAFE_RELEASE_FMOD_COMPONENT(this->m_pSound_Great);
    SAFE_RELEASE_FMOD_COMPONENT(this->m_pSound_Good);
    SAFE_RELEASE_FMOD_COMPONENT(this->m_pSound_Bad);
    SAFE_RELEASE_FMOD_COMPONENT(this->m_pSound_Miss);
    // 不可在释放系统前释放音频,否则报错
    //
    auto result = this->m_pSystem->close();
    ERRCHECK(result);
    SAFE_RELEASE_FMOD_COMPONENT(this->m_pSystem);
}
【整合模块】
让我们把完成的模块链接在一起,再修改一下之前的代码,为后面的部署做准备。
首先把HitJudger和SoundSystem加入GameModule中。代码和其他模块一致,别忘了在析构方法中CC_SAFEDELETE一下。同时修改一下SetSongData方法(不修改的话部署后找不到文件会崩):
void GameModule::SetSongData(const std::string& pName)
{
    CC_SAFE_DELETE(m_pSongData);
    m_pSongData = new SongData(FileUtils::getInstance()->fullPathForFilename(pName));
}
然后是SongTimer类。因为加入了音频引擎,时间应当从引擎中取得,而不是逐桢递加:
long SongTimer::GetTime()
{
    return GameModule::GetSongSystem()->GetCurPosition();
}
Common.h中的WASSERT宏调用了DebugBreak方法用于触发断点。但是这个方法是个WinAPI,上了其他平台就没这玩意了。同时考虑到如果项目编译Release版本,断言不需要了,所以得改改:
#ifdef _DEBUG
    #if CC_TARGET_PLATFORM == CC_PLATFORM_WIN32
        #define WASSERT(__COND__) if (!(__COND__)) { DebugBreak(); }
    #else
        #define WASSERT(__COND__) CC_ASSERT(__COND__)
    #endif
#else
    #define WASSERT(__COND__) do {} while (0);
#endif
★经测试__debugbreak方法在WP上可用,但是MSDN说这方法是“Microsoft Specific”的,估计在安卓和iOS等其他平台没有对应的实现。
接下来在LiveController类中加入一个变量和一个方法。变量用于保存离按钮最近的活动的物件索引,方法用于接受UI发送的消息并调用判定器:
public:
    void HitButtonsOnEvent(int pColume, bool pIsPress);

private:
    int m_CurIndexes[9];
m_CurIndexes变量在构造方法中需要全部赋值0,按钮事件方法实现如下:
void LiveController::HitButtonsOnEvent(int pColume, bool pIsPress)
{
    if (this->m_CurStatus != LCStatus::Running)
    {
        return;
    }

    auto songData = GameModule::GetSongData();
    auto objData = &(songData->GetObjColume(pColume)->at(this->m_CurIndexes[pColume]));
    auto curTime = GameModule::GetTimer()->GetTime();
    auto judger = GameModule::GetHitJudger();

    auto result = HitJudgeType::None;

    if (pIsPress)
    {
        result = judger->JudgeHead(songData->GetJudgement(), curTime, objData);

        if (result != HitJudgeType::None)
        {
            if (objData->Type == BeatObjectType::Block)
            {
                objData->Enabled = false;
            }
            else
            {
                objData->HeadHitted = true;
            }
        }
    }
    else if (objData->Type == BeatObjectType::Strip && objData->HeadHitted)
    {
        result = judger->JudgeTail(songData->GetJudgement(), curTime, objData);
        objData->Enabled = false;
    }

    GameModule::GetSongSystem()->PlayHitSound(result, pColume);
}
同时修改Update方法,加入Miss判定:
void LiveController::Update()
{
    //...
    //
    // 防止Strip在飞行时消失
    //
    if (bottomIndex > 0)
    {
        auto obj = columeData->at(bottomIndex - 1);
        if (obj.Type == BeatObjectType::Strip)
        {
            if (obj.EndTime > bottomTime && obj.Enabled)
            {
                bottomIndex--;
            }
        }
    }
    this->m_CurIndexes[i] = bottomIndex;
    // Miss判定
    //
    auto curObj = &columeData->at(bottomIndex);
    if (GameModule::GetHitJudger()->JudgeMiss(songData->GetJudgement(), curTime, curObj))
    {
        curObj->Enabled = false;
        GameModule::GetSongSystem()->PlayHitSound(HitJudgeType::Miss, i);

        if (bottomIndex > 0)
        {
            bottomIndex--;
        }
    }
    // 更新物件
    // ...
}
在ResetObjs方法中加入初始化音频文件的代码:
void LiveController::Reset()
{
    auto data = GameModule::GetSongData();
    WASSERT(data);

    this->m_pBeatObjectManager->ResetObjsFromData(data);
    GameModule::GetSongSystem()->SetSong(data->GetSongFilename());
}
再修改一下StartLive方法,加入播放歌曲的代码:
void LiveController::StartLive()
{
    this->m_CurStatus = LCStatus::Running;
    GameModule::GetSongSystem()->PlaySong();
}
最后是最上面的GetNearlyIndex方法,插入一小段代码以跳过不显示的物件:
inline int GetNearlyIndex(int pTime, const std::vector<BeatObjectData>* pColume)
{
    //
    //...
    while ((index_Start + 1) < index_End)
    {
        if (!pColume->at(index_Start).Enabled)
        {
            index_Start++;
            continue;
        }
    //...
    //
}
然后是LiveScene类,在init方法中加入HitInputUI,然后把之前用代码写死的坐标改成相对坐标:
bool LiveScene::init()
{
    if (!Layer::init())
    {
        return false;
    }
    Size visibleSize = Director::getInstance()->getVisibleSize();
    Vec2 origin = Director::getInstance()->getVisibleOrigin();
    // 加入背景图
    //
    auto bg = Sprite::create("bg.jpg");
    bg->setPosition(Vec2(
        visibleSize.width / 2 + origin.x,
        visibleSize.height / 2 + origin.y));
    this->addChild(bg);
    // 加上黑色半透明蒙层
    //
    auto colorLayer = LayerColor::create(Color4B(0, 0, 0, 192));
    this->addChild(colorLayer);
    // 初始化BeatInputUI
    //
    auto hiu = HitInputUI::create();
    hiu->setPosition(Vec2(
        visibleSize.width / 2 + origin.x,
        480 + origin.y));
    this->addChild(hiu);
    // 初始化BeatObjectManager
    //
    auto bom = BeatObjectManager::create();
    bom->setPosition(Vec2(
        visibleSize.width / 2 + origin.x,
        480 + origin.y));
    this->addChild(bom);
    // 初始化歌曲数据
    //
    GameModule::SetSongData("start_dash.xml");
    // 初始化控制器
    //
    GameModule::GetLiveController()->SetBeatObjectManager(bom);
    GameModule::GetLiveController()->ResetObjs();

    this->runAction(Sequence::createWithTwoActions(
        DelayTime::create(2),
        CallFunc::create([]()
        {
            GameModule::GetLiveController()->StartLive();
        })));

    this->scheduleUpdate();

    return true;
}
★我发现之前很逗逼地把BeatObjectManager做成LiveScene类的成员变量了,现在看来完全没有必要,删掉吧。
BeatObjectManager的init方法也要修改一下,去掉设置自身坐标的代码,也就是对setPosition()的调用。删一行而已,代码就不发了。
看了视频可以知道LL里面的条飞到按钮上之后,头部就不会移动了。为了做到这个效果来修改一下BeatObject类的setPositionY方法:
void BeatObject::setPositionY(float y)
{
    // 如果该物件是一个Block
    //
    if (this->IsBlock())
    {
        Node::setPositionY(y);
        auto headScale = GetMoveScale(y);
        this->m_pHead->setScale(headScale);
        this->m_pHead->setVisible(headScale > 0.05f);
    }
    // 如果该物件是一个Strip,则需要处理其身体和尾部
    //
    else
    {
        if (y < -400)
        {
            Node::setPositionY(-400);
        }
        else
        {
            Node::setPositionY(y);
        }
        auto posY = this->getPositionY();
        auto headScale = GetMoveScale(posY);
        this->m_pHead->setScale(headScale);
        this->m_pHead->setVisible(headScale > 0.05f);
        // 模拟无限远处飞来的效果,保证尾部的y坐标小于0
        //
        if (y + this->m_fLength > 0)
        {
            this->m_fCurLength = posY > -400 ? -posY : 400;
        }
        else
        {
            this->m_fCurLength = posY > -400 ? this->m_fLength : 400 + y + this->m_fLength;
        }

        if (this->m_fCurLength < 0)
        {
            this->m_fCurLength = 0;
        }

        auto tailScale = GetMoveScale(posY + this->m_fCurLength);
        this->m_pTail->setPositionY(this->m_fCurLength);
        this->m_pTail->setScale(tailScale);
        this->m_pTail->setVisible(tailScale > 0.05f);

        auto harfHeadWidth = headScale * 124 / 2.0f;
        auto harfTailWidth = tailScale * 124 / 2.0f;

        this->m_pBody->SetVertex(
            Vec2(-harfTailWidth, this->m_fCurLength),
            Vec2(-harfHeadWidth, 0),
            Vec2(harfTailWidth, this->m_fCurLength),
            Vec2(harfHeadWidth, 0));
    }
}
★和LL不同的是,LL中条的尾部可以飞过按钮,我不认为这是一个好的设计,所以代码中限制条的长度最小为0,即条的尾部最远飞到按钮上。
最后改一下AppDelegate类的applicationDidFinishLaunching方法,把设置设计分辨率的调用放在if外(修改前WP上测试发现分辨率总是设置了无效,后来才发现WP上就没进if,听说安卓也是这样的):
bool AppDelegate::applicationDidFinishLaunching() {
    //
    //...
    if(!glview) {
        glview = GLView::create("My Game");
        director->setOpenGLView(glview);
    }

    glview->setDesignResolutionSize(960, 640, ResolutionPolicy::SHOW_ALL);

    //...
    //
}
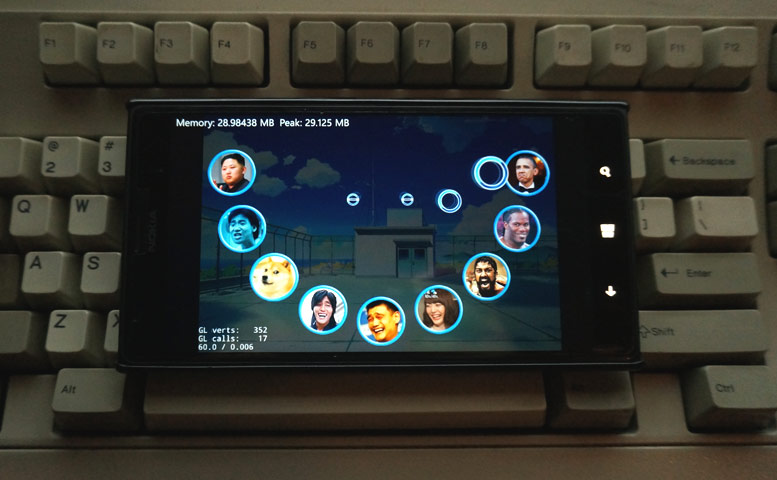
感觉改了好多东西,都是以前自己给自己挖的坑orz修改完成后,可以编译运行了。如果不出错的话,你会看到这样的界面,还能听到歌曲和音效。
用LL的图片怕起纠纷,所以我自己做了一套按钮,顺便想起武媚娘剪胸事件,干脆把背景也换了:

当然用鼠标的话只能一次点一个,基本上没法玩,接下来部署到移动设备上试试。
【部署到WP设备】
因为设备原因,以及家里电脑没装eclipse还有懒得去下ADK、NDK,只有部署到WP了。
啥,你问我WP是啥?既然你诚心诚意地问了,那么我大发慈悲地建议你略过这一小节,或者去百度一下。
在公司部署过安卓项目,感觉对比一下WP真的是比安卓的部署调试爽太多了,那是相当地爽,简直和iOS有一拼。而且在VS里面可以直接对真姬,呸,真机进行断点调试native层的代码。
部署只需要四个步骤。首先我们调整一下VS的WP项目文件。打开proj.wp8-xaml目录下的sln文件,将xxxxxxComponent(xxxxxx是你创建Cocos2dx工程时输入的名字)中的Classes筛选器下面所有代码清空,把我们的Classes目录下的所有文件拖进去,别忘了FMOD的头文件。
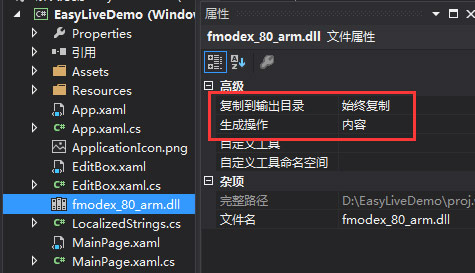
然后,我们需要下载FMOD的WP8版本。安装后,在xxxxxxComponent项目中的链接器选项中加入fmodex_80_arm.lib(如果在WP模拟器上调试,则需要fmodex_80_x86.lib)。
再然后,把fmodex_80_arm.dll(如果在WP模拟器上调试,则需要fmodex_80_x86.dll)拖到xxxxxx项目中,调整它的属性:复制到输出目录 - 始终复制,生成操作 - 内容。
如果在其他平台上使用FMOD,也需要引入对应的库文件。
最后,可以编译项目了。要让编译器把应用部署在设备上运行,请这样设置:

插入已经使用开发者账号解锁的WP设备,保持屏幕打开,编译完成后VS会将项目部署到手机上并运行。
如果想调试C++层的代码,需要在xxxxxx项目的属性——调试页卡中,将“UI任务”设为“仅限本机”即可。设置后,在cpp中的断点啊log啊啥的都生效了。
如果要修改应用的图标啊名称啊啥的,双击打开xxxxxx项目下的Properties——WMAppManifest.xml,可以直接进行修改,那是相当地方便。

然后试试我们的成果吧,可以试着打一下~
【本章结束语】
最头疼的一章终于弄出来了。做用户输入的时候试了好几种方案最后才定下来。所以建议各位在遇上复杂的,一时想不透的逻辑的时候,拿出笔记本或者打开Visio这类的软件,把思路画下来,整理好,弄清楚了再敲代码,省得返工。
本章用到的资源:点击下载(解压后放在Resources目录下,完全覆盖已有文件。不包含FMOD组件,请自行上官网下载)
★打击音效资源取自网络
下一章我们给游戏加入显示分数、血条等等的UI,以及打击的特效。
最后感叹一下如果要做下一系列我一定全部做好了再写博文……免得遇上加班等情况延期发布……毕竟加班乃码农之常情orz