Java的IO可以说对于初学者是非常不友好了,内容多,名词容易混。这里就由浅入深详细介绍下。
内容较多,新手请从头看起,如有基础则直接点击下面的链接跳转阅读!
目录:
3.纯文本文件(字符流)的读写(FileReader,FileWriter)
4.非纯文本(字节流)的读写(FileInputStream,FileOutputStream)
1.IO是什么?
我们免不了会对设备间的数据进行读取与写入(内存,硬盘等等都算设备),Java对数据的操作定义为了“流”。对流的操作都封装在了Java的IO包中(java.io)。对于流,我们可以有如下划分:
按照流向分:输入流(InputStream),输出流(OutputStream)
按照数据类型分:字节流,字符流
流向分比较好理解,这里简单说下字节流与字符流。
字节流是对文件的基本操作流(byte),这个文件可以是音频,可以是文档,因为字节就是我们最小的基本数据类型(字不是基本数据类型,java不认),用字节就可以处理所有类型的文件。
而字符流是对字节流的进一步说明,是对于纯文本文件(txt)的简单操作。是用来处理文字的流。
也就是说,所有流本质上都是都是字节,只不过人们为了方便,使用字符流来处理文字。
2.IO的体系与命名方法
乍一看很乱,其实很简单,掌握规律就好了。
java.lang.object
|--InputStream
|--OutputStream 这两个是字节流的抽象基类
|--Reader
|--Writer 这两个是字符流的抽象基类
由这两对抽象的基类可以派生出很多子类,规律就是:
父类名都是子类的后缀,换句话说,后缀名说明了这个类的操作对象是字节流还是字符流。前缀名是这个类的功能增强。
举两个例子:FileInputStream,后缀名说明了这是一个操作输入字节流的类,前缀说明其是对文件进行操作的。
再者,BufferedReader,后缀名表明这是操作字符流的,前缀说明为这个流加了一个缓冲区功能(后面会说到缓冲区)。
3.纯文本文件(字符流)的读写(FileReader,FileWriter)
3.1 FileReader
3.1.1 简单的读取
我们首先看下比较简单的纯文本文件的读写。
 1  public static void main(String[] args) throws IOException
 2     {
 3         FileReader fileReader = new FileReader("D:/Demo.txt");
 4         int ch;
 5         while ((ch = fileReader.read()) != -1)
 6         {
 7             System.out.print((char) ch);
 8         }
 9         fileReader.close();
10     }
首先我们定义了一个文件读取流对象,构造函数传入的是我们指定目录下的文件。
(题外话,文件路径相关)
1.相对路径与绝对路径
相对路径是从当前路径开始的路径。比如我们现在在D:/program,那么相对路径就会从D盘开始。我们要是想去找D:/program/Dict.exe,就可以直接表示为./Dict.exe,或者直接Dict.exe。只不过前面的写法比较严谨。“.”表示当前路径,“..”表示上一层路径(父路径)。
绝对路径就是不能偷懒,必须从头写起,也就是D:/program/Dict.exe。
2.“/”和“”
在linux中,使用“/”来表示文件路径,但是在win中“/”和“”没什么不同,唯一需要注意一点的是,还有转义字符这一层含义,我们如果有这么一个路径:D: ext.txt,这里 就成回车了。所以说,我们需要将进行转义,也就是“\”来表示路径:
D:\next.txt。但是我们要是用/就没事儿了:D:/next.txt。所以我比较喜欢/。
然后fileReader对象的read()方法会读取一个字符,但要注意返回值是int类型,我们打印的时候要转换为char。read()每执行一次就会向后移动一个单位,如果到达文件结尾会返回-1。我们使用while来遍历整个文件,结束条件当然就是返回值为-1的时候。
最重要的一点,在对流操作完毕之后,一定要关闭流。
3.1.2 使用字符数组读取数据
 1 public static void main(String[] args) throws IOException
 2     {
 3         FileReader fileReader = new FileReader("D:/Demo.txt");
 4         int num;
 5         char str[] = new char[1024];
 6         while ((num = fileReader.read(str) ) != -1)
 7         {
 8             System.out.println(new String(str,0,num));
 9         }
10     }
.read()有一个重载.read(char cbuf[]),可以将数据读入字符数组,返回的是读取到的字符数,若读到文件结尾返回-1。我们定义了一个字符数组且大小为1024(定义时最好定义为1024的整数倍),打印时我们在里面建立了一个字符串对象,指定了字符数组、开始位置与结束位置,也就是有效数据长度,这样就可以避免数据在最后不足1024位而打印多余数据的问题。
3.2 FileWriter
3.2.1 简单的写入
我们将一些文字写入到指定文件:
1  public static void main(String[] args) throws IOException
2     {
3         FileWriter fileWriter = new FileWriter("D:/Demo.txt");
4         fileWriter.write("衬衫的价格是九磅十五便士");
5         fileWriter.flush();
6         fileWriter.close();
7     }
同样创建了一个写入流对象,传入的是我们指定目录下的目标文件。然后调用.write(String str),写入了指定字符串。这里有一个重载,也可以传入一个int数字(java会自动转换为char类型,如超过char范围,会在文件中出现一个?字符,表示这个识别不了)。
与读取不同的是,这里有一句.flush()。这句话用来刷新流对象中的缓存中的数据,将数据刷新到目的地中。我们要是操作写入流就一定要去刷新。
其实,.close在结束流之前会做一次强制刷新。所以说,我们上面那句.flush是可以不要的。
3.2.2 文件的续写
我们如果将上面的String修改后再执行一次,会发现文件内容是新String,说明默认的写入方式是覆盖写入。我们若想续写,需要FileWRriter的另一个构造方法:FileWriter(String filename,Boolean append)也就是在路径后加入true表示续写。
3.3 IO异常
所有与IO有关的操作基本上都会抛出IOException。就那上面的读写来说,如果读取一个不存在的文件,或者写入时空间已满,都会抛出IOException或者他的子类。我们对这种异常的操作如下:
 1  public static void main(String[] args) 2     {
 3         FileWriter fileWriter = null;
 4         try
 5         {
 6             fileWriter = new FileWriter("Z:/Demo.txt", true);
 7             fileWriter.write("hahahaha");
 8         } catch (IOException e)
 9         {
10             System.out.println("文件打开失败!");
11
12         } finally
13         {
14             try
15             {
16                 if (fileWriter != null)
17                     fileWriter.close();
18
19             } catch (IOException e)
20             {
21                 System.out.println("文件关闭失败!");
22             }
23         }
24
25     }
首先需要说明的是,文件流对象要定义在try-catch外面,因为代码块内算一个整体。在者,我们的.close()也会抛出异常,而.close是无论文件打开与否一定会执行的操作,所以说把这句话放在finally中并且对其捕获异常。
下面的代码示例中,为了简洁,我统一用throws的方式处理。这只是为了演示简洁,实际中一定不可以这样。
3.4 小应用-文本文件的复制
思路很简单:创建两个流,一个读文件一个写文件。将数据读入到字符数组,然后写入流从数组中读取并写文件。
 1  public static void main(String[] args) throws IOException
 2     {
 3         FileReader fileReader = new FileReader("D:/Demo.java");
 4         FileWriter fileWriter = new FileWriter("D:/copy.txt");
 5         char str[] = new char[1024];
 6         int num=0;
 7         while ((num = fileReader.read(str)) != -1)
 8         {
 9             fileWriter.write(str,0,num);
10         }
11         fileReader.close();
12         fileWriter.close();
13     }
我们通过对比两个文件的字节大小就知道这俩是一模一样的了:


3.5 缓冲区技术(Buffered)
为了提高读取写入效率,我们使用了缓冲区技术。边读边写是很慢的,而且还伤硬盘。缓冲区是内存的一片区域,我们知道内存的读写速度很快,使用了缓冲区技术,我们的效率会成倍增加。
使用方法也很简单:
 1 public static void main(String[] args) throws IOException
 2 {
 3     FileReader fileReader = new FileReader("D:/Demo.java");
 4     BufferedReader bufferedReader = new BufferedReader(fileReader);
 5     String str=null;
 6     while ((str = bufferedReader.readLine()) != null)
 7     {
 8         System.out.println(str);
 9     }
10     fileReader.close();
11 }
BufferedReader接受一个字符输入流,然后将其存入缓冲区。buffered.readline()是一个对字符输入流装饰后的新方法,可以做到一次读取一行,但是这一行并不带有任何行终止符,也就是最后的回车换行是读不到的。
装饰设计模式:可以在原有的功能基础上新增技能,降级继承带来的耦合性。
具体实现:将想增强的类作为参数传入,然后加入新内容。
我们在使用缓冲之后,就不用去关闭流了,直接关缓冲区就行了,因为这俩已经相关联了。
3.6 小应用-使用缓冲区复制文件
 1 public static void main(String[] args) throws IOException
 2 {
 3     long start=System.currentTimeMillis();
 4     BufferedReader bufferedReader = new BufferedReader(new FileReader("D:/Demo.java"));
 5     BufferedWriter bufferedWriter = new BufferedWriter(new FileWriter("D:/copy.txt"));
 6     String str=null;
 7     while ((str = bufferedReader.readLine()) != null)
 8     {
 9         bufferedWriter.write(str);
10         bufferedWriter.newLine();
11         bufferedWriter.flush();
12     }
13     bufferedReader.close();
14     bufferedWriter.close();
15     long end = System.currentTimeMillis();
16     System.out.println(end-start);
17 }
因为bufferedWriter.write(str);不获取行终止符,我们就只能手动去加一行,也就是用bufferedWriter.newLine();因为数据并不是一次性读取完的,所以每次读取都要bufferedWriter.flush();刷新下。
3.7 为输出标行号
 1  public static void main(String[] args) throws IOException
 2  {
 3      FileReader fileReader = new FileReader("D:/Demo.java");
 4      LineNumberReader lineNumberReader = new LineNumberReader(fileReader);
 5      String str=null;
 6      while ((str = lineNumberReader.readLine()) != null)
 7      {
 8          System.out.println(lineNumberReader.getLineNumber()+" "+str);
 9      }
10      fileReader.close();
11  }
LineNumberReader是一个专门跟踪行号的类,他需要接收一个字符流。然后我们调用它的.getLineNumber()就可以接收到行号了。默认编号从0开始,如想自定义,可以使用setLineNumber(int num)来手动改变。
4.非纯文本(字节流)的读写(FileInputStream,FileOutputStream)
4.1 简单的读取
如果你已经掌握了上述内容,那么字节流对你来说就很简单了。
前面说过,我们可以对任何格式的文件使用字节流操作。所以现在仍使用文本文件进行演示。
 1 public static void main(String[] args) throws IOException
 2 {
 3     FileInputStream fileInputStream = new FileInputStream("D:/Demo.java");
 4     byte b[] = new byte[fileInputStream.available()];
 5     int num=0;
 6     while ((num=fileInputStream.read(b))!=-1)
 7     {
 8         System.out.println(new String(b,0,num));
 9     }
10     fileInputStream.close();
11 }
代码与前面的基本没有差异,说明两点不同:
1.因为是字节流,所以字符数组变成了字节数组;
2.fileInputStream.available()可以返回文件的(估计)大小,这样我们就可以定义一个正好大小的数组不会浪费。如若文件比较大,这种方式显然不妥。
4.2 复制一张图片
 1 public static void main(String[] args) throws IOException
 2 {
 3     FileInputStream fileInputStream = new FileInputStream("D:/1.jpg");
 4     FileOutputStream fileOutputStream = new FileOutputStream("D:/2.jpg");
 5     byte b[] = new byte[1024];
 6     int num=0;
 7     while ((num = fileInputStream.read(b)) != -1)//返回了读取的字节数
 8     {
 9         fileOutputStream.write(b,0,num);
10     }
11     fileInputStream.close();
12     fileOutputStream.close();
13 }
代码与字符流的基本一样。在第九行我们还是使用开始与结束参数来保证写入的都是有效数据。
4.3 字节流的缓冲区
 1 public static void main(String[] args) throws IOException
 2 {
 3     BufferedInputStream bufferedInputStream = new BufferedInputStream(new FileInputStream("D:/1.jpg"));
 4     BufferedOutputStream bufferedOutputStream = new BufferedOutputStream(new FileOutputStream("D:/2.jpg"));
 5     int b=0;
 6     while ((b = bufferedInputStream.read()) != -1)
 7     {
 8         bufferedOutputStream.write(b);
 9     }
10     bufferedInputStream.close();
11     bufferedOutputStream.close();
12 }
这里特意使用了一个字节一个字节读取的方式来掩饰,是为了说明这种方式也是可以的。
需要强调的一点:类名。前面的是功能增强(Buffered),后缀名是操作对象(InputStream)。可千万别整混了!
4.4 键盘的读取、输出与流的重定向
4.4.1 从键盘输入
既然涉及到数据,就免不了键盘的输入。还是用一个小栗子来演示下:
 1 public static void main(String[] args) throws IOException
 2 {
 3    InputStream inputStream=System.in;
 4     StringBuilder stringBuilder=new StringBuilder();
 5     while (true)
 6     {
 7         int m = inputStream.read();
 8         if (m == '
')
 9         {
10             continue;
11         }
12         if (m == '
')
13         {
14             String str=stringBuilder.toString();
15             stringBuilder.delete(0, stringBuilder.length());
16             System.out.println(str);
17         }
18         else
19         stringBuilder.append((char)m);
20     }
21 }
换行问题:
在windows当中,换行是用两个字符来表示的: ,而在linux中,是用 来表示的。而我们的回车键敲下去表示的是 ,所以上面的例子才会在 那里继续循环。
从键盘输入数据我们使用的是System.in。这是一个标准字节输入流,返回的是输入流(InputStream)。所以我们需要一个输入流对象来接收。然后我们使用了一个StringBuilder来不断的向字符串后面添加我们从键盘获取到的字符,等我们按下回车时,清空数据(delete)。很好理解,不再多说。
4.4.2 流的转换
上面的例子是输入一行输出一行,说白了就是读一行打印一行。自然而然我们就可以想到readLine()方法,但是这个是缓冲字符流的方法,我们现在是字节流,那有没有办法转换一下呢?
我们可以使用InputStreamReader来将字节流转换为字符流。
 1 public static void main(String[] args) throws IOException
 2 {
 3     InputStream inputStream=System.in;
 4     InputStreamReader inputStreamReader= new InputStreamReader(inputStream);
 5     BufferedReader bufferedReader = new BufferedReader(inputStreamReader);
 6     String str=null;
 7     while ((str = bufferedReader.readLine()) != null)
 8     {
 9         System.out.println(str);
10     }
11 }
InputStreamReader接收一个字节流对象,并将其转换为字符流。InputStreamReader是字节流到字符流的桥梁。
上面这么写太罗嗦,我们一般是这么写:
BufferedReader bufferedReader = new BufferedReader(new InputStreamReader(System.in));
数据从硬盘(或者其他设备,本例就是键盘)中读入内存时,顺序是,文件流->转换流->缓冲流;(字节->字符)
所以读入的时候,转换流是字节流到字符流的桥梁;
我们看上面那句话的顺序也就应该是--------->
与之相对的,我们也有OutputStreamWriter。
 1 public static void main(String[] args) throws IOException
 2 {
 3     BufferedReader bufferedReader = new BufferedReader(new InputStreamReader(System.in));
 4     BufferedWriter bufferedWriter = new BufferedWriter(new OutputStreamWriter(System.out));
 5     String str=null;
 6     while ((str = bufferedReader.readLine()) != null)
 7     {
 8         bufferedWriter.write(str);
 9         bufferedWriter.newLine();
10         bufferedWriter.flush();
11     }
12 }
OutputStreamWriter接受一个输出字节流对象,也就是System.out。与上面相反,OutputStreamWriter是字符流转换为字节流的桥梁。
数据从内存中写入硬盘(或者屏幕)时,顺序是,缓冲流->转化流->文件流;(字符->字节)
而缓冲流是字符流,本例中的文件流out是字节流,所以是字符流到字节流的桥梁;
顺序应该是
new BufferedWriter(new OutputStreamWriter(System.out));
<------------------
4.4.3 流的重定向
上面的System.in与System.out是从键盘读入,屏幕输出其实都是默认的,我们可以进行重定向,让它从文件读入或者写入到文件。
输出定向到文件:
1 System.setOut(new PrintStream("D:/text.txt"));
在你的代码前面加上一句这个就可以了。.setOut接收一个PrintStream对象,我们直接new一个就行。
输入重定向到文件:
1 System.setIn(new FileInputStream("D:/123.txt"));
.setIn接受一个输入流,我们传入的是InputStream的已实现子类FileInputStream。
这样我们的输入源就变成了文件,也就是从文件中读取。但其实这种方法的使用场景并不多。
5.文件
5.1 文件的概述
上面介绍完了各种流,这些流或多或少都跟文件相关。在Java中,万物基于对象,文件也不例外。当然就有一个File类将文件or文件夹封装为了对象。FIle类与上面的流向配合食用,效果更佳哦。
5.2 文件(夹)对象的定义
1 File file = new File("D:/Demo.txt");
一目了然,最简单的方式就是在File的构造函数中传入文件路径,这个文件可以是存在的,也可以是未出现的。
同理,这个参数也可以是一个文件夹:
1 File file = new File("D:/abc");
还有一种方式,就是将路径的文件名与其父路径分开,作为两个参数:
1 File file = new File("D:/","Demo.txt");//第一个参数是父路径,是字符串
或者,将封装了父绝对路径的File对象传入第一个参数中:
1 File file1 = new File("D:/");
2 File file2 = new File(file1, "Demo.txt");//与上面那个有点区别,这个的第一个参数是File对象
提示:上面说过,Windows与Linux的文件分隔符是不一样的,所以我们在打印路径的时候就要区别对待。使用File.separator可以输出与系统有关的分隔符。静态成员,无需对象。
5.3 文件的创建、删除、判断与获取文件信息
5.3.1创建
1  public static void main(String[] args) throws IOException
2  {
3      File file = new File("D:/Demo.txt");
4      Boolean isCreate = file.createNewFile();
5      System.out.println("文件创建:" + isCreate);
6  }
将我们想操作的文件封装为对象之后,我们就可以对其进行操作了。.createNewFile()可以创建新文件,并返回是否创建成功。如果文件在创建前已经存在,则会创建失败。他是不会覆盖的。
将程序运行两次:


创建目录也差不多:
1  public static void main(String[] args) throws IOException
2  {
3      File file = new File("D:/123");
4      Boolean isCreate = file.mkdir();
5      System.out.println("目录创建:"+isCreate);
6  }
使用mkdir()创建一级目录。也就是说,我们不可以创建嵌套目录,这个方法创建的文件路径深度只能为1级。
要想创建多层目录,只需使用mkdirs()就可以了。
5.3.2 删除
删除主要有两个方法:delete(),deleteOnExit()。
1 public static void main(String[] args) throws IOException
2 {
3     File file = new File("D:/Demo.txt");
4     System.out.println(file.delete());
5 }
这个不需要多解释,返回值为是否删除成功。删除成功的前提是这个文件存在。
1 public static void main(String[] args) throws IOException
2 {
3     File file = new File("D:/Demo.txt");
4     file.deleteOnExit();
5     System.out.println(file.exists());
6
7 }
file.deleteOnExit()是在虚拟机退出时删除文件。可以看到,我在最后一句加上了file.exists(),这句话返回文件是否存在。打印结果为true,说明当时文件并没有被删除。
5.3.3 判断
file.exists():判断文件(路径)是否存在。
isFile():判断一个File对象封装的是否为文件
isDirectory():判断一个File对象封装的是否为文件路径
但是要注意,若文件(路径)不存在时,isFile(),isDirectory()也会返回false。所以在判断类型前要判断下是否存在。
isAbsolute():判断路径是否为绝对路径。
isHidden():判断文件是否为隐藏文件。
canExecute():判断文件是否可执行。
canRead():判断文件是否可读。
canWrite():判断文件是否可写。
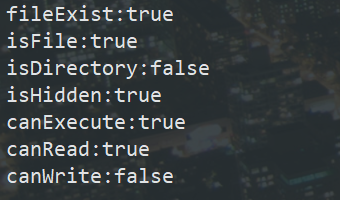
一个小例子演示下几个方法。
 1 public static void main(String[] args) throws IOException
 2 {
 3     File file = new File("D:/123.txt");
 4     System.out.println("fileExist:" + file.exists());
 5     System.out.println("isFile:" + file.isFile());
 6     System.out.println("isDirectory:" + file.isDirectory());
 7     System.out.println("isHidden:" + file.isHidden());
 8     System.out.println("canExecute:" + file.canExecute());
 9     System.out.println("canRead:" + file.canRead());
10     System.out.println("canWrite:" + file.canWrite());
11 }
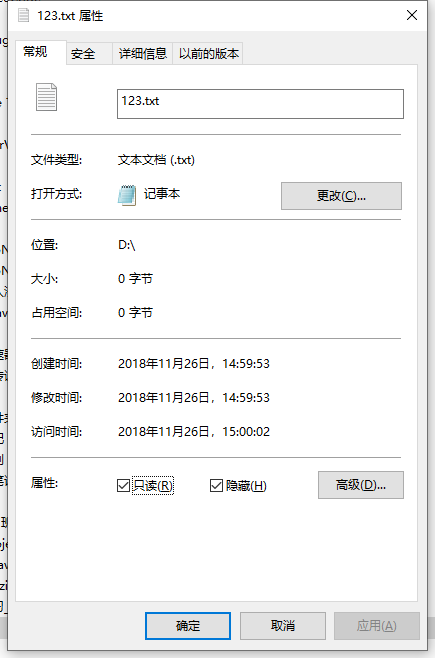
输出和文件属性:


5.3.4 获取信息
getName():获取文件(路径)名,返回值String
getParent():获取文件(路径)的父路径,返回值String。若为相对路径,返回null
getPath():获取文件(路径)的路径(定义的时候为抽象则返回抽象,绝对则为绝对),返回值String
getAbsolutePath():获取文件(路径)的绝对路径,返回值String
getAbsoluteFile():获取文件(路径)的绝对路径,返回值File对象。也就是说,这个方法将返回来的路径封装为了对象。
length():获取文件的大小。若为路径,则返回值不确定。返回值long。
lastModified():获取文件最后一次被修改的时间,返回值long。
 1 public static void main(String[] args) throws IOException
 2 {
 3     File file = new File("D:/123.txt");
 4     System.out.println("getName:" + file.getName());
 5     System.out.println("getParent:" + file.getParent());
 6     System.out.println("getPath:" + file.getPath());
 7     System.out.println("getAbsolutePath" + file.getAbsolutePath());
 8
 9     File file1 = file.getAbsoluteFile();
10     System.out.println("file1IsExists:" + file1.exists());
11
12     System.out.println("length:" + file.length());
13     System.out.println("lastModified:" + new Date(file.lastModified()));
14 }
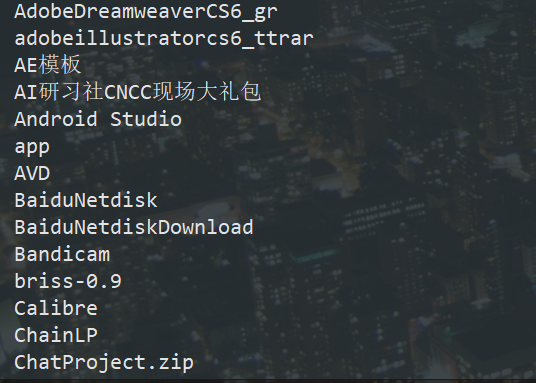
list():获取指定路径的文件列表,返回值String[]。该方法必须对路径进行操作。
listRoots():获取可用的文件系统根(翻译为人话就是C盘,D盘等等),返回值为File[]。
 1 public static void main(String[] args) throws IOException
 2 {
 3     File file=new File("D:/");
 4     String str[]=file.list();
 5     for (String s : str)
 6     {
 7         System.out.println(s);
 8     }
 9     File file1[] = file.listRoots();
10
11     for (File f : file1)
12     {
13         System.out.println(f);
14     }
15 }


list(FileNameFilter filter):有过滤器的list(),返回值String[]。
这个方法加一点说明,首先先上代码:
 1 public static void main(String[] args) throws IOException
 2 {
 3     File file = new File("D:/");
 4     String str[] = file.list(new FilenameFilter()
 5     {
 6         @Override
 7         public boolean accept(File dir, String name)
 8         {
 9             return name.contains("txt");
10         }
11     });
12     for (String s : str)
13     {
14         System.out.println(s);
15     }
16 }
这个方法里面有一个过滤器FileNameFilter,他是一个接口,所以我们使用匿名内部类来实现他,并重写其accept(File dir,String name)方法。其中,dir是文件的目录,name是文件的名称。
换句话说,这个过滤器会检查每个文件(夹),并将其路径和文件名传入dir和name中。在方法体内你可以加入自己的判断。返回值为boolean,true则进入String数组,false则不。我这里保留的是文件名包含"txt"的文件(夹)。
listFiles():获取路径下的所有文件。返回值File[]。若不是路径的对线,则返回null。
listFiles(FileNameFilter filter):有过滤器的listFiles(),返回值File[]。
这两个的使用与上面两个无二,不同的就是一个返回String,一个返回File[]。
5.4 递归获取、删除文件
先贴代码:
 1 public static void main(String[] args) throws IOException
 2 {
 3     File file = new File("C:/");
 4     ShowList(file);
 5 }
 6
 7 public static void ShowList(File file)
 8 {
 9     File file1[] = file.listFiles();
10     if(file1==null)
11         return;
12     //这两句很重要
13     for(int i=0;i<file1.length;i++)
14     {
15         if (file1[i].isFile())
16         {
17             System.out.println(file1[i]);
18         }else
19             ShowList(file1[i]);
20     }
21 }
首先获取文件路径下的文件列表并将其存在数组中,然后遍历每个数组元素,若为文件,则打印路径,否则继续递归获取路径下的文件列表。这个递归比较好理解,不再赘述,重点说下注释的两句:
系统中的一些文件是不让Java访问的,如果访问了就会返回null,程序就会抛出空指针异常(NullPointerException)。所以我们要避开这些目录或者文件。
和这个很相似,我们可以去删除一个路径下的指定规则的文件。
 1 public static void main(String[] args) throws IOException
 2 {
 3     File file = new File("C:/");
 4     RemoveList(file);
 5 }
 6
 7 public static void RemoveList(File file)
 8 {
 9     File file1[] = file.listFiles();
10     /*if(file1==null)
11         return;*/
12     //这两句很重要
13     for(int i=0;i<file1.length;i++)
14     {
15         if (file1[i].isFile())
16         {
17
18             System.out.println(file1[i].toString()+file1[i].delete());
19         }else
20             RemoveList(file1[i]);
21     }
22 }
这个就不执行了,因为Java删除文件是不进入回收站的,直接删。。
6 PrintWriter
PrintWriter是一个很神奇很强大的类,这个类可以将各种数据类型都原样打印,而不是以字节的形式表现的。这个类不会抛出IO异常。
这个方法的构造函数可以接收四种参数:
1.file对象
2.字符串路径。(String)
3.字节输出流。(OutputStream)
4.字符输出流。(Writer)
既然是一个打印流,那么我们就简单的输入一点数据,然后输出在控制台上。
 1 public static void main(String[] args)throws IOException
 2 {
 3     BufferedReader bufferedReader = new BufferedReader(new InputStreamReader(System.in));
 4
1 PrintWriter printWriter = new PrintWriter(System.out,true);
 5     String string=null;
 6     while ((string = bufferedReader.readLine()) != null)
 7     {
 8         printWriter.write(string);
 9         printWriter.flush();
10     }
11     printWriter.close();
12     bufferedReader.close();
13 }
几点说明:
1.第三行是我们前面说过的转换流,标准格式。转换完之后就是字符流了。
2.第四行传入的是标准输出流,输出到屏幕。
3.既然有缓冲字符流了,那就用readLine()最方便。因为每输入一次谁会在缓冲区中,所以要刷新一次。
我们也可以自己手动指定自动刷新的参数,方法就是在构造函数中加上true:
1 PrintWriter printWriter = new PrintWriter(System.out,true);
但是注意,要是自动刷新的话前一个参数必须是OutputStream及其子类(FileOutputStream,FileWriter),而且写入方法只能是print,println,format。
我们也可以将输入的数据输出到文件而不是屏幕:
 1  public static void main(String[] args)throws IOException
 2  {
 3      BufferedReader bufferedReader = new BufferedReader(new InputStreamReader(System.in));
 4      PrintWriter printWriter = new PrintWriter(new FileOutputStream("D:/123.txt"),true);
 5                                          //这里写FileWriter也可以。
 6      String string=null;
 7      while ((string = bufferedReader.readLine()) != null)
 8      {
 9          if (string.equals("exit"))
10          {
11              break;
12          }
13          printWriter.println(string);
14      }
15      printWriter.close();
16      bufferedReader.close();
17  }
7.对象的持久化存储
我们每运行一个程序,就会有一些对象创建并存放于堆内存中,随着程序的结束,这些对象也被从内存中清空。通过流的形式,我们可以将对象存放在文件中。
对象的持久化存储也叫做对象的序列化。
下面还是用代码说明下。
 1 package Practice;
 2
 3 import java.io.*;
 4
 5 public class IODemo
 6 {
 7     public static void main(String[] args)throws IOException
 8     {
 9         ObjectOutputStream objectOutputStream = new ObjectOutputStream(new FileOutputStream("D:/123.obj"));
10         Student student=new Student(12,"KangYH");
11         objectOutputStream.writeObject(student);
12         objectOutputStream.close();
13     }
14 }
15
16 class Student implements Serializable
17 {
18     private int age;
19     private String name;
20
21     public Student(int age, String name)
22     {
23         this.age = age;
24         this.name = name;
25     }
26 }
ObjectOutputStream的构造函数接收一个OutputStream,因为Object不是纯文本文件,所以这里用的是FileOutputStream。然后我们简单的创建了一个对象,并使用.writeObject(Object obj)来创建对象文件。
需要注意的是,并不是随便一个对象都可以被持久化,这个对象所属类必须实现Serializable接口(这个接口没有任何方法,只是起一个标记的作用)才行,否则抛出NotSerializableException异常。
与之对应的,ObjectInputStream就是读取对象的方法了。此时抛出的异常不再是IO异常而是ClassNotFoundException,因为文件中可能根本没有对象的信息。
 public static void main(String[] args)throws Exception
2 {
3     ObjectInputStream objectInputStream = new ObjectInputStream(new FileInputStream("D:/123.obj"));
4     Student student = (Student) objectInputStream.readObject();
5     System.out.println(student);
6     objectInputStream.close();
7 }
为了保持类与对象的唯一关联,在创建文件时会有一个serialVersionUID 的东西加进去,在读取对象文件时若当前类计算出的UID与文件的UID不一致,则会抛出异常。
比如,我把上面的类中的一个成员的权限修饰符进行改动,那么我就读不出来对象信息了,因为类被改动了,UID变了。
注意,静态是不能被序列化的。若想不序列化某一个非序列化成员,只需加一个关键字transident。
1 transient private int age;
8.管道流
以前我们操作读写流的时候并不能将读写直接进行对接,而是需要一个第三方文件来中转一下。为了能让读写直接对接,我们可以使用管道流。
管道流与多线程配合使用。

 1 class Read implements Runnable
 2 {
 3     private PipedInputStream pipedInputStream;
 4
 5     public Read(PipedInputStream pipedInputStream)
 6     {
 7         this.pipedInputStream = pipedInputStream;
 8     }
 9
10     @Override
11     public void run()
12     {
13         try
14         {
15             System.out.println("开始读取");
16             byte b[] = new byte[1024];
17             int len = pipedInputStream.read(b);
18             String str = new String(b, 0, len);
19             System.out.println(str);
20         } catch (IOException e)
21         {
22         }
23     }
24 }
25
26 class Write implements Runnable
27 {
28     public Write(PipedOutputStream pipedOutputStream)
29     {
30         this.pipedOutputStream = pipedOutputStream;
31     }
32
33     private PipedOutputStream pipedOutputStream;
34
35     @Override
36     public void run()
37     {
38         try
39         {
40             System.out.println("开始写入");
41             pipedOutputStream.write("1234".getBytes());
42             pipedOutputStream.close();
43         } catch (IOException e)
44         {
45         }
46     }
47 }
48
49 public class PipedStreamDemo
50 {
51     public static void main(String[] args) throws IOException
52     {
53         PipedOutputStream pipedOutputStream = new PipedOutputStream();
54         PipedInputStream pipedInputStream = new PipedInputStream();
55         pipedInputStream.connect(pipedOutputStream);
56         new Thread(new Read(pipedInputStream)).start();
57         new Thread(new Write(pipedOutputStream)).start();
58     }
59
60 }
既然是将读写进行联通,就要将输入管道流与输出管道流进行连接。使用pipedInputStream.connect(pipedOutputStream);当然,反过来也一样。
两个线程谁先执行并不重要,因为read()是阻塞式方法,没有数据时他会一直等待,知道有数据为止。
管道流并不复杂,不再赘述。
9.RandomAccessFile
这个类中封装了byte数组与文件指针,我们可以通过指针来对文件进行读写。
1 public static void main(String[] args)throws IOException
2 {
3     RandomAccessFile randomAccessFile = new RandomAccessFile("D:/123.txt", "rw");
4     randomAccessFile.write("hahaha哈哈哈哈".getBytes());
5     randomAccessFile.write(67);
6     randomAccessFile.close();
7 }
先看构造函数:第一个是文件,可以是File对象也可以是字符串路径。第二个是模式,rw表示为有读写权限,r表示为只读。若想对文件进行修改就一定注意权限要是rw。
传int型数据时,数据只向最低8位存放,其余的三个字节是空的,打印时数据可能在最低八位溢出(超出了byte的有效数据域),导致错误的结果。所以如果要存入特定类型的数据,我们要使用特定的方法:
writeInt();writeChar();writeBoolean()等等。
其次是写入write(),因为是以byte数组的形式存放的,所以要往里面传byte数组。在传入汉字的时候,可能会出现乱码的情况,因为一个汉字是占两个字节,读取的时候如果读了一半就会出现错误的输出。
为了避免这种情况,我们可以去手动调整指针,让存入的数据大小作为一个周期,换句话说就是每个数据占固定的字节数:
1 randomAccessFile.seek(8 * 2);
参数就是从文件开始向后偏移的字节数。我们通过这个操作,不仅可以向后添加数据,还可以更改现有的数据(每次都会从文件开头计算偏移量)。
我们也可以跳过指定字节数:
1 randomAccessFile.skipBytes(8 * 2);
每执行一次,指针就会向后偏移指定字节数。
10.DataStream
DataStream是专门用来读写特定数据的流对象。
 1 public static void main(String[] args) throws IOException
 2 {
 3     DataOutputStream dataOutputStream = new DataOutputStream(new FileOutputStream("D:/123.txt"));
 4     DataInputStream dataInputStream = new DataInputStream(new FileInputStream("D:/123.txt"));
 5     dataOutputStream.writeInt(789);
 6     dataOutputStream.writeBoolean(true);
 7     dataOutputStream.writeDouble(3.14159);
 8
 9     System.out.println(dataInputStream.readInt());
10     System.out.println(dataInputStream.readBoolean());
11     System.out.println(dataInputStream.readDouble());
12 }
要注意输出的顺序问题。如果将上面的输出调换顺序,会读出错误的结果。这也很好理解,数据是按照一定的字节数存入的,读取是当然也会按照规则读取。
对于IO流的总结应该是非常全面了,后续如果有其他内容再补充。
