一 . Java爬取B站弹幕
弹幕的存储位置

如何通过B站视频AV号找到弹幕对应的xml文件号
首先爬取视频网页,将对应视频网页源码获得

就可以找到该视频的av号aid=8678034
还有弹幕序号,cid=14295428
弹幕存放位置为 http://comment.bilibili.com/14295428.xml
 1 import org.apache.http.HttpEntity;
 2 import org.apache.http.client.methods.CloseableHttpResponse;
 3 import org.apache.http.client.methods.HttpGet;
 4 import org.apache.http.impl.client.CloseableHttpClient;
 5 import org.apache.http.impl.client.HttpClients;
 6 import org.apache.http.util.EntityUtils;
 7 import java.io.*;
 8 import java.net.URL;
 9 import java.util.regex.Matcher;
10 import java.util.regex.Pattern;
11
12 public class getBiliBiliBofqi {
13     public static boolean isInteger(String str) {
14         Pattern pattern = Pattern.compile("^[-\+]?[\d]*$");
15         return pattern.matcher(str).matches();
16     }
17     public static void getBofqi(String aid) throws Exception {
18         CloseableHttpClient closeableHttpClient = HttpClients.createDefault();
19         HttpGet httpGet = new HttpGet("https://www.bilibili.com/video/av" + aid + "/");
20         CloseableHttpResponse httpResponse = closeableHttpClient.execute(httpGet);
21         HttpEntity httpEntity = httpResponse.getEntity();
22         String en = EntityUtils.toString(httpEntity);
23         //"cid=16496518&aid=9979006&pre_ad="
24         String con = "cid=(.*)?&aid=";
25         Pattern ah = Pattern.compile(con);
26         Matcher mr = ah.matcher(en);
27         while (mr.find()) {
28             String id = mr.group();
29             // 解析弹幕xml文件
30             String newUrl = id.replace("cid=", "");
31             String x = newUrl.replace("&aid=", "");
32             if(!isInteger(x)){
33                 return ;
34             }
35             URL url  = new URL( "http://comment.bilibili.com/"+x+".xml" );
36             HttpGet httpGet1 = new HttpGet("http://comment.bilibili.com/"+x+".xml");
37             CloseableHttpResponse httpResponse1 = closeableHttpClient.execute(httpGet1) ;
38             HttpEntity httpEntity1 = httpResponse1.getEntity() ;
39             String en1 = EntityUtils.toString(httpEntity1,"utf-8") ;
40
41             String c = "">(.*?)<";
42             Pattern a = Pattern.compile(c);
43             Matcher m = a.matcher(en1);
44             RandomAccessFile randomAccessFile = new RandomAccessFile("E:\dan_"+x+".txt", "rw");
45             while (m.find()) {
46                 String speak = m.group().replace("">", "");
47                 speak = speak.replace("<", "");
48
49                 // 存储弹幕
50                 long len = randomAccessFile.length();
51                 randomAccessFile.seek(len);
52                 randomAccessFile.write(speak.getBytes());
53                 randomAccessFile.write("
".getBytes());
54                 System.out.println(speak);
55             }
56             randomAccessFile.write("
".getBytes());
57             randomAccessFile.close();
58         }
59     }
60     public static void main(String[] args) throws Exception {
61         getBofqi("16772795");
62         getBofqi("8542373");
63         getBofqi("5112921");
64         getBofqi("1747345");
65         getBofqi("2648921");
66         getBofqi("2333333");
67         getBofqi("3771373");
68         getBofqi("17224371");
69     }
70 }
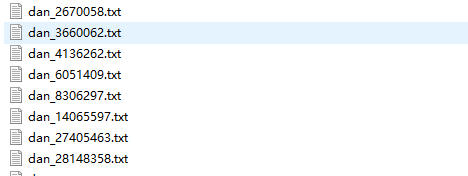
爬取的弹幕文件 :
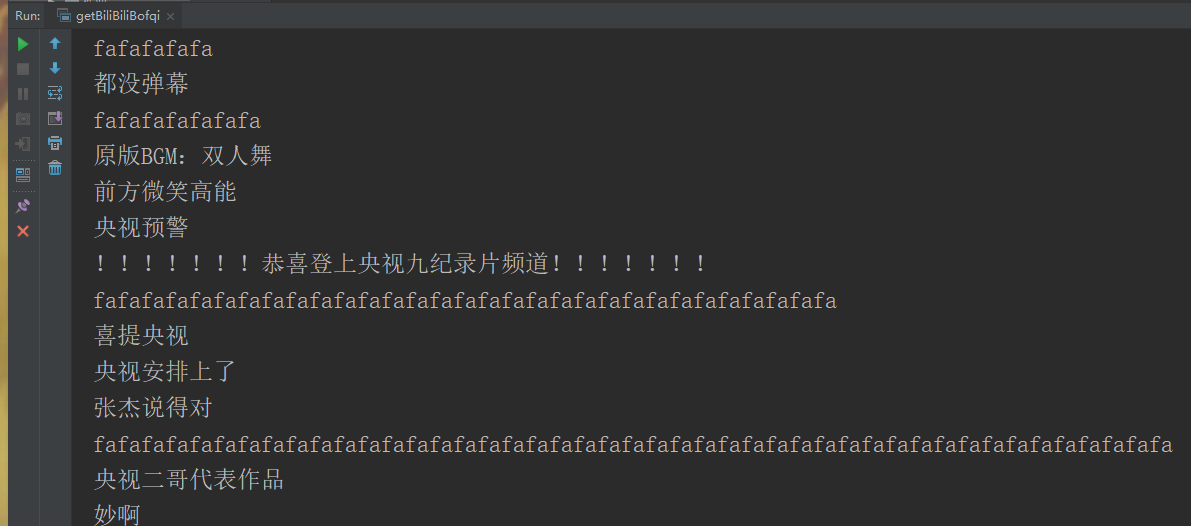
运行结果:
二 . Python云图Wordcloud生成弹幕词云
1      github:https://github.com/amueller/word_cloud
2      官方地址:https://amueller.github.io/word_cloud/

# coding: utf-8
import jieba
from scipy.misc import imread  # 这是一个处理图像的函数
from wordcloud import WordCloud, STOPWORDS, ImageColorGenerator
import matplotlib.pyplot as plt

back_color = imread('02.jpg')  # 解析该图片

wc = WordCloud(background_color='white',  # 背景颜色
               max_words=500,  # 最大词数
               #mask=back_color,  # 以该参数值作图绘制词云,这个参数不为空时,width和height会被忽略
               max_font_size=100,  # 显示字体的最大值
               stopwords=STOPWORDS.add('fa'),  # 使用内置的屏蔽词,再添加'苟利国'
               font_path="C:/Windows/Fonts/STFANGSO.ttf",  # 解决显示口字型乱码问题,可进入C:/Windows/Fonts/目录更换字体
               random_state=42,  # 为每个词返回一个PIL颜色
                 width=1000,  # 图片的宽
                 height=860  #图片的长
               )
# WordCloud各含义参数请点击 wordcloud参数

# 打开词源的文本文件
text = open('dan_6051409.txt').read()


# 该函数的作用就是把屏蔽词去掉,使用这个函数就不用在WordCloud参数中添加stopwords参数了
# 把你需要屏蔽的词全部放入一个stopwords文本文件里即可
def stop_words(texts):
    words_list = []
    word_generator = jieba.cut(texts, cut_all=False)  # 返回的是一个迭代器
    with open('stopwords.txt') as f:
        str_text = f.read()
        unicode_text = unicode(str_text, 'utf-8')  # 把str格式转成unicode格式
        f.close()  # stopwords文本中词的格式是'一词一行'
    for word in word_generator:
        if word.strip() not in unicode_text:
            words_list.append(word)
    return ' '.join(words_list)  # 注意是空格


text = stop_words(text)

wc.generate(text)
# 基于彩色图像生成相应彩色
image_colors = ImageColorGenerator(back_color)
# 显示图片
plt.imshow(wc)
# 关闭坐标轴
plt.axis('off')
# 绘制词云
plt.figure()
plt.imshow(wc.recolor(color_func=image_colors))
plt.axis('off')
# 保存图片
wc.to_file('1.png')
word_cloud 生成词云有两个方法。from text 和 from frequencies 。
即文本生成和频率生成,每一个都有对应的函数可以使用
1 generate(text)      Generate wordcloud from text.
2 generate_from_text(text)    Generate wordcloud from text.
3 generate_from_frequencies      Create a word_cloud from words and frequencies.
4 fit_words      Create a word_cloud from words and frequencies.
wordcloud包的基本用法
1 class wordcloud.WordCloud(font_path=None, width=400, height=200, margin=2,
2 ranks_only=None, prefer_horizontal=0.9,mask=None, scale=1, color_func=None,
3 max_words=200, min_font_size=4, stopwords=None, random_state=None,background_color='black',
4 max_font_size=None, font_step=1, mode='RGB', relative_scaling=0.5, regexp=None,
5 collocations=True,colormap=None, normalize_plurals=True)
font_path : string //字体路径,需要展现什么字体就把该字体路径+后缀名写上,如:font_path = '黑体.ttf'width : int (default=400) //输出的画布宽度,默认为400像素height : int (default=200) //输出的画布高度,默认为200像素prefer_horizontal : float (default=0.90) //词语水平方向排版出现的频率,默认 0.9 (所以词语垂直方向排版出现频率为 0.1 )mask : nd-array or None (default=None) //如果参数为空,则使用二维遮罩绘制词云。如果 mask 非空,设置的宽高值将被忽略,遮罩形状被 mask 取代。除全白(#FFFFFF)的部分将不会绘制,其余部分会用于绘制词云。如:bg_pic = imread('读取一张图片.png'),背景图片的画布一定要设置为白色(#FFFFFF),然后显示的形状为不是白色的其他颜色。可以用ps工具将自己要显示的形状复制到一个纯白色的画布上再保存,就ok了。scale : float (default=1) //按照比例进行放大画布,如设置为1.5,则长和宽都是原来画布的1.5倍。min_font_size : int (default=4) //显示的最小的字体大小font_step : int (default=1) //字体步长,如果步长大于1,会加快运算但是可能导致结果出现较大的误差。max_words : number (default=200) //要显示的词的最大个数stopwords : set of strings or None //设置需要屏蔽的词,如果为空,则使用内置的STOPWORDSbackground_color : color value (default=”black”) //背景颜色,如background_color='white',背景颜色为白色。max_font_size : int or None (default=None) //显示的最大的字体大小mode : string (default=”RGB”) //当参数为“RGBA”并且background_color不为空时,背景为透明。relative_scaling : float (default=.5) //词频和字体大小的关联性color_func : callable, default=None //生成新颜色的函数,如果为空,则使用 self.color_funcregexp : string or None (optional) //使用正则表达式分隔输入的文本collocations : bool, default=True //是否包括两个词的搭配colormap : string or matplotlib colormap, default=”viridis” //给每个单词随机分配颜色,若指定color_func,则忽略该方法。fit_words(frequencies) //根据词频生成词云【frequencies,为字典类型】generate(text) //根据文本生成词云generate_from_frequencies(frequencies[, ...]) //根据词频生成词云generate_from_text(text) //根据文本生成词云process_text(text) //将长文本分词并去除屏蔽词(此处指英语,中文分词还是需要自己用别的库先行实现,使用上面的 fit_words(frequencies) )recolor([random_state, color_func, colormap]) //对现有输出重新着色。重新上色会比重新生成整个词云快很多。to_array() //转化为 numpy arrayto_file(filename) //输出到文件