1、首先问自己一个问题,为啥要读SpringBoot源码呢?
像SpringBoot,你难道不好奇他的自动化配置、IOC和AOP的实现原理吗?
带着上面的问题,我们来Debug看看!
2、环境准备
Ⅰ、maven依赖关系(不同的SpringBoot版本、不同的依赖关系,运行结果会不一样,因为SpringBoot会自动配置)
<dependencies>
    <dependency>
        <groupId>org.springframework.boot</groupId>
        <artifactId>spring-boot-starter-data-redis</artifactId>
    </dependency>
    <dependency>
        <groupId>org.springframework.boot</groupId>
        <artifactId>spring-boot-starter-web</artifactId>
    </dependency>
    <dependency>
        <groupId>org.mybatis.spring.boot</groupId>
        <artifactId>mybatis-spring-boot-starter</artifactId>
        <version>2.1.4</version>
    </dependency>
    <dependency>
        <groupId>org.springframework.boot</groupId>
        <artifactId>spring-boot-starter-aop</artifactId>
    </dependency>
    <dependency>
        <groupId>io.springfox</groupId>
        <artifactId>springfox-boot-starter</artifactId>
        <version>3.0.0</version>
    </dependency>
    <dependency>
        <groupId>mysql</groupId>
        <artifactId>mysql-connector-java</artifactId>
        <scope>runtime</scope>
    </dependency>
    <dependency>
        <groupId>org.projectlombok</groupId>
        <artifactId>lombok</artifactId>
        <optional>true</optional>
    </dependency>
    <dependency>
        <groupId>cn.hutool</groupId>
        <artifactId>hutool-all</artifactId>
        <version>5.7.2</version>
    </dependency>
    <dependency>
        <groupId>com.baomidou</groupId>
        <artifactId>mybatis-plus-boot-starter</artifactId>
        <version>3.4.0</version>
    </dependency>
    <dependency>
        <groupId>com.baomidou</groupId>
        <artifactId>mybatis-plus-generator</artifactId>
        <version>3.4.0</version>
    </dependency>
    <dependency>
        <groupId>org.apache.commons</groupId>
        <artifactId>commons-pool2</artifactId>
        <version>2.10.0</version>
    </dependency>
    <dependency>
        <groupId>org.springframework.boot</groupId>
        <artifactId>spring-boot-starter-test</artifactId>
        <scope>test</scope>
    </dependency>
</dependencies>
Ⅱ、Debug前的准备
- clean
- compile
- install
3、开始调试
就像我们学习C语言时的HelloWorld一样,SpringBoot也有一个开场白:
package com.study.redis;

import org.springframework.boot.SpringApplication;
import org.springframework.boot.autoconfigure.SpringBootApplication;

/**
 * @author lemon
 */
@SpringBootApplication
public class RedisApplication {

    public static void main(String[] args) {
        SpringApplication.run(RedisApplication.class, args);
    }
}
然后我们Ctrl+鼠标左键点进SpringApplication的run方法可以看到下图:
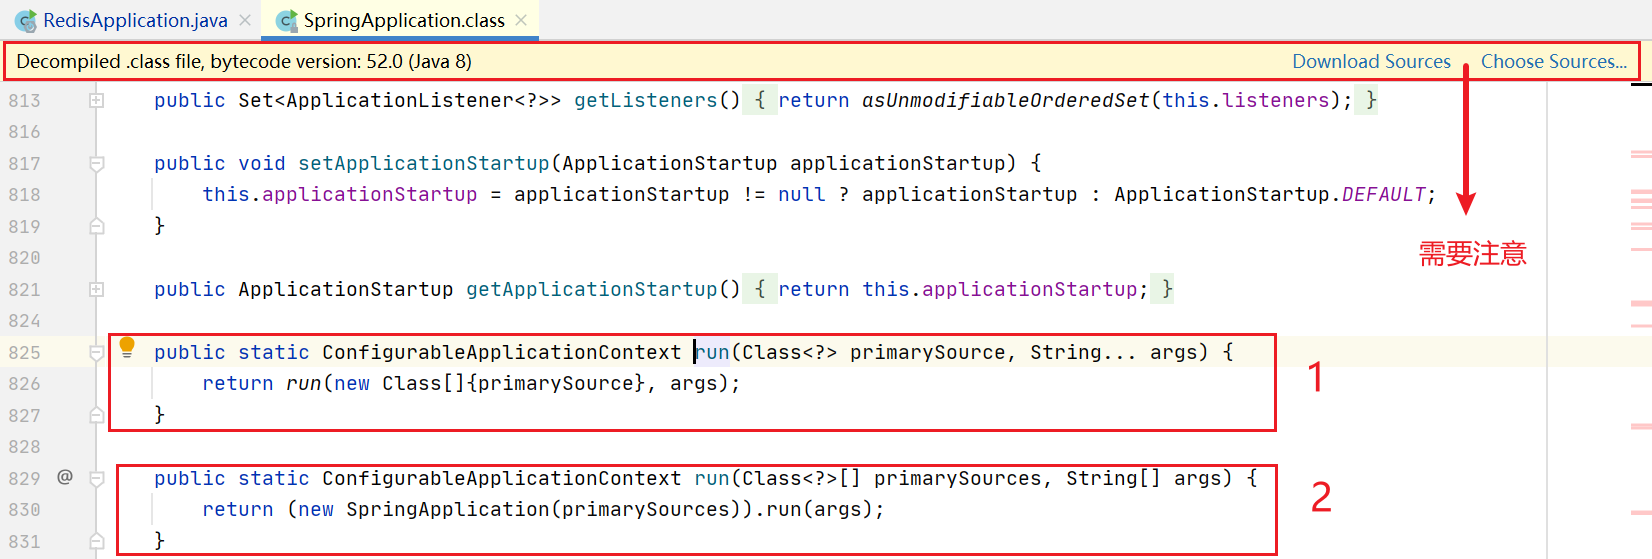
首先是调用形参为单个class的run方法,然后调用形参为class数组形式的run方法。
另外需要注意的是上面的那个Decompiled .class file,bytecode version: 52.0(Java 8) Download Sources Choose Sources...
为什么要注意这个呢,因为现在是对.class文件Debug,而不是Java文件,稍后Debug就会出现错误:
Source code does not match the byte code
我们选择Download Sources,如若有必要可以再Choose Sources,选择刚刚下载的Sources,然后就会看到带注释的方法了:
/**
     * Static helper that can be used to run a {@link SpringApplication} from the
     * specified source using default settings.
     * @param primarySource the primary source to load
     * @param args the application arguments (usually passed from a Java main method)
     * @return the running {@link ApplicationContext}
     */
    public static ConfigurableApplicationContext run(Class<?> primarySource, String... args) {
        return run(new Class<?>[] { primarySource }, args);
    }

    /**
     * Static helper that can be used to run a {@link SpringApplication} from the
     * specified sources using default settings and user supplied arguments.
     * @param primarySources the primary sources to load
     * @param args the application arguments (usually passed from a Java main method)
     * @return the running {@link ApplicationContext}
     */
    public static ConfigurableApplicationContext run(Class<?>[] primarySources, String[] args) {
        return new SpringApplication(primarySources).run(args);
    }
这里最终实例化了一个SpringApplication对象,并调用它的run方法,我们先看看初始化函数:
/**
     * Create a new {@link SpringApplication} instance. The application context will load
     * beans from the specified primary sources (see {@link SpringApplication class-level}
     * documentation for details. The instance can be customized before calling
     * {@link #run(String...)}.
     * @param primarySources the primary bean sources
     * @see #run(Class, String[])
     * @see #SpringApplication(ResourceLoader, Class...)
     * @see #setSources(Set)
     */
    public SpringApplication(Class<?>... primarySources) {
        this(null, primarySources);
    }

    /**
     * Create a new {@link SpringApplication} instance. The application context will load
     * beans from the specified primary sources (see {@link SpringApplication class-level}
     * documentation for details. The instance can be customized before calling
     * {@link #run(String...)}.
     * @param resourceLoader the resource loader to use
     * @param primarySources the primary bean sources
     * @see #run(Class, String[])
     * @see #setSources(Set)
     */
    @SuppressWarnings({ "unchecked", "rawtypes" })
    public SpringApplication(ResourceLoader resourceLoader, Class<?>... primarySources) {
        this.resourceLoader = resourceLoader;
        Assert.notNull(primarySources, "PrimarySources must not be null");
        this.primarySources = new LinkedHashSet<>(Arrays.asList(primarySources));
        this.webApplicationType = WebApplicationType.deduceFromClasspath();
        this.bootstrapRegistryInitializers = getBootstrapRegistryInitializersFromSpringFactories();
        setInitializers((Collection) getSpringFactoriesInstances(ApplicationContextInitializer.class));
        setListeners((Collection) getSpringFactoriesInstances(ApplicationListener.class));
        this.mainApplicationClass = deduceMainApplicationClass();
    }
初始化函数就先看到这儿,等要用的时候我们再回来看,接下来我们来看run方法:
/**
     * Run the Spring application, creating and refreshing a new
     * {@link ApplicationContext}.
     * @param args the application arguments (usually passed from a Java main method)
     * @return a running {@link ApplicationContext}
     */
    public ConfigurableApplicationContext run(String... args) {
        StopWatch stopWatch = new StopWatch();
        stopWatch.start();
        DefaultBootstrapContext bootstrapContext = createBootstrapContext();
        ConfigurableApplicationContext context = null;
        configureHeadlessProperty();
        SpringApplicationRunListeners listeners = getRunListeners(args);
        listeners.starting(bootstrapContext, this.mainApplicationClass);
        try {
            ApplicationArguments applicationArguments = new DefaultApplicationArguments(args);
            ConfigurableEnvironment environment = prepareEnvironment(listeners, bootstrapContext, applicationArguments);
            configureIgnoreBeanInfo(environment);
            Banner printedBanner = printBanner(environment);
            context = createApplicationContext();
            context.setApplicationStartup(this.applicationStartup);
            prepareContext(bootstrapContext, context, environment, listeners, applicationArguments, printedBanner);
            refreshContext(context);
            afterRefresh(context, applicationArguments);
            stopWatch.stop();
            if (this.logStartupInfo) {
                new StartupInfoLogger(this.mainApplicationClass).logStarted(getApplicationLog(), stopWatch);
            }
            listeners.started(context);
            callRunners(context, applicationArguments);
        }
        catch (Throwable ex) {
            handleRunFailure(context, ex, listeners);
            throw new IllegalStateException(ex);
        }

        try {
            listeners.running(context);
        }
        catch (Throwable ex) {
            handleRunFailure(context, ex, null);
            throw new IllegalStateException(ex);
        }
        return context;
    }
首先实例化了一个StopWatch对象:
/**
     * Construct a new {@code StopWatch}.
     * <p>Does not start any task.
     */
    public StopWatch() {
        this("");
    }

    /**
     * Construct a new {@code StopWatch} with the given ID.
     * <p>The ID is handy when we have output from multiple stop watches and need
     * to distinguish between them.
     * <p>Does not start any task.
     * @param id identifier for this stop watch
     */
    public StopWatch(String id) {
        this.id = id;
    }
然后调用了start方法,我们看看它的start方法干了啥:
/**
     * Start an unnamed task.
     * <p>The results are undefined if {@link #stop()} or timing methods are
     * called without invoking this method first.
     * @see #start(String)
     * @see #stop()
     */
    public void start() throws IllegalStateException {
        start("");
    }

    /**
     * Start a named task.
     * <p>The results are undefined if {@link #stop()} or timing methods are
     * called without invoking this method first.
     * @param taskName the name of the task to start
     * @see #start()
     * @see #stop()
     */
    public void start(String taskName) throws IllegalStateException {
        if (this.currentTaskName != null) {
            throw new IllegalStateException("Can't start StopWatch: it's already running");
        }
        this.currentTaskName = taskName;
        this.startTimeNanos = System.nanoTime();
    }
感觉啥也没干哈哈(菜鸟级理解)
接下来就是createBootstrapContext方法:
private DefaultBootstrapContext createBootstrapContext() {
        DefaultBootstrapContext bootstrapContext = new DefaultBootstrapContext();
        this.bootstrapRegistryInitializers.forEach((initializer) -> initializer.initialize(bootstrapContext));
        return bootstrapContext;
    }
首先实例化了一个DefaultBootstrapContext,调用的是默认的构造函数,无代码展示。
然后将bootstrapRegistryInitializer里面的每一个实例都初始化,那我们回来之前SpringApplication的构造函数:
this.bootstrapRegistryInitializers = getBootstrapRegistryInitializersFromSpringFactories();
@SuppressWarnings("deprecation")
    private List<BootstrapRegistryInitializer> getBootstrapRegistryInitializersFromSpringFactories() {
        ArrayList<BootstrapRegistryInitializer> initializers = new ArrayList<>();
        getSpringFactoriesInstances(Bootstrapper.class).stream()
                .map((bootstrapper) -> ((BootstrapRegistryInitializer) bootstrapper::initialize))
                .forEach(initializers::add);
        initializers.addAll(getSpringFactoriesInstances(BootstrapRegistryInitializer.class));
        return initializers;
    }
看到这个@SuppressWarnings("deprecation")注解,作者估计是不想用这个了吧。
可以看到initializers里面的元素都是从getSpringFactoriesInstances方法中来的:
private <T> Collection<T> getSpringFactoriesInstances(Class<T> type) {
        return getSpringFactoriesInstances(type, new Class<?>[] {});
    }
private <T> Collection<T> getSpringFactoriesInstances(Class<T> type, Class<?>[] parameterTypes, Object... args) {
        ClassLoader classLoader = getClassLoader();
        // Use names and ensure unique to protect against duplicates
        Set<String> names = new LinkedHashSet<>(SpringFactoriesLoader.loadFactoryNames(type, classLoader));
        List<T> instances = createSpringFactoriesInstances(type, parameterTypes, classLoader, args, names);
        AnnotationAwareOrderComparator.sort(instances);
        return instances;
    }
首先它实例化了一个类加载器,其实也就是下面这个:
Thread.currentThread().getContextClassLoader()
然后通过SpringFactoriesLoade的LoadFactoryNames方法实例实例化了一个Set<String>集合:
/**
     * Load the fully qualified class names of factory implementations of the
     * given type from {@value #FACTORIES_RESOURCE_LOCATION}, using the given
     * class loader.
     * <p>As of Spring Framework 5.3, if a particular implementation class name
     * is discovered more than once for the given factory type, duplicates will
     * be ignored.
     * @param factoryType the interface or abstract class representing the factory
     * @param classLoader the ClassLoader to use for loading resources; can be
     * {@code null} to use the default
     * @throws IllegalArgumentException if an error occurs while loading factory names
     * @see #loadFactories
     */
    public static List<String> loadFactoryNames(Class<?> factoryType, @Nullable ClassLoader classLoader) {
        ClassLoader classLoaderToUse = classLoader;
        if (classLoaderToUse == null) {
            classLoaderToUse = SpringFactoriesLoader.class.getClassLoader();
        }
        String factoryTypeName = factoryType.getName();
        return loadSpringFactories(classLoaderToUse).getOrDefault(factoryTypeName, Collections.emptyList());
    }
最终还是调用的loadSpringFactories方法:
private static Map<String, List<String>> loadSpringFactories(ClassLoader classLoader) {
        Map<String, List<String>> result = cache.get(classLoader);
        if (result != null) {
            return result;
        }

        result = new HashMap<>();
        try {
            Enumeration<URL> urls = classLoader.getResources(FACTORIES_RESOURCE_LOCATION);
            while (urls.hasMoreElements()) {
                URL url = urls.nextElement();
                UrlResource resource = new UrlResource(url);
                Properties properties = PropertiesLoaderUtils.loadProperties(resource);
                for (Map.Entry<?, ?> entry : properties.entrySet()) {
                    String factoryTypeName = ((String) entry.getKey()).trim();
                    String[] factoryImplementationNames =
                            StringUtils.commaDelimitedListToStringArray((String) entry.getValue());
                    for (String factoryImplementationName : factoryImplementationNames) {
                        result.computeIfAbsent(factoryTypeName, key -> new ArrayList<>())
                                .add(factoryImplementationName.trim());
                    }
                }
            }

            // Replace all lists with unmodifiable lists containing unique elements
            result.replaceAll((factoryType, implementations) -> implementations.stream().distinct()
                    .collect(Collectors.collectingAndThen(Collectors.toList(), Collections::unmodifiableList)));
            cache.put(classLoader, result);
        }
        catch (IOException ex) {
            throw new IllegalArgumentException("Unable to load factories from location [" +
                    FACTORIES_RESOURCE_LOCATION + "]", ex);
        }
        return result;
    }
我们先来看看cache是啥:
static final Map<ClassLoader, Map<String, List<String>>> cache = new ConcurrentReferenceHashMap<>();
很明细,里面是空的,接下来我们看看下面这句:
Enumeration<URL> urls = classLoader.getResources(FACTORIES_RESOURCE_LOCATION);
public static final String FACTORIES_RESOURCE_LOCATION = "META-INF/spring.factories";
通过Debug,我们得到如下结果:
算了,这个urls里面东西太多了,反正就是一些包相关信息,我们直接看result吧,反正信息都是从类加载器取出来的:
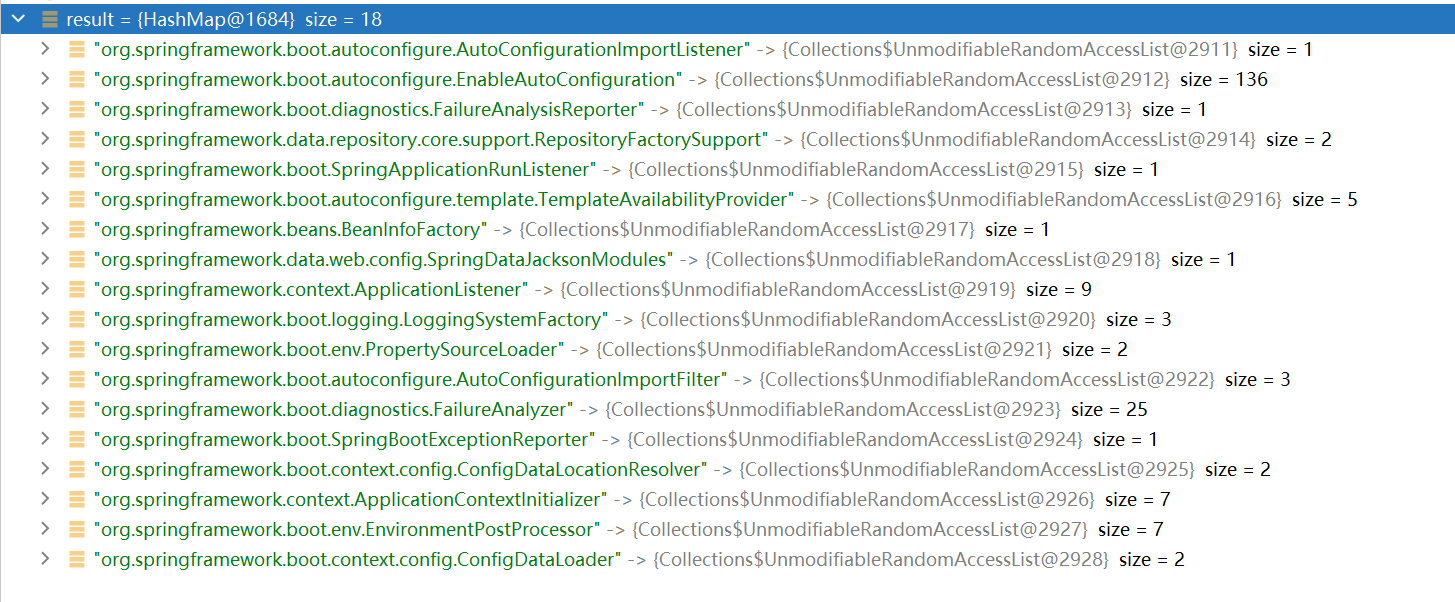
现在我们回到LoadFactoryNames方法,由于返回的result中没有对应Bootstrapper.class类型的键,所以返回一个空列表。
那我们再看看是否有对应的BootstrapRegistryInitializer.class类型的键,同样也没有。
所以初始化构造的bootstrapRegistryInitializer是一个空列表。

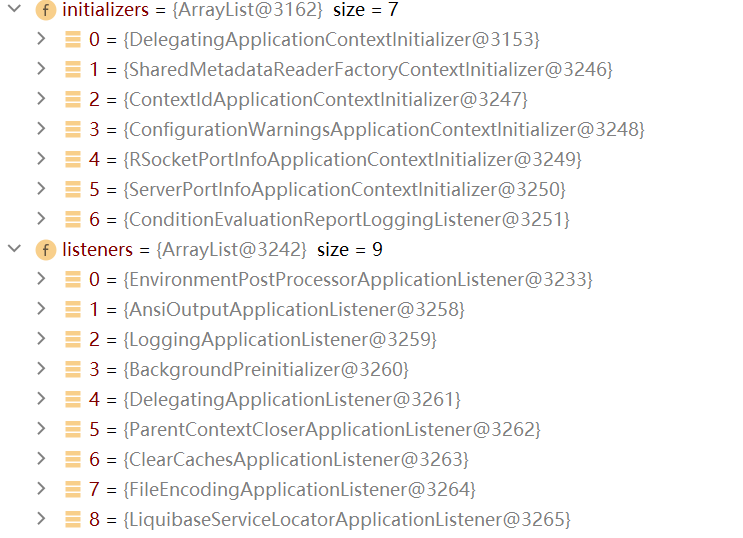
但是initializer和listeners有值:
接下来我们回到createBootstrapContext方法,由于bootstrapRegistryInitializer是一个空列表,
所以该方法相当于直接返回一个默认的DefaultBootstrapContext,没有做其他操作。
现在再回到run方法中的configureHeadlessProperty方法:
private void configureHeadlessProperty() {
        System.setProperty(SYSTEM_PROPERTY_JAVA_AWT_HEADLESS,
                System.getProperty(SYSTEM_PROPERTY_JAVA_AWT_HEADLESS, Boolean.toString(this.headless)));
    }
这一步就简单的设置一下系统所属性,接下来我们看看getRunListeners方法:
private SpringApplicationRunListeners getRunListeners(String[] args) {
        Class<?>[] types = new Class<?>[] { SpringApplication.class, String[].class };
        return new SpringApplicationRunListeners(logger,
                getSpringFactoriesInstances(SpringApplicationRunListener.class, types, this, args),
                this.applicationStartup);
    }
我们先看看构造函数:
SpringApplicationRunListeners(Log log, Collection<? extends SpringApplicationRunListener> listeners,
            ApplicationStartup applicationStartup) {
        this.log = log;
        this.listeners = new ArrayList<>(listeners);
        this.applicationStartup = applicationStartup;
    }
简单的赋值,没啥好说的,我们回到getSpringFactoriesInstances方法:
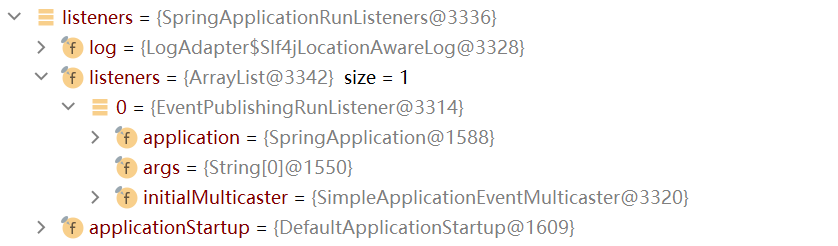
可以看到返回了一个listeners(EventPublishingRunlistener),这个我们稍后会用到。
接下来看看createSpringFactoriesInstances方法实例化对象:
@SuppressWarnings("unchecked")
    private <T> List<T> createSpringFactoriesInstances(Class<T> type, Class<?>[] parameterTypes,
            ClassLoader classLoader, Object[] args, Set<String> names) {
        List<T> instances = new ArrayList<>(names.size());
        for (String name : names) {
            try {
                Class<?> instanceClass = ClassUtils.forName(name, classLoader);
                Assert.isAssignable(type, instanceClass);
                Constructor<?> constructor = instanceClass.getDeclaredConstructor(parameterTypes);
                T instance = (T) BeanUtils.instantiateClass(constructor, args);
                instances.add(instance);
            }
            catch (Throwable ex) {
                throw new IllegalArgumentException("Cannot instantiate " + type + " : " + name, ex);
            }
        }
        return instances;
    }
可以看到是通过类路径和类加载器来实例化对象的,我们再回到run方法:(该listeners中包含一个EventPublishListener对象)
listeners.starting(bootstrapContext, this.mainApplicationClass);
void starting(ConfigurableBootstrapContext bootstrapContext, Class<?> mainApplicationClass) {
        doWithListeners("spring.boot.application.starting", (listener) -> listener.starting(bootstrapContext),
                (step) -> {
                    if (mainApplicationClass != null) {
                        step.tag("mainApplicationClass", mainApplicationClass.getName());
                    }
                });
    }
private void doWithListeners(String stepName, Consumer<SpringApplicationRunListener> listenerAction,
            Consumer<StartupStep> stepAction) {
        StartupStep step = this.applicationStartup.start(stepName);
        this.listeners.forEach(listenerAction);
        if (stepAction != null) {
            stepAction.accept(step);
        }
        step.end();
    }
通过调用listeners的start方法,最终调用该实例的的listeners的starting方法,我们再看看step干了啥:
private static final DefaultStartupStep DEFAULT_STARTUP_STEP = new DefaultStartupStep();

    @Override
    public DefaultStartupStep start(String name) {
        return DEFAULT_STARTUP_STEP;
    }
虽然方法名叫start,但是只是实例化一个DefaultStartupStep对象,接下来再看listener的starting方法(也就是EventPublishListener):
@Override
    public void starting(ConfigurableBootstrapContext bootstrapContext) {
        this.initialMulticaster
                .multicastEvent(new ApplicationStartingEvent(bootstrapContext, this.application, this.args));
    }
我们再看看EventPublishListener的构造函数,他的属性是怎么赋值的:
public EventPublishingRunListener(SpringApplication application, String[] args) {
        this.application = application;
        this.args = args;
        this.initialMulticaster = new SimpleApplicationEventMulticaster();
        for (ApplicationListener<?> listener : application.getListeners()) {
            this.initialMulticaster.addApplicationListener(listener);
        }
    }
可以看到initialMulticaster是SimpleApplicationEventMulticaster的实例,再看看ApplicationStartingEvent构造函数:
/**
     * Create a new {@link ApplicationStartingEvent} instance.
     * @param bootstrapContext the bootstrap context
     * @param application the current application
     * @param args the arguments the application is running with
     */
    public ApplicationStartingEvent(ConfigurableBootstrapContext bootstrapContext, SpringApplication application,
            String[] args) {
        super(application, args);
        this.bootstrapContext = bootstrapContext;
    }
反正就是构造一个实例就完了,那我们再回到initialMulticaster的multicasEvent方法:
@Override
    public void multicastEvent(ApplicationEvent event) {
        multicastEvent(event, resolveDefaultEventType(event));
    }
@Override
    public void multicastEvent(final ApplicationEvent event, @Nullable ResolvableType eventType) {
        ResolvableType type = (eventType != null ? eventType : resolveDefaultEventType(event));
        Executor executor = getTaskExecutor();
        for (ApplicationListener<?> listener : getApplicationListeners(event, type)) {
            if (executor != null) {
                executor.execute(() -> invokeListener(listener, event));
            }
            else {
                invokeListener(listener, event);
            }
        }
    }
event就是ApplicationStartingEvent的一个实例,由于SimpleApplicationEventMulticaster的构造函数如下:
/**
     * Create a new SimpleApplicationEventMulticaster.
     */
    public SimpleApplicationEventMulticaster() {
    }
所以Executor是空的,接下来我们看看getApplicationListeners方法:
    /**
     * Return a Collection of ApplicationListeners matching the given
     * event type. Non-matching listeners get excluded early.
     * @param event the event to be propagated. Allows for excluding
     * non-matching listeners early, based on cached matching information.
     * @param eventType the event type
     * @return a Collection of ApplicationListeners
     * @see org.springframework.context.ApplicationListener
     */
    protected Collection<ApplicationListener<?>> getApplicationListeners(
            ApplicationEvent event, ResolvableType eventType) {

        Object source = event.getSource();
        Class<?> sourceType = (source != null ? source.getClass() : null);
        ListenerCacheKey cacheKey = new ListenerCacheKey(eventType, sourceType);

        // Potential new retriever to populate
        CachedListenerRetriever newRetriever = null;

        // Quick check for existing entry on ConcurrentHashMap
        CachedListenerRetriever existingRetriever = this.retrieverCache.get(cacheKey);
        if (existingRetriever == null) {
            // Caching a new ListenerRetriever if possible
            if (this.beanClassLoader == null ||
                    (ClassUtils.isCacheSafe(event.getClass(), this.beanClassLoader) &&
                            (sourceType == null || ClassUtils.isCacheSafe(sourceType, this.beanClassLoader)))) {
                newRetriever = new CachedListenerRetriever();
                existingRetriever = this.retrieverCache.putIfAbsent(cacheKey, newRetriever);
                if (existingRetriever != null) {
                    newRetriever = null;  // no need to populate it in retrieveApplicationListeners
                }
            }
        }

        if (existingRetriever != null) {
            Collection<ApplicationListener<?>> result = existingRetriever.getApplicationListeners();
            if (result != null) {
                return result;
            }
            // If result is null, the existing retriever is not fully populated yet by another thread.
            // Proceed like caching wasn't possible for this current local attempt.
        }

        return retrieveApplicationListeners(eventType, sourceType, newRetriever);
    }
我们来看看对应的event、eventType是什么:
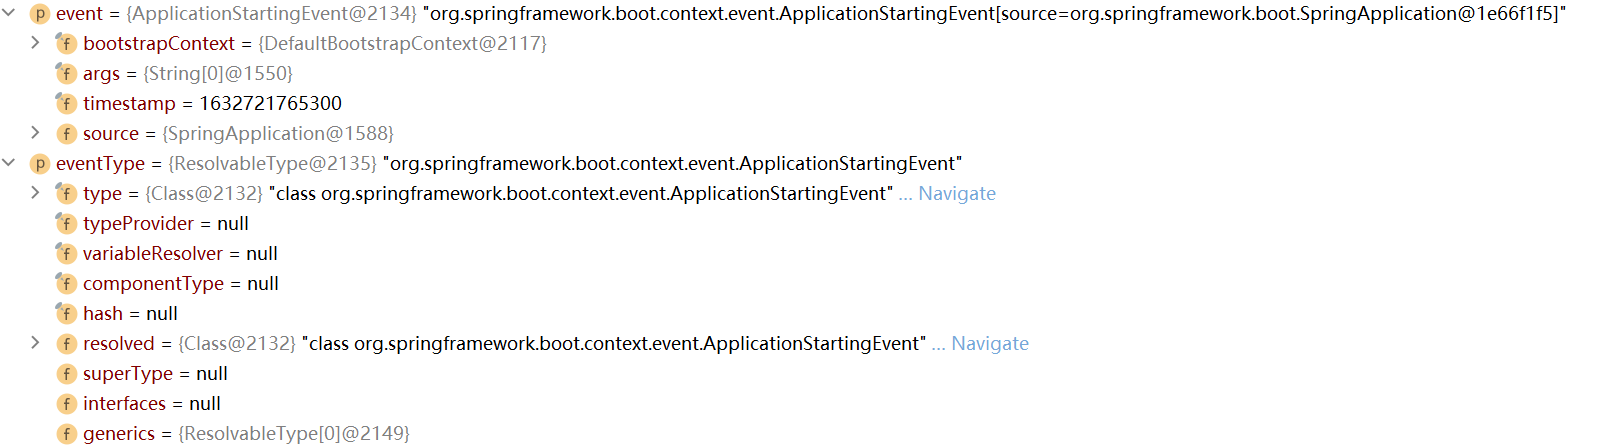
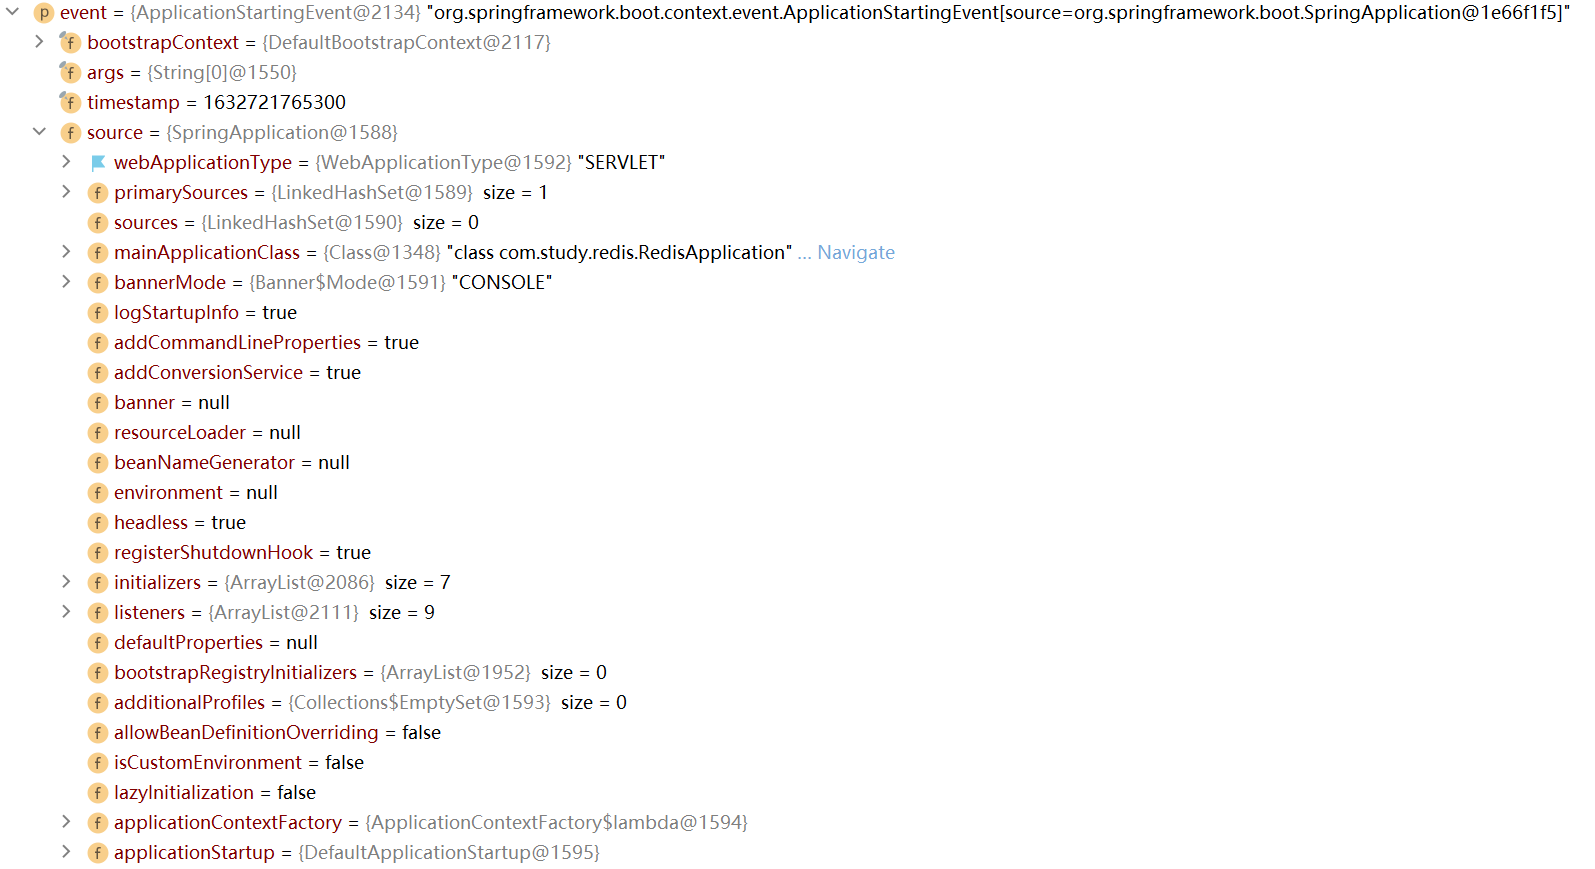
source就是之前构造的SpringApplication实例:
接下来根据eventType和sourceType创建了一个cacheKey:
public ListenerCacheKey(ResolvableType eventType, @Nullable Class<?> sourceType) {
            Assert.notNull(eventType, "Event type must not be null");
            this.eventType = eventType;
            this.sourceType = sourceType;
        }
就是简单的赋值,没啥好说的,然后根据该key获取一个值:
CachedListenerRetriever existingRetriever = this.retrieverCache.get(cacheKey);
final Map<ListenerCacheKey, CachedListenerRetriever> retrieverCache = new ConcurrentHashMap<>(64);
由于retrieverCache是一个空的ConcurrentHashMap(),为啥要用并发Map,我们先不管。
由于existingRetriever是空的,并且beanClassLoader也是空的,所以我们直接看retrieveApplicationListeners方法:
/**
     * Actually retrieve the application listeners for the given event and source type.
     * @param eventType the event type
     * @param sourceType the event source type
     * @param retriever the ListenerRetriever, if supposed to populate one (for caching purposes)
     * @return the pre-filtered list of application listeners for the given event and source type
     */
    private Collection<ApplicationListener<?>> retrieveApplicationListeners(
            ResolvableType eventType, @Nullable Class<?> sourceType, @Nullable CachedListenerRetriever retriever) {

        List<ApplicationListener<?>> allListeners = new ArrayList<>();
        Set<ApplicationListener<?>> filteredListeners = (retriever != null ? new LinkedHashSet<>() : null);
        Set<String> filteredListenerBeans = (retriever != null ? new LinkedHashSet<>() : null);

        Set<ApplicationListener<?>> listeners;
        Set<String> listenerBeans;
        synchronized (this.defaultRetriever) {
            listeners = new LinkedHashSet<>(this.defaultRetriever.applicationListeners);
            listenerBeans = new LinkedHashSet<>(this.defaultRetriever.applicationListenerBeans);
        }

        // Add programmatically registered listeners, including ones coming
        // from ApplicationListenerDetector (singleton beans and inner beans).
        for (ApplicationListener<?> listener : listeners) {
            if (supportsEvent(listener, eventType, sourceType)) {
                if (retriever != null) {
                    filteredListeners.add(listener);
                }
                allListeners.add(listener);
            }
        }

        // Add listeners by bean name, potentially overlapping with programmatically
        // registered listeners above - but here potentially with additional metadata.
        if (!listenerBeans.isEmpty()) {
            ConfigurableBeanFactory beanFactory = getBeanFactory();
            for (String listenerBeanName : listenerBeans) {
                try {
                    if (supportsEvent(beanFactory, listenerBeanName, eventType)) {
                        ApplicationListener<?> listener =
                                beanFactory.getBean(listenerBeanName, ApplicationListener.class);
                        if (!allListeners.contains(listener) && supportsEvent(listener, eventType, sourceType)) {
                            if (retriever != null) {
                                if (beanFactory.isSingleton(listenerBeanName)) {
                                    filteredListeners.add(listener);
                                }
                                else {
                                    filteredListenerBeans.add(listenerBeanName);
                                }
                            }
                            allListeners.add(listener);
                        }
                    }
                    else {
                        // Remove non-matching listeners that originally came from
                        // ApplicationListenerDetector, possibly ruled out by additional
                        // BeanDefinition metadata (e.g. factory method generics) above.
                        Object listener = beanFactory.getSingleton(listenerBeanName);
                        if (retriever != null) {
                            filteredListeners.remove(listener);
                        }
                        allListeners.remove(listener);
                    }
                }
                catch (NoSuchBeanDefinitionException ex) {
                    // Singleton listener instance (without backing bean definition) disappeared -
                    // probably in the middle of the destruction phase
                }
            }
        }

        AnnotationAwareOrderComparator.sort(allListeners);
        if (retriever != null) {
            if (filteredListenerBeans.isEmpty()) {
                retriever.applicationListeners = new LinkedHashSet<>(allListeners);
                retriever.applicationListenerBeans = filteredListenerBeans;
            }
            else {
                retriever.applicationListeners = filteredListeners;
                retriever.applicationListenerBeans = filteredListenerBeans;
            }
        }
        return allListeners;
    }
我们直接来到下面这段代码:
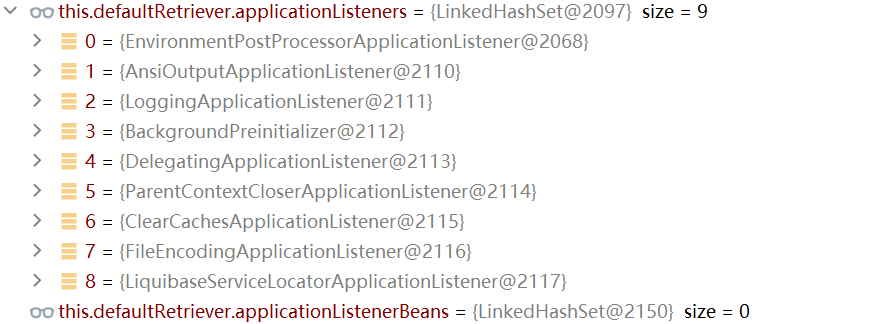
synchronized (this.defaultRetriever) {
            listeners = new LinkedHashSet<>(this.defaultRetriever.applicationListeners);
            listenerBeans = new LinkedHashSet<>(this.defaultRetriever.applicationListenerBeans);
        }
发现这个defaultRetriever.applicationListeners直接有值了
它是从哪儿来的呢?
private final DefaultListenerRetriever defaultRetriever = new DefaultListenerRetriever();
/**
     * Helper class that encapsulates a general set of target listeners.
     */
    private class DefaultListenerRetriever {

        public final Set<ApplicationListener<?>> applicationListeners = new LinkedHashSet<>();

        public final Set<String> applicationListenerBeans = new LinkedHashSet<>();

        public Collection<ApplicationListener<?>> getApplicationListeners() {
            List<ApplicationListener<?>> allListeners = new ArrayList<>(
                    this.applicationListeners.size() + this.applicationListenerBeans.size());
            allListeners.addAll(this.applicationListeners);
            if (!this.applicationListenerBeans.isEmpty()) {
                BeanFactory beanFactory = getBeanFactory();
                for (String listenerBeanName : this.applicationListenerBeans) {
                    try {
                        ApplicationListener<?> listener =
                                beanFactory.getBean(listenerBeanName, ApplicationListener.class);
                        if (!allListeners.contains(listener)) {
                            allListeners.add(listener);
                        }
                    }
                    catch (NoSuchBeanDefinitionException ex) {
                        // Singleton listener instance (without backing bean definition) disappeared -
                        // probably in the middle of the destruction phase
                    }
                }
            }
            AnnotationAwareOrderComparator.sort(allListeners);
            return allListeners;
        }
    }
这里我们并未找到该值的来源,那我们找一下哪些地方用到了这个defaultRetriever:
@Override
    public void addApplicationListener(ApplicationListener<?> listener) {
        synchronized (this.defaultRetriever) {
            // Explicitly remove target for a proxy, if registered already,
            // in order to avoid double invocations of the same listener.
            Object singletonTarget = AopProxyUtils.getSingletonTarget(listener);
            if (singletonTarget instanceof ApplicationListener) {
                this.defaultRetriever.applicationListeners.remove(singletonTarget);
            }
            this.defaultRetriever.applicationListeners.add(listener);
            this.retrieverCache.clear();
        }
    }
这里向里面添加listener的,我们再看看有那个地方调用了这个方法:
public EventPublishingRunListener(SpringApplication application, String[] args) {
        this.application = application;
        this.args = args;
        this.initialMulticaster = new SimpleApplicationEventMulticaster();
        for (ApplicationListener<?> listener : application.getListeners()) {
            this.initialMulticaster.addApplicationListener(listener);
        }
    }
发现原来是在最开始初始化EventPublishRunListener的时候添加的。
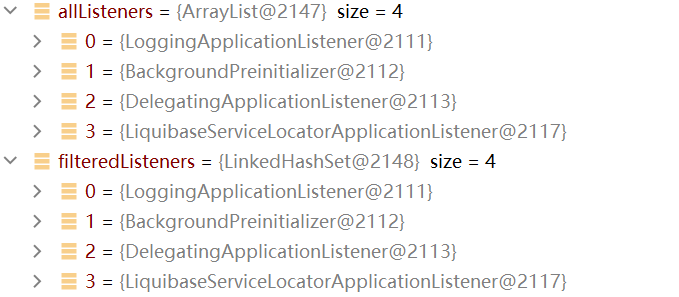
接下来就是判断是否支持事件,添加到对应的listeners中去,另外由于listenersBean是空的,所以没啥好说的。
我们直接看返回结果:
分析这么多,我们终于可以回到以下代码了:
@Override
    public void multicastEvent(final ApplicationEvent event, @Nullable ResolvableType eventType) {
        ResolvableType type = (eventType != null ? eventType : resolveDefaultEventType(event));
        Executor executor = getTaskExecutor();
        for (ApplicationListener<?> listener : getApplicationListeners(event, type)) {
            if (executor != null) {
                executor.execute(() -> invokeListener(listener, event));
            }
            else {
                invokeListener(listener, event);
            }
        }
    }
/**
     * Invoke the given listener with the given event.
     * @param listener the ApplicationListener to invoke
     * @param event the current event to propagate
     * @since 4.1
     */
    protected void invokeListener(ApplicationListener<?> listener, ApplicationEvent event) {
        ErrorHandler errorHandler = getErrorHandler();
        if (errorHandler != null) {
            try {
                doInvokeListener(listener, event);
            }
            catch (Throwable err) {
                errorHandler.handleError(err);
            }
        }
        else {
            doInvokeListener(listener, event);
        }
    }
@SuppressWarnings({"rawtypes", "unchecked"})
    private void doInvokeListener(ApplicationListener listener, ApplicationEvent event) {
        try {
            listener.onApplicationEvent(event);
        }
        catch (ClassCastException ex) {
            String msg = ex.getMessage();
            if (msg == null || matchesClassCastMessage(msg, event.getClass()) ||
                    (event instanceof PayloadApplicationEvent &&
                            matchesClassCastMessage(msg, ((PayloadApplicationEvent) event).getPayload().getClass()))) {
                // Possibly a lambda-defined listener which we could not resolve the generic event type for
                // -> let's suppress the exception.
                Log loggerToUse = this.lazyLogger;
                if (loggerToUse == null) {
                    loggerToUse = LogFactory.getLog(getClass());
                    this.lazyLogger = loggerToUse;
                }
                if (loggerToUse.isTraceEnabled()) {
                    loggerToUse.trace("Non-matching event type for listener: " + listener, ex);
                }
            }
            else {
                throw ex;
            }
        }
    }
最终调用的是onApplicationEvent方法,不同的listener该方法不一样:


以上就是为了让listeners跑起来,除了第一个初始化了日志系统,其他的执行都是false,啥也没干哈哈。
可能我想要的东西在下面,接下来我们看看run方法中try语句块的代码:
try {
            ApplicationArguments applicationArguments = new DefaultApplicationArguments(args);
            ConfigurableEnvironment environment = prepareEnvironment(listeners, bootstrapContext, applicationArguments);
            configureIgnoreBeanInfo(environment);
            Banner printedBanner = printBanner(environment);
            context = createApplicationContext();
            context.setApplicationStartup(this.applicationStartup);
            prepareContext(bootstrapContext, context, environment, listeners, applicationArguments, printedBanner);
            refreshContext(context);
            afterRefresh(context, applicationArguments);
            stopWatch.stop();
            if (this.logStartupInfo) {
                new StartupInfoLogger(this.mainApplicationClass).logStarted(getApplicationLog(), stopWatch);
            }
            listeners.started(context);
            callRunners(context, applicationArguments);
        }
        catch (Throwable ex) {
            handleRunFailure(context, ex, listeners);
            throw new IllegalStateException(ex);
        }

        try {
            listeners.running(context);
        }
        catch (Throwable ex) {
            handleRunFailure(context, ex, null);
            throw new IllegalStateException(ex);
        }
        return context;
我们先来看下DefaultApplicationArguments构造函数:
public DefaultApplicationArguments(String... args) {
        Assert.notNull(args, "Args must not be null");
        this.source = new Source(args);
        this.args = args;
    }
很简单的赋值函数,接下来我们看看prepareEnvironment方法:
private ConfigurableEnvironment prepareEnvironment(SpringApplicationRunListeners listeners,
            DefaultBootstrapContext bootstrapContext, ApplicationArguments applicationArguments) {
        // Create and configure the environment
        ConfigurableEnvironment environment = getOrCreateEnvironment();
        configureEnvironment(environment, applicationArguments.getSourceArgs());
        ConfigurationPropertySources.attach(environment);
        listeners.environmentPrepared(bootstrapContext, environment);
        DefaultPropertiesPropertySource.moveToEnd(environment);
        bindToSpringApplication(environment);
        if (!this.isCustomEnvironment) {
            environment = new EnvironmentConverter(getClassLoader()).convertEnvironmentIfNecessary(environment,
                    deduceEnvironmentClass());
        }
        ConfigurationPropertySources.attach(environment);
        return environment;
    }
我们看看environment是什么:
private ConfigurableEnvironment getOrCreateEnvironment() {
        if (this.environment != null) {
            return this.environment;
        }
        switch (this.webApplicationType) {
        case SERVLET:
            return new StandardServletEnvironment();
        case REACTIVE:
            return new StandardReactiveWebEnvironment();
        default:
            return new StandardEnvironment();
        }
    }
首先我们先回到SpringApplication的构造函数:
/**
     * Create a new {@link SpringApplication} instance. The application context will load
     * beans from the specified primary sources (see {@link SpringApplication class-level}
     * documentation for details. The instance can be customized before calling
     * {@link #run(String...)}.
     * @param resourceLoader the resource loader to use
     * @param primarySources the primary bean sources
     * @see #run(Class, String[])
     * @see #setSources(Set)
     */
    @SuppressWarnings({ "unchecked", "rawtypes" })
    public SpringApplication(ResourceLoader resourceLoader, Class<?>... primarySources) {
        this.resourceLoader = resourceLoader;
        Assert.notNull(primarySources, "PrimarySources must not be null");
        this.primarySources = new LinkedHashSet<>(Arrays.asList(primarySources));
        this.webApplicationType = WebApplicationType.deduceFromClasspath();
        this.bootstrapRegistryInitializers = getBootstrapRegistryInitializersFromSpringFactories();
        setInitializers((Collection) getSpringFactoriesInstances(ApplicationContextInitializer.class));
        setListeners((Collection) getSpringFactoriesInstances(ApplicationListener.class));
        this.mainApplicationClass = deduceMainApplicationClass();
    }
并没有初始化environment,也没有默认值,从之前Debud的结果也可以看出来,我们看看deduceFromClasspath方法:
static WebApplicationType deduceFromClasspath() {
        if (ClassUtils.isPresent(WEBFLUX_INDICATOR_CLASS, null) && !ClassUtils.isPresent(WEBMVC_INDICATOR_CLASS, null)
                && !ClassUtils.isPresent(JERSEY_INDICATOR_CLASS, null)) {
            return WebApplicationType.REACTIVE;
        }
        for (String className : SERVLET_INDICATOR_CLASSES) {
            if (!ClassUtils.isPresent(className, null)) {
                return WebApplicationType.NONE;
            }
        }
        return WebApplicationType.SERVLET;
    }
反正这个也是通过ClassUtils来判断环境是啥,最后返回的是WebApplicationType.SERVLET。
接下来看看configureEnvironment方法:
/**
     * Template method delegating to
     * {@link #configurePropertySources(ConfigurableEnvironment, String[])} and
     * {@link #configureProfiles(ConfigurableEnvironment, String[])} in that order.
     * Override this method for complete control over Environment customization, or one of
     * the above for fine-grained control over property sources or profiles, respectively.
     * @param environment this application's environment
     * @param args arguments passed to the {@code run} method
     * @see #configureProfiles(ConfigurableEnvironment, String[])
     * @see #configurePropertySources(ConfigurableEnvironment, String[])
     */
    protected void configureEnvironment(ConfigurableEnvironment environment, String[] args) {
        if (this.addConversionService) {
            ConversionService conversionService = ApplicationConversionService.getSharedInstance();
            environment.setConversionService((ConfigurableConversionService) conversionService);
        }
        configurePropertySources(environment, args);
        configureProfiles(environment, args);
    }
由于addConversionService默认是true,我们接下来看看getSharedInstance方法:
/**
     * Return a shared default application {@code ConversionService} instance, lazily
     * building it once needed.
     * <p>
     * Note: This method actually returns an {@link ApplicationConversionService}
     * instance. However, the {@code ConversionService} signature has been preserved for
     * binary compatibility.
     * @return the shared {@code ApplicationConversionService} instance (never
     * {@code null})
     */
    public static ConversionService getSharedInstance() {
        ApplicationConversionService sharedInstance = ApplicationConversionService.sharedInstance;
        if (sharedInstance == null) {
            synchronized (ApplicationConversionService.class) {
                sharedInstance = ApplicationConversionService.sharedInstance;
                if (sharedInstance == null) {
                    sharedInstance = new ApplicationConversionService();
                    ApplicationConversionService.sharedInstance = sharedInstance;
                }
            }
        }
        return sharedInstance;
    }
private static volatile ApplicationConversionService sharedInstance;
既然该方法用到了锁,我们就当他是线程安全的方法来分析:(对sharedInstance读和写只在这个方法里)
为什么这里在锁后要再读一次呢,因为最先获取锁的线程初始化过了,所以不用再初始化。
public ApplicationConversionService() {
        this(null);
    }
public ApplicationConversionService(StringValueResolver embeddedValueResolver) {
        if (embeddedValueResolver != null) {
            setEmbeddedValueResolver(embeddedValueResolver);
        }
        configure(this);
    }
/**
     * Configure the given {@link FormatterRegistry} with formatters and converters
     * appropriate for most Spring Boot applications.
     * @param registry the registry of converters to add to (must also be castable to
     * ConversionService, e.g. being a {@link ConfigurableConversionService})
     * @throws ClassCastException if the given FormatterRegistry could not be cast to a
     * ConversionService
     */
    public static void configure(FormatterRegistry registry) {
        DefaultConversionService.addDefaultConverters(registry);
        DefaultFormattingConversionService.addDefaultFormatters(registry);
        addApplicationFormatters(registry);
        addApplicationConverters(registry);
    }
反正就是初始化一个格式转换器,具体干嘛用的也不知道,看下一行代码吧:
/**
     * Add, remove or re-order any {@link PropertySource}s in this application's
     * environment.
     * @param environment this application's environment
     * @param args arguments passed to the {@code run} method
     * @see #configureEnvironment(ConfigurableEnvironment, String[])
     */
    protected void configurePropertySources(ConfigurableEnvironment environment, String[] args) {
        MutablePropertySources sources = environment.getPropertySources();
        if (!CollectionUtils.isEmpty(this.defaultProperties)) {
            DefaultPropertiesPropertySource.addOrMerge(this.defaultProperties, sources);
        }
        if (this.addCommandLineProperties && args.length > 0) {
            String name = CommandLinePropertySource.COMMAND_LINE_PROPERTY_SOURCE_NAME;
            if (sources.contains(name)) {
                PropertySource<?> source = sources.get(name);
                CompositePropertySource composite = new CompositePropertySource(name);
                composite.addPropertySource(
                        new SimpleCommandLinePropertySource("springApplicationCommandLineArgs", args));
                composite.addPropertySource(source);
                sources.replace(name, composite);
            }
            else {
                sources.addFirst(new SimpleCommandLinePropertySource(args));
            }
        }
    }
这个函数由于都是false,相当于什么都没执行,configureProfiles方法是个空函数,我们回到attach方法:
/**
     * Attach a {@link ConfigurationPropertySource} support to the specified
     * {@link Environment}. Adapts each {@link PropertySource} managed by the environment
     * to a {@link ConfigurationPropertySource} and allows classic
     * {@link PropertySourcesPropertyResolver} calls to resolve using
     * {@link ConfigurationPropertyName configuration property names}.
     * <p>
     * The attached resolver will dynamically track any additions or removals from the
     * underlying {@link Environment} property sources.
     * @param environment the source environment (must be an instance of
     * {@link ConfigurableEnvironment})
     * @see #get(Environment)
     */
    public static void attach(Environment environment) {
        Assert.isInstanceOf(ConfigurableEnvironment.class, environment);
        MutablePropertySources sources = ((ConfigurableEnvironment) environment).getPropertySources();
        PropertySource<?> attached = sources.get(ATTACHED_PROPERTY_SOURCE_NAME);
        if (attached != null && attached.getSource() != sources) {
            sources.remove(ATTACHED_PROPERTY_SOURCE_NAME);
            attached = null;
        }
        if (attached == null) {
            sources.addFirst(new ConfigurationPropertySourcesPropertySource(ATTACHED_PROPERTY_SOURCE_NAME,
                    new SpringConfigurationPropertySources(sources)));
        }
    }
oh,shit English,what's mean?大致意思好像是适配环境的,跳过:
void environmentPrepared(ConfigurableBootstrapContext bootstrapContext, ConfigurableEnvironment environment) {
        doWithListeners("spring.boot.application.environment-prepared",
                (listener) -> listener.environmentPrepared(bootstrapContext, environment));
    }
private void doWithListeners(String stepName, Consumer<SpringApplicationRunListener> listenerAction) {
        doWithListeners(stepName, listenerAction, null);
    }
private void doWithListeners(String stepName, Consumer<SpringApplicationRunListener> listenerAction,
            Consumer<StartupStep> stepAction) {
        StartupStep step = this.applicationStartup.start(stepName);
        this.listeners.forEach(listenerAction);
        if (stepAction != null) {
            stepAction.accept(step);
        }
        step.end();
    }
仿佛又回到了原来的方法,只是稍有变动:
@Override
    public void environmentPrepared(ConfigurableBootstrapContext bootstrapContext,
            ConfigurableEnvironment environment) {
        this.initialMulticaster.multicastEvent(
                new ApplicationEnvironmentPreparedEvent(bootstrapContext, this.application, this.args, environment));
    }
@Override
    public void multicastEvent(ApplicationEvent event) {
        multicastEvent(event, resolveDefaultEventType(event));
    }

    @Override
    public void multicastEvent(final ApplicationEvent event, @Nullable ResolvableType eventType) {
        ResolvableType type = (eventType != null ? eventType : resolveDefaultEventType(event));
        Executor executor = getTaskExecutor();
        for (ApplicationListener<?> listener : getApplicationListeners(event, type)) {
            if (executor != null) {
                executor.execute(() -> invokeListener(listener, event));
            }
            else {
                invokeListener(listener, event);
            }
        }
    }
不过最终都是调用的multicastEvent方法,我们直接看getApplicationListeners的返回结果吧:

这次返回了六个listener,比上次多两个,而且有重复的,最后还是调用这个方法:
@SuppressWarnings({"rawtypes", "unchecked"})
    private void doInvokeListener(ApplicationListener listener, ApplicationEvent event) {
        try {
            listener.onApplicationEvent(event);
        }
        catch (ClassCastException ex) {
            String msg = ex.getMessage();
            if (msg == null || matchesClassCastMessage(msg, event.getClass()) ||
                    (event instanceof PayloadApplicationEvent &&
                            matchesClassCastMessage(msg, ((PayloadApplicationEvent) event).getPayload().getClass()))) {
                // Possibly a lambda-defined listener which we could not resolve the generic event type for
                // -> let's suppress the exception.
                Log loggerToUse = this.lazyLogger;
                if (loggerToUse == null) {
                    loggerToUse = LogFactory.getLog(getClass());
                    this.lazyLogger = loggerToUse;
                }
                if (loggerToUse.isTraceEnabled()) {
                    loggerToUse.trace("Non-matching event type for listener: " + listener, ex);
                }
            }
            else {
                throw ex;
            }
        }
    }
environment这一块我们就不看了吧,现在直接看banner:
private Banner printBanner(ConfigurableEnvironment environment) {
        if (this.bannerMode == Banner.Mode.OFF) {
            return null;
        }
        ResourceLoader resourceLoader = (this.resourceLoader != null) ? this.resourceLoader
                : new DefaultResourceLoader(null);
        SpringApplicationBannerPrinter bannerPrinter = new SpringApplicationBannerPrinter(resourceLoader, this.banner);
        if (this.bannerMode == Mode.LOG) {
            return bannerPrinter.print(environment, this.mainApplicationClass, logger);
        }
        return bannerPrinter.print(environment, this.mainApplicationClass, System.out);
    }
由于默认bannerMode为Banner.Mode.CONSOLE,并且resourceLoader为空,resourceLoaser为DefaultResourceLoader。
Banner print(Environment environment, Class<?> sourceClass, PrintStream out) {
        Banner banner = getBanner(environment);
        banner.printBanner(environment, sourceClass, out);
        return new PrintedBanner(banner, sourceClass);
    }
private Banner getBanner(Environment environment) {
        Banners banners = new Banners();
        banners.addIfNotNull(getImageBanner(environment));
        banners.addIfNotNull(getTextBanner(environment));
        if (banners.hasAtLeastOneBanner()) {
            return banners;
        }
        if (this.fallbackBanner != null) {
            return this.fallbackBanner;
        }
        return DEFAULT_BANNER;
    }
如果是图片的话:
private Banner getImageBanner(Environment environment) {
        String location = environment.getProperty(BANNER_IMAGE_LOCATION_PROPERTY);
        if (StringUtils.hasLength(location)) {
            Resource resource = this.resourceLoader.getResource(location);
            return resource.exists() ? new ImageBanner(resource) : null;
        }
        for (String ext : IMAGE_EXTENSION) {
            Resource resource = this.resourceLoader.getResource("banner." + ext);
            if (resource.exists()) {
                return new ImageBanner(resource);
            }
        }
        return null;
    }
static final String BANNER_IMAGE_LOCATION_PROPERTY = "spring.banner.image.location";
可以通过配置文件路径或者在resource目录下新建一个名为banner,后缀只能为gif、jpg、png的图片。
如果是文本的话:
private Banner getTextBanner(Environment environment) {
        String location = environment.getProperty(BANNER_LOCATION_PROPERTY, DEFAULT_BANNER_LOCATION);
        Resource resource = this.resourceLoader.getResource(location);
        try {
            if (resource.exists() && !resource.getURL().toExternalForm().contains("liquibase-core")) {
                return new ResourceBanner(resource);
            }
        }
        catch (IOException ex) {
            // Ignore
        }
        return null;
    }
static final String BANNER_LOCATION_PROPERTY = "spring.banner.location";
static final String DEFAULT_BANNER_LOCATION = "banner.txt";
也可以通过配置文件路径或者在resource目录下新建一个banner.txt文件。
如果都没有配置并且fallBackBanner为空的话,就返回默认的Banner:
private static final Banner DEFAULT_BANNER = new SpringBootBanner();
我们看看默认的banner的printBanner方法:
@Override
    public void printBanner(Environment environment, Class<?> sourceClass, PrintStream printStream) {
        for (String line : BANNER) {
            printStream.println(line);
        }
        String version = SpringBootVersion.getVersion();
        version = (version != null) ? " (v" + version + ")" : "";
        StringBuilder padding = new StringBuilder();
        while (padding.length() < STRAP_LINE_SIZE - (version.length() + SPRING_BOOT.length())) {
            padding.append(" ");
        }

        printStream.println(AnsiOutput.toString(AnsiColor.GREEN, SPRING_BOOT, AnsiColor.DEFAULT, padding.toString(),
                AnsiStyle.FAINT, version));
        printStream.println();
    }
private static final String[] BANNER = { "", "  .   ____          _            __ _ _",
            " /\\ / ___'_ __ _ _(_)_ __  __ _ \ \ \ \", "( ( )\___ | '_ | '_| | '_ \/ _` | \ \ \ \",
            " \\/  ___)| |_)| | | | | || (_| |  ) ) ) )", "  '  |____| .__|_| |_|_| |_\__, | / / / /",
            " =========|_|==============|___/=/_/_/_/" };

    private static final String SPRING_BOOT = " :: Spring Boot :: ";
Banner介绍完了,我们接下来看看createApplicationContext方法:
/**
     * Strategy method used to create the {@link ApplicationContext}. By default this
     * method will respect any explicitly set application context class or factory before
     * falling back to a suitable default.
     * @return the application context (not yet refreshed)
     * @see #setApplicationContextClass(Class)
     * @see #setApplicationContextFactory(ApplicationContextFactory)
     */
    protected ConfigurableApplicationContext createApplicationContext() {
        return this.applicationContextFactory.create(this.webApplicationType);
    }
最终跳到这个接口方法中:
/**
     * A default {@link ApplicationContextFactory} implementation that will create an
     * appropriate context for the {@link WebApplicationType}.
     */
    ApplicationContextFactory DEFAULT = (webApplicationType) -> {
        try {
            switch (webApplicationType) {
            case SERVLET:
                return new AnnotationConfigServletWebServerApplicationContext();
            case REACTIVE:
                return new AnnotationConfigReactiveWebServerApplicationContext();
            default:
                return new AnnotationConfigApplicationContext();
            }
        }
        catch (Exception ex) {
            throw new IllegalStateException("Unable create a default ApplicationContext instance, "
                    + "you may need a custom ApplicationContextFactory", ex);
        }
    };
为什么会跳到这个接口方法中呢,因为这个applicationContextFactory指向的就是上面的方法,这个方法名应该可以随便取吧!
private ApplicationContextFactory applicationContextFactory = ApplicationContextFactory.DEFAULT;
因为webApplicationType是SERVLET,所以返回WebServerApplicationContext上下文。
接下来我们看prepareContext方法:
private void prepareContext(DefaultBootstrapContext bootstrapContext, ConfigurableApplicationContext context,
            ConfigurableEnvironment environment, SpringApplicationRunListeners listeners,
            ApplicationArguments applicationArguments, Banner printedBanner) {
        context.setEnvironment(environment);
        postProcessApplicationContext(context);
        applyInitializers(context);
        listeners.contextPrepared(context);
        bootstrapContext.close(context);
        if (this.logStartupInfo) {
            logStartupInfo(context.getParent() == null);
            logStartupProfileInfo(context);
        }
        // Add boot specific singleton beans
        ConfigurableListableBeanFactory beanFactory = context.getBeanFactory();
        beanFactory.registerSingleton("springApplicationArguments", applicationArguments);
        if (printedBanner != null) {
            beanFactory.registerSingleton("springBootBanner", printedBanner);
        }
        if (beanFactory instanceof DefaultListableBeanFactory) {
            ((DefaultListableBeanFactory) beanFactory)
                    .setAllowBeanDefinitionOverriding(this.allowBeanDefinitionOverriding);
        }
        if (this.lazyInitialization) {
            context.addBeanFactoryPostProcessor(new LazyInitializationBeanFactoryPostProcessor());
        }
        // Load the sources
        Set<Object> sources = getAllSources();
        Assert.notEmpty(sources, "Sources must not be empty");
        load(context, sources.toArray(new Object[0]));
        listeners.contextLoaded(context);
    }
我们直接看到postProcessApplicationContext方法:
/**
     * Apply any relevant post processing the {@link ApplicationContext}. Subclasses can
     * apply additional processing as required.
     * @param context the application context
     */
    protected void postProcessApplicationContext(ConfigurableApplicationContext context) {
        if (this.beanNameGenerator != null) {
            context.getBeanFactory().registerSingleton(AnnotationConfigUtils.CONFIGURATION_BEAN_NAME_GENERATOR,
                    this.beanNameGenerator);
        }
        if (this.resourceLoader != null) {
            if (context instanceof GenericApplicationContext) {
                ((GenericApplicationContext) context).setResourceLoader(this.resourceLoader);
            }
            if (context instanceof DefaultResourceLoader) {
                ((DefaultResourceLoader) context).setClassLoader(this.resourceLoader.getClassLoader());
            }
        }
        if (this.addConversionService) {
            context.getBeanFactory().setConversionService(ApplicationConversionService.getSharedInstance());
        }
    }
由于beanNameGenerator和resourceLoader都为空,但是addConversionService不为空,所以就设置了一个格式转换器。
然后就是调用applyInitializers方法:
/**
     * Apply any {@link ApplicationContextInitializer}s to the context before it is
     * refreshed.
     * @param context the configured ApplicationContext (not refreshed yet)
     * @see ConfigurableApplicationContext#refresh()
     */
    @SuppressWarnings({ "rawtypes", "unchecked" })
    protected void applyInitializers(ConfigurableApplicationContext context) {
        for (ApplicationContextInitializer initializer : getInitializers()) {
            Class<?> requiredType = GenericTypeResolver.resolveTypeArgument(initializer.getClass(),
                    ApplicationContextInitializer.class);
            Assert.isInstanceOf(requiredType, context, "Unable to call initializer.");
            initializer.initialize(context);
        }
    }
/**
     * Returns read-only ordered Set of the {@link ApplicationContextInitializer}s that
     * will be applied to the Spring {@link ApplicationContext}.
     * @return the initializers
     */
    public Set<ApplicationContextInitializer<?>> getInitializers() {
        return asUnmodifiableOrderedSet(this.initializers);
    }
就是调用SpringApplication的initializers的初始化方法,就不介绍了(大家可以自己看看),然后就是contextPrepared方法:
void contextPrepared(ConfigurableApplicationContext context) {
        doWithListeners("spring.boot.application.context-prepared", (listener) -> listener.contextPrepared(context));
    }
还是一样的套路:
private void doWithListeners(String stepName, Consumer<SpringApplicationRunListener> listenerAction) {
        doWithListeners(stepName, listenerAction, null);
    }

    private void doWithListeners(String stepName, Consumer<SpringApplicationRunListener> listenerAction,
            Consumer<StartupStep> stepAction) {
        StartupStep step = this.applicationStartup.start(stepName);
        this.listeners.forEach(listenerAction);
        if (stepAction != null) {
            stepAction.accept(step);
        }
        step.end();
    }
这里也不介绍了,然后就是close方法:
/**
     * Method to be called when {@link BootstrapContext} is closed and the
     * {@link ApplicationContext} is prepared.
     * @param applicationContext the prepared context
     */
    public void close(ConfigurableApplicationContext applicationContext) {
        this.events.multicastEvent(new BootstrapContextClosedEvent(this, applicationContext));
    }
@Override
    public void multicastEvent(ApplicationEvent event) {
        multicastEvent(event, resolveDefaultEventType(event));
    }
还是一样的套路,不介绍了,我们看后面的代码:
if (this.logStartupInfo) {
            logStartupInfo(context.getParent() == null);
            logStartupProfileInfo(context);
        }
这个是和日志相关的,我们不看了,接下来看看beanFactory相关的:
/**
     * Return the single internal BeanFactory held by this context
     * (as ConfigurableListableBeanFactory).
     */
    @Override
    public final ConfigurableListableBeanFactory getBeanFactory() {
        return this.beanFactory;
    }
/**
     * Create a new GenericApplicationContext.
     * @see #registerBeanDefinition
     * @see #refresh
     */
    public GenericApplicationContext() {
        this.beanFactory = new DefaultListableBeanFactory();
    }
反正就是实例化了一个DefaultListableBeanFactory对象,然后通过该实例添加了两个bean。
由于lazyInitialization为false,所以不会执行addBeanFactoryPostProcessor方法,我们直接看load方法:
/**
     * Load beans into the application context.
     * @param context the context to load beans into
     * @param sources the sources to load
     */
    protected void load(ApplicationContext context, Object[] sources) {
        if (logger.isDebugEnabled()) {
            logger.debug("Loading source " + StringUtils.arrayToCommaDelimitedString(sources));
        }
        BeanDefinitionLoader loader = createBeanDefinitionLoader(getBeanDefinitionRegistry(context), sources);
        if (this.beanNameGenerator != null) {
            loader.setBeanNameGenerator(this.beanNameGenerator);
        }
        if (this.resourceLoader != null) {
            loader.setResourceLoader(this.resourceLoader);
        }
        if (this.environment != null) {
            loader.setEnvironment(this.environment);
        }
        loader.load();
    }
该方法会加载bean到应用上下文,我们看一下getBeanDefinitionRegistry方法:
/**
     * Get the bean definition registry.
     * @param context the application context
     * @return the BeanDefinitionRegistry if it can be determined
     */
    private BeanDefinitionRegistry getBeanDefinitionRegistry(ApplicationContext context) {
        if (context instanceof BeanDefinitionRegistry) {
            return (BeanDefinitionRegistry) context;
        }
        if (context instanceof AbstractApplicationContext) {
            return (BeanDefinitionRegistry) ((AbstractApplicationContext) context).getBeanFactory();
        }
        throw new IllegalStateException("Could not locate BeanDefinitionRegistry");
    }
它会直接返回第一个,我们再看看createBeanDefinitionLoader方法:
/**
     * Factory method used to create the {@link BeanDefinitionLoader}.
     * @param registry the bean definition registry
     * @param sources the sources to load
     * @return the {@link BeanDefinitionLoader} that will be used to load beans
     */
    protected BeanDefinitionLoader createBeanDefinitionLoader(BeanDefinitionRegistry registry, Object[] sources) {
        return new BeanDefinitionLoader(registry, sources);
    }
/**
     * Create a new {@link BeanDefinitionLoader} that will load beans into the specified
     * {@link BeanDefinitionRegistry}.
     * @param registry the bean definition registry that will contain the loaded beans
     * @param sources the bean sources
     */
    BeanDefinitionLoader(BeanDefinitionRegistry registry, Object... sources) {
        Assert.notNull(registry, "Registry must not be null");
        Assert.notEmpty(sources, "Sources must not be empty");
        this.sources = sources;
        this.annotatedReader = new AnnotatedBeanDefinitionReader(registry);
        this.xmlReader = (XML_ENABLED ? new XmlBeanDefinitionReader(registry) : null);
        this.groovyReader = (isGroovyPresent() ? new GroovyBeanDefinitionReader(registry) : null);
        this.scanner = new ClassPathBeanDefinitionScanner(registry);
        this.scanner.addExcludeFilter(new ClassExcludeFilter(sources));
    }
接下来我们直接看load方法,由于beanNameGenerator、resourceLoader和environment都为空:
/**
     * Load the sources into the reader.
     */
    void load() {
        for (Object source : this.sources) {
            load(source);
        }
    }
private void load(Object source) {
        Assert.notNull(source, "Source must not be null");
        if (source instanceof Class<?>) {
            load((Class<?>) source);
            return;
        }
        if (source instanceof Resource) {
            load((Resource) source);
            return;
        }
        if (source instanceof Package) {
            load((Package) source);
            return;
        }
        if (source instanceof CharSequence) {
            load((CharSequence) source);
            return;
        }
        throw new IllegalArgumentException("Invalid source type " + source.getClass());
    }

怎么说呢,这个sources只有一个,那就是我的项目主类,很明显这个不是我们想要的问题的答案,接着往下看:
又到了listeners.contextLoaded方法了,为啥说又呢,因为这个还是一样的套路,不说了。
我们接下来回到run方法中的refreshContext方法,据说该方法中包含我们想要的答案(调试了这么久,终于到高潮了啊)
private void refreshContext(ConfigurableApplicationContext context) {
        if (this.registerShutdownHook) {
            try {
                context.registerShutdownHook();
            }
            catch (AccessControlException ex) {
                // Not allowed in some environments.
            }
        }
        refresh((ApplicationContext) context);
    }
我们看看registerShutdownHook方法:
/**
     * Register a shutdown hook {@linkplain Thread#getName() named}
     * {@code SpringContextShutdownHook} with the JVM runtime, closing this
     * context on JVM shutdown unless it has already been closed at that time.
     * <p>Delegates to {@code doClose()} for the actual closing procedure.
     * @see Runtime#addShutdownHook
     * @see ConfigurableApplicationContext#SHUTDOWN_HOOK_THREAD_NAME
     * @see #close()
     * @see #doClose()
     */
    @Override
    public void registerShutdownHook() {
        if (this.shutdownHook == null) {
            // No shutdown hook registered yet.
            this.shutdownHook = new Thread(SHUTDOWN_HOOK_THREAD_NAME) {
                @Override
                public void run() {
                    synchronized (startupShutdownMonitor) {
                        doClose();
                    }
                }
            };
            Runtime.getRuntime().addShutdownHook(this.shutdownHook);
        }
    }
反正就是和上面注释说的一样,注册一个关闭上下文的线程,我们直接看refresh方法:
/**
     * Refresh the underlying {@link ApplicationContext}.
     * @param applicationContext the application context to refresh
     */
    protected void refresh(ConfigurableApplicationContext applicationContext) {
        applicationContext.refresh();
    }
@Override
    public final void refresh() throws BeansException, IllegalStateException {
        try {
            super.refresh();
        }
        catch (RuntimeException ex) {
            WebServer webServer = this.webServer;
            if (webServer != null) {
                webServer.stop();
            }
            throw ex;
        }
    }
好了重点来了,就是下面这一段代码:
@Override
    public void refresh() throws BeansException, IllegalStateException {
        synchronized (this.startupShutdownMonitor) {
            StartupStep contextRefresh = this.applicationStartup.start("spring.context.refresh");

            // Prepare this context for refreshing.
            prepareRefresh();

            // Tell the subclass to refresh the internal bean factory.
            ConfigurableListableBeanFactory beanFactory = obtainFreshBeanFactory();

            // Prepare the bean factory for use in this context.
            prepareBeanFactory(beanFactory);

            try {
                // Allows post-processing of the bean factory in context subclasses.
                postProcessBeanFactory(beanFactory);

                StartupStep beanPostProcess = this.applicationStartup.start("spring.context.beans.post-process");
                // Invoke factory processors registered as beans in the context.
                invokeBeanFactoryPostProcessors(beanFactory);

                // Register bean processors that intercept bean creation.
                registerBeanPostProcessors(beanFactory);
                beanPostProcess.end();

                // Initialize message source for this context.
                initMessageSource();

                // Initialize event multicaster for this context.
                initApplicationEventMulticaster();

                // Initialize other special beans in specific context subclasses.
                onRefresh();

                // Check for listener beans and register them.
                registerListeners();

                // Instantiate all remaining (non-lazy-init) singletons.
                finishBeanFactoryInitialization(beanFactory);

                // Last step: publish corresponding event.
                finishRefresh();
            }

            catch (BeansException ex) {
                if (logger.isWarnEnabled()) {
                    logger.warn("Exception encountered during context initialization - " +
                            "cancelling refresh attempt: " + ex);
                }

                // Destroy already created singletons to avoid dangling resources.
                destroyBeans();

                // Reset 'active' flag.
                cancelRefresh(ex);

                // Propagate exception to caller.
                throw ex;
            }

            finally {
                // Reset common introspection caches in Spring's core, since we
                // might not ever need metadata for singleton beans anymore...
                resetCommonCaches();
                contextRefresh.end();
            }
        }
    }
啊,好多呀,不想写了,我们把refresh方法后面的几个方法介绍完吧,refresh留到下一篇介绍。
首先就是afterRefresh,这个方法是空函数:
/**
     * Called after the context has been refreshed.
     * @param context the application context
     * @param args the application arguments
     */
    protected void afterRefresh(ConfigurableApplicationContext context, ApplicationArguments args) {
    }
没啥好说的,接下来就是stopWatch的stop方法:
/**
     * Stop the current task.
     * <p>The results are undefined if timing methods are called without invoking
     * at least one pair of {@code start()} / {@code stop()} methods.
     * @see #start()
     * @see #start(String)
     */
    public void stop() throws IllegalStateException {
        if (this.currentTaskName == null) {
            throw new IllegalStateException("Can't stop StopWatch: it's not running");
        }
        long lastTime = System.nanoTime() - this.startTimeNanos;
        this.totalTimeNanos += lastTime;
        this.lastTaskInfo = new TaskInfo(this.currentTaskName, lastTime);
        if (this.keepTaskList) {
            this.taskList.add(this.lastTaskInfo);
        }
        ++this.taskCount;
        this.currentTaskName = null;
    }
嗯,就是记录了一下运行时间啥的等等,没啥好讲的。
然后就是日志也没啥好说的,这个listeners见到好多次了都是一个套路,我们跳过他,看看callRunners:
private void callRunners(ApplicationContext context, ApplicationArguments args) {
        List<Object> runners = new ArrayList<>();
        runners.addAll(context.getBeansOfType(ApplicationRunner.class).values());
        runners.addAll(context.getBeansOfType(CommandLineRunner.class).values());
        AnnotationAwareOrderComparator.sort(runners);
        for (Object runner : new LinkedHashSet<>(runners)) {
            if (runner instanceof ApplicationRunner) {
                callRunner((ApplicationRunner) runner, args);
            }
            if (runner instanceof CommandLineRunner) {
                callRunner((CommandLineRunner) runner, args);
            }
        }
    }
由于runners是一个空数组,我们就不看callRunner了,这个函数就也相当于啥也没干。
至此,整个run方法除了refresh方法就全Debug完了,这么看下去好像也没有什么收获,看不到他的设计思想。