1 模板表单
模型通过指令隐式创建
技巧01:需要在模块级别引入 FormsModule ,通常在共享模块中引入再导出,然后在需要用到 FormsModule 的模块中导入共享模块就可以啦
import { FormsModule, ReactiveFormsModule } from '@angular/forms';


import { NgModule } from '@angular/core';
import { CommonModule } from '@angular/common';

import {
  MdToolbarModule,
  MdIconModule,
  MdButtonModule,
  MdCardModule,
  MdInputModule,
  MdListModule,
  MdSlideToggleModule,
  MdGridListModule,
  MdDialogModule,
  MdAutocompleteModule,
  MdMenuModule,
  MdCheckboxModule,
  MdTooltipModule,
  MdRadioModule,
  MdDatepickerModule,
  MdNativeDateModule,
  MdSelectModule,
 } from '@angular/material';
import { ConfirmDialogComponent } from './confirm-dialog/confirm-dialog.component';
import { DirectiveModule } from '../directive/directive.module';
import { FormsModule, ReactiveFormsModule } from '@angular/forms';

@NgModule({
  imports: [
    CommonModule,
    FormsModule,
    ReactiveFormsModule,
    MdToolbarModule,
    MdIconModule,
    MdButtonModule,
    MdCardModule,
    MdInputModule,
    MdListModule,
    MdSlideToggleModule,
    MdGridListModule,
    MdDialogModule,
    MdAutocompleteModule,
    MdMenuModule,
    MdCheckboxModule,
    MdTooltipModule,
    MdRadioModule,
    MdDatepickerModule,
    MdNativeDateModule,
    MdSelectModule,
    DirectiveModule
  ],
  declarations: [ConfirmDialogComponent],
  entryComponents: [ ConfirmDialogComponent ],
  exports: [
    CommonModule,
    FormsModule,
    ReactiveFormsModule,
    MdToolbarModule,
    MdIconModule,
    MdButtonModule,
    MdCardModule,
    MdInputModule,
    MdListModule,
    MdSlideToggleModule,
    MdGridListModule,
    MdDialogModule,
    MdAutocompleteModule,
    MdMenuModule,
    MdCheckboxModule,
    MdTooltipModule,
    MdRadioModule,
    MdDatepickerModule,
    MdNativeDateModule,
    MdSelectModule,
    DirectiveModule
  ]
})
export class SharedModule { }
1.1 指令
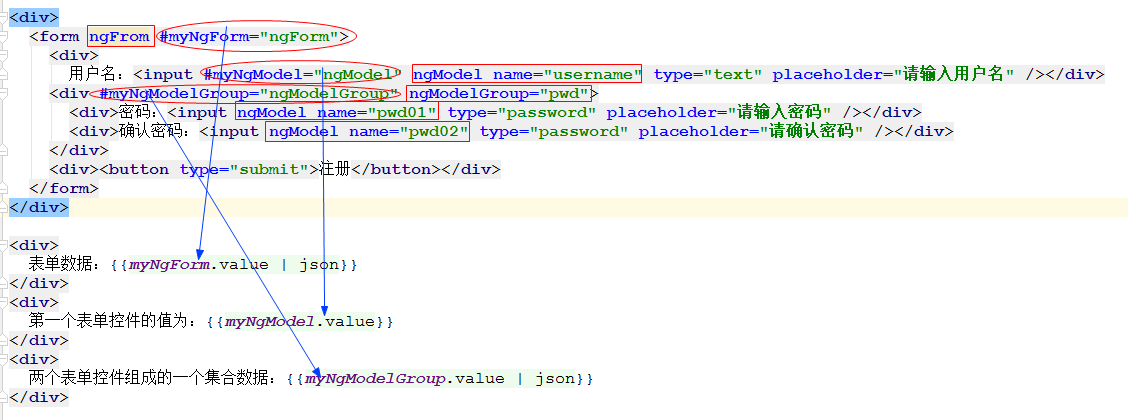
NgForm
隐式创建一个FormGroup实例
NgForm指令会为表单元素创建一个表单控件对象FormControl的集合,用来存放标有NgModel指令的表单对象
NgModel
隐式创建一个FormControl实例
该指令需要配合name属性使用
绑定了NgModel指令的表单控件会根据该表单控件的name属性来为来创建一个FormControl对象,并存放到FormControl的集合中
NgModelGroup
隐式创建一个FromGroup实例
该指令需要进行赋值
多个表单对象组成的一个FormControl的集合
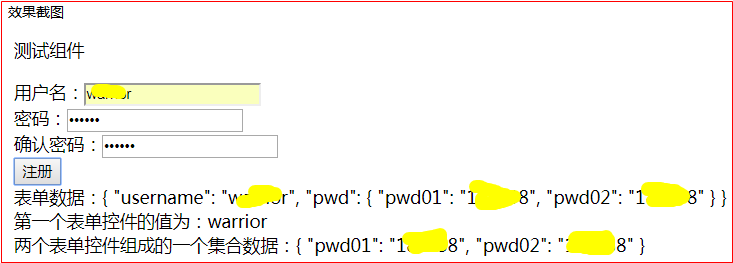
代码截图
效果截图
1.2 编程步骤
1.2.1 利用 ngModel 实现双向绑定
》在组件控制类中创建变量 desc
desc: string = 'hello boy';
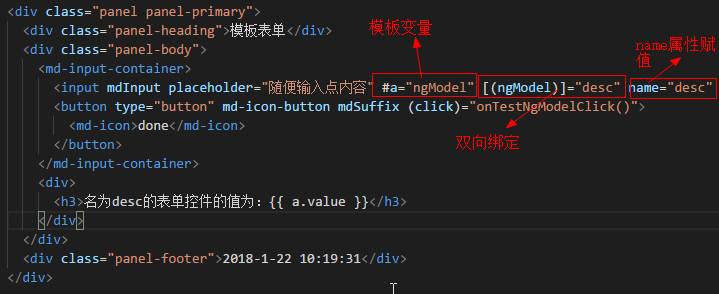
》在组件模板中通过 ngModel实现表单元素和控制类中变量desc的双向绑定
技巧01:最好为表单元素的name属性设置一个值,因为如果该表单元素在form表单内部没有为表单元素的name赋值时就会报错;原因是angular会默认给form元素自动添加ngForm指令,而标注有ngForm指令的元素内部如果有元素标注了ngModel就必须为其name属性赋值
1.2.2 ngModel指令详解
官方文档:点击前往
[(ngModel)] 其实是 ngModel 和 (onModelChange)的简便写法;ngModel右边是一个控制器变量,(onModelChange)右边是一个处理触发事件的方法

<div class="panel panel-primary">
  <div class="panel-heading">模板表单</div>
  <div class="panel-body">
    <md-input-container>
      <input mdInput placeholder="随便输入点内容" #a="ngModel" ngModel="desc" (ngModelChange)="desc=a.value" name="desc" />
      <button type="button" md-icon-button mdSuffix (click)="onTestNgModelClick()">
        <md-icon>done</md-icon>
      </button>
    </md-input-container>
    <div>
      <h3>名为desc的表单控件的值为:{{ a.value }}</h3>
    </div>
  </div>
  <div class="panel-footer">2018-1-22 10:19:31</div>
</div>
2 响应式表单
详解请参见:《Angular2 开发实战 基于TypeScript》
开发步骤:在TS文件中创建模型 -> 利用指令将HTML元素和模型关联起来
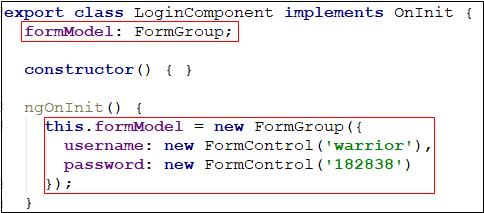
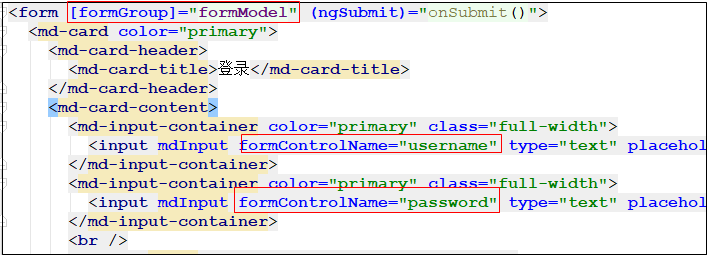
<form [formGroup]="formModel" (ngSubmit)="onSubmit()">
  <md-card color="primary">
    <md-card-header>
      <md-card-title>登录</md-card-title>
    </md-card-header>
    <md-card-content>
      <md-input-container color="primary" class="full-width">
        <input mdInput formControlName="username" type="text" placeholder="请输入登录名称" />
      </md-input-container>
      <md-input-container color="primary" class="full-width">
        <input mdInput formControlName="password" type="text" placeholder="请输入登录密码" />
      </md-input-container>
      <br />
      <button color="primary" type="submit" style="margin: 0 auto;display: block;" md-raised-button >登录</button>
      <!--<button color="primary" style="margin: 0 auto;display: block;" md-raised-button [routerLink]="['/home']">登录</button>-->
    </md-card-content>
    <md-card-actions class="text-right">
      <p>还没注册?<a>注册</a></p>
      <p>忘记密码?<a>找回密码</a></p>
    </md-card-actions>
  </md-card>
</form>
<hr >
import { Component, OnInit } from '@angular/core';
import {FormControl, FormGroup} from '@angular/forms';

@Component({
  selector: 'app-login',
  templateUrl: './login.component.html',
  styleUrls: ['./login.component.scss']
})
export class LoginComponent implements OnInit {
  formModel: FormGroup;

  constructor() { }

  ngOnInit() {
    this.formModel = new FormGroup({
      username: new FormControl('warrior'),
      password: new FormControl('182838')
    });
  }

  onSubmit(value: any) {
    console.log(JSON.stringify(this.formModel.value));
  }

}
2.1 FormGroup
一个FormGroup是一个或多个FromControl组成
官方文档:点击前往
2.1.1 常用的属性和方法
》valid : 验证 FormGroup 的有效性
》value :FromGroup中所有FromControl值
》get :获取单个的FormControl
get(path: Array<string|number>|string): AbstractControl|null
》controls:获取单个或多个FormControl,该方法一般用于动态给某个或某几个FormControl动态添加验证方法,或者获取某个FormControl的错误信息
this.loginForm.controls['password']
例1:动态添加验证方法
this.loginForm.controls['password'].setValidators(this.fury);
例2:获取错误信息
<h4>hello:{{ testForm.controls['email'].errors | json }}</h4>
》hasError :判断目标FormControl中某一个验证是否通过,返回true表示没有通过
hasError(errorCode: string, path?: string[]): boolean
》getError : 获取某个验证器的验证结果


技巧01:hasError和getError的书写格式时一样的,都是hasError('验证器对应的关键字',‘被验证元素的路径’),这里的验证对应的键值就是验证器源代码中返回的那个对象中的键,本案例中就是phoneValidator
2.2 FormControl
代表单个表单元素
官方文档:点击前往
2.2.1 常用属性和方法
》valid :验证FormControl是否有效
》value :获取FormControl对应元素内容
》errors :FormControl的错误信息(前提:需要为该FormControl添加过滤器)
》touched:验证FormControl是否接触过
》setValidators:添加验证器
this.loginForm.controls['password'].setValidators(this.fury);
2.3 FormGroup、FormControl综合应用
2.3.1 综合运用01
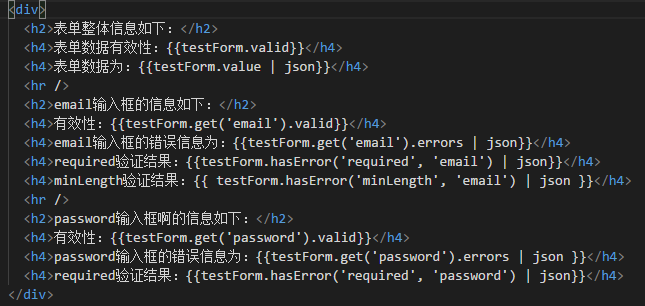
    <div>
      <h2>表单整体信息如下:</h2>
      <h4>表单数据有效性:{{testForm.valid}}</h4>
      <h4>表单数据为:{{testForm.value | json}}</h4>
      <hr />
      <h2>email输入框的信息如下:</h2>
      <h4>有效性:{{testForm.get('email').valid}}</h4>
      <h4>email输入框的错误信息为:{{testForm.get('email').errors | json}}</h4>
      <h4>required验证结果:{{testForm.hasError('required', 'email') | json}}</h4>
      <h4>minLength验证结果:{{ testForm.hasError('minLength', 'email') | json }}</h4>
      <hr />
      <h2>password输入框啊的信息如下:</h2>
      <h4>有效性:{{testForm.get('password').valid}}</h4>
      <h4>password输入框的错误信息为:{{testForm.get('password').errors | json }}</h4>
      <h4>required验证结果:{{testForm.hasError('required', 'password') | json}}</h4>
    </div>
2.3.2 综合运用02
<div class="panel panel-primary">
  <div class="panel-heading">响应式表单</div>
  <div class="panel-body test_form_div">
    <span class="fill_remaining_space"></span>
    <mat-card class="test_form_card">
      <mat-card-header>
        <mat-card-title>客户信息录入</mat-card-title>
      </mat-card-header>
      <mat-card-content>
        <form [formGroup]="testForm" (ngSubmit)="onSubmit()">
          <mat-input-container>
            <input matInput formControlName="idcard" placeholder="请输入身份证编号" />
            <mat-error *ngIf="testForm.hasError('required', 'idcard')">
              <span>证件编号是必填项</span>
            </mat-error>
            <mat-error *ngIf="testForm.hasError('idcardLengthValidator', 'idcard')">
              <span>{{ testForm.getError('idcardLengthValidator', 'idcard')?.requiredLength }}</span>
            </mat-error>
          </mat-input-container>
          <mat-input-container>
            <input matInput formControlName="name" placeholder="请输入姓名" />
            <mat-error *ngIf="testForm.hasError('required', 'name')">
              <span>姓名是必填项</span>
            </mat-error>
          </mat-input-container>
          <mat-input-container>
            <input matInput formControlName="phone" placeholder="请输入联系电话" />
            <mat-error *ngIf="testForm.hasError('required', 'phone')">
              <span>联系电话是必填项</span>
            </mat-error>
            <mat-error *ngIf="testForm.hasError('phoneValidator', 'phone')">
              <span>{{ testForm.getError('phoneValidator', 'phone')?.desc }}</span>
            </mat-error>
          </mat-input-container>
          <mat-input-container>
            <input matInput formControlName="address" placeholder="请输入上车地点" />
            <mat-error *ngIf="testForm.hasError('required', 'address')">
              <span>上车地址是必填项</span>
            </mat-error>
          </mat-input-container>
          <mat-input-container>
            <input matInput formControlName="hometown" placeholder="请输入籍贯" />
          </mat-input-container>
          <div class="submit">
            <span class="fill_remaining_space"></span>
            <button mat-raised-button [disabled]="!testForm.valid">提交</button>
            <span class="fill_remaining_space"></span>
          </div>
        </form>
      </mat-card-content>
      <mat-card-actions>
        <button mat-raised-button style=" 100%;">取消</button>
      </mat-card-actions>
    </mat-card>
    <span class="fill_remaining_space"></span>
  </div>
  <div class="panel-footer">2018-3-7 09:15:50</div>
</div>
import { Component, OnInit } from '@angular/core';
import { FormGroup, FormBuilder, Validators } from '@angular/forms';
import { FormControl } from '../../../../node_modules/_@angular_forms@5.2.5@@angular/forms/src/model';

@Component({
  selector: 'app-test02',
  templateUrl: './test02.component.html',
  styleUrls: ['./test02.component.scss']
})
export class Test02Component implements OnInit {

  testForm: FormGroup;

  constructor(
    private formBuilder: FormBuilder
  ) { }

  ngOnInit() {
    this.testForm = this.formBuilder.group({
      idcard: ['500225199310031919', [Validators.required,  Validators.maxLength(18), this.idcardLengthValidator], [] ],
      name: ['王杨帅', [Validators.required], []],
      phone: ['13272885616', [Validators.required, this.phoneValidator], []],
      address: ['重庆市沙坪坝区三峡广场', [Validators.required], []],
      hometown: ['重庆']
    });
  }

  onSubmit() {
    console.log(this.testForm.value);
  }

  myValidator(fc: FormControl, num: number): {[key: string]: any} {
    const valid = fc.value === 'warrior';
    return valid ? null : {myValidator: true}
  }
  idcardLengthValidator(fc: FormControl): {[key: string]: any} {
    const valid = fc.value.length === 18;
    return valid ? null : {idcardLengthValidator: {requiredLength: '身份证编号必须是18位数字'}};
  }
  phoneValidator(phone: FormControl): {[key: string]: any} {
    const value = phone.value || '';
    const valid = value.match(/^d{11}$/);
    return valid ? null : {phoneValidator: {desc:'联系电话必须是11位数字'}}
  }
}
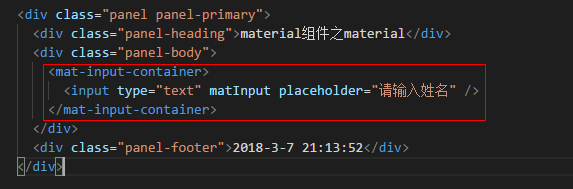
技巧01:如果时单独使用material的Input组件就直接用一个 mat-input-container 组件将 input 元素包含起来就行啦,而且一个 mat-input-container 只能包含一个 input 元素,例如
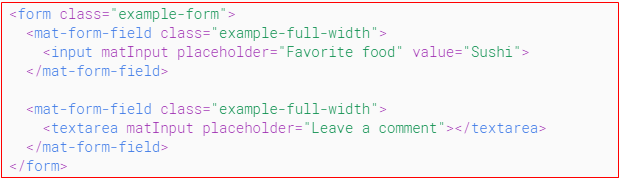
技巧02: 如果实在 form 标签中使用 material 的 input 组件,官方是用 mat-form-field 将 input 元素包含起来的,一个 mat-form-field 也只能包含一个 input 组件,例如
2.4 编程步骤
2.4.1 在模块级别导入ReactiveFormsModule
import { FormsModule, ReactiveFormsModule } from '@angular/forms';
import { NgModule } from '@angular/core';
import { CommonModule } from '@angular/common';

import {
  MdToolbarModule,
  MdIconModule,
  MdButtonModule,
  MdCardModule,
  MdInputModule,
  MdListModule,
  MdSlideToggleModule,
  MdGridListModule,
  MdDialogModule,
  MdAutocompleteModule,
  MdMenuModule,
  MdCheckboxModule,
  MdTooltipModule,
  MdRadioModule,
  MdDatepickerModule,
  MdNativeDateModule,
  MdSelectModule,
 } from '@angular/material';
import { ConfirmDialogComponent } from './confirm-dialog/confirm-dialog.component';
import { DirectiveModule } from '../directive/directive.module';
import { FormsModule, ReactiveFormsModule } from '@angular/forms';

@NgModule({
  imports: [
    CommonModule,
    FormsModule,
    ReactiveFormsModule,
    MdToolbarModule,
    MdIconModule,
    MdButtonModule,
    MdCardModule,
    MdInputModule,
    MdListModule,
    MdSlideToggleModule,
    MdGridListModule,
    MdDialogModule,
    MdAutocompleteModule,
    MdMenuModule,
    MdCheckboxModule,
    MdTooltipModule,
    MdRadioModule,
    MdDatepickerModule,
    MdNativeDateModule,
    MdSelectModule,
    DirectiveModule
  ],
  declarations: [ConfirmDialogComponent],
  entryComponents: [ ConfirmDialogComponent ],
  exports: [
    CommonModule,
    FormsModule,
    ReactiveFormsModule,
    MdToolbarModule,
    MdIconModule,
    MdButtonModule,
    MdCardModule,
    MdInputModule,
    MdListModule,
    MdSlideToggleModule,
    MdGridListModule,
    MdDialogModule,
    MdAutocompleteModule,
    MdMenuModule,
    MdCheckboxModule,
    MdTooltipModule,
    MdRadioModule,
    MdDatepickerModule,
    MdNativeDateModule,
    MdSelectModule,
    DirectiveModule
  ]
})
export class SharedModule { }
2.4.2 在控制器类中构建数据模型

2.4.3 在模板中使用FormGroup、FromControl进行数据绑定

2.5 代码总汇
import { Component, OnInit, HostListener} from '@angular/core';
import { FormControl, FormGroup, FormBuilder, Validators } from '@angular/forms';

@Component({
  selector: 'app-test01',
  templateUrl: './test01.component.html',
  styleUrls: ['./test01.component.scss']
})
export class Test01Component implements OnInit {

  testForm: FormGroup;
  data: any;

  name: FormControl = new FormControl();

  desc: string = 'hello boy';

  taskLists = [
    {label: 1, name: '进行中'},
    {label: 2, name: '已完成'}
  ];

  constructor() {}

  ngOnInit() {
    this.testForm = new FormGroup({
      email: new FormControl('', [Validators.required, Validators.minLength(4)], []),
      password: new FormControl('', [Validators.required], [])
    });

    this.name.valueChanges
    .debounceTime(500)
    .subscribe(value => alert(value));

  }

  @HostListener('keyup.enter')
  onTestNgModelClick() {
    alert('提交');

  }

  onTestClick() {
    this.data = this.testForm.get('email').value;
    console.log(this.testForm.getError);
  }

}
<div class="panel panel-primary">
  <div class="panel-heading">响应式表单</div>
  <div class="panel-body">
    <form [formGroup]="testForm">
      <md-input-container>
        <input mdInput type="text" placeholder="请输入邮箱" formControlName="email" />
        <span mdSuffix>@163.com</span>
      </md-input-container>
      <br />
      <md-input-container>
        <input mdInput type="password" placeholder="请输入密码" formControlName="password" />
      </md-input-container>
    </form>
    <hr />
    <div>
      <h2>表单整体信息如下:</h2>
      <h4>表单数据有效性:{{testForm.valid}}</h4>
      <h4>表单数据为:{{testForm.value | json}}</h4>
      <hr />
      <h2>email输入框的信息如下:</h2>
      <h4>有效性:{{testForm.get('email').valid}}</h4>
      <h4>email输入框的错误信息为:{{testForm.get('email').errors | json}}</h4>
      <h4>required验证结果:{{testForm.hasError('required', 'email') | json}}</h4>
      <h4>minLength验证结果:{{ testForm.hasError('minLength', 'email') | json }}</h4>
      <hr />
      <h2>password输入框啊的信息如下:</h2>
      <h4>有效性:{{testForm.get('password').valid}}</h4>
      <h4>password输入框的错误信息为:{{testForm.get('password').errors | json }}</h4>
      <h4>required验证结果:{{testForm.hasError('required', 'password') | json}}</h4>
    </div>
    <div>
      <button nd-rasied-button (click)="onTestClick()">获取数据</button>
      <h4>data变量:{{data}}</h4>
    </div>
  </div>
  <div class="panel-footer">2018-1-22 15:58:43</div>
</div>
2.6 自定义验证器
2.6.1 验证器接口
interface ValidatorFn {
  (c: AbstractControl): ValidationErrors|null
}
从验证器接口的源代码中可以看出,验证器就是一个普通的方法而已,只不过该方法的接受参数必须是AbstractControl类型,返回类型是一个JavaScript对象,当验证通过时返回null,验证不同过时返回的对象中有一个和验证器方法同名的属性
2.6.2 编程步骤
》自定一个一个方法
  myValidator(fc: FormControl): {[key: string]: any} {
    const valid = fc.value === 'admin';
    return valid ? null : {myValidator: {requiredUsername: 'admin', actualUsername: fc.value}};
  }
》在响应式表单的数据模型中使用即可

》在模板中对表单进行数据绑定

2.6.3 代码汇总
import { Component, OnInit, HostListener} from '@angular/core';
import { FormControl, FormGroup, FormBuilder, Validators } from '@angular/forms';

@Component({
  selector: 'app-test01',
  templateUrl: './test01.component.html',
  styleUrls: ['./test01.component.scss']
})
export class Test01Component implements OnInit {

  loginForm: FormGroup;

  testForm: FormGroup;
  data: any;

  name: FormControl = new FormControl();

  desc: string = 'hello boy';

  taskLists = [
    {label: 1, name: '进行中'},
    {label: 2, name: '已完成'}
  ];

  constructor(
    private formBuilder: FormBuilder
  ) {}

  ngOnInit() {
    this.testForm = new FormGroup({
      email: new FormControl('', [Validators.required, Validators.minLength(4)], []),
      password: new FormControl('', [Validators.required], [])
    });

    this.name.valueChanges
    .debounceTime(500)
    .subscribe(value => alert(value));

    this.loginForm = this.formBuilder.group({
      username: ['', [Validators.required, Validators.minLength(4), this.myValidator], []],
      userpwd: ['', [Validators.required, Validators.minLength(6)], []]
    });

  }

  @HostListener('keyup.enter')
  onTestNgModelClick() {
    alert('提交');

  }

  onTestClick() {
    // this.data = this.testForm.get('email').value;
    // console.log(this.testForm.getError);
    console.log(this.testForm.controls['email']);
  }

  onTestLogin() {
    console.log(this.loginForm.value);
    if (this.loginForm.valid) {
      console.log('登陆数据合法');
    } else {
      console.log('登陆数据不合法');
      console.log(this.loginForm.controls['username'].errors);
      console.log(this.loginForm.get('userpwd').errors);
    }
  }

  myValidator(fc: FormControl): {[key: string]: any} {
    const valid = fc.value === 'admin';
    return valid ? null : {myValidator: {requiredUsername: 'admin', actualUsername: fc.value}};
  }

}
<div class="panel panel-primary">
  <div class="panel-heading">自定义验证器</div>
  <div class="panel-body">
    <form (ngSubmit)="onTestLogin()" [formGroup]="loginForm">
      <md-input-container>
        <input mdInput placeholder="请输入登录名" formControlName="username" />
      </md-input-container>
      <br />
      <md-input-container>
        <input mdInput placeholder="请输入密码" formControlName="userpwd" />
      </md-input-container>
      <br />
      <button type="submit" md-raised-button>登陆</button>
    </form>
  </div>
  <div class="panel-footer">2018-1-23 11:06:01</div>
</div>
2.7 响应式表单和material结合实例
<div class="client_div">
  <span class="fill_remaining_space"></span>
  <div class="client_form_div">
    <span class="fill_remaining_space"></span>
    <mat-card class="test_form_card">
      <mat-card-header>
        <mat-card-title>客户信息录入</mat-card-title>
      </mat-card-header>
      <mat-card-content>
        <form [formGroup]="clientForm" (ngSubmit)="onSubmit()">
          <mat-input-container>
            <input type="text" matInput matTooltip="身份证编号:{{ clientForm.controls['idcard'].value }}" formControlName="idcard" placeholder="请输入身份证编号" />
            <mat-error *ngIf="clientForm.hasError('required', 'idcard')">
              <span>证件编号是必填项</span>
            </mat-error>
            <mat-error *ngIf="clientForm.hasError('idcardLengthValidator', 'idcard')">
              <span>{{ clientForm.getError('idcardLengthValidator', 'idcard')?.requiredLength }}</span>
            </mat-error>
          </mat-input-container>
          <mat-input-container>
            <input type="text" matInput matTooltip="姓名:{{ clientForm.controls['name'].value }}" formControlName="name" placeholder="请输入姓名" />
            <mat-error *ngIf="clientForm.hasError('required', 'name')">
              <span>姓名是必填项</span>
            </mat-error>
          </mat-input-container>
          <mat-input-container>
            <input type="text" matInput matTooltip="联系电话:{{ clientForm.controls['phone'].value }}" formControlName="phone" placeholder="请输入联系电话" />
            <mat-error *ngIf="clientForm.hasError('required', 'phone')">
              <span>联系电话是必填项</span>
            </mat-error>
            <mat-error *ngIf="clientForm.hasError('phoneValidator', 'phone')">
              <span>{{ clientForm.getError('phoneValidator', 'phone')?.desc }}</span>
            </mat-error>
          </mat-input-container>
          <mat-input-container>
            <input type="text" matInput matTooltip="性别:{{ clientForm.controls['gender'].value }}" formControlName="gender" placeholder="请选择性别" [matAutocomplete]="auto" />
            <mat-error *ngIf="clientForm.hasError('required', 'gender')">
              <span>性别是必填项</span>
            </mat-error>
            <mat-error *ngIf="clientForm.hasError('genderValidator', 'gender')">
              <span>{{ clientForm.getError('genderValidator', 'gender')?.desc }}</span>
            </mat-error>

                <!-- <span *ngIf="genderError">性别必须是男</span> -->

            <mat-autocomplete #auto="matAutocomplete">
              <mat-option *ngFor="let genderItem of genderList" [value]="genderItem">
                <span>{{ genderItem }}</span>
              </mat-option>
            </mat-autocomplete>
          </mat-input-container>
          <mat-input-container>
            <input type="text" matInput matTooltip="上车地点:{{clientForm.controls['address'].value}}" formControlName="address" placeholder="请输入上车地点" />
            <mat-error *ngIf="clientForm.hasError('required', 'address')">
              <span>上车地址是必填项</span>
            </mat-error>
          </mat-input-container>
          <mat-input-container>
            <input type="text" matInput matTooltip="籍贯:{{ clientForm.controls['hometown'].value }}" formControlName="hometown" placeholder="请输入籍贯" />
          </mat-input-container>
          <mat-input-container style=" 99%;">
            <input type="text" matInput matTooltip="备注信息:{{ clientForm.controls['remarks'].value }}" formControlName="remarks" placeholder="备注信息">
          </mat-input-container>
          <div class="submit">
            <span class="fill_remaining_space"></span>
            <button mat-raised-button [disabled]="!clientForm.valid" type="submit" class="btn btn-success">
              <span class="glyphicon glyphicon-log-out"></span>
              <span>提交</span>
            </button>
            <span class="fill_remaining_space"></span>
          </div>
        </form>
      </mat-card-content>
      <mat-card-actions>
        <button mat-raised-button style=" 100%;" type="button" (click)="onCancel()" class="btn btn-warning">
          <span class="glyphicon glyphicon-remove"></span>
          <span>取消</span>
        </button>
      </mat-card-actions>
    </mat-card>
    <span class="fill_remaining_space"></span>
  </div>
  <span class="fill_remaining_space"></span>
</div>


<!-- <hr />
<div>从路径中获取到的idcard数据为:{{ receivedIdcard }}</div>
<div>从queryParams中获取到的clientOperateType数据为:{{ clientOperateType }}</div>
<div>从queryParmas中获取到的clientInfoType数据为:{{ clientInfoType }}</div>
<span matTooltip="Good Boy">放上去</span> -->
import { Component, OnInit, OnDestroy } from '@angular/core';
import { ClientService } from '../client.service';
import { FormBuilder, FormGroup, Validators, FormControl } from '@angular/forms';
import { Router, ActivatedRoute } from '@angular/router';
import { ClientBaseInfo } from '../../model/ClientBaseInfo';
import { error } from 'util';

@Component({
  selector: 'app-client-operate',
  templateUrl: './client-operate.component.html',
  styleUrls: ['./client-operate.component.scss']
})
export class ClientOperateComponent implements OnInit, OnDestroy {

  clientForm: FormGroup; // 客户信息表单
  sub: any; // 订阅返回对象01
  sub02: any; // 订阅返回对象02
  receivedIdcard: string; // 从路由中获取的idcard参数
  clientOperateType: number;
  currentClientInfo: ClientBaseInfo; // 当前的客户信息
  genderList: string[]; // 性别列表
  clientInfoType: string; // 客户信息类型 base 还是 detail

  postResult: any;
  putResult: any;

  constructor(
    private formBuilder: FormBuilder, // 表单对象创建器
    private clientService: ClientService, // 客户服务
    private _router: Router, // 路由
    private _activatedRoute: ActivatedRoute // 用于获取路由参数
  ) { }

  ngOnInit() {
    this.genderList = ["男", "女", "不"]; // 初始化性别列表
    this.clientForm = this.formBuilder.group({ // 初始化表单信息
      idcard: ['', [Validators.required,  Validators.maxLength(18), this.idcardLengthValidator], [] ],
      name: ['', [Validators.required, Validators.minLength(1)], []],
      phone: ['', [Validators.required, this.phoneValidator], []],
      gender: ['', [Validators.required, this.genderValidator], [] ],
      address: ['', [Validators.required], []],
      hometown: ['', [], [] ],
      remarks: ['', [], []],
      status: [1, [], []]
    });
    this.sub = this._activatedRoute.params.subscribe(params => { // 利用ActivatedRoute对象获取路由参数
      this.receivedIdcard = params['idcard'];
    });
    this.sub02 = this._activatedRoute.queryParams.subscribe(parmas => {
       this.clientOperateType = parseInt(parmas['type']);
       this.clientInfoType = parmas['clientInfoType'];
    });
    this.clientService.getClientInfoByIdcard(this.receivedIdcard).subscribe(resp => { // 根据从路由中获取到的idcard信息查询对应的客户信息,并对表单信息进行更新
      if (resp.data === null) {
          alert('无对应Idcard的客户信息,请先进行注册');
      } else {
        if (this.clientOperateType === 1) {
          this.currentClientInfo = resp.data;
          this.clientForm.controls['idcard'].setValue(this.currentClientInfo.idcard);
          this.clientForm.controls['name'].setValue(this.currentClientInfo.name);
          this.clientForm.controls['phone'].setValue(this.currentClientInfo.phone);
          this.clientForm.controls['gender'].setValue(this.currentClientInfo.gender);
          this.clientForm.controls['address'].setValue(this.currentClientInfo.address);
          this.clientForm.controls['hometown'].setValue(this.currentClientInfo.hometown);
          this.clientForm.controls['remarks'].setValue(this.currentClientInfo.remarks);
        }
      }

    });


  }

  ngOnDestroy() {
    this.sub.unsubscribe(); // 取消订阅,目的是为了防止内存泄漏
    this.sub02.unsubscribe();
  }

  // 提交表单
  onSubmit() {
    if (this.clientOperateType === 0) {
      alert('新增客户');
      this.clientService.createClientInfo(this.clientForm.value)
                        .subscribe(
                          resp => {
                            // console.log(resp);
                            // alert(resp.message);
                            if (resp.code === 0 ) {
                              // alert('新增客户成功');
                            }
                            if (this.clientInfoType === 'base') {
                              this._router.navigate(['/client/clientBaseInfo']);
                            }
                            if (this.clientInfoType === 'detail') {
                              this._router.navigate(['/client/clientDetailInfo']);
                            }
                          },
                          error => {
                            console.log(error);
                          },
                          () => {
                            // alert('新增完成');
                          }
                        );
    } else {
      this.clientService.updateClientInfo(this.clientForm.value)
                        .subscribe(
                          resp => {
                            // console.log(resp);
                            // alert(resp.message);
                            if (resp.code === 0 ) {
                              alert('客户信息更新成功');
                            }
                            if (this.clientInfoType === 'base') {
                              this._router.navigate(['/client/clientBaseInfo']);
                            }
                            if (this.clientInfoType === 'detail') {
                              this._router.navigate(['/client/clientDetailInfo']);
                            }
                          },
                          error => {
                            console.log(error);
                          },
                          () => {
                            // alert('更新完成');
                          }
                        );
    }
  }

  // 取消客户信息编辑操作
  onCancel() {
    this.onReturnRouter();
  }

  // 根据queryParams中的clientInfoType确定该返回到那个路由
  onReturnRouter() {
    if (this.clientInfoType === 'base') {
      this._router.navigate(['/client/clientBaseInfo']);
    }
    if (this.clientInfoType === 'detail') {
      this._router.navigate(['/client/clientDetailInfo']);
    }
  }

  // 自动义过滤器
  myValidator(fc: FormControl, num: number): {[key: string]: any} {
    const valid = fc.value === 'warrior';
    return valid ? null : {myValidator: true}
  }
  idcardLengthValidator(fc: FormControl): {[key: string]: any} {
    const valid = fc.value.length === 18;
    return valid ? null : {idcardLengthValidator: {requiredLength: '身份证编号必须是18位字符串'}};
  }
  phoneValidator(phone: FormControl): {[key: string]: any} {
    const value = phone.value || '';
    const valid = value.match(/^d{11}$/);
    return valid ? null : {phoneValidator: {desc:'联系电话必须是11位数字'}}
  }
  genderValidator(gender: FormControl): {[key: string]: any} {
    const value = gender.value;
    let valid = false;
    if ( value == '男' || value == '女' || value ==  '不' ) {
        valid = true;
    }
    return valid ? null : {genderValidator: {desc: '性别只能从下拉框进行选择'}};
  }

}
3 HTTP
Angular有自己的HTTP库来调用外部的API,在Angular中采用observable来实现异步请求
HTTP官方文档:点击前往
技巧01:angular的HTTP服务提供的相关方法返回的是一个可观察对象(即:observable),而且这个可观察对象中的数据是Response类型;我们可以利用josn()方法来将数据类型转化成一个javaScript对象
3.1 GET请求
get(url: string, options?: RequestOptionsArgs): Observable<Response>
get方法需要传入两个参数
参数1:请求路径,必填
参数2:请求参数,可选
interface RequestOptionsArgs {
  url?: string|null
  method?: string|RequestMethod|null
  search?: string|URLSearchParams|{[key: string]: any | any[]}|null
  params?: string|URLSearchParams|{[key: string]: any | any[]}|null
  headers?: Headers|null
  body?: any
  withCredentials?: boolean|null
  responseType?: ResponseContentType|null
}
技巧01:有get请求的方法签名可以看出,get请求返回的是一个可观察对象,而且可观察对象中的数据类型是Response类型
3.1.1 编程步骤
> 准备好后台接口
API:http://127.0.0.1:4200/dev/test/testGet
package cn.xiangxu.springboottest.TestDemo;

import cn.xiangxu.springboottest.commons.enums.GirlEnum;
import cn.xiangxu.springboottest.commons.exceptions.GirlException;
import cn.xiangxu.springboottest.model.dataViewModel.ResultViewModel;
import cn.xiangxu.springboottest.utils.ResultViewModelUtil;
import lombok.extern.slf4j.Slf4j;
import org.springframework.web.bind.annotation.GetMapping;
import org.springframework.web.bind.annotation.RequestMapping;
import org.springframework.web.bind.annotation.RestController;

@RestController
//@RequestMapping(value = "/myServlet")
@RequestMapping(value = "test")
@Slf4j
public class TestDemoController {

    @GetMapping(value = "/test01")
    public String test01() {
//        throw new GirlException(GirlEnum.PARAM_ERROR);
        return "hello boy";
    }

    @GetMapping(value = "testGet")
    public ResultViewModel testGet() {
        log.info("测试get请求");
        return ResultViewModelUtil.success("测试Get请求成功");
    }

}
> 在模块级别引入HttpModule

import { BrowserModule } from '@angular/platform-browser';
import { NgModule } from '@angular/core';

import { AppComponent } from './app.component';
import { TestComponent } from './test/test.component';
import {FormsModule, ReactiveFormsModule} from '@angular/forms';

import {HomeModule} from './home/home.module';
import {SharedModule} from './shared/shared.module';

import {
  AccordionModule,
  AlertModule,
  CarouselModule
} from 'ngx-bootstrap';
import {AppRouting} from './app.routing';
import {LoginModule} from './login/login.module';
import {BrowserAnimationsModule} from '@angular/platform-browser/animations';
import {HttpModule} from '@angular/http';

@NgModule({
  declarations: [
    AppComponent,
    TestComponent
  ],
  imports: [
    SharedModule,
    BrowserModule,
    HttpModule,
    FormsModule,
    ReactiveFormsModule,
    BrowserAnimationsModule,
    HomeModule,
    LoginModule,
    AppRouting,
    AccordionModule.forRoot(),
    AlertModule.forRoot(),
    CarouselModule.forRoot()
  ],
  providers: [],
  bootstrap: [AppComponent]
})
export class AppModule { }
> 在组件中依赖注入Http常量
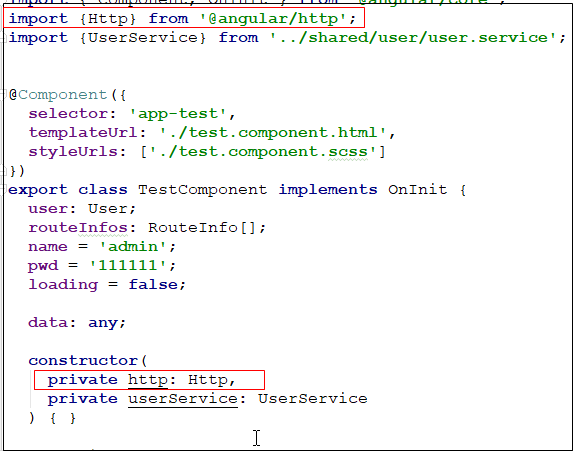
> 在组件的TS文件中调用get方法发送get请求
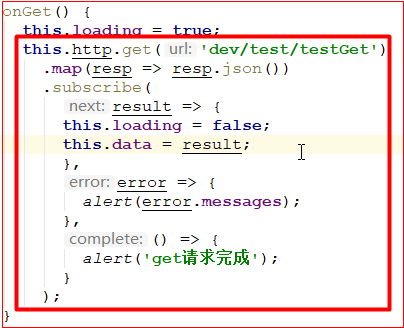
  onGet() {
    this.loading = true;
    this.http.get('dev/test/testGet')
      .map(resp => resp.json())
      .subscribe(
        result => {
        this.loading = false;
        this.data = result;
        },
        error => {
          alert(error.messages);
        },
        () => {
          alert('get请求完成');
        }
      );
  }
代码解释01:map函数是rxjs的内容
代码解释02:json() 方法的作用是从可观察对象中Response类型的数据的数据中提取出响应体并解析成一个Object
技巧01:只用被订阅到了后才会触发get请求
技巧02:subscribe方法支持可以传入三个参数
参数1 -> 请求成功的处理方法(必选,请求成功时就会执行)
参数2 -> 请求失败的处理方法(可选,遇到错误时就会执行)
参数3 -> 请求完成的处理方法(可选,无论请求成功与否都会执行)
3.2 POST请求
post(url: string, body: any, options?: RequestOptionsArgs): Observable<Response>
post方法需要传入3个参数:
参数1:请求路径
参数2:请求体(一般把请求数据放在里面)
参数3:请求参数(例如:请求头信息)
interface RequestOptionsArgs {
  url?: string|null
  method?: string|RequestMethod|null
  search?: string|URLSearchParams|{[key: string]: any | any[]}|null
  params?: string|URLSearchParams|{[key: string]: any | any[]}|null
  headers?: Headers|null
  body?: any
  withCredentials?: boolean|null
  responseType?: ResponseContentType|null
}
3.2.1 编程步骤
> 准备后台API

package cn.xiangxu.springboottest.TestDemo;

import cn.xiangxu.springboottest.commons.enums.GirlEnum;
import cn.xiangxu.springboottest.commons.exceptions.GirlException;
import cn.xiangxu.springboottest.model.dataViewModel.ResultViewModel;
import cn.xiangxu.springboottest.utils.ResultViewModelUtil;
import lombok.extern.slf4j.Slf4j;
import org.springframework.web.bind.annotation.*;

@RestController
//@RequestMapping(value = "/myServlet")
@RequestMapping(value = "test")
@Slf4j
public class TestDemoController {

    @GetMapping(value = "/test01")
    public String test01() {
//        throw new GirlException(GirlEnum.PARAM_ERROR);
        return "hello boy";
    }

    @GetMapping(value = "testGet")
    public ResultViewModel testGet() {
        log.info("测试get请求");
        return ResultViewModelUtil.success("测试Get请求成功");
    }

    @PostMapping(value = "testPost")
    public ResultViewModel testPost(
            @RequestParam String name,
            @RequestParam Integer age
    ) {
        log.info("获取到的参数为:{} --- {}", name, age);
        log.info("测试Post请求");
        return ResultViewModelUtil.success("测试Post请求成功");
    }

}
> 在模块级别导入HttpModule
> 在组件中依赖注入Http常量
> 在组件的TS中通过Http常量调用post方法
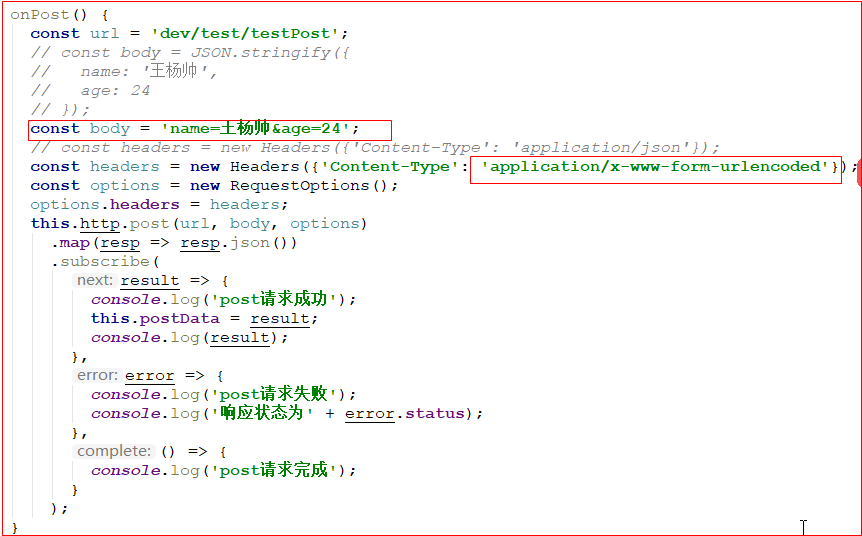
坑01:当后台使用 @RequestParam 注解来接收参数时,angular2前端的数据格式必须是 const body = 'name=三少&age=24',而且请求头的Content-type值必须为:'application/x-www-form-urlencoded'
坑02:当后台使用 @RequestBody 注解来接收参数时,angular2前端的数据格式必须是
    const body = JSON.stringify({
      name: '王杨帅',
      age: 24
    });
而且请求头的Content-type值必须是application/json
  onPost() {
    const url = 'dev/test/testPost';
    // const body = JSON.stringify({
    //   name: '王杨帅',
    //   age: 24
    // });
    const body = 'name=王杨帅&age=24';
    // const headers = new Headers({'Content-Type': 'application/json'});
    const headers = new Headers({'Content-Type': 'application/x-www-form-urlencoded'});
    const options = new RequestOptions();
    options.headers = headers;
    this.http.post(url, body, options)
      .map(resp => resp.json())
      .subscribe(
        result => {
          console.log('post请求成功');
          this.postData = result;
          console.log(result);
        },
        error => {
          console.log('post请求失败');
          console.log('响应状态为' + error.status);
        },
        () => {
          console.log('post请求完成');
        }
      );
  }
3.2.2 参考文档
4 表单元素双向绑定
4.1 利用ngModel实现
4.1.1 在模块级别导入 FormsModule

import { FormsModule} from '@angular/forms';
4.1.2 在组件中使用ngModel指令
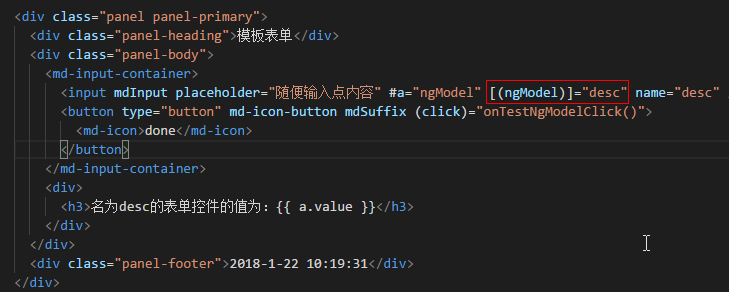
<div class="panel panel-primary">
  <div class="panel-heading">模板表单</div>
  <div class="panel-body">
    <md-input-container>
      <input mdInput placeholder="随便输入点内容" #a="ngModel" [(ngModel)]="desc" name="desc" />
      <button type="button" md-icon-button mdSuffix (click)="onTestNgModelClick()">
        <md-icon>done</md-icon>
      </button>
    </md-input-container>
    <div>
      <h3>名为desc的表单控件的值为:{{ a.value }}</h3>
    </div>
  </div>
  <div class="panel-footer">2018-1-22 10:19:31</div>
</div>
4.1.3 在控制类中定义变量
import { Component, OnInit, HostListener} from '@angular/core';
import { FormControl } from '@angular/forms';

@Component({
  selector: 'app-test01',
  templateUrl: './test01.component.html',
  styleUrls: ['./test01.component.scss']
})
export class Test01Component implements OnInit {

  name: FormControl = new FormControl();

  desc: string = 'hello boy';

  taskLists = [
    {label: 1, name: '进行中'},
    {label: 2, name: '已完成'}
  ];

  constructor() {}

  ngOnInit() {
    this.name.valueChanges
    .debounceTime(500)
    .subscribe(value => alert(value));
  }

  @HostListener('keyup.enter')
  onTestNgModelClick() {
    alert('提交');
  }

}
4.2 利用FormControl实现
4.2.1 在模块级别导入ReactiveFormsModule
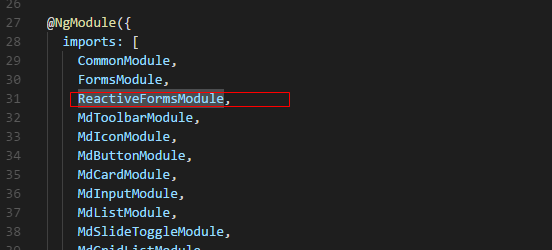
import { ReactiveFormsModule } from '@angular/forms';
4.2.2 在组件中使用fromControl属性
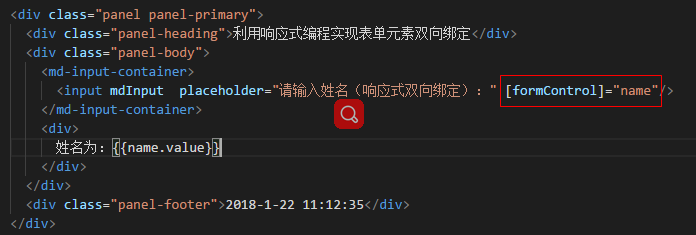
<div class="panel panel-primary">
  <div class="panel-heading">利用响应式编程实现表单元素双向绑定</div>
  <div class="panel-body">
    <md-input-container>
      <input mdInput  placeholder="请输入姓名(响应式双向绑定):" [formControl]="name"/>
    </md-input-container>
    <div>
      姓名为:{{name.value}}
    </div>
  </div>
  <div class="panel-footer">2018-1-22 11:12:35</div>
</div>
4.2.3 在控制类中定义变量,并实现响应式监控表单控件数据变化
坑01:利用响应式监控表单值时需要用到RXJS的操作符,所以必须在组件或者模块级别导入先关的RXJS操作符
技巧01:一般是将RXJS相关的操作符在核心模块中进行导入,然后将核心模块导入主模块进行啦,这样就可以防止RXJS操作多次导入;注意:核心模块只能导入一次
技巧02:本案例没有在组件中导入RXJS先关操作符,应该是在模块级别或者核心模块中进行了RXJS操作符的导入操作,在本博客中并没有将那部分代码提出来而已
技巧03:本案例涉及到的RXJS操作符是 debounceTime , 所以需要在组件或者模块级别中导入 debounceTime
import 'rxjs/add/operator/debounceTime';
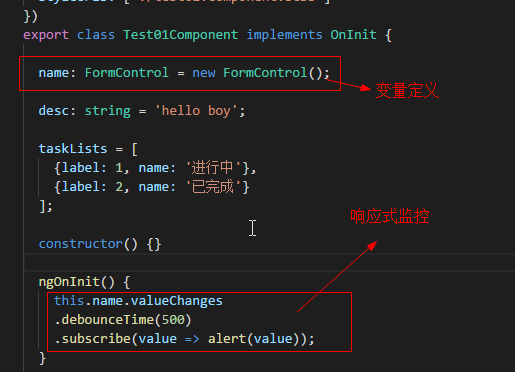
import { Component, OnInit, HostListener} from '@angular/core';
import { FormControl } from '@angular/forms';
@Component({
selector: 'app-test01',
templateUrl: './test01.component.html',
styleUrls: ['./test01.component.scss']
})
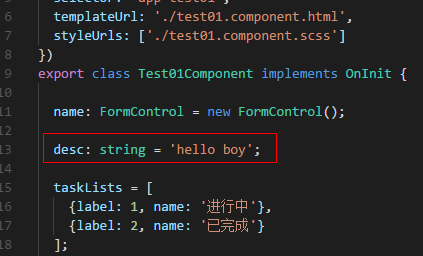
export class Test01Component implements OnInit {
name: FormControl = new FormControl();
desc: string = 'hello boy';
taskLists = [
{label: 1, name: '进行中'},
{label: 2, name: '已完成'}
];
constructor() {}
ngOnInit() {
this.name.valueChanges
.debounceTime(500)
.subscribe(value => alert(value));
}
@HostListener('keyup.enter')
onTestNgModelClick() {
alert('提交');
}
}