RESideMenu第三方storyboard的使用方法
step1
创建一个继承于RESideMenu的子类Viewcontroller
RootViewController。h
#import "RESideMenu.h"
@interface RootViewController : RESideMenu
@end
在storyboard中关联RootViewController, 并将其设置为根视图

step 2
在storyboard中添加一个navigation Controller和Viewcontroller,并且给navigation Controller添加storyboard ID, 点击item按住鼠标右键拖拽,选中presentleftMenuViewController, 点击item时就会出现抽屉效果

step 3
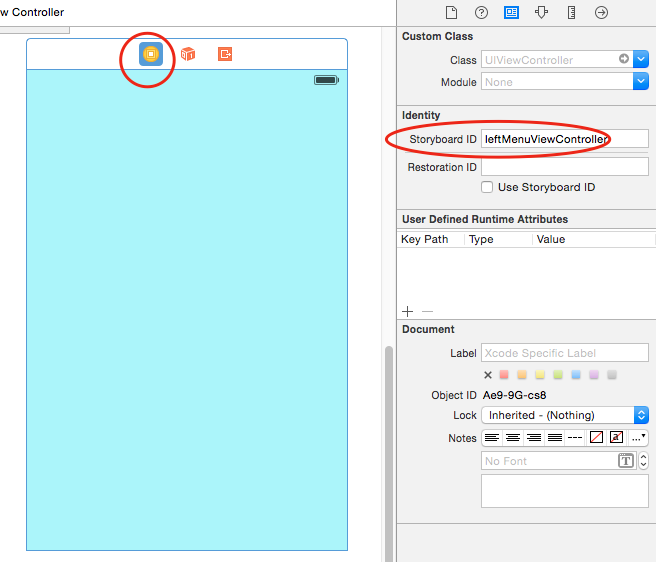
在storyboard中添加一个viewcontroller, 作为抽屉展示的视图,添加添加storyboard ID
step4
最后在RootViewcontroller.m中添加代码就能实现抽屉效果
#import "RootViewController.h"
#import "ViewController.h"
#import "RESideMenu.h"
@interface RootViewController ()<RESideMenuDelegate>
@end
@implementation RootViewController

- (void)awakeFromNib
{
    self.contentViewController = [self.storyboard instantiateViewControllerWithIdentifier:@"contentViewController"];
//    self.contentViewController = self;
    self.leftMenuViewController = [self.storyboard instantiateViewControllerWithIdentifier:@"leftMenuViewController"];
    self.menuPreferredStatusBarStyle = UIStatusBarStyleLightContent;
    self.contentViewShadowColor = [UIColor blackColor];
    self.contentViewShadowOffset = CGSizeMake(0, 0);
    self.contentViewShadowOpacity = 0.6;
    self.contentViewShadowRadius = 12;
    self.contentViewShadowEnabled = NO;
//    self.rightMenuViewController = [self.storyboard instantiateViewControllerWithIdentifier:@"rightMenuViewController"];
}
效果图:

注: leftViewController可以是一个tableView,点击跳转页面效果将contentViewController改变即可, 关键实现代码
@interface DEMOLeftMenuViewController ()

@property (strong, readwrite, nonatomic) UITableView *tableView;

@end

@implementation DEMOLeftMenuViewController

- (void)viewDidLoad
{
    [super viewDidLoad];
    self.tableView = ({
        UITableView *tableView = [[UITableView alloc] initWithFrame:CGRectMake(0, (self.view.frame.size.height - 54 * 5) / 2.0f, self.view.frame.size.width, 54 * 5) style:UITableViewStylePlain];
        tableView.autoresizingMask = UIViewAutoresizingFlexibleTopMargin | UIViewAutoresizingFlexibleBottomMargin | UIViewAutoresizingFlexibleWidth;
        tableView.delegate = self;
        tableView.dataSource = self;
        tableView.opaque = NO;
        tableView.backgroundColor = [UIColor clearColor];
        tableView.backgroundView = nil;
        tableView.separatorStyle = UITableViewCellSeparatorStyleNone;
        tableView.bounces = NO;
        tableView.scrollsToTop = NO;
        tableView;
    });
    [self.view addSubview:self.tableView];
}

#pragma mark -
#pragma mark UITableView Delegate

- (void)tableView:(UITableView *)tableView didSelectRowAtIndexPath:(NSIndexPath *)indexPath
{
    [tableView deselectRowAtIndexPath:indexPath animated:YES];
    switch (indexPath.row) {
        case 0:
            [self.sideMenuViewController setContentViewController:[[UINavigationController alloc] initWithRootViewController:[self.storyboard instantiateViewControllerWithIdentifier:@"firstViewController"]]
                                                         animated:YES];
            [self.sideMenuViewController hideMenuViewController];
            break;
        case 1:
            [self.sideMenuViewController setContentViewController:[[UINavigationController alloc] initWithRootViewController:[self.storyboard instantiateViewControllerWithIdentifier:@"secondViewController"]]
                                                         animated:YES];
            [self.sideMenuViewController hideMenuViewController];
            break;
        default:
            break;
    }
}

#pragma mark -
#pragma mark UITableView Datasource

- (CGFloat)tableView:(UITableView *)tableView heightForRowAtIndexPath:(NSIndexPath *)indexPath
{
    return 54;
}

- (NSInteger)numberOfSectionsInTableView:(UITableView *)tableView
{
    return 1;
}

- (NSInteger)tableView:(UITableView *)tableView numberOfRowsInSection:(NSInteger)sectionIndex
{
    return 5;
}

- (UITableViewCell *)tableView:(UITableView *)tableView cellForRowAtIndexPath:(NSIndexPath *)indexPath
{
    static NSString *cellIdentifier = @"Cell";

    UITableViewCell *cell = [tableView dequeueReusableCellWithIdentifier:cellIdentifier];

    if (cell == nil) {
        cell = [[UITableViewCell alloc] initWithStyle:UITableViewCellStyleDefault reuseIdentifier:cellIdentifier];
        cell.backgroundColor = [UIColor clearColor];
        cell.textLabel.font = [UIFont fontWithName:@"HelveticaNeue" size:21];
        cell.textLabel.textColor = [UIColor whiteColor];
        cell.textLabel.highlightedTextColor = [UIColor lightGrayColor];
        cell.selectedBackgroundView = [[UIView alloc] init];
    }

    NSArray *titles = @[@"Home", @"Calendar", @"Profile", @"Settings", @"Log Out"];
    NSArray *images = @[@"IconHome", @"IconCalendar", @"IconProfile", @"IconSettings", @"IconEmpty"];
    cell.textLabel.text = titles[indexPath.row];
    cell.imageView.image = [UIImage imageNamed:images[indexPath.row]];

    return cell;
}