本文将叙述TS在RN的具体应用和具体JS转TS的步骤要点
TS泛型介绍
- 泛型进行了传入传出值的类型约束
- 变量约束:
message:T - 函数、类约束:
使用泛型创建工厂函数
- 变量约束:
class BeeKeeper {
    hasMask: boolean;
}

class ZooKeeper {
    nametag: string;
}

class Animal {
    numLegs: number;
}

class Bee extends Animal {
    keeper: BeeKeeper;
}

class Lion extends Animal {
    keeper: ZooKeeper;
}

function createInstance<A extends Animal>(c: new () => A): A {
    return new c();
}

createInstance(Lion).keeper.nametag;  // typechecks!
createInstance(Bee).keeper.hasMask;   // typechecks!
泛型类
class Greeter<T> {
    greeting: T;
    constructor(message: T) {
        this.greeting = message;
    }
    greet() {
        return this.greeting;
    }
}

let greeter = new Greeter<string>("Hello, world");
无状态组件(函数组件)
- 函数组件因为不能保存属性,所以只能对props进行操作,不能保存state属性
在JS中我们是这样封装一个函数组件的
import * as React from 'react'

export const Logo = props => {
    const { logo, className, alt } = props

    return (
        <img src={logo} className={className} alt={alt} />
    )
}
但是这样会在TS中出错,因为props里面的变量并没有声明,TS需要对props进行类型声明,所以我们需要用interface来声明。
import * as React from 'react'

interface IProps {
    logo?: string
    className?: string | number
    alt?: string
}

export const Logo = (props: IProps) => {
    const { logo, className, alt } = props

    return (
        <img src={logo} className={className} alt={alt} />
    )
}
- 当我们又要在props加个children组件的话,我们又要在interface里面添加
interface IProps {
	/**
     * logo的地址
     */
    logo?: string
    className?: string
    alt?: string
    children?: ReactNode
}
其实有一种更规范更简单的办法,type SFC<P>已经定义了children类型。
我们只需要这样使用:
export const Logo: React.SFC<IProps> = props => {
    const { logo, className, alt } = props

    return (
        <img src={logo} className={className} alt={alt} />
    )
}
有状态组件(类组件)
- 有状态组件除了props之外还需要state,对于class写法的组件要泛型的支持,即
Component<P, S>,因此需要传入传入state和props的类型,这样我们就可以正常使用props和state了。
import * as React from 'react'

interface Props {
    handleSubmit: (value: string) => void
}

interface State {
    itemText: string
}

export class TodoInput extends React.Component<Props, State> {
    constructor(props: Props) {
        super(props)
        this.state = {
            itemText: ''
        }
    }
}
受控组件
再接着讲我们之前定义的TodoInput组件,其实此组件也是一个受控组件,当我们改变input的value的时候需要调用this.setState来不断更新状态,这个时候就会用到『事件』类型。
对于input组件onChange中的事件,我们一般是这样声明的:
private updateValue(e: React.ChangeEvent<HTMLInputElement>) {
    this.setState({ itemText: e.target.value })
}
当我们需要提交表单的时候,需要这样定义事件类型:
interface Props {
    handleSubmit: (value: string) => void
}
private handleSubmit(e: React.FormEvent<HTMLFormElement>) {
    e.preventDefault()
    if (!this.state.itemText.trim()) {
        return
    }

    this.props.handleSubmit(this.state.itemText)
    this.setState({itemText: ''})
}
默认属性
- 假设我们需要通过props来给input组件传递属性,而且需要初始值,我们这个时候完全可以通过class来进行代码简化。
// props.type.ts

interface InputSetting {
    placeholder?: string
    maxlength?: number
}

export class TodoInputProps {
    public handleSubmit: (value: string) => void
    public inputSetting?: InputSetting = {
        maxlength: 20,
        placeholder: '请输入todo',
    }
}
- 再回到
TodoInput组件中,我们直接用class作为类型传入组件,同时实例化类,作为默认属性。 - 注意:TS类中的静态属性不能在类外部创建,也就是不能
TodoInput.defaultProps = {}
export class TodoInput extends React.Component<TodoInputProps, State>{
	public static defaultProps = new TodoInputProps();
}
用class作为props类型以及生产默认属性实例有以下好处:
- 代码量少:一次编写,既可以作为类型也可以实例化作为值使用
- 避免错误:分开编写一旦有一方造成书写错误不易察觉
!解决默认变量未定义
这种方法虽然不错,但是之后我们会发现问题了,虽然我们已经声明了默认属性,但是在使用的时候,依然显示inputSetting可能未定义。
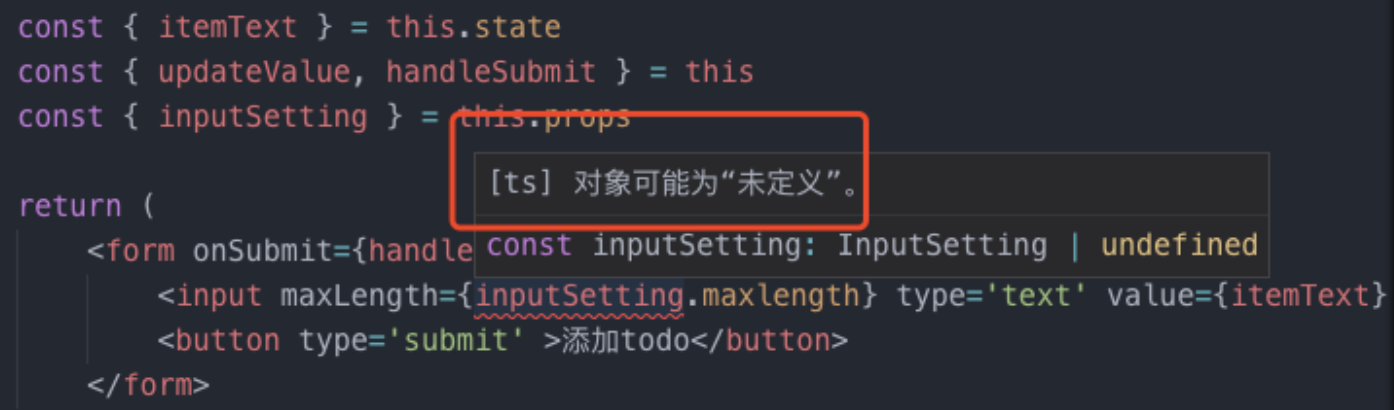
解决方式是加!,他的作用是告诉编译器这个变量不是undefined, inputSetting!.length
还可以用三目运算符
声明数组时一定要加上类型
errors: any[],不然就是never
声明对象中的键值对
在本项目的Block RN样式预定义时,我们没有在RN原生的styles上用预先设置好的泛型,就只是一个styles
//无泛型
export const styles = StyleSheet.create({
  block: {
    flex: 1
  },
  row: {
    flexDirection: "row"
  },
  column: {
    flexDirection: "column"
  },
  card: {
    borderRadius: theme.sizes.radius
  },
  center: {
    alignItems: "center"
  },
  middle: {
    justifyContent: "center"
  },
  left: {
    justifyContent: "flex-start"
  },
  right: {
    justifyContent: "flex-end"
  },
  top: {
    justifyContent: "flex-start"
  },
  bottom: {
    justifyContent: "flex-end"
  },
  shadow: {
    shadowColor: theme.colors.black,
    shadowOffset: { width: 0, height: 2 },
    shadowOpacity: 0.1,
    shadowRadius: 13,
    elevation: 2
  },
  accent: { backgroundColor: theme.colors.accent },
  primary: { backgroundColor: theme.colors.primary },
  secondary: { backgroundColor: theme.colors.secondary },
  tertiary: { backgroundColor: theme.colors.tertiary },
  black: { backgroundColor: theme.colors.black },
  white: { backgroundColor: theme.colors.white },
  gray: { backgroundColor: theme.colors.gray },
  gray2: { backgroundColor: theme.colors.gray2 }
});
在之后的BlockStyles包裹引用中
color && styles[color],
color && !styles[color] && { backgroundColor: color },
这两个进行了键值对的搜索,但是会报错,如下图
const blockStyles = [
      styles.block,
      flex && { flex },
      flex === false && { flex: 0 }, // reset / disable flex
      row && styles.row,
      column && styles.column,
      center && styles.center,
      middle && styles.middle,
      left && styles.left,
      right && styles.right,
      top && styles.top,
      bottom && styles.bottom,
      margin && { ...this.handleMargins() },
      padding && { ...this.handlePaddings() },
      card && styles.card,
      shadow && styles.shadow,
      space && { justifyContent: `space-${space}` },
      wrap && { flexWrap: "wrap" },
      color && styles[color], // predefined styles colors for backgroundColor
      color && !styles[color] && { backgroundColor: color }, // custom backgroundColor
      style // rewrite predefined styles
    ];
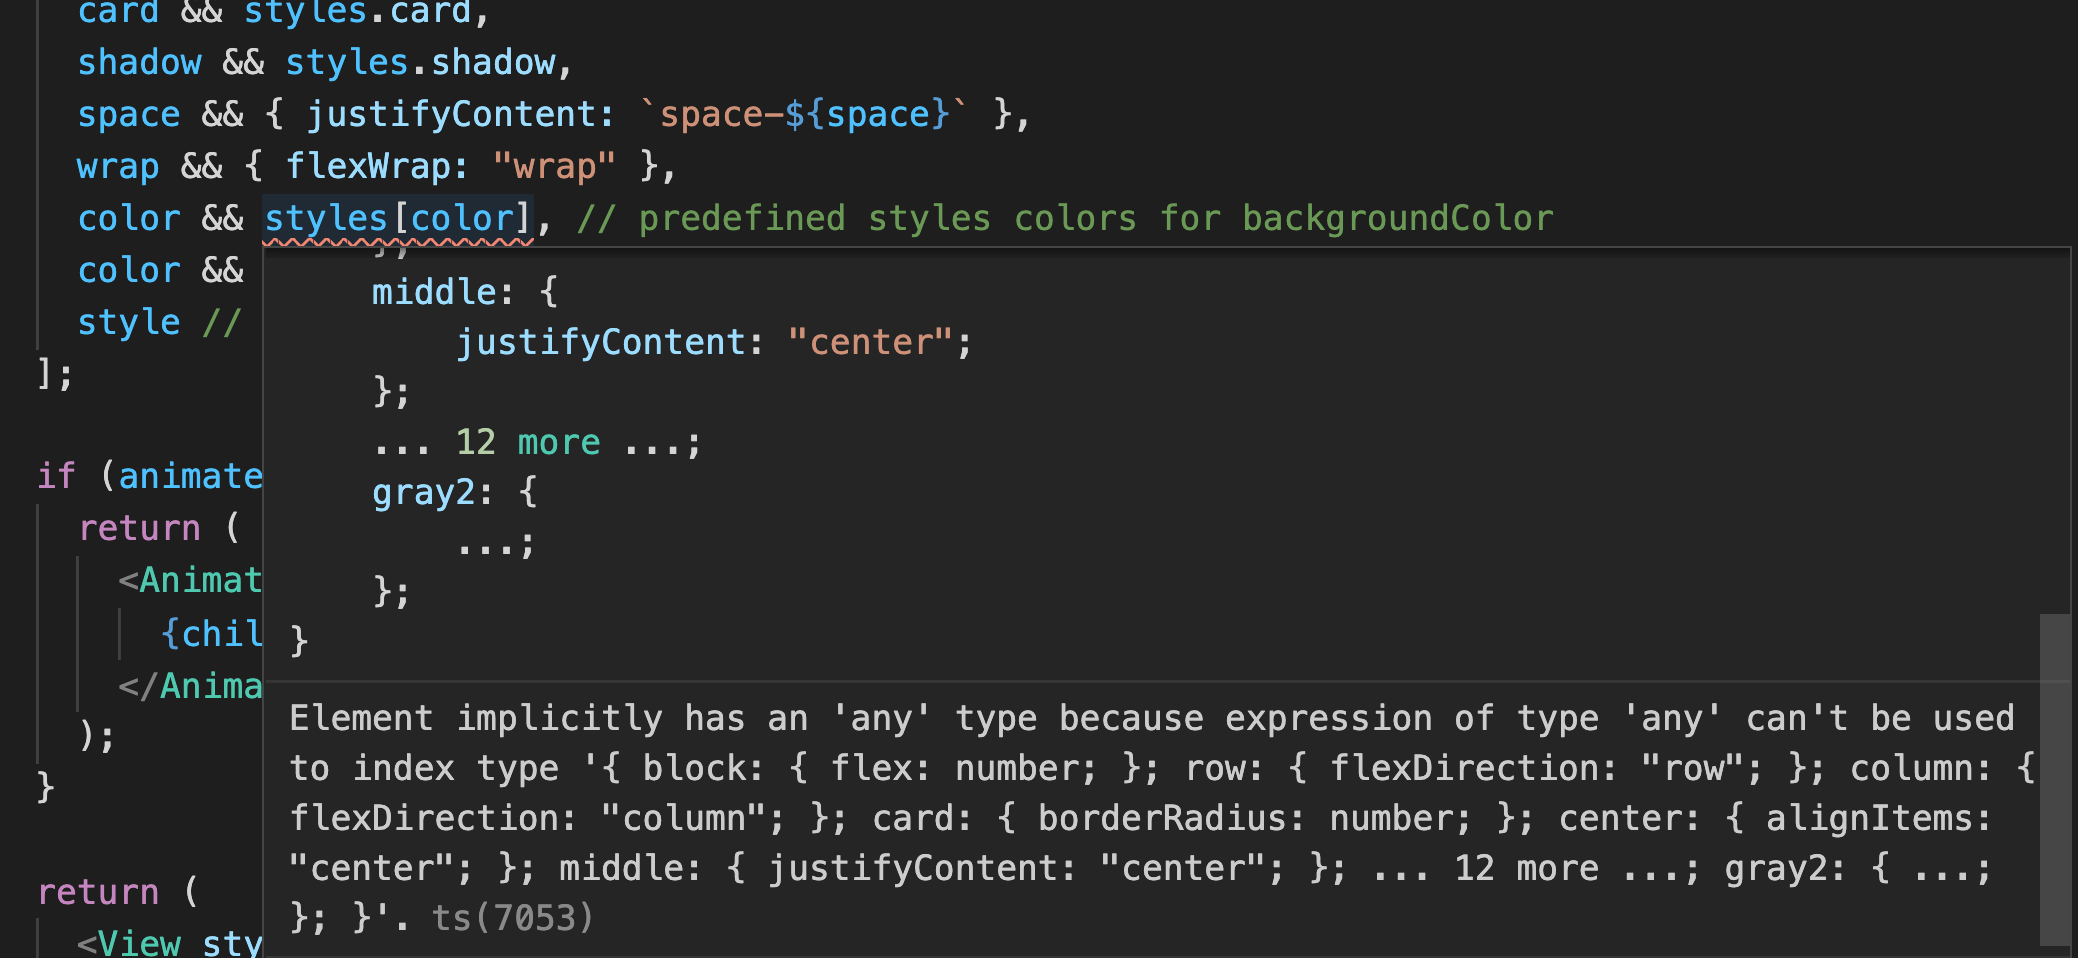
因为index不能为any,所以需要进行泛型约束index的类型。
interface IProps{
  [key: string]: any;
  [key: number]: any;
  // [key: string]: ()=>{};
}
export const styles:IProps = StyleSheet.create({})
以下请 参考此文