在实际环境中,我们的应用程序会有多个服务调用者,如何将其组织起来统一对外提供服务呢?我们可以使用Netflix的Zuul框架构建微服务集群网关来解决这个问题。
1. Zuul框架介绍
1.1 关于Zuul
Spring Cloud提供了多个组件用于集群内部的通信,例如服务管理组件Eureka,负载均衡组件Ribbon,REST客户端组件Feign等等。如果集群提供可一个API或者Web服务,需要与外部进行通信,最好的方式就是添加一个网关,将集群的服务都隐藏到网关后面,这种做法对于外部客户端来说,无需关心集群的内部结构,只需关心网关的配置信息;对于Spring Cloud集群来说,不必过多的暴露服务,提高了集群的安全性。
代理层作为应用集群的大门,在技术选择上尤为重要,很多传统的解决方案,在软件选择上使用了Nginx、Apache等服务器。Netflix提供了自己的解决方案:Zuul。Zuul是Netflix的一个子项目,Spring Cloud对其进行了进一步的封装与实现,将其整合到了spring-netflix项目中,为微服务集群提供代理、过滤和路由等功能。
1.2 Zuul的功能
Zuul将外部的请求划分为不同阶段,每个阶段都提供了一系列的过滤器,这些过滤器可以帮我们实现以下的功能:
》 身份验证和安全性:对需要身份验证的资源进行过滤,拒绝处理不服个身份认证的请求;
》观察和监控:跟踪重要的数据,为我们展示准确的请求状况;
》动态路由:将请求动态路由到不同的服务器;
》负载分配:设置每种请求的处理能力,删除那些超出限制的请求;
》静态相应处理:提供一些静态的过滤器,直接响应一些请求,而不将他们转发到集群内部;
》路由的多样化:除了可以将请求路由到Spring Cloud集群外,还可以将请求路由到其他服务。
2. 在Web项目中使用Zuul
下面将开发一个简单的程序,初步展示Zuul的功能。,程序架构如下

2.1 Web项目整合Zuul
新建一个maven的测试项目,测试项目的目录结构及架构图如下

其中网关项目firstrouter在8080端口启动,而服务项目bookserver在8090端口启动。在firstrouter项目中引入相关的依赖,代码清单如下
pom.xml
<?xml version="1.0" encoding="UTF-8"?>
<project xmlns="http://maven.apache.org/POM/4.0.0"
         xmlns:xsi="http://www.w3.org/2001/XMLSchema-instance"
         xsi:schemaLocation="http://maven.apache.org/POM/4.0.0 http://maven.apache.org/xsd/maven-4.0.0.xsd">
    <modelVersion>4.0.0</modelVersion>

    <groupId>com.triheart</groupId>
    <artifactId>firstrouter</artifactId>
    <version>1.0-SNAPSHOT</version>

    <dependencyManagement>
        <dependencies>
            <dependency>
                <groupId>org.springframework.cloud</groupId>
                <artifactId>spring-cloud-dependencies</artifactId>
                <version>Dalston.SR1</version>
                <type>pom</type>
                <scope>import</scope>
            </dependency>
        </dependencies>
    </dependencyManagement>
    <dependencies>
        <dependency>
            <groupId>org.springframework.cloud</groupId>
            <artifactId>spring-cloud-starter-zuul</artifactId>
        </dependency>
        <dependency>
            <groupId>org.apache.httpcomponents</groupId>
            <artifactId>httpclient</artifactId>
            <version>4.5.3</version>
        </dependency>
    </dependencies>
</project>
我们需要为项目加入spring-cloud-stater-zuul依赖,由于Zuul底层使用了HttpClient,因此需要加入相应的依赖。为了能让Web项目开启对Zuul项目的支持,我们需要在启动类中加入@EnableZuulProxy注解,代码清单如下
RouterApp.java
package com.triheart.firstrouter;

import org.springframework.boot.autoconfigure.SpringBootApplication;
import org.springframework.boot.builder.SpringApplicationBuilder;
import org.springframework.cloud.netflix.zuul.EnableZuulProxy;

/**
 * @author 阿遠
 * Date: 2018/9/2
 * Time: 14:33
 */
@SpringBootApplication
@EnableZuulProxy
public class RouterApp {

    public static void main(String[] args){
        new SpringApplicationBuilder(RouterApp.class).properties("server.port=8080").run(args);
    }
}
我们项目的启动端口设置为8080,现在我们已经完成了一个拥有Zuul功能的Web项目,接下来,我们测试其路由功能。
2.2测试路由功能
新建名为bookserver的maven项目,该项目是一个普通的Spring Boot项目,依赖如下
pom.xml
<?xml version="1.0" encoding="UTF-8"?>
<project xmlns="http://maven.apache.org/POM/4.0.0"
         xmlns:xsi="http://www.w3.org/2001/XMLSchema-instance"
         xsi:schemaLocation="http://maven.apache.org/POM/4.0.0 http://maven.apache.org/xsd/maven-4.0.0.xsd">
    <modelVersion>4.0.0</modelVersion>

    <groupId>com.triheart</groupId>
    <artifactId>bookserver</artifactId>
    <version>1.0-SNAPSHOT</version>

    <dependencies>
        <dependency>
            <groupId>org.springframework.boot</groupId>
            <artifactId>spring-boot-starter-web</artifactId>
            <version>1.5.4.RELEASE</version>
        </dependency>
    </dependencies>

</project>
再为bookserver添加一个/hello服务,为了简单起见我们将项目的启动器和控制器写在一起,代码清单如下
ServerApp.java
package com.triheart.bookserver;

import org.springframework.boot.autoconfigure.SpringBootApplication;
import org.springframework.boot.builder.SpringApplicationBuilder;
import org.springframework.web.bind.annotation.PathVariable;
import org.springframework.web.bind.annotation.RequestMapping;
import org.springframework.web.bind.annotation.RequestMethod;
import org.springframework.web.bind.annotation.RestController;

/**
 * @author 阿遠
 * Date: 2018/9/2
 * Time: 14:37
 */
@SpringBootApplication
@RestController
public class ServerApp {

    @RequestMapping(value = "/hello/{name}", method = RequestMethod.GET)
    public String hello(@PathVariable("name") String name) {
        return "hello  " + name;
    }

    public static void main(String[] args){
        new SpringApplicationBuilder(ServerApp.class).properties("server.port=8090").run(args);
    }
}
我们将项目的端口设置为8090,在控制器中,建立了一个/hello/{name}的服务,服务成功调用后,会返回相应的字符串。接下来,我们修改firstrouter项目的配置文件,让其进行转发工作。
为firstrouter项目添加application.yml文件,代码清单如下
application.yml
zuul:
  routes:
    books:
      url: http://localhost:8090
加入以上的配置后,发送给http://localhost:8080/books的所有请求会被转发到8090端口,也就是访问firstrouter项目,实际上会调用bookserver的服务。启动两个应用,在浏览器中访问http://localhost:8080/books/hello/ayun,可以看到浏览器的输出如下:

我们可以看到,发送的请求已经被转发到bookserver进行处理。
3.过滤器运行机制
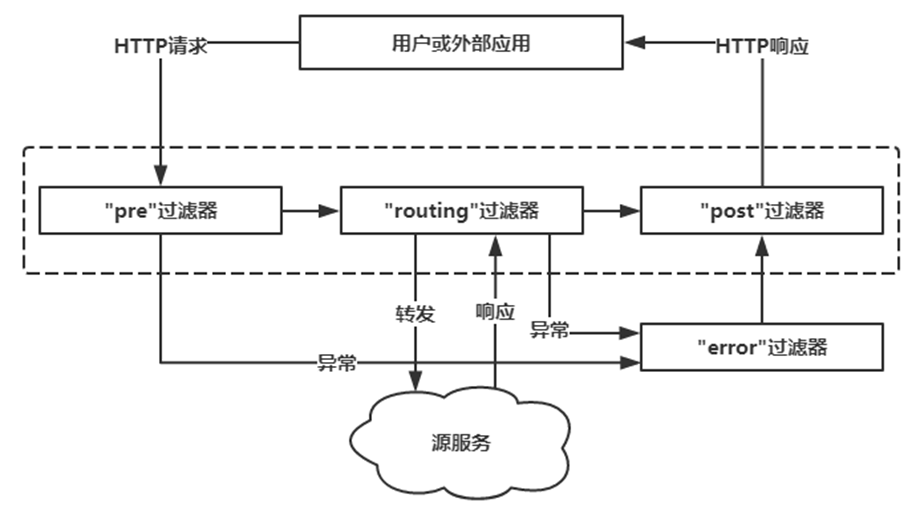
在前面的项目中,我们使用了@EnableZuulProxy注解。开启该注解后,在Spring容器初始化时,会将Zuul的相关配置初始化,其中包含一个Spring Boot的Bean:ServletRegistrationBean,该类主要用于注册Servlet。Zuul提供了一个ZuulServlet类,在Servlet的Service方法中,执行各种Zuul过滤器(ZuulFilter)。下图为HTTP请求在ZuulServlet中的生命周期。

ZuulServlet的Service方法接受到请求后,会执行pre阶段的过滤器,再执行routing阶段的过滤器,最后执行post阶段的过滤器。其中routing阶段的过滤器会将请求转发到“源服务”,源服务可以使第三方的Web服务,也可以是Spring Cloud的集群服务。在执行pre和routing阶段的过滤器时,如果出现异常,则会执行error过滤器。整个过程的HTTP请求、HTTP响应、状态等数据,都会被封装到一个RequestContext对象中。