可以使用三种方式将回调方法添加到 LocalConnection 对象:
- 使 LocalConnection 类成为子类,并添加方法。
- 将
LocalConnection.client属性设置为实现方法的对象。 - 创建扩展 LocalConnection 的动态类,并动态附加方法。
为了了解如何使用 LocalConnection 对象在两个文件之间进行通信,了解每个文件中使用的命令非常有用。一个文件被称为接收方文件;该文件中包含要调用的方法。接收方文件中必须包含一个 LocalConnection 对象和对 connect() 方法的调用。另一个文件被称为发送方文件;这是调用方法的那个文件。发送方文件中必须包含另一个 LocalConnection 对象和对 send() 方法的调用。
send() 和 connect() 的使用将有所不同,这取决于 文件是在同一个域中、在具有可预知域名的不同域中还是在具有不可预知域名(即动态域名)的不同域中。下文将说明这三种不同的情况,并针对每种情况分别提供代码示例。
同一个域。这是使用 LocalConnection 对象最简单的情况,它只允许在位于同一个域中的 LocalConnection 对象间通信,这是因为默认情况下,应用程序允许同域通信。当同一个域中的两个 文件通信时,无需实施任何特殊的安全措施,而只需将 connectionName 参数的同一个值传递给 connect() 和 send() 方法。
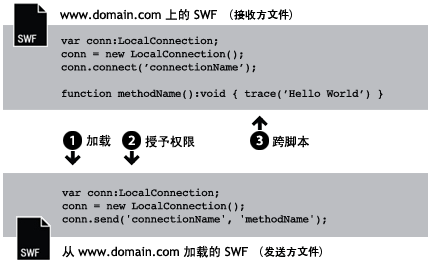
// receivingLC is in http://www.domain.com/receiving.swf
receivingLC.connect('myConnection');

// sendingLC is in http://www.domain.com/sending.swf
// myMethod() is defined in sending.swf
sendingLC.send('myConnection', 'myMethod');
具有可预知域名的不同域。当不同域中的两个 SWF 文件通信时,需要通过调用 allowDomain() 方法来允许在这两个不同域之间进行通信。还需要在 send() 方法中使用接收方 LocalConnection 对象的域名限定连接名:
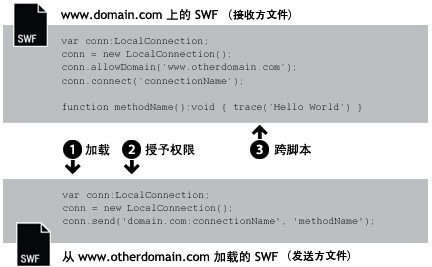
// receivingLC is in http://www.domain.com/receiving.swf
receivingLC.allowDomain('www.anotherdomain.com');
receivingLC.connect('myConnection');

// sendingLC is in http://www.anotherdomain.com/sending.swf
sendingLC.send('www.domain.com:myConnection', 'myMethod');
具有不可预知域名的不同域。有时候,可能希望具有接收方 LocalConnection 对象的 文件在域之间具有更好的可移植性。为了避免在 send() 方法中指定域名,但要指出接收方和发送方 LocalConnection 对象不在同一个域中,可在 connect() 和 send() 调用中的连接名称之前加一个下划线 (_)。要允许在这两个不同域之间通信,请调用 allowDomain() 方法并传递您希望允许 LocalConnection 调用的域。或者,也可以传递通配符 (*) 参数来允许从所有域调用:
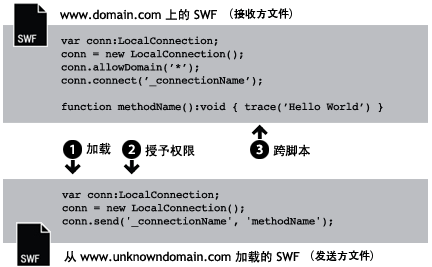
// receivingLC is in http://www.domain.com/receiving.swf
receivingLC.allowDomain('*');
receivingLC.connect('_myConnection');

// sendingLC is in http://www.anotherdomain.com/sending.swf
sendingLC.send('_myConnection', 'myMethod');
从 Flash Player 到 AIR 应用程序。在 AIR 应用程序沙箱中创建的 LocalConnection 对象使用一个特殊字符串作为连接前缀,而不是使用域名。此字符串的格式为 app#appID.pubID,其中,appID 是应用程序 ID,pubID 是应用程序的发行商 ID。(如果 AIR 应用程序使用发行商 ID,则仅包括发行商 ID。)例如,如果 AIR 应用程序的应用程序 ID 为“com.example”,没有发行商 ID,则您可以使用app#com.example:myConnection 作为本地连接字符串。AIR 应用程序还必须调用 allowDomain() 方法,传入调用 SWF 文件的原始域:
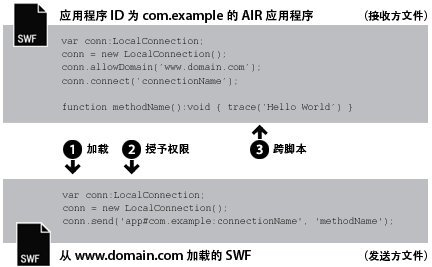
// receivingLC is an AIR application with app ID = com.example (and no publisher ID)
receivingLC.allowDomain('www.domain.com');
receivingLC.connect('myConnection');

// sendingLC is in http://www.domain.com/sending.swf
sendingLC.send('app#com.example:myConnection', 'myMethod');
注意:如果 AIR 应用程序在 AIR 应用程序沙箱外部加载 SWF,则使用该 SWF 建立本地连接的规则与使用 Flash Player 中运行的 SWF 建立连接的规则相同。
从 AIR 应用程序到 Flash Playe。当 AIR 应用程序与 Flash Player 运行时中运行的 SWF 通信时,您需要通过调用 allowDomain() 方法并传入 AIR 应用程序的连接前缀,来允许两者之间的通信。例如,如果 AIR 应用程序的应用程序 ID 为“com.example”,没有发行商 ID,则您可以将字符串 app#com.example 传递给 allowDomain() 方法。您还需要在 send() 方法中使用接收方 LocalConnection 对象的域名(使用“localhost”作为从本地文件系统加载的 SWF 文件的域)来限定连接名:
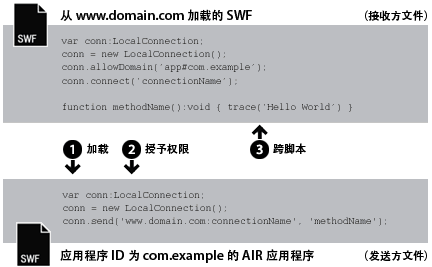
// receivingLC is in http://www.domain.com/receiving.swf
receivingLC.allowDomain('app#com.example');
receivingLC.connect('myConnection');

// sendingLC is an AIR application with app ID = com.example (and no publisher ID)
sendingLC.send('www.domain.com:myConnection', 'myMethod');
从一个 AIR 应用程序到另一个 AIR 应用程序。要在两个 AIR 应用程序之间进行通信,您需要通过调用 allowDomain() 方法并传入发送方 AIR 应用程序的连接前缀,来允许两者之间的通信。例如,如果发送方应用程序的应用程序 ID 为“com.example”,没有发行商 ID,您可以将字符串 app#com.example 传递给接收方应用程序中的 allowDomain() 方法。还需要在 send() 方法中使用接收方 LocalConnection 对象的连接前缀限定连接名:
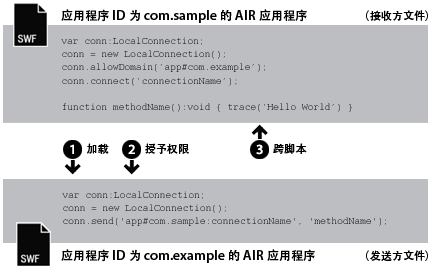
// receivingLC is an AIR application with app ID = com.sample (and no publisher ID)
receivingLC.allowDomain('app#com.example');
receivingLC.connect('myConnection');

// sendingLC is an AIR application with app ID = com.example (and no publisher ID)
sendingLC.send('app#com.sample:myConnection', 'myMethod');
可以使用 LocalConnection 对象发送和接收单个 文件中的数据,但这不是通常的用法。
例子:
发送者
 1 <?xml version="1.0" encoding="utf-8"?>
 2 <mx:Application xmlns:mx="http://www.adobe.com/2006/mxml" layout="absolute" creationComplete="init(event)">
 3     <mx:Script>
 4         <![CDATA[
 5             import mx.events.FlexEvent;
 6
 7             private var lc:LocalConnection;
 8
 9             protected function send(event:FlexEvent):void
10             {
11                 lc.send( "receiver", "receiverMessage", input.text );
12                 lc.addEventListener(StatusEvent.STATUS, onStatus);
13
14             }
15
16             protected function init(event:FlexEvent):void
17             {
18                 lc = new LocalConnection();
19                 lc.client = this;
20                 lc.connect( "receiver2" );
21             }
22
23             protected function onStatus(event:StatusEvent):void
24             {
25                 switch( event.level )
26                 {
27                     case "status":
28                         trace( "message send" );
29                         break;
30                     case "error":
31                         trace( "error" );
32                         break;
33                 }
34             }
35
36             public function receiverMessage(msg:String):void
37             {
38                 msgtext.text += msg + "
";
39             }
40
41         ]]>
42     </mx:Script>
43     <mx:TextInput id="input" left="10" right="10" top="10" enter="send(event)"/>
44     <mx:TextArea id="msgtext" left="10" right="10" top="49" bottom="10"/>
45
46 </mx:Application>
接收者
 1 <?xml version="1.0" encoding="utf-8"?>
 2 <mx:Application xmlns:mx="http://www.adobe.com/2006/mxml" layout="absolute" creationComplete="init(event)" >
 3     <mx:Script>
 4         <![CDATA[
 5             import mx.events.FlexEvent;
 6
 7             private var lc:LocalConnection;
 8
 9             protected function init(event:FlexEvent):void
10             {
11
12                 lc = new LocalConnection();
13
14                 lc.client = this;
15
16                 try
17                 {
18                     lc.connect( "receiver" );
19                 }
20                 catch( e:* )
21                 {
22                     trace( " already exist..... " );
23                 }
24             }
25
26             public function receiverMessage(msg:String):void
27             {
28                 msgtext.text += msg + "
";
29             }
30
31             protected function send(event:FlexEvent):void
32             {
33                 lc.send( "receiver2", "receiverMessage", input.text );
34             }
35
36         ]]>
37     </mx:Script>
38     <mx:TextArea id="msgtext" left="10" right="10" top="45" bottom="10"/>
39     <mx:TextInput id="input" left="10" right="10" top="10" bottom="431" enter="send(event)"/>
40
41 </mx:Application>