写在前面
最近小伙伴们的要求越来越高,学完设计模式学高并发,学完高并发又想学Java8新特性,学完Java8新特性又要学Spring,学着Spring又让我整理一篇关于分布式事务的文章,而且还提出了要求:要实战型的!那好吧,安排上!关于分布式事务,写些啥呢?想来想去,还是按照小伙伴们留言说的:先写一篇关于实战型的文章吧!也是纯技术文章,熬夜两周多整理出来的!在此,也要感谢下在公众号方面给予我支持和帮助的前辈们!
话外音
假如某人有5个女朋友(有点复杂),每天晚上都会给他的女朋友打电话说晚安,那么每给一个女朋友打电话,其他女朋友都要进入等待状态。一个一个打下去。。。等打到最后一个已经是凌晨了,对方都睡了。那么有什么办法可以解决呢?此时这个人可以利用微信公众号将自己甜言蜜语放进公众号中,让他女朋友订阅公众号,则这些女朋友不用依次等待又可收到消息。此原理就是消息队列。
一、什么是中间件
非底层操作系统软件,非业务应用软件,不是直接给最终用户使用,不能直接给客户带来价值的软件统称为中间件。
二、什么是消息中间件
关注于数据的发送和接受,利用高效可靠的异步消息传递机制集成分布式系统。
三、什么是分布式事务
分布式事务是指事务的参与者、支持事务的服务器、资源服务器以及事务管理器分别位于不同的分布式系统的不同节点上
四、如何增强并发能力高并发键壮性
1、负载均衡:预防单点故障,提升键壮性
2、缓存:各种缓存,功盖天下
3、异步:提高并发,提升用户体验
4、读写分离:积微成著,提高吞吐量
五、消息中间件带来的好处
1、解耦:传统模式的缺点:系统间耦合性太强;中间件模式的的优点:将消息写入消息队列,需要消息的系统自己从消息队列中订阅
2、异步:传统模式的缺点:一些非必要的业务逻辑以同步的方式运行,太耗费时间;中间件模式的的优点:将消息写入消息队列,非必要的业务逻辑以异步的方式运行,加快响应速度
3、横向扩展
4、安全可靠
5、顺序保证
六、常用的消息中间件
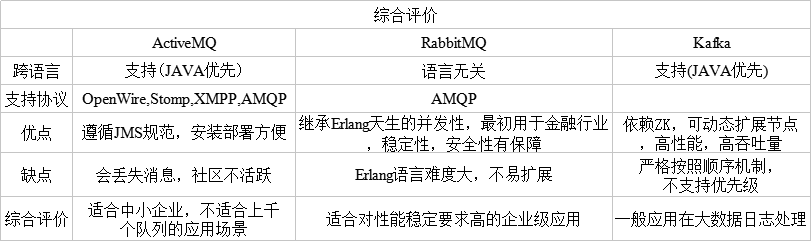
这里我只演示前两者,目前只会前两种(比较流行),至于Kafka是基于日志形式,严格意义上他作于消息中间件角色不是很突出。
七、ActiveMQ
1、什么是JMS规范
Java消息服务(Java Message Service)即JMS,是一个Java平台中面向消息中间件的API,用于在两个应用程序之间或分布式系统中发送/接收消息,进行异步通信。
2、JMS相关概念
1)、消费者/订阅者:接收并处理消息的客户端
2)、消息:应用程序之间传递的数据内容
3)、消息模式:在客户端之间传递消息的方式,JMS中定义了主题和队列两种模式
3、ActiveMQ安装
Window下安装ActiveMQ
1)、下载:ActiveMQ下载
2)、进入bin/win64目录
3)、启动(演示方式一)
方式一:以管理员身份运行activemq.bat(直接可以运行)
方式二: installService.bat是以服务方式启动的,用超级管理员身份运行后还需到服务中启动该服务
4)、根据客户端显示的地址用浏览器进行访问:127.0.0.1:8161
5)、利用默认用户密码为admin admin即可进入管理平台
Linux下载
1)、下载
[root@localhost bin]# wget https://archive.apache.org/dist/activemq/5.14.0/apache-activemq-5.14.0-bin.tar.gz
[root@localhost java]# tar -zxvf apache-activemq-5.14.0-bin.tar.gz
2)、运行
[root@localhost java]# cd apache-activemq-5.14.0/
[root@localhost apache-activemq-5.14.0]# cd bin/
[root@localhost bin]# ./activemq start
[root@localhost bin]# ps -ef | grep activemq
3)、防火墙开启端口号
#activemq
-A INPUT -p tcp --dport 8161 -j ACCEPT
-A INPUT -p tcp --dport 61616 -j ACCEPT
4)、浏览器访问管理平台:activemq的端口号为8161
默认用户名为admin 密码为admin
访问域名:http://Ip:8161
5)、关闭服务
[root@localhost bin]# ./activemq stop
4、实战入门
队列模式
- 导入依赖
<dependencies>
    <dependency>
        <groupId>org.apache.activemq</groupId>
        <artifactId>activemq-all</artifactId>
        <version>5.14.0</version>
    </dependency>
</dependencies>
- 生产者:定义一个生产者类
**
 * 定义生产者
 */
public class AppProducer {
    //61616为activemq默认端口
    private static final String URL="tcp://192.168.174.133:61616";
    private static final String queueName="queue-test";
    public static void main(String[] args) throws JMSException {
        //1.创建ConnectionFactory
        ConnectionFactory connectionFactory=new ActiveMQConnectionFactory(URL);
        //2.创建Connection
        Connection connection=connectionFactory.createConnection();
        //3.启动连接
        connection.start();
        //4.创建会话
        //第一个参数为是否支持事务
        //第二个参数为自动确认,客户端发送和接收消息不需要做额外的工作。哪怕是接收端发生异常,也会被当作正常发送成功
        Session session=connection.createSession(false, Session.AUTO_ACKNOWLEDGE);
        //5.创建一个目标
        Destination destination=session.createQueue(queueName);
        //6.创建一个生产者
        MessageProducer producer=session.createProducer(destination);
        for(int i=0;i<100;i++){
            //7.创建消息
            TextMessage textMessage=session.createTextMessage("text"+i);
            //8.发布消息
            producer.send(textMessage);
            System.out.println("发送消息"+textMessage.getText());
        }
        //9.关闭连接
        connection.close();
    }
}
运行代码,访问http://192.168.174.133:8161/admin/ ,点击queues,此时可以看出生产了100条消息,0个被消费
- 消费者:定义一个消费者类
**
 * 定义消费者
 */
public class AppConsumer {
    //61616为activemq默认端口
    private static final String URL="tcp://192.168.174.133:61616";
    private static final String queueName="queue-test";
    public static void main(String[] args) throws JMSException {
        //1.创建ConnectionFactory
        ConnectionFactory connectionFactory=new ActiveMQConnectionFactory(URL);
        //2.创建Connection
        Connection connection=connectionFactory.createConnection();
        //3.启动连接
        connection.start();
        //4.创建会话
        //第一个参数为是否支持事务
        //第二个参数为自动确认,客户端发送和接收消息不需要做额外的工作。哪怕是接收端发生异常,也会被当作正常发送成功
        Session session=connection.createSession(false, Session.AUTO_ACKNOWLEDGE);
        //5.创建一个目标
        Destination destination=session.createQueue(queueName);
        //6.创建一个消费者
        MessageConsumer consumer=session.createConsumer(destination);
        //7.创建一个监听器
        consumer.setMessageListener(new MessageListener() {
            public void onMessage(Message message) {
                TextMessage textMessage= (TextMessage) message;
                try {
                    System.out.println("接收消息:"+textMessage.getText());
                } catch (JMSException e) {
                    e.printStackTrace();
                }
            }
        });
        //8.关闭连接
        //connection.close();
    }
}
此时运行消费者,可以消费消息,在管理平台也可以看到被消费的消息通知
主题模式
- 生产者
/**
 * 主题模式
 * 定义生产者
 */
public class AppProducer {
    //61616为activemq默认端口
    private static final String URL="tcp://192.168.174.133:61616";
    private static final String topicName="topic-test";
    public static void main(String[] args) throws JMSException {
        //1.创建ConnectionFactory
        ConnectionFactory connectionFactory=new ActiveMQConnectionFactory(URL);
        //2.创建Connection
        Connection connection=connectionFactory.createConnection();
        //3.启动连接
        connection.start();
        //4.创建会话
        //第一个参数为是否支持事务
        //第二个参数为自动确认,客户端发送和接收消息不需要做额外的工作。哪怕是接收端发生异常,也会被当作正常发送成功
        Session session=connection.createSession(false, Session.AUTO_ACKNOWLEDGE);
        //5.创建一个目标
        Destination destination=session.createTopic(topicName);
        //6.创建一个生产者
        MessageProducer producer=session.createProducer(destination);
        for(int i=0;i<100;i++){
            //7.创建消息
            TextMessage textMessage=session.createTextMessage("text"+i);
            //8.发布消息
            producer.send(textMessage);
            System.out.println("发送消息"+textMessage.getText());
        }
        //9.关闭连接
        connection.close();
    }
}
- 消费者
/**
 * 主题模式
 * 定义消费者
 */
public class AppConsumer {
    //61616为activemq默认端口
    private static final String URL="tcp://192.168.174.133:61616";
    private static final String topicName="topic-test";
    public static void main(String[] args) throws JMSException {
        //1.创建ConnectionFactory
        ConnectionFactory connectionFactory=new ActiveMQConnectionFactory(URL);
        //2.创建Connection
        Connection connection=connectionFactory.createConnection();
        //3.启动连接
        connection.start();
        //4.创建会话
        //第一个参数为是否支持事务
        //第二个参数为自动确认,客户端发送和接收消息不需要做额外的工作。哪怕是接收端发生异常,也会被当作正常发送成功
        Session session=connection.createSession(false, Session.AUTO_ACKNOWLEDGE);
        //5.创建一个目标
        Destination destination=session.createTopic(topicName);
        //6.创建一个消费者
        MessageConsumer consumer=session.createConsumer(destination);
        //7.创建一个监听器
        consumer.setMessageListener(new MessageListener() {
            public void onMessage(Message message) {
                TextMessage textMessage= (TextMessage) message;
                try {
                    System.out.println("接收消息:"+textMessage.getText());
                } catch (JMSException e) {
                    e.printStackTrace();
                }
            }
        });
        //8.关闭连接
        //connection.close();
    }
}
5、ActiveMQ集成Spring
- 使用Spring继承JMS连接ActiveMQ
ConnectionFactory:用于管理连接的连接工厂,一个Spring为我们提供的连接池,JmsTemplate每次发送消息都会重新创建连接,会话和productor。Spring中提供了SingleConnectionFactory和CachingConnectionFactory。
JmsTemplate:用于发送和接收消息的模板类,是Spring提供的,只需向Spring容器内注册这个类就可以使用JmsTemplate方便的操作Jms,JmsTemplate类是线程安全的,可以在整个应用范围使用。
MessageListerner: 消息监听器,实现一个onMessage方法,该方法只接收一个Message参数。
- 整个spring代码实战
2.1) 先引入依赖
<!--定义一个变量指定spring版本号-->
<properties>
    <spring.version>4.2.5.RELEASE</spring.version>
</properties>
<dependencies>
     <dependency>
        <groupId>junit</groupId>
        <artifactId>junit</artifactId>
        <version>4.11</version>
        <scope>test</scope>
    </dependency>
    <dependency>
        <groupId>org.springframework</groupId>
        <artifactId>spring-context</artifactId>
        <version>${spring.version}</version>
    </dependency>
    <dependency>
        <groupId>org.springframework</groupId>
        <artifactId>spring-jms</artifactId>
        <version>${spring.version}</version>
    </dependency>
    <dependency>
        <groupId>org.springframework</groupId>
        <artifactId>spring-test</artifactId>
        <version>${spring.version}</version>
    </dependency>
    <dependency>
        <groupId>org.apache.activemq</groupId>
        <artifactId>activemq-core</artifactId>
        <version>5.7.0</version>
        <exclusions>
            <exclusion>
                <artifactId>spring-contxt</artifactId>
                <groupId>org.springframework</groupId>
            </exclusion>
        </exclusions>
    </dependency>
</dependencies>
2.2) 生产者
2.2.1) 定义接口
/**
 * spring整合acitivemq
 * 定义生产者
 */
public interface ProducerService {
    void sendMessage(String message);
}
2.2.2) 定义实现类
/**
 * 定义生产者实现类
 */
public class ProducerServiceImpl implements ProducerService {
    @Autowired
    JmsTemplate jmsTemplate;
    @Resource(name = "queueDestination")
    //@Resource(name="topicDestination")
    Destination destination;

    public void sendMessage(final String message) {
        //使用JmsTemplate发送消息
        jmsTemplate.send(destination, new MessageCreator() {
            //创建一个消息
            public Message createMessage(Session session) throws JMSException {
                TextMessage textMessage = session.createTextMessage(message);
                return textMessage;
            }
        });
        System.out.println("发送消息:" + message);
    }
}
2.2.3) 定义调用者
/**
 * 创建生产调用者
 */
public class ProducerClient {
    public static void main(String[] args) {
        ClassPathXmlApplicationContext context=new ClassPathXmlApplicationContext("producer.xml");
        ProducerService service=context.getBean(ProducerService.class);
        for(int i = 0;i < 100;i++) {
            service.sendMessage("test" + i);
        }
        context.close();
    }
}
2.2.4) 定义公共配置文件
此文件因为生产者和消费者都需要一些公共配置,最后将公共的部分抽取出来
<?xml version="1.0" encoding="UTF-8"?>
<beans xmlns="http://www.springframework.org/schema/beans"
       xmlns:xsi="http://www.w3.org/2001/XMLSchema-instance"
       xmlns:context="http://www.springframework.org/schema/context"
       xsi:schemaLocation="http://www.springframework.org/schema/beans http://www.springframework.org/schema/beans/spring-beans.xsd http://www.springframework.org/schema/context http://www.springframework.org/schema/context/spring-context.xsd">
    <context:annotation-config/>
    <!--ActiveMQ为我们提供的ConnectionFactory-->
    <bean id="targetConnectionFactory" class="org.apache.activemq.ActiveMQConnectionFactory">
        <property name="brokerURL" value="tcp://192.168.174.133:61616"/>
    </bean>
    <!--Spring jms为我们提供的连接池-->
    <bean id="connectionFactory" class="org.springframework.jms.connection.SingleConnectionFactory">
        <property name="targetConnectionFactory" ref="targetConnectionFactory"/>
    </bean>
    <!--一个队列目的地,点对点的-->
    <bean id="queueDestination" class="org.apache.activemq.command.ActiveMQQueue">
        <constructor-arg value="queue"/>
    </bean>
    <!--配置主题目的地,发布订阅模式-->
    <bean id="topicDestination" class="org.apache.activemq.command.ActiveMQTopic">
        <constructor-arg value="topic"/>
    </bean>
</beans>
2.2.5) 定义生产者配置文件
<?xml version="1.0" encoding="UTF-8"?>
<beans xmlns="http://www.springframework.org/schema/beans"
       xmlns:xsi="http://www.w3.org/2001/XMLSchema-instance"
       xmlns:context="http://www.springframework.org/schema/context"
       xsi:schemaLocation="http://www.springframework.org/schema/beans http://www.springframework.org/schema/beans/spring-beans.xsd http://www.springframework.org/schema/context http://www.springframework.org/schema/context/spring-context.xsd">
    <!--引入公共配置文件-->
    <import resource="common.xml"/>
    <!--配置JmsTemplate,用于发送消息-->
    <bean id="jmsTemplate" class="org.springframework.jms.core.JmsTemplate">
        <property name="connectionFactory" ref="connectionFactory"/>
    </bean>
    <bean class="com.jms_spring.producer.ProducerServiceImpl"></bean>
</beans>
2.3) 消费者
2.3.1) 定义监听者类
/**
 * 创建消息监听者
 */
public class ConsumerMessageListener implements MessageListener{
    public void onMessage(Message message) {
        TextMessage textMessage= (TextMessage) message;
        try {
            System.out.println("接受消息"+textMessage.getText());
        } catch (JMSException e) {
            e.printStackTrace();
        }
    }
}
2.3.2) 定义调用者
**
 * 消费者调用者
 */
public class ConsumerClient {
    public static void main(String[] args) {
        ApplicationContext applicationContext=new ClassPathXmlApplicationContext("consumer.xml");

    }
}
2.3.3) 定义消费者配置文件
<?xml version="1.0" encoding="UTF-8"?>
<beans xmlns="http://www.springframework.org/schema/beans"
       xmlns:xsi="http://www.w3.org/2001/XMLSchema-instance"
       xsi:schemaLocation="http://www.springframework.org/schema/beans
    http://www.springframework.org/schema/beans/spring-beans.xsd">
      <!--导入公共配置-->
      <import resource="common.xml"/>
      <!--配置消息监听器-->
      <bean id="consumerMessageListener" class="com.jms_spring.consumer.ConsumerMessageListener"/>
      <!--配置消息容器-->
      <bean id="jmsContainer" class="org.springframework.jms.listener.DefaultMessageListenerContainer">
          <property name="connectionFactory" ref="connectionFactory"/>
          <property name="destination" ref="queueDestination"/>
          <!-- <property name="destination" ref="topicDestination"/>-->
           <property name="messageListener" ref="consumerMessageListener"/>
       </bean>
 </beans>
2.4) 扩展:订阅模式
生产者采用订阅模式
@Resource(name="topicDestination")
Destination destination;
消费者配置文件中引入订阅模式
<property name="destination" ref="topicDestination"/>
6、ActiveMQ集群
- 为什么要对消息中间件集群
实现高可用,以排除单点故障引起的服务中断
实现负载均衡,以提升效率为更多客户提供服务
- 集群方式
客户端模式:让多个消费者消费同一个队列
Broker clusters:多个Broker之间同步消息
Master Slave:实现高可用
- ActiveMQ失效转移(failover)
允许当其中一台消息服务器宕机,客户端在传输层上重新连接到其他消息服务器
transportOptions参数说明
randomize默认true,表示在URI列表中选择URI连接时是否采用随机策略
initialReconnectDelay:默认为10,单位毫秒,表示第一次尝试重连之间等待的时间
maxReconnetDelay:默认30000,单位毫秒,最长重连的时间间隔
- ActiveMQ中的NetworkConnector
网络连接器主要配置ActiveMQ服务器与服务器之间的网路通讯方式,用于服务器传递消息
网络连接器分为静态连接器和动态连接器
静态连接器
<networkConnectors>
    <networkConnetor uri="static:(tcp://127.0.0.1:61617,tcp://127.0.0.1:61618)"/>
</networkConnectors>
动态连接器
<networkConnectors>
    <networkConnector uri="multicast://default"/>
</networkConnectors>
<transportConnectors>
    <transportConnector uri=tco://localhost:0" discoveryUri="multicast://default"/>
</transportConnectors>
- 关于ActiveMQ Master Slave集群方案
Shared storage master/slave 共享存储
Replicated LevelDB Store 基于复制的LevelDB Store

7、实战
7.1构建集群环境
[root@localhost java]# mkdir activemq_colony
[root@localhost java]# cp -rf apache-activemq-5.14.0 activemq_colony/activemq-a
[root@localhost java]# cp -rf apache-activemq-5.14.0 activemq_colony/activemq-b
[root@localhost java]# cp -rf apache-activemq-5.14.0 activemq_colony/activemq-c
7.2创建一个共享目录用来做master、slave集群使用的共享存储文件夹
[root@localhost java]# cd activemq_colony/
[root@localhost activemq_colony]# mkdir kahadb
7.3配置节点
a节点:
[root@localhost activemq_colony]# cd activemq-a
[root@localhost activemq-a]# cd conf
[root@localhost conf]# vim activemq.xml
(1) 先找到网络提供服务的地方,a节点默认使用61616端口,其他端口也不需要,所以可以直接注释掉
<!-- <transportConnector name="amqp" uri="amqp://0.0.0.0:5672?maximumConnections=1000&wireFormat.maxFrameSize=104857600"/>
<transportConnector name="stomp" uri="stomp://0.0.0.0:61613?maximumConnections=1000&wireFormat.maxFrameSize=104857600"/>
<transportConnector name="mqtt" uri="mqtt://0.0.0.0:1883?maximumConnections=1000&wireFormat.maxFrameSize=104857600"/>
<transportConnector name="ws" uri="ws://0.0.0.0:61614?maximumConnections=1000&wireFormat.maxFrameSize=104857600"/>-->
(2) 给a节点添加网络连接器的配置项
 <networkConnectors>
           <networkConnector name="local_network" uri="static:(tcp://127.0.0.1:61617,tcp://127.0.0.1:61618)"/>
 </networkConnectors>
(3) 给a节点配置后端提供管理地址的jetty服务器端口,注意a节点使用的是默认配置,所以这里无须改动,直接退出
<property name="port" value="8161"/>
a节点配置完毕
b节点
(1) 注释网络服务
<!-- <transportConnector name="amqp" uri="amqp://0.0.0.0:5672?maximumConnections=1000&wireFormat.maxFrameSize=104857600"/>
<transportConnector name="stomp" uri="stomp://0.0.0.0:61613?maximumConnections=1000&wireFormat.maxFrameSize=104857600"/>
<transportConnector name="mqtt" uri="mqtt://0.0.0.0:1883?maximumConnections=1000&wireFormat.maxFrameSize=104857600"/>
<transportConnector name="ws" uri="ws://0.0.0.0:61614?maximumConnections=1000&wireFormat.maxFrameSize=104857600"/>-->
(2) 给b节点添加网络连接器的配置项
<networkConnectors>
    <networkConnector name="network_a" uri="static:(tcp://127.0.0.1:61616)"/>
</networkConnectors>
(3) 因为b节点和c节点需要配置成master和slave,我们采用的是共享文件夹的方式,所以需要配置节点存储方案,位置配置指定的自定义存储的目录
<persistenceAdapter>
         <kahaDB directory="/usr/java/activemq_colony/kahadb"/>
  </persistenceAdapter>
(4) 修改对外提供服务的端口号,改为61617
<transportConnector name="openwire" uri="tcp://0.0.0.0:61617?maximumConnections=1000&wireFormat.maxFrameSize=104857600"/>
(5) 为b节点配置jetty提供的服务地址,也就是管理端口
<property name="port" value="8162"/>
c节点
(1) 因为b节点和c节点配置文件差不多,可以讲b配置文件复制给c
[root@localhost conf]# cp activemq.xml ../../activemq-c/conf/
cp:是否覆盖"../../activemq-c/conf/activemq.xml"? y
(2) 编辑c配置文件
[root@localhost conf]# cd ../../activemq-c/conf
[root@localhost conf]# vim activemq.xml
<transportConnector name="openwire" uri="tcp://0.0.0.0:61618?maximumConnections=1000&wireFormat.maxFrameSize=104857600"/>
(3) 为c节点配置管理端口
<property name="port" value="8163"/>
7.4一次启动三台ActiveMQ
[root@localhost activemq_colony]# ./activemq-a/bin/activemq start
[root@localhost activemq_colony]# ./activemq-b/bin/activemq start
[root@localhost activemq_colony]# ./activemq-c/bin/activemq start
#查看是否启动成功
[root@localhost activemq_colony]# ps -ef | grep activemq
#查看各节点对外提供的端口号
[root@localhost activemq_colony]# netstat -anp|grep 61616
tcp        0      0 :::61616                    :::*                        LISTEN      7073/java
tcp        0      0 ::ffff:127.0.0.1:61616      ::ffff:127.0.0.1:53838      ESTABLISHED 7073/java
tcp        0      0 ::ffff:127.0.0.1:53838      ::ffff:127.0.0.1:61616      ESTABLISHED 7164/java
[root@localhost activemq_colony]# netstat -anp|grep 61617
tcp        0      0 :::61617                    :::*                        LISTEN      7164/java
tcp        0      0 ::ffff:127.0.0.1:34096      ::ffff:127.0.0.1:61617      ESTABLISHED 7073/java
tcp        0      0 ::ffff:127.0.0.1:61617      ::ffff:127.0.0.1:34096      ESTABLISHED 7164/java
[root@localhost activemq_colony]# netstat -anp|grep 61618
#c节点看不到对外提供服务的信息,但是进程启动成功,是因为b节点和c节点配置的是master和slave,现,b节点获取到了共享文件夹的主动权,c节点正在等待获得资源,并且提供服务
#此时关掉b节点
[root@localhost activemq_colony]# ./activemq-b/bin/activemq stop
#再查看c节点
[root@localhost activemq_colony]# netstat -anp|grep 61618
tcp        0      0 :::61618                    :::*                        LISTEN      7225/java
tcp        0      0 ::ffff:127.0.0.1:47052      ::ffff:127.0.0.1:61618      ESTABLISHED 7073/java
tcp        0      0 ::ffff:127.0.0.1:61618      ::ffff:127.0.0.1:47052      ESTABLISHED 7225/java
#此时c节点可以看到对外提供服务的信息,c节点成为了master
#再次启动b节点
[root@localhost activemq_colony]# ./activemq-b/bin/activemq start
#查看b节点对外服务
[root@localhost activemq_colony]# netstat -anp|grep 61617
#此时b节点成为slave,所以看不到服务信息,只有c节点挂失才能重新成为master获得主动权
测试(这里利用之前queue代码)
生产者
注意url需要配置状态转移failover,此作用是当前一个配置的节点挂失后直接转到第二个配置的节点
/**
 * 集群环境
 * 定义生产者
 */
public class AppProducer {
    //61616为activemq默认端口
    private static final String URL="failover:(tcp://192.168.174.133:61617,tcp://192.168.174.133:61618)?randomize=true";
    private static final String queueName="test1";
    public static void main(String[] args) throws JMSException {
        //1.创建ConnectionFactory
        ConnectionFactory connectionFactory=new ActiveMQConnectionFactory(URL);
        //2.创建Connection
        Connection connection=connectionFactory.createConnection();
        //3.启动连接
        connection.start();
        //4.创建会话
        //第一个参数为是否支持事务
        //第二个参数为自动确认,客户端发送和接收消息不需要做额外的工作。哪怕是接收端发生异常,也会被当作正常发送成功
        Session session=connection.createSession(false, Session.AUTO_ACKNOWLEDGE);
        //5.创建一个目标
        Destination destination=session.createQueue(queueName);
        //6.创建一个生产者
        MessageProducer producer=session.createProducer(destination);
        for(int i=0;i<100;i++){
            //7.创建消息
            TextMessage textMessage=session.createTextMessage("text"+i);
            //8.发布消息
            producer.send(textMessage);
            System.out.println("发送消息"+textMessage.getText());
        }
        //9.关闭连接
        connection.close();
消费者
消费者需要配置三台域名
/**
 * 集群环境
 * 定义消费者
 */
public class AppConsumer {
    //61616为activemq默认端口
    private static final String URL="failover:(tcp://192.168.174.133:61616,tcp://192.168.174.133:61617,tcp://192.168.174.133:61618)?randomize=true";
    private static final String queueName="test1";
    public static void main(String[] args) throws JMSException {
        //1.创建ConnectionFactory
        ConnectionFactory connectionFactory=new ActiveMQConnectionFactory(URL);
        //2.创建Connection
        Connection connection=connectionFactory.createConnection();
        //3.启动连接
        connection.start();
        //4.创建会话
        //第一个参数为是否支持事务
        //第二个参数为自动确认,客户端发送和接收消息不需要做额外的工作。哪怕是接收端发生异常,也会被当作正常发送成功
        Session session=connection.createSession(false, Session.AUTO_ACKNOWLEDGE);
        //5.创建一个目标
        Destination destination=session.createQueue(queueName);
        //6.创建一个消费者
        MessageConsumer consumer=session.createConsumer(destination);
        //7.创建一个监听器
        consumer.setMessageListener(new MessageListener() {
            public void onMessage(Message message) {
                TextMessage textMessage= (TextMessage) message;
                try {
                    System.out.println("接收消息:"+textMessage.getText());
                } catch (JMSException e) {
                    e.printStackTrace();
                }
            }
        });
        //8.关闭连接
        //connection.close();
    }
}
7.5浏览器输入域名访问管理平台
运行生成者,查看队列中的消息
注意此时b节点为slave,他不对外提供服务
http://192.168.174.133:8161/admin/
http://192.168.174.133:8163/admin
此时是在c节点生成的消息,挂失c节点,模拟c机器故障
[root@localhost activemq_colony]# ./activemq-c/bin/activemq stop
运行消费者
访问域名b
http://192.168.174.133:8162/admin/
查看各个节点连接情况以及消费情况,注意防火墙需要开通8162和8163端口号
八、RabbitMQ安装
1、RabbitMQ安装(Linux)
1)安装GCC GCC-C++ Openssl等模块(安装过请忽略)
yum -y install make gcc gcc-c++ kernel-devel m4 ncurses-devel openssl-devel
- 安装ncurses
yum -y install ncurses-devel
- 安装erlang环境
#安装rabbitmq时 提示错误: erlang >= 19.3 is needed by rabbitmq-server-3.7.4-1.el7.noarch
yum 安装了 erlang但是版本不对 只能卸载
yum remove erlang
#首先安装Erlang
 wget http://erlang.org/download/otp_src_20.3.tar.gz
#如果提示找不到命令的话可以执行 yum -y install wget 安装一下
tar -xf otp_src_20.3.tar.gz
#安装相关依赖项
yum -y install make gcc gcc-c++ kernel-devel m4 ncurses-devel openssl-devel unixODBC-devel libtool libtool-ltdl-devel
#依次执行以下命令:
cd otp_src_20.3
./otp_build autoconf
./configure
#出现如下 信息。

*********************************************************************
**********************  APPLICATIONS DISABLED  **********************
*********************************************************************

jinterface     : No Java compiler found
*********************************************************************
*********************************************************************
**********************  APPLICATIONS INFORMATION  *******************
*********************************************************************

wx             : wxWidgets not found, wx will NOT be usable
*********************************************************************
*********************************************************************
**********************  DOCUMENTATION INFORMATION  ******************
*********************************************************************

documentation  :
                 fop is missing.
                 Using fakefop to generate placeholder PDF files.
*********************************************************************
#继续 执行 :
make
make install
#安装成功后
#Erlang 默认安装路径可以用whereis erlang 查看
erlang: /usr/lib64/erlang /usr/local/lib/erlang
#Erlang 默认安装路径为  /usr/local/lib/erlang
 export ERLANG_HOME=/usr/local/lib/erlang
 export PATH=$PATH:$ERLANG_HOME/bin
    #改完之后重新加载环境变量:
  source /etc/profile
    #出现结果:
  erl
  Erlang/OTP 20 [erts-9.3] [source] [64-bit] [smp:2:2] [ds:2:2:10] [async-threads:10] [hipe] [kernel-poll:false]
   #安装erlang成功!
- 安装RabbitMQ
4.1) 下载rabbitmq-server的jar包
wget https://dl.bintray.com/rabbitmq/all/rabbitmq-server/3.7.4/rabbitmq-server-3.7.4-1.el7.noarch.rpm
4.2) 下载好之后:
rpm -ivh rabbitmq-server-3.7.4-1.el7.noarch.rpm或者
rpm --import https://www.rabbitmq.com/rabbitmq-release-signing-key.asc
yum install rabbitmq-server-3.7.4-1.el7.noarch.rpm
报错!如下:
error: Failed dependencies:
erlang >= 19.3 is needed by rabbitmq-server-3.7.4-1.el7.noarch
socat is needed by rabbitmq-server-3.7.4-1.el7.noarch
那是因为之前用whereis erlang 查询 有2个版本
现在我们删除 一个老版本:rm -rf /usr/lib64/erlang
rpm -ivh --nodeps rabbitmq-server-3.7.4-1.el7.noarch.rpm
nodeps表示不检查依赖关系。
然后执行以下命令:
chkconfig rabbitmq-server on (开机自启动)
/sbin/service rabbitmq-server start
/sbin/service rabbitmq-server stop
安装的路径 默认cd /usr/lib/rabbitmq/
#开启远程访问
vi /etc/rabbitmq/rabbit.conf
##添加一个内容
{[{rabbit,[{loopback_users,[]}]}].
4.3) 随后移动至/usr/local/下 改名rabbitmq
cp -r rabbitmq_server-3.6.9 /usr/local/rabbitmq
4.4) 这种下载的方式解压后直接可以使用,无需再编译安装
#进入到rabbit文件内,其命令文件存在于sbin文件夹下,因此需要将sbin文件夹的路径添加到PATH中:修改/etc/profile
export PATH=/usr/lib/rabbitmq/sbin:$PATH
exprot PATH=/usr/local/erlang/bin      #注意也要引入erlang环境
#执行source /etc/profile使得PATH路径更新,rabbitMQ安装成功。
4.4) 这种下载的方式解压后直接可以使用,无需再编译安装
#进入到rabbit文件内,其命令文件存在于sbin文件夹下,因此需要将sbin文件夹的路径添加到PATH中:修改/etc/profile
export PATH=/usr/lib/rabbitmq/sbin:$PATH
exprot PATH=/usr/local/erlang/bin      #注意也要引入erlang环境
#执行source /etc/profile使得PATH路径更新,rabbitMQ安装成功。
4.5) 开启防火墙端口号15672
4.6) 添加用户
方式一:通过代码形式
[root@localhost sbin]# pwd
/usr/lib/rabbitmq/bin
[root@localhost sbin]#./rubbitmq-server start #开启rabbitmq服务
#这里可能会报Applying plugin configuration to rabbit@localhost... failed.
#我忽略了
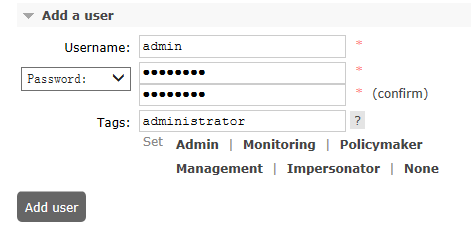
[root@localhost sbin]# rabbitmqctl add_user admin 12345678 #添加新用户和密码
Creating user "admin" ...
[root@localhost sbin]# rabbitmqctl set_user_tags admin administrator #设置新账号为超级管理员
Setting tags for user "admin" to [administrator] ...
[root@localhost sbin]# rabbitmqctl set_permissions -p "/" admin ".*" ".*" ".*" #设置用户权限
Setting permissions for user "admin" in vhost "/" ...
[root@localhost sbin]# rabbitmq-plugins enable rabbitmq_management #开启web界面管理工具
Plugin configuration unchanged.
Applying plugin configuration to rabbit@localhost... nothing to do.
方式二:通过管理平台的方式
- 启动
[root@localhost bin]# cd /usr/lib/rabbitmq/bin
[root@localhost bin]# ./rabbitmq-server start
  ##  ##
  ##  ##      RabbitMQ 3.7.4. Copyright (C) 2007-2018 Pivotal Software, Inc.
  ##########  Licensed under the MPL.  See http://www.rabbitmq.com/
  ######  ##
  ##########  Logs: /var/log/rabbitmq/rabbit@localhost.log
                    /var/log/rabbitmq/rabbit@localhost_upgrade.log

              Starting broker...
 completed with 3 plugins.
- 通过guest用户进入管理平台
#输入域名,默认用户名和密码为guest guest
http://192.168.174.133:15672
- 进入管理平台后点击添加用户
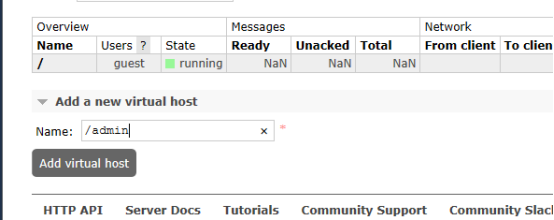
- Add new virtual host
- 授权

2、RabbitMQ入门之Hello篇
- 引入约束
<dependencies>
<!-- https://mvnrepository.com/artifact/com.rabbitmq/amqp-client -->
        <dependency>
            <groupId>com.rabbitmq</groupId>
            <artifactId>amqp-client</artifactId>
            <version>5.1.2</version>
        </dependency>
    <dependency>
        <groupId>org.slf4j</groupId>
        <artifactId>slf4j-log4j12</artifactId>
        <version>1.7.25</version>
    </dependency>
    <dependency>
        <groupId>org.apache.commons</groupId>
        <artifactId>commons-lang3</artifactId>
        <version>3.3.2</version>
    </dependency>
    <dependency>
      <groupId>org.glassfish.web</groupId>
      <artifactId>javax.servlet.jsp.jstl</artifactId>
      <version>1.2.2</version>
    </dependency>
  </dependencies>
- 定义工具类连接RabbitMQ
/**
 * 用于创建连接的工具类
 *
 */
public class ConnectUtil {
    public static Connection getConnection() throws Exception{
        ConnectionFactory connection=new ConnectionFactory();
        connection.setHost("192.168.174.133");//设置server地址
        connection.setPort(5672);//设置端口号,注意区分于浏览器中的输入的端口为15672
        connection.setUsername("admin");
        connection.setPassword("12345678");
        connection.setVirtualHost("/admin");
        return connection.newConnection();//创建一个新的连接

    }
}
- 定义生产者
/**
 * 测试之一:定义一个生产者
 *
 */
public class Sender {
    private final static String QUEUE="testHello";//定义队列的名字
    public static void main(String[] args) throws Exception {
        //获取连接
        Connection connection = ConnectUtil.getConnection();
        //创建通道
        Channel channel = connection.createChannel();
        //申明队列
        /**
         * 申明队列,如果队列存在则什么都不做,如果不存在才创建
         * 参数1:队列名字
         * 参数2:是否持久化队列,我们的队列模式是在内存中的,如果rabbimq重启会丢失,如果设置为true则会保存到erlang自带的数据库中,重启会重新读取数据
         * 参数3:是否排外,有两个作用,第一个当我们的连接关闭后是否会自动删除队列,作用二:私有当前队列,如果私有了其他通道不可以访问当前队列,如果为true,一般是一个队列只适用于一个消费者使用
         * 参数4:是否自动删除
         * 参数5:我们的一些其他参数
         */
        channel.queueDeclare(QUEUE,false,false,false,null);
        //发送队列
        /**
         * 第一个参数:exchange交换机
         * 第二个参数:队列名
         */
        channel.basicPublish("", QUEUE, null, "发送的消息".getBytes());
        //关闭连接
        channel.close();
        connection.close();
    }
}
- 定义消费者
/**
 * 定义一个消费者
 *
 */
public class Recev {
    private final static String QUEUE = "testHello";

    public static void main(String[] args) throws Exception {
        Connection connection = ConnectUtil.getConnection();
        Channel channel = connection.createChannel();
        channel.queueDeclare(QUEUE, false, false, false, null);
        QueueingConsumer consumer = new QueueingConsumer(channel);
        //接受消息,参数2:自动确认
        channel.basicConsume(QUEUE,true,consumer);
        //获取消息
        while(true){
            Delivery delivery=consumer.nextDelivery();
            String message=new String(delivery.getBody());
            System.out.println(message);
        }
    }
}
3、work模式
将消息发给两个消费者(将消息发送至消息队列,由两个消费者接收),但是每次只能一个消费者接收到,一种集群模式
- 生产者代码与上保持不变
/**
 * 测试之一:定义一个生产者
 *
 */
public class Sender {
    private final static String QUEUE="testwork";//定义队列的名字
    public static void main(String[] args) throws Exception {
        //获取连接
        Connection connection = ConnectUtil.getConnection();
        //创建通道
        Channel channel = connection.createChannel();
        //申明队列
        /**
         * 申明队列,如果队列存在则什么都不做,如果不存在才创建
         * 参数1:队列名字
         * 参数2:是否持久化队列,我们的队列模式是在内存中的,如果rabbimq重启会丢失,如果设置为true则会保存到erlang自带的数据库中,重启会重新读取数据
         * 参数3:是否排外,有两个作用,第一个当我们的连接关闭后是否会自动删除队列,作用二:私有当前队列,如果私有了其他通道不可以访问当前队列,如果为true,一般是一个队列只适用于一个消费者使用
         * 参数4:是否自动删除
         * 参数5:我们的一些其他参数
         */
        channel.queueDeclare(QUEUE,false,false,false,null);
        //发送队列
        /**
         * 第一个参数:exchange交换机
         * 第二个参数:队列名
         */
        for(int i=0;i<100;i++){
            channel.basicPublish("", QUEUE, null, ("发送的消息"+i).getBytes());
        }
        //关闭连接
        channel.close();
        connection.close();
    }
}
- 消费者有两个
消费者1:
public class Recver1 {
    private final static String QUEUE="testwork";//定义队列的名字
    public static void main(String[] args) throws Exception {
        Connection connection = ConnectUtil.getConnection();
        final Channel channel = connection.createChannel();
        channel.queueDeclare(QUEUE, false, false, false, null);

        Consumer consumer=new DefaultConsumer(channel){
            @Override
            public void handleDelivery(String consumerTag, Envelope envelope, BasicProperties properties, byte[] body)
                    throws IOException {
                //当我们收到消息的时候调用
                System.out.println("消费者2收到的内容是:"+new String(body));
                try {
                    Thread.sleep(10);//模拟耗时
                } catch (InterruptedException e) {
                    // TODO Auto-generated catch block
                    e.printStackTrace();
                }
                //手动确认
                //参数2:false为确认收到消息,true为拒绝收到消息
                channel.basicAck(envelope.getDeliveryTag(),false);
            }

        };
        //注册消费者,参数2为手动确认,代表我们收到消息后需要手动告诉服务器,我收到消息了
        channel.basicConsume(QUEUE, false,consumer);
    }
}
消费者2
public class Recver2 {
    private final static String QUEUE="testwork";//定义队列的名字
    public static void main(String[] args) throws Exception {
        Connection connection = ConnectUtil.getConnection();
        final Channel channel = connection.createChannel();
        channel.queueDeclare(QUEUE, false, false, false, null);
        channel.basicQos(1);//告诉服务器,在我们没有确认当前消息完成之前,不要给我发新的消息
        Consumer consumer=new DefaultConsumer(channel){
            @Override
            public void handleDelivery(String consumerTag, Envelope envelope, BasicProperties properties, byte[] body)
                    throws IOException {
                //当我们收到消息的时候调用
                System.out.println("消费者1收到的内容是:"+new String(body));
                try {
                    Thread.sleep(300);//模拟机器耗时,它比第一台接受者接收的慢
                } catch (InterruptedException e) {
                    // TODO Auto-generated catch block
                    e.printStackTrace();
                }
                //手动确认
                //参数2:false为确认收到消息,true为拒绝收到消息
                channel.basicAck(envelope.getDeliveryTag(),false);
            }

        };
        //注册消费者,参数2为手动确认,代表我们收到消息后需要手动告诉服务器,我收到消息了
        channel.basicConsume(QUEUE, false,consumer);
    }
}
启动顺序:先启动两个消费者,再启动生产者
1)、值得注意的是:发送者发送100条消息,两个消费者接受,虽然两个消费者都能接收到消息,但是接收的是不同内容,可能是消费者1接受的是偶数,消费2接收的是奇数等。这里模拟了两台机器处理事务效率不同(利用睡眠进行耗时操作),针对于耗时多的机器,说明其处理事务性能不强,可以利用channel.basicQos(1);设置给他分配少点的事务处理
2)、work模式用于集群环境下,如电商下订单处理,可以由多个服务器接受业务,只要能接收到处理事务就行
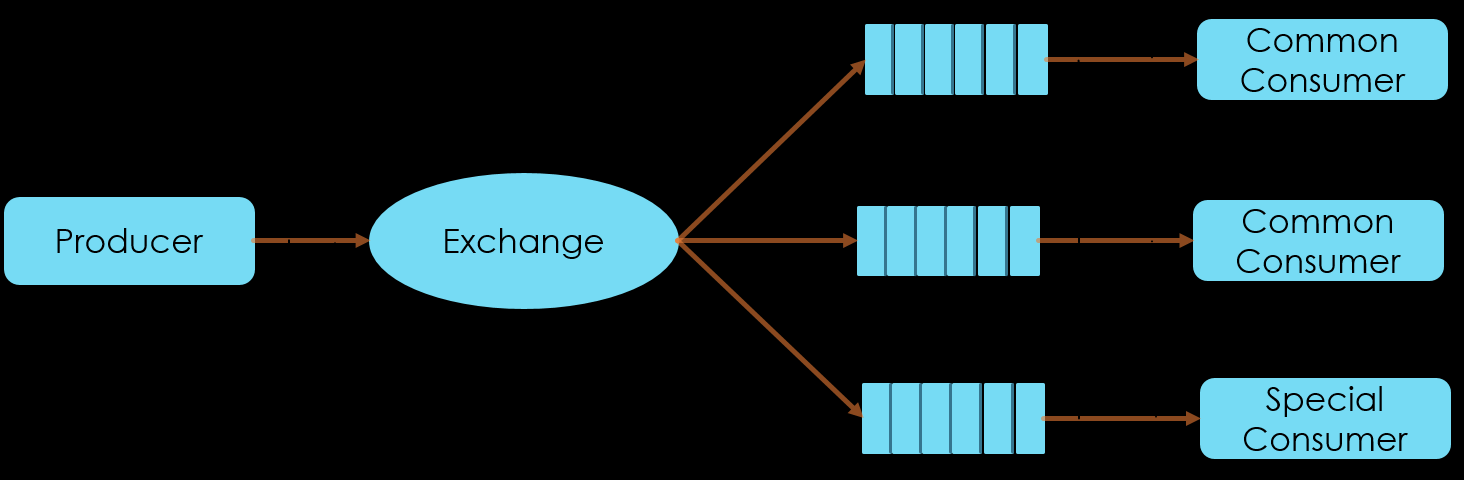
4、Publish_Subscribe发布订阅
生产者将消息不再直接发送到队列,而是发送到交换机,此时有不同的队列注册到交换机上,不同消费者注册到不同的队列上。此时生产者发送的消息,所有在交换机上注册的消费者都能收的到
- 生产者
public class Sender {
    private final static String EXCHANGE_NAME="testexchange";//定义交换机的名称
    public static void main(String[] args) throws Exception{
        Connection connection = ConnectUtil.getConnection();
        Channel channel = connection.createChannel();
        //申明一个交换机
        channel.exchangeDeclare(EXCHANGE_NAME, "fanout");//定义一个交换机,类型时fanout,也就是发布订阅模式
        //发布订阅模式,因为消息是先发送到交换机中,而交换机没有保存功能的,所以没有消费者,消息会丢失
        channel.basicPublish(EXCHANGE_NAME, "",null,"发布订阅模式的消息".getBytes());
        channel.close();
        connection.close();
    }
}
- 消费者1
public class Recve1 {
    private final static String EXCHANGE_NAME="testexchange";//定义交换机的名称
    public static void main(String[] args) throws Exception {
        Connection connection = ConnectUtil.getConnection();
        final Channel channel = connection.createChannel();
        //申明队列
        channel.queueDeclare("testpubqueue1",false,false,false,null);
        //绑定队列到交换机中
        channel.queueBind("testpubqueue1", EXCHANGE_NAME, "");
        channel.basicQos(1);

        Consumer consumer=new DefaultConsumer(channel){
            @Override
            public void handleDelivery(String consumerTag, Envelope envelope, BasicProperties properties, byte[] body)
                    throws IOException {
                System.out.println("消费者1:"+new String(body));
                channel.basicAck(envelope.getDeliveryTag(), false);
            }

        };
        channel.basicConsume("testpubqueue1", false,consumer);
    }
}
- 消费者2
public class Recve2 {
    private final static String EXCHANGE_NAME="testexchange";//定义交换机的名称
    public static void main(String[] args) throws Exception {
        Connection connection = ConnectUtil.getConnection();
        final Channel channel = connection.createChannel();
        //申明队列
        channel.queueDeclare("testpubqueue2",false,false,false,null);
        //绑定队列到交换机中
        channel.queueBind("testpubqueue2", EXCHANGE_NAME, "");
        channel.basicQos(1);

        Consumer consumer=new DefaultConsumer(channel){
            @Override
            public void handleDelivery(String consumerTag, Envelope envelope, BasicProperties properties, byte[] body)
                    throws IOException {
                System.out.println("消费者2:"+new String(body));
                channel.basicAck(envelope.getDeliveryTag(), false);
            }

        };
        channel.basicConsume("testpubqueue1", false,consumer);
    }
}
第一次启动如果报交换机不存在,说明得先启动生产者注册交换机,再启动两个消费者,启动生成者发送消息应用:用于给多个机器发送消息,需要多方收到消息
5、路由模式
配置交换机通过路由模式指定发送消息到不同的队列
- 发送者
public class Sender {
    private final static String EXCHANGE_NAME="testrouter";//定义交换机的名称
    public static void main(String[] args) throws Exception {
        Connection connection = ConnectUtil.getConnection();
        Channel channel = connection.createChannel();
        channel.exchangeDeclare(EXCHANGE_NAME, "direct");//定义路由形式的交换机
        channel.basicPublish(EXCHANGE_NAME, "Key2", null, "路由消息".getBytes());
        channel.close();
        connection.close();
    }
}
- 消费者1
public class Recve1 {
    private final static String EXCHANGE_NAME="testrouter";//定义交换机的名称
    public static void main(String[] args) throws Exception {
        Connection connection = ConnectUtil.getConnection();
        final Channel channel = connection.createChannel();
        //申明队列
        channel.queueDeclare("testrouterqueue1",false,false,false,null);
        //绑定队列到交换机中
        //参数3:标记,绑定到交换机的时候会指定一个标记。只有和他一样的标记的消息才会被当前消费者收到
        channel.queueBind("testrouterqueue1", EXCHANGE_NAME, "Key1");
        //如果要接受多个标记,只需要再执行一次即可
        channel.queueBind("testrouterqueue1", EXCHANGE_NAME, "Key2");
        channel.basicQos(1);

        Consumer consumer=new DefaultConsumer(channel){
            @Override
            public void handleDelivery(String consumerTag, Envelope envelope, BasicProperties properties, byte[] body)
                    throws IOException {
                System.out.println("消费者1:"+new String(body));
                channel.basicAck(envelope.getDeliveryTag(), false);
            }

        };
        channel.basicConsume("testrouterqueue1", false,consumer);
    }
}
- 消费者2
public class Recve2 {
    private final static String EXCHANGE_NAME="testrouter";//定义交换机的名称
    public static void main(String[] args) throws Exception {
        Connection connection = ConnectUtil.getConnection();
        final Channel channel = connection.createChannel();
        //申明队列
        channel.queueDeclare("testrouterqueue2",false,false,false,null);
        //绑定队列到交换机中
        //参数3:标记,绑定到交换机的时候会指定一个标记。只有和他一样的标记的消息才会被当前消费者收到
        channel.queueBind("testrouterqueue2", EXCHANGE_NAME, "Key1");
        //如果要接受多个标记,只需要再执行一次即可
        channel.queueBind("testrouterqueue2", EXCHANGE_NAME, "Key3");
        channel.basicQos(1);

        Consumer consumer=new DefaultConsumer(channel){
            @Override
            public void handleDelivery(String consumerTag, Envelope envelope, BasicProperties properties, byte[] body)
                    throws IOException {
                System.out.println("消费者2:"+new String(body));
                channel.basicAck(envelope.getDeliveryTag(), false);
            }

        };
        channel.basicConsume("testrouterqueue2", false,consumer);
    }
}
原理:发送者绑定端口号,如这里绑定Key1,会去匹配哪个消费者绑定了该键,如果绑定就可以收到消息,这里消费者1和2都绑定了,所以都可收的到
6、topic模式
Router模式弊端:生成者必须根据消费绑定的端口进行选择,不能凭空铸造,Topic模式满足匹配某类或者某几类操作,就如同通配符模式,“#”可以匹配一个或者多个词,“*”匹配不多不少一个词
- 生产者
public class sender {
    private final static String EXCHANGE_NAME="testtotic";//定义交换机的名称
    public static void main(String[] args) throws Exception {
        Connection connection = ConnectUtil.getConnection();
        Channel channel = connection.createChannel();
        channel.exchangeDeclare(EXCHANGE_NAME, "topic");
        channel.basicPublish(EXCHANGE_NAME, "abc.1.2", null, "topic模式消息".getBytes());
        channel.close();
        connection.close();
    }
}
- 消费者1
public class Recve1 {
    private final static String EXCHANGE_NAME="testtotic";//定义交换机的名称
    public static void main(String[] args) throws Exception {
        Connection connection = ConnectUtil.getConnection();
        final Channel channel = connection.createChannel();
        //申明队列
        channel.queueDeclare("testtopicqueue1",false,false,false,null);
        //绑定队列到交换机中
        //参数3:标记,绑定到交换机的时候会指定一个标记。只有和他一样的标记的消息才会被当前消费者收到
        channel.queueBind("testtopicqueue1", EXCHANGE_NAME, "Key.*");
        //如果要接受多个标记,只需要再执行一次即可
        channel.queueBind("testtopicqueue1", EXCHANGE_NAME, "abc.#");
        channel.basicQos(1);

        Consumer consumer=new DefaultConsumer(channel){
            @Override
            public void handleDelivery(String consumerTag, Envelope envelope, BasicProperties properties, byte[] body)
                    throws IOException {
                System.out.println("消费者1:"+new String(body));
                channel.basicAck(envelope.getDeliveryTag(), false);
            }

        };
        channel.basicConsume("testtopicqueue1", false,consumer);
    }
}
- 消费者2
public class Recve2 {
    private final static String EXCHANGE_NAME="testtotic";//定义交换机的名称
    public static void main(String[] args) throws Exception {
        Connection connection = ConnectUtil.getConnection();
        final Channel channel = connection.createChannel();
        //申明队列
        channel.queueDeclare("testtopicqueue2",false,false,false,null);
        //绑定队列到交换机中
        //参数3:标记,绑定到交换机的时候会指定一个标记。只有和他一样的标记的消息才会被当前消费者收到
        channel.queueBind("testtopicqueue2", EXCHANGE_NAME, "Key.#");
        //如果要接受多个标记,只需要再执行一次即可
        channel.queueBind("testtopicqueue2", EXCHANGE_NAME, "abc.#");
        channel.basicQos(1);

        Consumer consumer=new DefaultConsumer(channel){
            @Override
            public void handleDelivery(String consumerTag, Envelope envelope, BasicProperties properties, byte[] body)
                    throws IOException {
                System.out.println("消费者2:"+new String(body));
                channel.basicAck(envelope.getDeliveryTag(), false);
            }

        };
        channel.basicConsume("testtopicqueue2", false,consumer);
    }
}
生成者测试数据:key.1 或者key.1.2 或者 abc.1.2
7、rabbitmq与spring整合(自动确认消息接收)
- 引入依赖
<dependency>
    <groupId>org.springframework.amqp</groupId>
    <artifactId>spring-rabbit</artifactId>
    <version>1.6.1.RELEASE</version>
</dependency>
    <dependency>
        <groupId>org.springframework</groupId>
        <artifactId>spring-test</artifactId>
        <version>4.3.7.RELEASE</version>
    </dependency>
    <dependency>
        <groupId>junit</groupId>
        <artifactId>junit</artifactId>
        <version>4.12</version>
    </dependency>
- 编写spring配置文件applicationContext.xml
<beans xmlns="http://www.springframework.org/schema/beans"
       xmlns:xsi="http://www.w3.org/2001/XMLSchema-instance"
       xmlns:rabbit="http://www.springframework.org/schema/rabbit"
       xsi:schemaLocation="http://www.springframework.org/schema/rabbit
                           http://www.springframework.org/schema/rabbit/spring-rabbit-1.7.xsd
                           http://www.springframework.org/schema/beans
                        http://www.springframework.org/schema/beans/spring-beans-4.3.xsd">
     <!-- 1.定义连接工厂 -->
     <rabbit:connection-factory id="connectionFactory" host="192.168.174.133" port="5672" username="admin" password="12345678" virtual-host="/admin"/>
     <!-- 2.定义rabbitmq的模板
             如果发送到队列,则写queue=""
             如果发送到交换机,则写exchange=""
             定义路由绑定routing-key=""
     -->
     <rabbit:template id="template" connection-factory="connectionFactory" exchange=""></rabbit:template>
     <rabbit:admin connection-factory="connectionFactory"/>
     <!-- 3.消息发送到交换机还是消息队列 -->
     <!-- 4.定义队列 -->
     <rabbit:queue name="myQueue" auto-declare="true"/>
     <!-- 5.如果发送到交换机,要定义交换机 -->
     <rabbit:fanout-exchange name="fanoutExchange" auto-declare="true">
         <!--将队列绑定到交换机 -->
         <rabbit:bindings>
             <rabbit:binding queue="myQueue"/>
         </rabbit:bindings>
     </rabbit:fanout-exchange>
      <!-- 6.定义监听容器,当收到消息的时候就会执行内部的配置 -->
     <rabbit:listener-container connection-factory="connectionFactory">
         <!-- 定义到那个类里面的什么方法用于处理收到的消息 -->
         <rabbit:listener ref="consumer" method="test" queue-names="myQueue"/>
     </rabbit:listener-container>
     <!-- 7.定义一个消费者 -->
     <bean id="consumer" class="com.rabbitmq.spring.MyConsumer"/>
     <!-- 扩展:路由模式
     <rabbit:direct-exchange name="directExchange" durable="true" auto-delete="false">
         <rabbit:bindings>
             <rabbit:binding queue="myQueue" key="key1"></rabbit:binding>
         </rabbit:bindings>
     </rabbit:direct-exchange>-->
     <!-- 扩展:topic模式
     <rabbit:topic-exchange name="topicExchange" durable="true" auto-delete="false">
         <rabbit:bindings>
             <rabbit:binding pattern="dfasfsd.*" queue="myQueue"/>
         </rabbit:bindings>
     </rabbit:topic-exchange>-->
</beans>
- 定义消费者
public class MyConsumer {
    /**
     * 用于接收消息
     * @param message
     */
    public void test(String message){
        System.out.println(message);
    }
}
- 编写测试类
public class SpringTest {
    public static void main(String[] args) {
        ApplicationContext context=new ClassPathXmlApplicationContext("classpath:applicationContext.xml");
        RabbitTemplate template = context.getBean(RabbitTemplate.class);
        template.convertAndSend("Spring的消息");
        ((ClassPathXmlApplicationContext)context).destroy();
    }
}
8、spring与rabbitmq整合(手动确认消息接收)
- 编写spring配置文件
<beans xmlns="http://www.springframework.org/schema/beans"
       xmlns:xsi="http://www.w3.org/2001/XMLSchema-instance"
       xmlns:rabbit="http://www.springframework.org/schema/rabbit"
       xmlns:context="http://www.springframework.org/schema/context"
       xsi:schemaLocation="http://www.springframework.org/schema/rabbit
                           http://www.springframework.org/schema/rabbit/spring-rabbit-1.7.xsd
                           http://www.springframework.org/schema/beans
                        http://www.springframework.org/schema/beans/spring-beans-4.3.xsd
                        http://www.springframework.org/schema/context
                        http://www.springframework.org/schema/context/spring-context-4.3.xsd">
     <!-- 定义包扫描 -->
     <context:component-scan base-package="com.rabbitmq.spring2"/>
     <!-- 定义json数据转换 -->
     <bean id="jsonMessageConverter" class="org.springframework.amqp.support.converter.org.springframework.amqp.support.converter.JsonMessageConverter"></bean>
     <!-- 定义连接工厂:publisher-confirms为true情况下确认失败等回调才会执行 -->
     <rabbit:connection-factory id="connectionFactory"
                                 host="192.168.174.133" port="5672"
                                 username="admin" password="12345678"
                                 virtual-host="/admin" publisher-confirms="true"/>
     <rabbit:admin connection-factory="connectionFactory"/>
     <!-- 确认时进行指令,失败时也进行指令 -->
     <rabbit:template id="amqpTemplate" connection-factory="connectionFactory"
                             confirm-callback="confirmCallbackListener"
                             return-callback="returnCallbackListener"
                             mandatory="true"/>
     <rabbit:queue name="CONFIRM_TEST"/>
    <rabbit:direct-exchange name="DIRECT-EX" id="DIRECT-EX">
         <rabbit:bindings>
             <rabbit:binding queue="CONFIRM_TEST"/>
         </rabbit:bindings>
     </rabbit:direct-exchange>
     <rabbit:listener-container connection-factory="connectionFactory" acknowledge="manual">
         <rabbit:listener queues="CONFIRM_TEST" ref="consumer"/>
     </rabbit:listener-container>
</beans>
- 定义消费者
@Component("receiveConfirmTestListener")
public class ReceiveConfirmTestListener implements ChannelAwareMessageListener{
    /***
     * 收到消息的时候执行的监控
     */
    @Override
    public void onMessage(Message message, Channel channel) throws Exception {
        try{
            System.out.println("消费者收到了消息:"+message);
            channel.basicAck(message.getMessageProperties().getDeliveryTag(), false);
        }catch (Exception e) {
            e.printStackTrace();
            channel.basicAck(message.getMessageProperties().getDeliveryTag(), false);
        }
    }
}
- 确定回调
@Component("confirmCallbackListener")
public class ConfirmCallbackListener implements org.springframework.amqp.rabbit.core.RabbitTemplate.ConfirmCallback{

    @Override
    public void confirm(CorrelationData data, boolean ack, String cause) {
        // TODO Auto-generated method stub
        System.out.println("确认回调:ask=="+ack+"cause=="+cause);
    }
}
- 失败回调
@Component("returnCallbackListener")
public class ReturnCallbackListener implements ReturnCallback{

    @Override
    public void returnedMessage(Message message, int replyCode, String replyText, String exchange, String routingKey) {
        // TODO Auto-generated method stub
        System.out.println("失败:message=="+new String(message.getBody())+"replyCode=="+replyCode+"replyText=="+replyText+"exchange=="+exchange+"routingKey=="+routingKey);
    }
}
- 生产者
@Component("publishUtil")
public class PublishUtil {
    @Autowired
    private AmqpTemplate amqpTemplate;
    public void send(String exchange,String routingkey,Object message){
        amqpTemplate.convertAndSend(exchange,routingkey,message);
    }
}
- 定义测试类
@RunWith(SpringJUnit4ClassRunner.class)
@ContextConfiguration(locations="classpath:applicationContext2.xml")
public class TestMain {
    @Autowired
    private PublishUtil publishUtil;
    private static String Exchange="DIRECT-EX";//定义交换机
    private static String Queue="CONFIRM_TEST";
    /**
     * Exchange 和Queue都对,confirm会执行,ack=true
     * @throws Exception
     */
    @Test
    public void test1() throws Exception{
        String message="当前时间为:"+System.currentTimeMillis();
        publishUtil.send(Exchange, Queue, message);
        Thread.sleep(2000);
    }
}
9、关于消息持久化
当服务停掉时再次重启,消费者还是能接收到重启前的消息
- 生产者
public class Sender {
    private static String EXCHANGE_NAME="testpersist";
    public static void main(String[] args) throws Exception {
        Connection connection=ConnectUtil.getConnection();
        Channel channel = connection.createChannel();
        //申明一个持久的交换机
        channel.exchangeDeclare(EXCHANGE_NAME, "direct",true,false,null);
        // MessageProperties.PERSISTENT_TEXT_PLAIN初久化消息
        //申明持久化消息
        channel.basicPublish(EXCHANGE_NAME, "abc", MessageProperties.PERSISTENT_TEXT_PLAIN, "持久化的消息".getBytes());
        channel.close();
        connection.close();
    }
}
- 消费者
public class Recver {
    private static String EXCHANGE_NAME="testpersist";
    private static String QUEUE_NAME="testpersistqueue";
    public static void main(String[] args) throws Exception {
        Connection connection=ConnectUtil.getConnection();
        Channel channel = connection.createChannel();
        channel.exchangeDeclare(EXCHANGE_NAME, "direct",true,false,null);
        //申明持久化的队列
        channel.queueDeclare(QUEUE_NAME,true,false,false,null);
        channel.queueBind(QUEUE_NAME, EXCHANGE_NAME,"abc");
        Consumer consume=new DefaultConsumer(channel){
            @Override
            public void handleDelivery(String consumerTag, Envelope envelope, BasicProperties properties, byte[] body)
                    throws IOException {
                System.out.println("收到消息:"+new String(body));
            }
        };
        channel.basicConsume(QUEUE_NAME, true,consume);
    }
}
九、基于RabbitMQ企业级实战
业务需求:每次我们shopping时,都会或多或少涉及到优惠券的事。在接口调用订单系统创建订单后,需要锁定优惠券,此时订单系统需要调用优惠券接口,要保证优惠券和订单的数据都能对的上,一个订单只能使用一张优惠券,优惠券只能被一个订单使用
1、环境部署之数据库表
注意:订单和优惠券为不同的项目工程

订单表:
CREATE TABLE `table_order` (
    `order_id` VARCHAR(255) NOT NULL COMMENT '订单号',
    `user_id` VARCHAR(255) NOT NULL COMMENT '用户编号',
    `order_content` VARCHAR(255) NOT NULL COMMENT '订单内容(买了哪些东西)',
    `create_time` datetime NOT NULL COMMENT '创建时间',
    PRIMARY KEY (`order_id`)
)ENGINE=INNODB DEFAULT CHARSET=utf8 COMMENT '订单信息表(一个订单只能使用一张优惠券)';
优惠券:
CREATE TABLE `table_coupon` (
    `coupon_id` VARCHAR(255)     NOT NULL COMMENT '优惠券唯一编码',
    `user_id`    VARCHAR(255) DEFAULT NULL COMMENT '用户ID',
    `coupon_price` VARCHAR(255) DEFAULT NULL COMMENT '优惠券',
    `order_id` VARCHAR(255) DEFAULT NULL COMMENT '订单编号',
    `coupon_status` VARCHAR(255) DEFAULT NULL COMMENT '状态 none:没被使用 lock;锁定 use:已使用',
    PRIMARY KEY (`coupon_id`)
) ENGINE=INNODB DEFAULT CHARSET=utf8 COMMENT='优惠券表,优惠券只能被一个订单使用';
2、未引入分布式事务实战
当接口调用失败时,系统事务回滚,提示用户操作失败
代码如下
订单:
2.1)引入依赖
<properties>
    <project.build.sourceEncoding>UTF-8</project.build.sourceEncoding>
</properties>
<dependencies>
    <dependency>
        <!--使用Junit4,采用注解形式 -->
        <groupId>junit</groupId>
        <artifactId>junit</artifactId>
        <version>4.11</version>
        <scope>test</scope>
    </dependency>
    <dependency>
        <groupId>commons-logging</groupId>
        <artifactId>commons-logging</artifactId>
        <version>1.2</version>
    </dependency>
    <!-- https://mvnrepository.com/artifact/log4j/log4j -->
    <dependency>
        <groupId>log4j</groupId>
        <artifactId>log4j</artifactId>
        <version>1.2.17</version>
    </dependency>
    <!--数据库驱动 -->
    <dependency>
        <groupId>mysql</groupId>
        <artifactId>mysql-connector-java</artifactId>
        <version>5.1.38</version>
        <!--配置maven工作范围:因为驱动只有真正工作时才会启动 -->
        <scope>runtime</scope>
    </dependency>
    <dependency>
        <groupId>c3p0</groupId>
        <artifactId>c3p0</artifactId>
        <version>0.9.1.2</version>
    </dependency>
    <dependency>
        <groupId>javax.servlet</groupId>
        <artifactId>jstl</artifactId>
        <version>1.2</version>
        <scope>provided</scope>
    </dependency>

    <!--spring依赖 -->
    <!--1.spring核心依赖 -->
    <dependency>
        <groupId>org.springframework</groupId>
        <artifactId>spring-core</artifactId>
        <version>4.1.7.RELEASE</version>
    </dependency>
    <dependency>
        <groupId>org.springframework</groupId>
        <artifactId>spring-beans</artifactId>
        <version>4.1.7.RELEASE</version>
    </dependency>
    <dependency>
        <groupId>org.springframework</groupId>
        <artifactId>spring-context</artifactId>
        <version>4.1.7.RELEASE</version>
    </dependency>
    <!--2.spring Dao层依赖 -->
    <dependency>
        <groupId>org.springframework</groupId>
        <artifactId>spring-jdbc</artifactId>
        <version>4.1.7.RELEASE</version>
    </dependency>
    <dependency>
        <groupId>org.springframework</groupId>
        <artifactId>spring-tx</artifactId>
        <version>4.1.7.RELEASE</version>
    </dependency>
    <!--3.spring web相关依赖:用于当启动服务器时加载配置文件 -->
    <dependency>
        <groupId>org.springframework</groupId>
        <artifactId>spring-web</artifactId>
        <version>4.1.7.RELEASE</version>
    </dependency>
    <!--用于springMVC需要 -->
    <dependency>
        <groupId>org.springframework</groupId>
        <artifactId>spring-webmvc</artifactId>
        <version>4.1.7.RELEASE</version>
    </dependency>
    <!--4.spring test测试相关依赖 -->
    <dependency>
        <groupId>org.springframework</groupId>
        <artifactId>spring-test</artifactId>
        <version>4.1.7.RELEASE</version>
    </dependency>
</dependencies>
2.2) spring之dao层配置文件
<beans xmlns="http://www.springframework.org/schema/beans"
       xmlns:xsi="http://www.w3.org/2001/XMLSchema-instance"
       xmlns:context="http://www.springframework.org/schema/context"
       xsi:schemaLocation="http://www.springframework.org/schema/beans
                        http://www.springframework.org/schema/beans/spring-beans-3.0.xsd
                        http://www.springframework.org/schema/context
                        http://www.springframework.org/schema/context/spring-context-3.0.xsd">
   <context:property-placeholder location="classpath:jdbc.properties"/>
   <!--2.配置数据库连接池-->
     <bean id="dataSource" class="com.mchange.v2.c3p0.ComboPooledDataSource">
          <!--配置基本的基本的数据库连接-->
          <property name="driverClass" value="${driver}"/>
          <property name="jdbcUrl" value="${url}"/>
          <property name="user" value="${username}"/>
          <property name="password" value="${password}"/>
          <!--配置c3p0私有属性-->
          <property name="maxPoolSize" value="30"/>
          <property name="minPoolSize" value="10"/>
          <!--关闭连接后不自动commit-->
          <property name="autoCommitOnClose" value="false"/>
          <!--获取连接超时时间-->
          <property name="checkoutTimeout" value="1000"/>
          <!--当获取连接失败时的重试次数-->
          <property name="acquireRetryAttempts" value="2"/>
     </bean>
</beans>
2.3) spring之service层配置文件
<beans xmlns="http://www.springframework.org/schema/beans"
       xmlns:xsi="http://www.w3.org/2001/XMLSchema-instance"
       xmlns:context="http://www.springframework.org/schema/context"
       xmlns:tx="http://www.springframework.org/schema/tx"
       xsi:schemaLocation="http://www.springframework.org/schema/beans
                        http://www.springframework.org/schema/beans/spring-beans-3.0.xsd
                        http://www.springframework.org/schema/context
                        http://www.springframework.org/schema/context/spring-context-3.0.xsd
                        http://www.springframework.org/schema/tx
                        http://www.springframework.org/schema/tx/spring-tx-3.0.xsd">
      <bean id="orderService" class="com.distribute.service.OrderService">
          <property name="dataSource" ref="dataSource"></property>
      </bean>
     <!--配置基于注解的声明式事务
        默认使用注解来管理事务行为,需要在方法中配置注解-->
        <!--配置事务管理器-->
    <bean id="transactionManager" class="org.springframework.jdbc.datasource.DataSourceTransactionManager">
          <!--注入数据库链接池-->
          <property name="dataSource" ref="dataSource"/>
    </bean>
    <tx:annotation-driven transaction-manager="transactionManager"/>
</beans>
2.4) 配置连接数据库配置文件
driver=com.mysql.jdbc.Driver
url=jdbc:mysql://192.168.174.133:3306/test2?useUnicode=true&characterEncoding=utf8
username=root
password=root
2.5) 配置log4j
# Global logging configuration
log4j.rootLogger=DEBUG, stdout
# Console output...
log4j.appender.stdout=org.apache.log4j.ConsoleAppender
log4j.appender.stdout.layout=org.apache.log4j.PatternLayout
log4j.appender.stdout.layout.ConversionPattern=%5p [%t] - %m%n
2.6) 配置SpringMvc配置文件
<?xml version="1.0" encoding="UTF-8"?>
<beans xmlns="http://www.springframework.org/schema/beans"
       xmlns:mvc="http://www.springframework.org/schema/mvc"
       xmlns:xsi="http://www.w3.org/2001/XMLSchema-instance"
       xmlns:context="http://www.springframework.org/schema/context"
       xsi:schemaLocation="http://www.springframework.org/schema/beans
            http://www.springframework.org/schema/beans/spring-beans-4.1.xsd
            http://www.springframework.org/schema/context
            http://www.springframework.org/schema/context/spring-context-4.1.xsd
            http://www.springframework.org/schema/mvc
            http://www.springframework.org/schema/mvc/spring-mvc.xsd">
        <context:component-scan base-package="com.distribute.controller"/>
        <mvc:annotation-driven/>
</beans>
2.7) 针对web.xml进行修改配置spring配置文件和springMV配置文件的加载
<!-- springMvc前端控制器 -->
    <!-- 开启spring各核心配置文件扫描 -->
  <context-param>
    <param-name>contextConfigLocation</param-name>
    <param-value>classpath:applicationContext-*.xml</param-value>
  </context-param>
  <listener>
    <listener-class>org.springframework.web.context.ContextLoaderListener</listener-class>
  </listener>
  <!-- 开启SpringMVc拦截器-->
  <servlet>
    <servlet-name>SpringMvc</servlet-name>
    <servlet-class>org.springframework.web.servlet.DispatcherServlet</servlet-class>
    <!-- 配置SpringMvc核心配置文件所在路径  -->
    <init-param>
      <param-name>contextConfigLocation</param-name>
      <param-value>classpath:SpringMvc.xml</param-value>
    </init-param>
    <load-on-startup>1</load-on-startup>
  </servlet>
  <servlet-mapping>
    <servlet-name>SpringMvc</servlet-name>
    <url-pattern>*.action</url-pattern>
  </servlet-mapping>
2.8) Controller层
@RestController
@RequestMapping("/order")
public class OrderController {
    private final Logger logger=Logger.getLogger(OrderController.class);
    @Autowired
    OrderService orderService;
    /**
     * 创建订单
     * @param userId   用户名
     * @param orderContent 订单内容(购买什么东西)
     * @param couponId    (优惠券)
     * @return
     */
    @RequestMapping("/create")
    public Object createOrder(String userId,String orderContent,String couponId){
        //调用service方法获取
        System.out.println("====================ok");
        try{
            orderService.createOrder(userId,orderContent,couponId);
        }catch(Exception e){
            logger.error("出错啦",e);
            return ">>>>>>>>>>>>>>failed<<<<<<<<<<<<";
        }
        return ">>>>>>>>>>>>>successfully<<<<<<<<<<<";
	}
}
2.9) 业务层
@Service
@Transactional(rollbackFor=Exception.class)
public class OrderService extends JdbcDaoSupport{

    public void createOrder(String userId, String orderContent, String couponId) throws Exception {
        //1.添加订单记录
        String orderId=UUID.randomUUID().toString();
        String sql="insert into table_order (order_id,user_id,order_content,create_time) values (?,?,?,now())";
        int count=this.getJdbcTemplate().update(sql,new Object[]{orderId,userId,orderContent});
        if(count!=1){
            throw new Exception("订单创建失败,原因[数据库操作失败]");
        }
        //2.调用优惠券接口
        RestTemplate restTemplate=createRestTemplate();
        String httpUrl="http://localhost:8080/OrderDiscount/coupon/lock.action?orderId="+orderId+"&couponId="+couponId;
        String result=restTemplate.getForObject(httpUrl, String.class);
        if(!"ok".equals(result)){
            throw new Exception("订单创建失败:原因[调用优惠券接口失败]");
        }
        logger.warn("订单创建成功");
    }
    //创建一个HTTP请求工具类
    public RestTemplate createRestTemplate(){
        SimpleClientHttpRequestFactory requestFactory=new SimpleClientHttpRequestFactory();
        //连接超时时间>3秒
        requestFactory.setConnectTimeout(3000);
        //处理超时时间>2秒
        requestFactory.setReadTimeout(2000);
        return new RestTemplate(requestFactory);
    }
}
优惠券
优惠券环境和订单差不多
- spring之service层配置文件
<beans xmlns="http://www.springframework.org/schema/beans"
       xmlns:xsi="http://www.w3.org/2001/XMLSchema-instance"
       xmlns:context="http://www.springframework.org/schema/context"
       xmlns:tx="http://www.springframework.org/schema/tx"
       xsi:schemaLocation="http://www.springframework.org/schema/beans
                        http://www.springframework.org/schema/beans/spring-beans-3.0.xsd
                        http://www.springframework.org/schema/context
                        http://www.springframework.org/schema/context/spring-context-3.0.xsd
                        http://www.springframework.org/schema/tx
                        http://www.springframework.org/schema/tx/spring-tx-3.0.xsd">
      <bean id="discountService" class="com.discount.service.DiscountService">
          <property name="dataSource" ref="dataSource"></property>
      </bean>
      <bean id="mQConsumer" class="com.discount.service.MQConsumer">

      </bean>
      <!--配置事务管理器-->
    <bean id="transactionManager" class="org.springframework.jdbc.datasource.DataSourceTransactionManager">
          <!--注入数据库链接池-->
          <property name="dataSource" ref="dataSource"/>
    </bean>
                        <!--配置基于注解的声明式事务
        默认使用注解来管理事务行为,需要在方法中配置注解-->
    <tx:annotation-driven transaction-manager="transactionManager"/>
</beans>
- controller层
@RestController
@RequestMapping("/coupon")
public class DiscountController {
    @Autowired
    private DiscountService discountService;//下单后,锁定优惠券
    @RequestMapping("/lock")
    public String lock(String orderID,String couponId){
        try {
            //Thread.sleep(3000L);模拟并发情况下导致网络卡顿
            discountService.lockcoupon(orderID, couponId);
            return "ok";
        } catch (Exception e) {
            // TODO Auto-generated catch block
            e.printStackTrace();
        }
        return "exception";
    }
    //支付成功后,确定订单使用了优惠券
    @RequestMapping("/use")
    public String use(String orderId){
        return "";
    }
}
- service 层
package com.discount.service;

import java.sql.SQLException;

import org.springframework.jdbc.core.support.JdbcDaoSupport;
import org.springframework.transaction.annotation.Transactional;

public class DiscountService extends JdbcDaoSupport{
    @Transactional
    public void lockcoupon(String orderId, String couponId) throws SQLException {
        //将指定优惠券的状态由none改为lock
        String sql="update table_coupon set order_id=?,coupon_status='lock' where coupon_status='none' and coupon_id=?";
        int update=this.getJdbcTemplate().update(sql,new Object[]{orderId,couponId});
        if(update!=1){
            throw new SQLException("优惠券操作失败,原因[数据操作]");
        }
    }
}
此时模拟分布式事务环境操纵优惠券时网络卡顿情况:打开优惠券controller层被注释的代码
Thread.sleep(3000L);//模拟并发情况下导致网络卡顿
discountService.lockcoupon(orderID, couponId);
return "ok";
因为在订单业务层定义了工具类(一下代码),其工具类中定义了请求调用优惠券时间不能超过2秒,而优惠券睡眠了3秒肯定会请求超时,此时应该会导致事务执行失败,事务回滚
//创建一个HTTP请求工具类
public RestTemplate createRestTemplate(){
    SimpleClientHttpRequestFactory requestFactory=new SimpleClientHttpRequestFactory();
    //连接超时时间>3秒
    requestFactory.setConnectTimeout(3000);
    //处理超时时间>2秒
    requestFactory.setReadTimeout(2000);
    return new RestTemplate(requestFactory);
}
根据发送的请求会调用订单中的createOrder方法,在该方法中又会调用service业务层,进而通过RestTemplate接口远程调用优惠券方法。
运行条件前提:保证优惠券表中有c0000优惠券信息(且优惠券状态是null)
结果:订单虽然未创建,但是优惠券被锁了(被使用了)
分析原因:当接口调用失败时,订单系统事务回滚,提示用户操作失败
误区:接口出错的情况下,是能够实现的。但是在接口调用超时的情况下,会出现“优惠券系统处理成功,订单系统处理失败”的情况
3、分布式事务实战--基于RabbitMQ消息队列实现
3.1) 订单和优惠券引入关于RabbitMQ的依赖jar包
<!-- 引入RabbitMQ -->
<!-- https://mvnrepository.com/artifact/com.rabbitmq/amqp-client -->
<dependency>
    <groupId>com.rabbitmq</groupId>
    <artifactId>amqp-client</artifactId>
    <version>5.1.2</version>
</dependency>

    <!-- https://mvnrepository.com/artifact/com.alibaba/fastjson -->
    <!--用于转换为Json格式-->
<dependency>
    <groupId>com.alibaba</groupId>
    <artifactId>fastjson</artifactId>
    <version>1.2.46</version>
</dependency>
订单:
3.2) 定义支持分布式事务的订单service
@Service
@Transactional(rollbackFor=Exception.class)
public class OrderServiceDistribute extends JdbcDaoSupport{
    public void createOrder(String userId, String orderContent, String couponId) throws Exception {
        //1.添加订单记录
        String orderId=UUID.randomUUID().toString();
        String sql="insert into table_order (order_id,user_id,order_content,create_time) values (?,?,?,now())";
        int count=this.getJdbcTemplate().update(sql,new Object[]{orderId,userId,orderContent});
        if(count!=1){
            throw new Exception("订单创建失败,原因[数据库操作失败]");
        }
        //2.不直接使用优惠券调用http接口,通过rabbitmq发送消息通知其他系统去处理
        //代码:不做任何封装,理解原则底层实现
        ConnectionFactory factory=new ConnectionFactory();
        factory.setHost("192.168.174.133");
        factory.setPort(5672);
        factory.setUsername("admin");
        factory.setPassword("12345678");
        Connection connection=factory.newConnection();//创建连接
        Channel channel=connection.createChannel();//打开通道,发送消息
        channel.exchangeDeclare("createOrderExchange", BuiltinExchangeType.FANOUT);//定义一个交换机,用于传送消息至对应的队列中去
        channel.queueDeclare("couponQueue",true,false,false,null);//定义一个queue队列
        channel.queueBind("couponQueue", "createOrderExchange", "*");//配置绑定关系,才能指定消息发送到哪个队列
        //2.2发送消息
        JSONObject jsonObject=new JSONObject();
        jsonObject.put("couponId",couponId);
        jsonObject.put("orderId",orderId);
        String message=jsonObject.toString();
        channel.basicPublish("createOrderExchange", "", null, message.getBytes());
        //2.3断开链接
        channel.close();
        connection.close();
        logger.warn("订单创建成功");
    }
    //创建一个HTTP请求工具类
    public RestTemplate createRestTemplate(){
        SimpleClientHttpRequestFactory requestFactory=new SimpleClientHttpRequestFactory();
        //连接超时时间>3秒
        requestFactory.setConnectTimeout(3000);
        //处理超时时间>2秒
        requestFactory.setReadTimeout(2000);
        return new RestTemplate(requestFactory);
    }
}
3.3) 订单的spring配置文件之service层引入该类的注解
<bean id="orderServiceDistribute" class="com.distribute.service.OrderServiceDistribute">
          <property name="dataSource" ref="dataSource"></property>
</bean>
3.4) 在订单controller中,重新调用支持事务的service,并且运行代码,此时订单创建成功,但是优惠券没有使用,其操纵放在了消息队列中了,等待消费者消费
package com.distribute.controller;

import org.apache.log4j.Logger;
import org.springframework.beans.factory.annotation.Autowired;
import org.springframework.web.bind.annotation.RequestMapping;
import org.springframework.web.bind.annotation.ResponseBody;
import org.springframework.web.bind.annotation.RestController;

import com.distribute.service.OrderService;
import com.distribute.service.OrderServiceDistribute;

@RestController
@RequestMapping("/order")
public class OrderController {
    private final Logger logger=Logger.getLogger(OrderController.class);
    @Autowired
    OrderService orderService;
    @Autowired
    OrderServiceDistribute distribute;
    /**
     * 创建订单
     * @param userId   用户名
     * @param orderContent 订单内容(购买什么东西)
     * @param couponId    (优惠券)
     * @return
     */
    @RequestMapping("/create")
    public Object createOrder(String userId,String orderContent,String couponId){
        //调用service方法获取
        System.out.println("====================ok");
        try{
            distribute.createOrder(userId,orderContent,couponId);
        }catch(Exception e){
            logger.error("出错啦",e);
            return ">>>>>>>>>>>>>>failed<<<<<<<<<<<<";
        }
        return ">>>>>>>>>>>>>successfully<<<<<<<<<<<";
    }
}
优惠券
3.5) 编写优惠券业务层
/**
 * 用来消费coupon队列里的信息,修改优惠券的状态
 *
 */
@Component
public class MQConsumer {
    private final Logger logger=Logger.getLogger(MQConsumer.class);
    //此注解用于当创建此类对象时初始化此方法
    Connection connect=null;
    Channel channel=null;
    @Autowired
    DiscountService discount;
    @PostConstruct
    public void init() throws Exception{
        //连接mq
        ConnectionFactory factory=new ConnectionFactory();
        factory.setHost("192.168.174.133");
        factory.setPort(15672);
        factory.setUsername("admin");
        factory.setPassword("12345678");
        Connection connection=factory.newConnection();//创建连接
        Channel channel=connection.createChannel();//打开通道,发送消息
        //开始消费,从队列中读取消息
        Consumer consumer=new DefaultConsumer(channel){
            @Override
            public void handleDelivery(String consumerTag, Envelope envelope, BasicProperties properties, byte[] body)
                    throws IOException {
                //消费接受queue里面消息进行业务处理
                JSONObject message=JSONObject.parseObject(new String(body));
                String orderId=message.getString("orderId");
                String couponId=message.getString("couponId");
                try{
                    //锁定优惠券的方法
                    discount.lockcoupon(orderId, couponId);
                }catch(Exception e){
                    logger.warn("出现异常",e);
                }
            }

        };
        channel.basicConsume("couponQueue", consumer);
    }
    //用于最后执行该方法
    @PreDestroy
    public void destory() throws Exception{
        channel.close();
        connect.close();
    }
}
3.6) 编写优惠券的spring之service层引入该类配置文件
<bean id="mQConsumer" class="com.discount.service.MQConsumer">
</bean>
关键点1:如果发送消息至rabbitmq失败?怎么处理
rabbitmq提供消息确认机制confim(保证消息投递到消息队列),用于响应消息发送情况,但是其前提是将它持久化(持久化是防止中途宕加挂失导致消息随机器挂失而丢失,持久化是保存到消息队列中)
#确认机制
channel.basicPublish("createOrderExchange", "", null, message.getBytes());
#持久化
channel.queueDeclare("couponQueue",true,false,false,null);//定义一个queue队列,true表示持久化
#实现如下:
#问题:发送消息至rabbitmq 失败?
        //保证消息投递到消息队列
        channel.confirmSelect();
        channel.basicPublish("createOrderExchange", "", null, message.getBytes());
channel.waitForConfirmsOrDie();//等待rabbitmq确认
关键点2:Queue中的消息被正确的消费
ACK机制:消费者开启手动ack的模式
通知mq,消息正确消费
通知mq,消息处理异常,需要再次消费
通知mq,消息处理异常,丢弃掉
问题:怎么保证消费者消费了
try{
     //锁定优惠券的方法
     discount.lockcoupon(orderId, couponId);
    //如果处理完毕,告诉mq ACK 成功的处理掉了
     channel.basicAck(envelope.getDeliveryTag(), false);
    }catch(SQLException e){//此可以自定义
      logger.warn("不需要处理异常,已经记录下来了",e);
      //通知mq,消息处理异常,不需要继续处理,丢弃
      channel.basicNack(envelope.getDeliveryTag(), false, false);//第三个参数是重发,他的作用是否启用取决于第二个参数
      }catch(Exception e){
          logger.warn("出现不可知的异常,需要通知重发",e);
          channel.basicNack(envelope.getDeliveryTag(), false, true);
         }
     }
        //消费,设置为手动ack确认(false)
      channel.basicConsume("couponQueue",false, consumer);
详细代码如下:
订单业务层
@Service
@Transactional(rollbackFor=Exception.class)
public class OrderServiceDistribute extends JdbcDaoSupport{
    public void createOrder(String userId, String orderContent, String couponId) throws Exception {
        //1.添加订单记录
        String orderId=UUID.randomUUID().toString();
        String sql="insert into table_order (order_id,user_id,order_content,create_time) values (?,?,?,now())";
        int count=this.getJdbcTemplate().update(sql,new Object[]{orderId,userId,orderContent});
        if(count!=1){
            throw new Exception("订单创建失败,原因[数据库操作失败]");
        }
        //2.不直接使用优惠券调用http接口,通过rabbitmq发送消息通知其他系统去处理
        //代码:不做任何封装,理解原则底层实现
        ConnectionFactory factory=new ConnectionFactory();
        factory.setHost("192.168.174.133");
        factory.setPort(5672);
        factory.setUsername("admin");
        factory.setPassword("12345678");
        Connection connection=factory.newConnection();//创建连接
        Channel channel=connection.createChannel();//打开通道,发送消息
        channel.exchangeDeclare("createOrderExchange", BuiltinExchangeType.FANOUT);//定义一个交换机,用于传送消息至对应的队列中去
        channel.queueDeclare("couponQueue",true,false,false,null);//定义一个queue队列
        channel.queueBind("couponQueue", "createOrderExchange", "*");//配置绑定关系,才能指定消息发送到哪个队列
        //2.2发送消息
        JSONObject jsonObject=new JSONObject();
        jsonObject.put("couponId",couponId);
        jsonObject.put("orderId",orderId);
        String message=jsonObject.toString();
        channel.basicPublish("createOrderExchange", "", null, message.getBytes());
        //2.3断开链接
        channel.close();
        connection.close();
        logger.warn("订单创建成功");
    }
    //创建一个HTTP请求工具类
    public RestTemplate createRestTemplate(){
        SimpleClientHttpRequestFactory requestFactory=new SimpleClientHttpRequestFactory();
        //连接超时时间>3秒
        requestFactory.setConnectTimeout(3000);
        //处理超时时间>2秒
        requestFactory.setReadTimeout(2000);
        return new RestTemplate(requestFactory);
    }
}
订单controller层
package com.distribute.controller;

import org.apache.log4j.Logger;
import org.springframework.beans.factory.annotation.Autowired;
import org.springframework.web.bind.annotation.RequestMapping;
import org.springframework.web.bind.annotation.ResponseBody;
import org.springframework.web.bind.annotation.RestController;

import com.distribute.service.OrderService;
import com.distribute.service.OrderServiceDistribute;

@RestController
@RequestMapping("/order")
public class OrderController {
    private final Logger logger=Logger.getLogger(OrderController.class);
    @Autowired
    OrderService orderService;
    @Autowired
    OrderServiceDistribute distribute;
    /**
     * 创建订单
     * @param userId   用户名
     * @param orderContent 订单内容(购买什么东西)
     * @param couponId    (优惠券)
     * @return
     */
    @RequestMapping("/create")
    public Object createOrder(String userId,String orderContent,String couponId){
        //调用service方法获取
        System.out.println("====================ok");
        try{
            distribute.createOrder(userId,orderContent,couponId);
        }catch(Exception e){
            logger.error("出错啦",e);
            return ">>>>>>>>>>>>>>failed<<<<<<<<<<<<";
        }
        return ">>>>>>>>>>>>>successfully<<<<<<<<<<<";
    }
}
优惠券业务层
/**
 * 用来消费coupon队列里的信息,修改优惠券的状态
 *
 */
@Component
public class MQConsumer{
    private final Logger logger=Logger.getLogger(MQConsumer.class);
    //此注解用于当创建此类对象时初始化此方法
    Connection connect=null;
    Channel channel=null;
    @Autowired
    DiscountService discount;
    @PostConstruct
    public void init() throws Exception{
        //连接mq
        ConnectionFactory factory=new ConnectionFactory();
        factory.setHost("192.168.174.133");
        factory.setPort(5672);
        factory.setUsername("admin");
        factory.setPassword("12345678");
        Connection connection=factory.newConnection();//创建连接
        channel=connection.createChannel();//打开通道,发送消息
        //开始消费,从队列中读取消息
        Consumer consumer=new DefaultConsumer(channel){
            @Override
            public void handleDelivery(String consumerTag, Envelope envelope, BasicProperties properties, byte[] body)
                    throws IOException {
                //消费接受queue里面消息进行业务处理
                JSONObject message=JSONObject.parseObject(new String(body));
                String orderId=message.getString("orderId");
                String couponId=message.getString("couponId");
                try{
                    //锁定优惠券的方法
                    discount.lockcoupon(orderId, couponId);
                    //如果处理完毕,告诉mq ACK 成功的处理掉了
                    channel.basicAck(envelope.getDeliveryTag(), false);
                }catch(SQLException e){//此可以自定义
                    logger.warn("不需要处理异常,已经记录下来了",e);
                    //通知mq,消息处理异常,不需要继续处理,丢弃
                    channel.basicNack(envelope.getDeliveryTag(), false, false);//第三个参数是重发,他的作用是否启用取决于第二个参数
                }catch(Exception e){
                    logger.warn("出现不可知的异常,需要通知重发",e);
                    channel.basicNack(envelope.getDeliveryTag(), false, true);
                }
            }

        };
        //消费,设置为手动ack确认(false)
        channel.basicConsume("couponQueue",false, consumer);
    }
    //用于最后执行该方法
    @PreDestroy
    public void destory() throws Exception{
        channel.close();
        connect.close();
    }
}
此时优惠券没有controller层,因为它要手动方式启动优惠券项目,项目启动后就会自动加载MQConsumer中init方法,从而消费消息队列中的消息,订单被创建,优惠券处于被锁状态
十、关于CAP原则的取舍
1、什么是CAP
CAP定理是指分布式WEB服务无法同时满足以下3个属性
数据一致性:如果系统对一个写操作返回成功,那么之后的读请求都必须读到这个新数据;如果返回失败,那么所有读操作都不能读到这个数据,对调用者而言数据具有强一致性
服务可用性:所有读写请求在一定时间内得到响应,可终止、不会一直等待
分区容错性:在网络分区的情况下,被分隔的及诶单仍然正常对外服务。
十一、消息队列有什么缺点
分析:一个使用了MQ的项目,如果连这个问题都没有考虑过,就把MQ引进去了,那就给自己的项目带来了风险。我们引入一个技术,要对这个技术的弊端有充分的认识,才能做好预防。要记住,不要给公司挖坑!
回答:回答也很容易,从以下两个个角度来答:
系统可用性降低:你想啊,本来其他系统只要运行好好的,那你的系统就是正常的。现在你非要加个消息队列进去,那消息队列挂了,你的系统不是呵呵了。因此,系统可用性降低。
系统复杂性增加:要多考虑很多方面的问题,比如一致性问题、如何保证消息不被重复消费,如何保证保证消息可靠传输。因此,需要考虑的东西更多,系统复杂性增大
十二、如何保证消息不被重复消费
分析:这个问题其实换一种问法就是,如何保证消息队列的幂等性?这个问题可以认为是消息队列领域的基本问题。
回答:先来说一下为什么会造成重复消费?
其实无论是那种消息队列,造成重复消费原因其实都是类似的。正常情况下,消费者在消费消息时候,消费完毕后,会发送一个确认信息给消息队列,消息队列就知道该消息被消费了,就会将该消息从消息队列中删除。只是不同的消息队列发送的确认信息形式不同,例如RabbitMQ是发送一个ACK确认消息,RocketMQ是返回一个CONSUME_SUCCESS成功标志,kafka实际上有个offset的概念,简单说一下,就是每一个消息都有一个offset,kafka消费过消息后,需要提交offset,让消息队列知道自己已经消费过了。那造成重复消费的原因?,就是因为网络传输等等故障,确认信息没有传送到消息队列,导致消息队列不知道自己已经消费过该消息了,再次将该消息分发给其他的消费者。
如何解决?这个问题针对业务场景来答分以下几点:
(1)比如,你拿到这个消息做数据库的insert操作。那就容易了,给这个消息做一个唯一主键,那么就算出现重复消费的情况,就会导致主键冲突,避免数据库出现脏数据。
(2)再比如,你拿到这个消息做redis的set的操作,那就容易了,不用解决,因为你无论set几次结果都是一样的,set操作本来就算幂等操作。
(3)如果上面两种情况还不行,上大招。准备一个第三方介质,来做消费记录。以redis为例,给消息分配一个全局id,只要消费过该消息,将<id,message>以K-V形式写入redis。那消费者开始消费前,先去redis中查询有没消费记录即可。
写在最后
如果觉得文章对你有点帮助,请微信搜索并关注「 冰河技术 」微信公众号,跟冰河学习【分布式事务】专题。让分布式事务问题变得更加简单!