卫星菜单是现在一个非常受欢迎的“控件”,很多Android程序员都趋之若鹜,预览如下图。传统的卫星菜单是用Animation实现的,需要大量的代码,而且算法极多,一不小心就要通宵Debug。本帖贴出用属性动画Animator来实现卫星菜单。

一、浅析属性动画Animator
Animator是Android3.0发布的新功能,代码简单,效果丰富。属性动画,顾名思义,只要是可以GET和SET的属性,我们都可以用属性动画进行处理。属性动画中常用的属性和方法如下:
ValueAnimator  //数值发生器,可以实现很多很灵活的动画效果
ObjectAnimator  //ValueAnimator的子类,对ValueAnimator进行了封装,让我们可以更轻松的使用属性动画,我们通过ObjectAnimator来操纵一个对象,产生动画效果
AnimatorListener  //对动画的开始、结束、暂停、重复等动作的事件监听(需要重写四个方法)
AnimatorListenerAdapter  //对动画的开始、结束、暂停、重复中的一个动作的事件监听(根据选择的动作,只需要重写一个方法)
AnimatorSet  //动画的集合,用来设置多个动画之间的关系(之前、之后、同时等)
PropertyValuesHolder  //动画的集合,和AnimatorSet类似
TypeEvaluator  //值计算器,在使用ValueAnimator.ofObject()方法时引入自定义的属性对象
Interpolator  //插值器,设置动画的特效(速度渐变、弹跳等)
下面对这几个类做一下简单的介绍:
(一)ObjectAnimator:ObjectAnimator是最简单、最常用的属性动画,根据文档上的叙述: This subclass of ValueAnimator provides support for animating properties on target objects. ,这个ValueAnimator的子类对Object对象的属性提供动画。ObjectAnimator中常用的属性如下:
translationX / translationY             水平/垂直平移
rotaionX / rotationY                    横向/纵向旋转
scaleX / scaleY                         水平/垂直缩放
X / Y                                   直接到达X/Y坐标
alpha                                   透明度
我们使用一些方法( ofFloat() 、 ofInt() 、 ofObject() 、 ofPropertyValuesHolder() 等)来实现动画,调用 start() 方法来启动动画。选择哪个方法,主要是属性值的类型决定的。我们先来看看文档中对这几个方法的介绍:
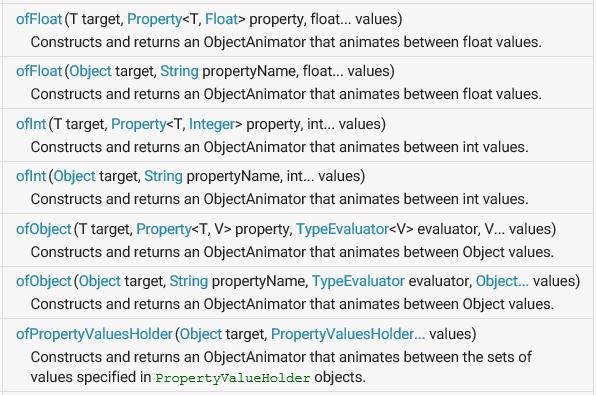
target指的是动画的作用对象,一般指控件;propertyName就是上面说的“translationX”、“alpha”等属性名;values是一个不定长数组,记录着属性的始末值。唯一不同的是ofPropertyValuesHolder()方法,这个方法没有property参数,是因为这个参数在PropertyValuesHolder对象中就已经使用(下面会介绍PropertyValuesHolder的使用方法)。
(二)AnimatorListener:这是一个接口,监听属性动画的状态(开始/重复/结束/取消),Animator及其子类(包括ValueAnimator和ObjectAnimator等)都可以使用这个接口,使用 anim.addListener() 使用这个接口。具体的使用方法如下:
animator.addListener(new AnimatorListener() {
    @Override  // 动画开始的监听器
    public void onAnimationStart(Animator animation) { ... }
    @Override  // 动画重复的监听器
    public void onAnimationRepeat(Animator animation) { ... }
    @Override  // 动画结束的监听器
    public void onAnimationEnd(Animator animation) { ... }
    @Override  // 动画取消的监听器
    public void onAnimationCancel(Animator animation) { ... }
});
(三)AnimatorListenerAdapter:我们在实际开发中往往不会用到AnimatorListener中的全部四个方法,所以如果我们使用AnimatorListener,不仅浪费系统资源,代码看上去也不好看,因此,我们需要一个适配器(Adapter),可以让我们根据自己的意愿,只实现监听器中的一个或几个方法,这就要用到AnimatorListenerAdapter了。AnimatorListenerAdapter的使用方法和AnimatorListener一样,都需要使用 anim.addListener() 方法,不同的是参数。代码如下:
animator.addListener(new AnimatorListenerAdapter() {
    @Override
    public void onAnimationEnd(Animator animation) { ... }
    @Override
    public void onAnimationCancel(Animator animation) { ... }
});
(四)AnimatorSet:先来看文档中的介绍: This class plays a set of Animator objects in the specified order. Animations can be set up to play together, in sequence, or after a specified delay. 这个类支持按顺序播放一系列动画,这些动画可以同时播放、按顺序播放,也可以在一段时间之后播放(主要通过 setStartDelay() 方法实现)。下面是文档中对这些方法的介绍:
值得说的是play()方法,它返回的是一个Builder对象,而Builder对象可以通过 with() 、 before() 、 after() 等方法,非常方便的控制一个动画与其他Animator动画的先后顺序。例如:
AnimatorSet s = new AnimatorSet();
s.play(anim1).with(anim2);
s.play(anim2).before(anim3);
s.play(anim4).after(anim3);
(五)PropertyValuesHolder:使用PropertyValuesHolder结合ObjectAnimator或ValueAnimator,可以达到AnimatorSet的效果。可以说,PropertyValuesHolder就是为了动画集而存在的,它不能单独的存在,因为它没有target参数(因此可以节省系统资源),所以只能依靠ObjectAnimator或ValueAnimator存在。一个实例的代码如下:
PropertyValuesHolder pvh1 = PropertyValuesHolder.ofFloat("translationX", 0F, 200F);
PropertyValuesHolder pvh2 = PropertyValuesHolder.ofFloat("translationY", 0F, 200F);
PropertyValuesHolder pvh3 = PropertyValuesHolder.ofFloat("rotation", 0F, 360F);
ObjectAnimator.ofPropertyValuesHolder(top, pvh1, pvh2, pvh3).setDuration(2000).start();
(六)ValueAnimator:是ObjectAnimator的父类,但由于不能相应动画,也不能设置属性(值的是没有target和property两个参数),所以不常用。如果我们要监听ValueAnimator,则只能为ValueAnimator添加一个AnimatorUpdateListener(AnimatorUpdateListener可以监听Animator每个瞬间的变化,取出对应的值)。一个实例的代码如下:
ValueAnimator animator = ValueAnimator.ofInt(0, 100); // 没有target和property参数
animator.setDuration(5000);
animator.addUpdateListener(new AnimatorUpdateListener() {
    @Override
    public void onAnimationUpdate(ValueAnimator animation) {
        Integer value = (Integer) animation.getAnimatedValue();
        System.out.println("-->" + value);
    }
});
animator.start();
(七)TypeEvaluator:主要用于ValueAnimator的ofObject()方法。根据文档中的介绍, Evaluators allow developers to create animations on arbitrary property types ,Evaluators允许开发者自定义动画参数。因此,使用TypeEvaluator,我们可以打破ObjectAnimator的动画范围禁锢,创造我们自己的动画。大致代码如下:
ValueAnimator animator = ValueAnimator.ofObject(new TypeEvaluator<Object>() {
    @Override
    public Object evaluate(float fraction, Object startValue, Object endValue) {
        return null;
    }
});
animator.start();
(八)Interpolator:插值器,可以设置动画的效果。Animator内置了很多插值器,如渐加速、渐减速、弹跳等等。插值器的种类可以在模拟器API DEMO应用的Views - Animation - Interpolator中查看。为Animator添加插值器只需要 animator.setInterpolator(new OvershootInterpolator()); 即可。
二、实现卫星菜单
实现卫星菜单,我们主要使用了ObjectAnimator。先来介绍一下这个DEMO的效果(如下组图):开始的时候在屏幕左上角显示一个红色的按钮,点击之后弹出一列子菜单,每个子菜单之间的距离递增,弹出的时间递减,弹出时会有OverShoot效果,点击每个子菜单都会弹出相应的Toast;弹出菜单后再次点击红色按钮,则收回所有子菜单。

下面贴出代码。


 1 <RelativeLayout xmlns:android="http://schemas.android.com/apk/res/android"
 2     xmlns:tools="http://schemas.android.com/tools"
 3     android:layout_width="match_parent"
 4     android:layout_height="match_parent"
 5     android:background="@color/white" >
 6
 7     <!-- 上面的七张图片是七个子菜单 -->
 8     <ImageView
 9         android:id="@+id/menuitem_07"
10         style="@style/SateliteMenu_Item_Theme"
11         android:contentDescription="@string/app_name"
12         android:src="@drawable/item_07" />
13
14     <ImageView
15         android:id="@+id/menuitem_06"
16         style="@style/SateliteMenu_Item_Theme"
17         android:contentDescription="@string/app_name"
18         android:src="@drawable/item_06" />
19
20     <ImageView
21         android:id="@+id/menuitem_05"
22         style="@style/SateliteMenu_Item_Theme"
23         android:contentDescription="@string/app_name"
24         android:src="@drawable/item_05" />
25
26     <ImageView
27         android:id="@+id/menuitem_04"
28         style="@style/SateliteMenu_Item_Theme"
29         android:contentDescription="@string/app_name"
30         android:src="@drawable/item_04" />
31
32     <ImageView
33         android:id="@+id/menuitem_03"
34         style="@style/SateliteMenu_Item_Theme"
35         android:contentDescription="@string/app_name"
36         android:src="@drawable/item_03" />
37
38     <ImageView
39         android:id="@+id/menuitem_02"
40         style="@style/SateliteMenu_Item_Theme"
41         android:contentDescription="@string/app_name"
42         android:src="@drawable/item_02" />
43
44     <ImageView
45         android:id="@+id/menuitem_01"
46         style="@style/SateliteMenu_Item_Theme"
47         android:contentDescription="@string/app_name"
48         android:src="@drawable/item_01" />
49
50     <!-- 最上层的红色按钮,因为它显示在最上面,因此布局代码在最后 -->
51     <ImageView
52         android:id="@+id/menu_top"
53         android:layout_width="35.0dip"
54         android:layout_height="35.0dip"
55         android:layout_marginLeft="17.0dip"
56         android:layout_marginTop="17.0dip"
57         android:contentDescription="@string/app_name"
58         android:src="@drawable/top_toopen" />
59
60 </RelativeLayout>
 1 public class MainActivity extends Activity implements OnClickListener {
 2     private ImageView top; // 红色按钮
 3     // 七个子菜单的ID组成的数组
 4     private int[] ids = new int[] { R.id.menuitem_01, R.id.menuitem_02, R.id.menuitem_03, R.id.menuitem_04, R.id.menuitem_05, R.id.menuitem_06, R.id.menuitem_07, };
 5     private List<ImageView> itemList; // 七个子菜单都加到List中
 6     private boolean isMenuOpen; // 记录子菜单是否打开了
 7
 8     @Override
 9     protected void onCreate(Bundle savedInstanceState) {
10         super.onCreate(savedInstanceState);
11         setContentView(R.layout.activity_main);
12         initView();
13     }
14
15     private void initView() {
16         top = (ImageView) findViewById(R.id.menu_top);
17         top.setOnClickListener(this);
18
19         itemList = new ArrayList<ImageView>();
20         for (int i = 0; i < ids.length; i++) {
21             ImageView imageView = (ImageView) findViewById(ids[i]);
22             imageView.setOnClickListener(this);
23             itemList.add(imageView);
24         }
25     }
26
27     @Override
28     public void onClick(View v) {
29         switch (v.getId()) {
30         case R.id.menu_top:
31             if (!isMenuOpen) { // 如果子菜单处于关闭状态,则使用Animator动画打开菜单
32                 for (int i = 0; i < itemList.size(); i++) {
33                     // 子菜单之间的间距对着距离的增加而递增
34                     ObjectAnimator animator = ObjectAnimator.ofFloat(itemList.get(i), "translationY", 0, (i + 1) * (30 + 2 * i));
35                     animator.setDuration((7 - i) * 100); // 最远的子菜单弹出速度最快
36                     animator.setInterpolator(new OvershootInterpolator()); // 设置插值器
37                     animator.start();
38                 }
39                 top.setImageResource(R.drawable.top_toclose);
40                 isMenuOpen = true;
41             } else { // 如果子菜单处于打开状态,则使用Animator动画关闭菜单
42                 for (int i = 0; i < itemList.size(); i++) {
43                     ObjectAnimator animator = ObjectAnimator.ofFloat(itemList.get(i), "translationY", (i + 1) * (30 + 2 * i), 0);
44                     animator.setDuration((7 - i) * 100);
45                     animator.start();
46                 }
47                 top.setImageResource(R.drawable.top_toopen);
48                 isMenuOpen = false;
49             }
50             break;
51         default:
52             Toast.makeText(MainActivity.this, "Item" + (itemList.indexOf(v) + 1) + " Clicked...", Toast.LENGTH_SHORT).show();
53             break;
54         }
55     }
56 }
三、扩展
使用属性动画可以实现的功能还有很多,这里再追加一个“评分”的功能实现。直接显示成绩往往给人一种突兀的感觉,所以我们想利用属性动画来实现一个数字变换的“成绩单”,让成绩滚动显示,同时,越到最后滚动的越慢,最后停止在真正的分数上。
思路:我们需要用到ValueAnimator,并用AnimatorUpdateListener作为动画的监听器,监听动画的每一个动作,并为成绩的TextView设置Text。
以下是代码。
 1 <RelativeLayout xmlns:android="http://schemas.android.com/apk/res/android"
 2     xmlns:tools="http://schemas.android.com/tools"
 3     android:layout_width="match_parent"
 4     android:layout_height="match_parent"
 5     android:background="@color/white" >
 6
 7     <TextView
 8         android:id="@+id/main_mark"
 9         android:layout_width="wrap_content"
10         android:layout_height="wrap_content"
11         android:layout_centerInParent="true"
12         android:textColor="#ff0000"
13         android:textSize="65.0sp" />
14
15 </RelativeLayout>
 1 public class MainActivity extends Activity {
 2     private TextView mark;
 3     private static final int REAL_MARK = 96;
 4
 5     @Override
 6     protected void onCreate(Bundle savedInstanceState) {
 7         super.onCreate(savedInstanceState);
 8         setContentView(R.layout.activity_main);
 9         initView();
10     }
11
12     private void initView() {
13         mark = (TextView) findViewById(R.id.main_mark);
14
15         ValueAnimator animator = ValueAnimator.ofInt(0, REAL_MARK);
16         animator.setDuration(3000);
17         animator.setInterpolator(new DecelerateInterpolator());
18         animator.addUpdateListener(new AnimatorUpdateListener() {
19             @Override
20             public void onAnimationUpdate(ValueAnimator animation) {
21                 Integer value = (Integer) animation.getAnimatedValue();
22                 mark.setText(value + "");
23             }
24         });
25         animator.start();
26     }
27 }