接到项目, 用react和material-ui实现轮播图. 搜索了一些方法参考, 不论语言/框架的使用,大体上分为两种思路
超宽列表实现法
在原生JS或者JQuery中,轮播图的实现一般是这样子的
设置一个ul, 把所有图片横向展开,复制第一张图到最后,设置显示的界面 正好为一张图的大小和宽度,然后不断向后移动. 到最后一张图时无变化的切换到第一张,
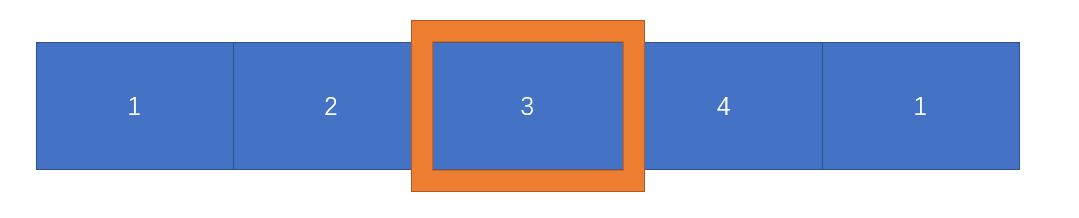
橙色框为显示穿体,可以想象成在后面抽动图片条, 抽到后一个的时候瞬间无动画的回到初始状态.
这个可以类比数据结构中的循环数组,首尾相连,从一个元素开始可以遍历完整个队列然后回到初始元素,类似项链的一个圈.
循环队列显示法
而我们观察到,影响整个动画的只有3个元素,当前图像和前后两个图像,因此可以类比数据结构中的循环队列,每次只记录当前元素和当前元素前后的状态,用index指向当前元素即可
那么就有三种状态
center 显示在屏幕中间的图片
left 即将从屏幕中移除的图片,动画效果直到完全出屏幕
right 即将进入屏幕的图片,动画效果从右侧贴紧屏幕到正中
图片被包裹在一个div中 以下为代码
import React, { Component } from 'react';
import PropTypes from 'prop-types';
import classNames from 'classnames';
import { withStyles } from '@material-ui/core/styles';

const styles = ({
  root: {
    position: "relative",
    padding: 0,
    margin: 0,
    overflow: "hidden",
     "100%",
  },
  center: {
    position: "relative",  //显示在中间的要撑开div
     "100%",
    left: 0,  //用于transition动画,必须设定left值
    transition :"all 1s ease-in-out",
  },
  right: {
    position :"absolute",
    left: "100%",
     "100%",
    top: 0,
  },
  left: {
    position :"absolute",
    left: "-100%",
     "100%",
    top: 0,
    transition :"all 1s ease-in-out",
  }
});

class Slideshow extends Component {

  state = {
    index: 0,
    images: [],
  };

  turn = step => {
    let index = this.state.index + step;
    if (index >= this.state.images.length) {
      index = 0;
    }
    if (index < 0) {
      index = this.props.images.length - 1;
    }
    this.setState({ index: index })
  };

  go = () => {
    this.timer = setInterval(
      () => this.turn(1),
      this.props.delay * 1000,
    )
  };

  clear = () => {
    clearInterval(this.timer)
  };

  componentDidMount() {
    const images = [
       require('../image/1.jpg'),
       require('../image/2.jpg'),
       require('../image/3.png'),
    ];
    this.setState({
      images: images,
    });
    this.go()
  };


  componentWillUnmount() {
    this.clear();
  }

  render() {
    const { classes } = this.props;

    return (
      <div
        className={classes.root}
        onMouseOver={this.clear}  //鼠标悬停时停止计时
        onMouseLeave={this.go}
      >
        { this.state.images.map((item, index) => (
          <img
            src={ item }
            alt=""
            key={index}
            className={ classNames(
            { [classes.center]: index === this.state.index },
            {
              [classes.right]:
              index === this.state.index + 1 || (index === 0 && this.state.index === this.state.images.length - 1)
            },
            {
              [classes.left]:
              index === this.state.index - 1 || (index === this.state.images.length - 1 && this.state.index === 0)
            },
          ) }/>
        ))
        }
      </div>
    )

  }
}


Slideshow.propTypes = {
  classes: PropTypes.object.isRequired,
};

export default withStyles(styles)(Slideshow);
有了基本框架之后,向左向右翻动的按钮和显示页数的按钮也可以直接做出来了. 只需要改变当前页面的index即可生效
在做按钮的时候发现一个问题,这个方法在只有3张图片的时候 会有奇怪的情况出现.原因是因为 只有3张图片 每一张都是本体 前驱 后继 每次转换的时候都会进行一次transform
解决办法 用4张图片 或者设置left和right 的opacity:0