原生操作数据库模块 pymysql
pymsql是Python中操作MySQL的模块(其使用方法和MySQLdb几乎相同,在python3中,MySQLdb这个库已经不能继续使用了)
下载安装
pip3 install pymysql
another way:用集成开发环境pycharm安装模块:
File-->Settings-->Project:xxx-->Project Interpreter-->右侧有个小 ‘+’ 号,点击--->在输入框里输入要安装的模块(pymysql)-->左下角Install Package
如图:


使用步骤
|
1
|
连接数据库--->创建游标--->执行SQL--->fetch获得数据,进行业务处理--->关闭游标--->commit--->关闭数据库连接 |
1、基本使用

import pymysql
user=input('用户名: ').strip()
pwd=input('密码: ').strip()

#链接
conn=pymysql.connect(host='localhost',user='root',password='123456',database='test',charset='utf8')
#游标
cursor=conn.cursor() #执行完毕返回的结果集默认以元组显示
#配置结果集为字典形式
#cursor=conn.cursor(cursor=pymysql.cursors.DictCursor)


#执行sql语句
sql='select * from user where username="%s" and password="%s"' %(user,pwd) #注意%s需要加引号
print(sql)
res=cursor.execute(sql) #执行sql语句,返回sql查询成功的记录数目
print(res)

cursor.close()
conn.close()

if res:
    print('登录成功')
else:
    print('登录失败')
2、sql注入
我们大家都知道:-- 是sql的注释,语法为: -- sql语句
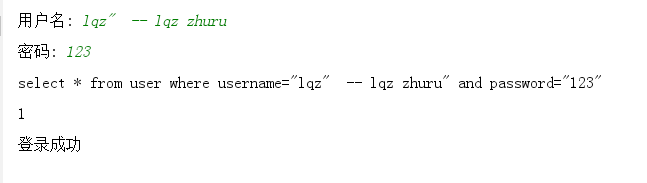
假如我(用户名存在的情况):
用户名输入: lqz“ -- lqz zhuru
密码输入:123
显示结果如下:
或者我(用户名不存在的情况):
用户名输入: liuqz“ -- lqz zhuru
密码输入:123
显示结果如下:
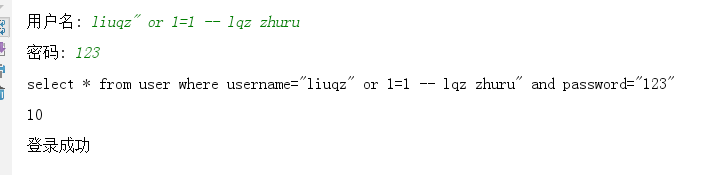


#用户存在,绕过密码
select * from user where username="lqz" -- lqz zhuru" and password="123"

#用户不存在,直接绕过:
select * from user where username="liuqz" or 1=1 -- lqz zhuru" and password="123"

#-- 是注释掉后面的sql,有什么也不会执行
#  or 1=1 永远成立
#这样就绕过了用户名密码验证,就是我们常说的sql注入
解决方案:
# 原来是我们对sql进行字符串拼接
sql="select * from user where username='%s' and password='%s'" %(user,pwd)print(sql)res=cursor.execute(sql)

# 改写为(execute帮我们做字符串拼接,我们无需且一定不能再为%s加引号了)
sql = "select * from user where usernamne=%s and password=%s"
res = cursor.execute(sql, [user, pwd])
# pymysql模块自动帮我们解决sql注入的问题,只要我们按照pymysql的规矩来。
# !!!注意%s需要去掉引号,因为pymysql会自动为我们加上
3、增,删,改
import pymysql
#链接
conn=pymysql.connect(host='localhost',user='root',password='123456',database='test')
#游标
cursor=conn.cursor()

#执行sql语句
#part1
# sql='insert into user(username,password) values("liuqingzheng","123456");'
# res=cursor.execute(sql) #执行sql语句,返回sql影响成功的行数
# print(res)

#part2
# sql='insert into user(username,password) values(%s,%s)'
# res=cursor.execute(sql,("liuqingzheng","123456")) #执行sql语句,返回sql影响成功的行数
# print(res)

#part3 插入
# sql='insert into user(username,password) values(%s,%s);'
# res=cursor.executemany(sql,[("lqz","123456"),("egon","1234"),("kevin","111")]) #执行sql语句,返回sql影响成功的行数
# print(res)
#part4 修改
# sql='update user set username=%s , password = %s where id=%s'
# res=cursor.execute(sql,['lqz','1234',1]) #执行sql语句,返回sql影响成功的行数
# print(res)
#part5 删除
# sql= 'delete from user where id = %s'
# res=cursor.execute(sql,2)
# print(res)
conn.commit() #提交后才发现表中插入记录成功
cursor.close()
conn.close()
4、查询之fetchone,fetchmany,fetchall
import pymysql
#链接
conn=pymysql.connect(host='localhost',user='root',password='123456',database='test')
#游标
cursor=conn.cursor()

#执行sql语句
sql='select * from user;'
rows=cursor.execute(sql) #执行sql语句,返回sql影响成功的行数rows,将结果放入一个集合,等待被查询

# cursor.scroll(3,mode='absolute') # 相对绝对位置移动
# cursor.scroll(1,mode='relative') # 相对当前位置移动
res1=cursor.fetchone()
res2=cursor.fetchone()
res3=cursor.fetchone()
res4=cursor.fetchmany(2)
res5=cursor.fetchall()
print(res1)
print(res2)
print(res3)
print(res4)
print(res5)
print('%s 行数据'%rows)
5、获取插入的最新自增id
import pymysql
conn=pymysql.connect(host='localhost',user='root',password='123456',database='test')
cursor=conn.cursor()

sql='insert into user(username,password) values(%s,%s);'
rows=cursor.execute(sql,['liuqz','12345'])
# rows= cursor.executemany(sql,[('liuqz','111'),('liuqz2','222')])
print(cursor.lastrowid) #在插入语句后查看

conn.commit()
cursor.close()
conn.close()
# print(cursor.lastrowid) #放在这也可以
6、注意
fetch获取的数据默认是元组,如果想要字典类型:
import pymysql
#链接
conn=pymysql.connect(host='localhost',user='root',password='123456',database='test')
#游标
cursor=conn.cursor(cursor=pymysql.cursors.DictCursor)#在此处设置
#执行sql语句
sql='select * from user;'
rows=cursor.execute(sql)
res1=cursor.fetchone()
print(res1)