1. 建立虚拟环境
建议python版本3以上
python3 -m venv venv 生成虚拟环境
source venv/bin/activate 将虚拟环境导出来,作为环境变量直接执行
deactivate推出虚拟环境

pip install django -i https://pypi.douban.com/simple 在虚拟环境中安装django
2. 第一个项目
django-admin startproject "项目名" 创建项目(我这里叫first_project)
mv venv first_project/ 因为是一套东西所以放在一起
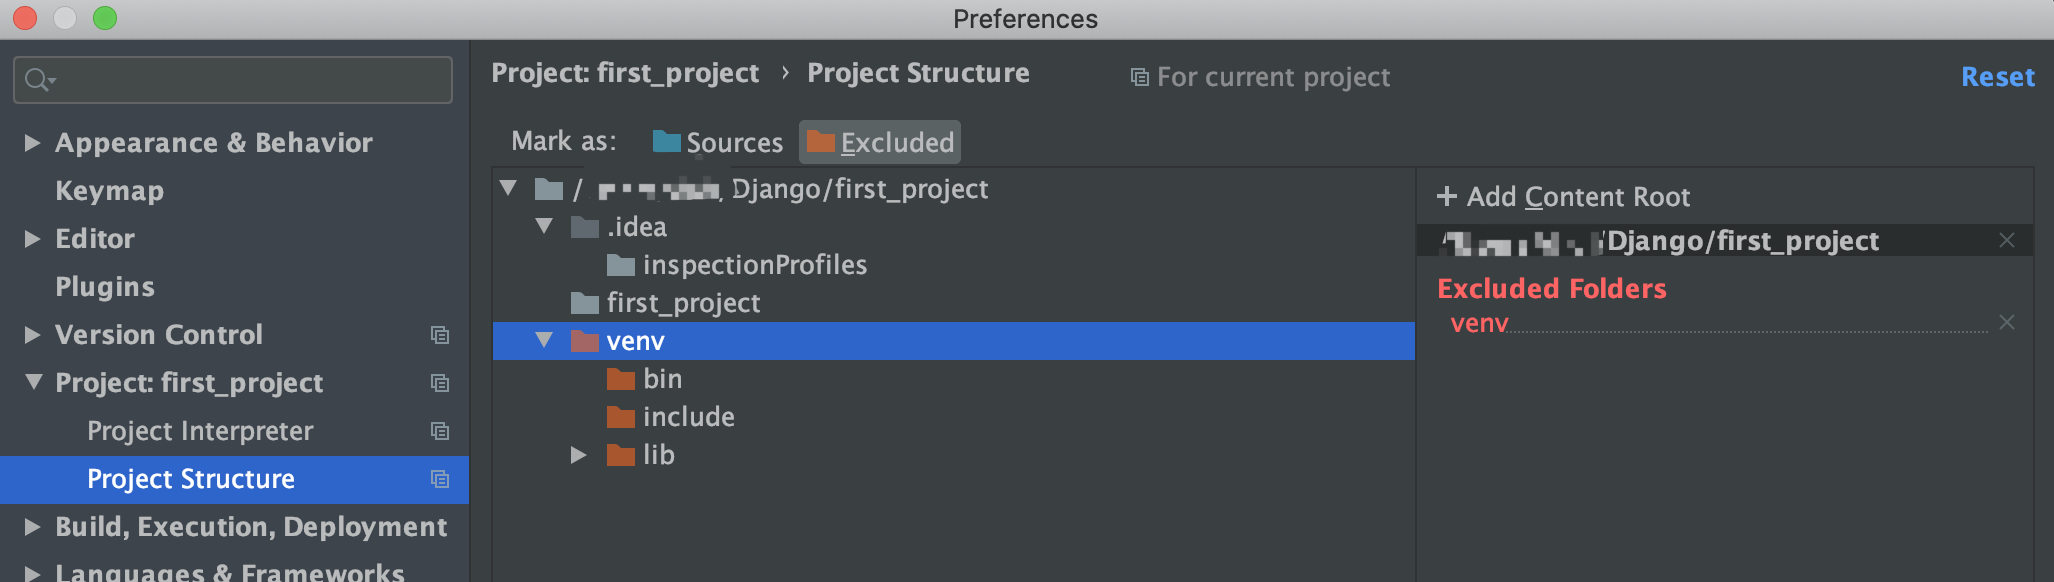
用pycharm打开该项目,然后将venu排除,因为其本身跟逻辑没有任何关系
注意:我这里发现移动完虚拟环境后,不能用虚拟环境的python了,我又重新在first_project下重新生成的虚拟环境并安装django
用pycharm的终端新建app:django-admin startapp first_app

first_project/first_project/settings.py是全局配置文件,urls是路由
django遵循可插拔式的 plugable,就是每个app之前必应该有依赖的情况,保持独立
3. MTV+urls
models:数据库管理员,非必须的
template:模版引擎,从数据转成模版语言,其实就是转换器,非必须的
view:视图,接口引擎,访问url时,处理接口的逻辑,用来响应请求的,必须的
流程:
浏览器中输入url->urls->views->models->数据库->views->templates->response(字节码)->浏览器
4. Hello World
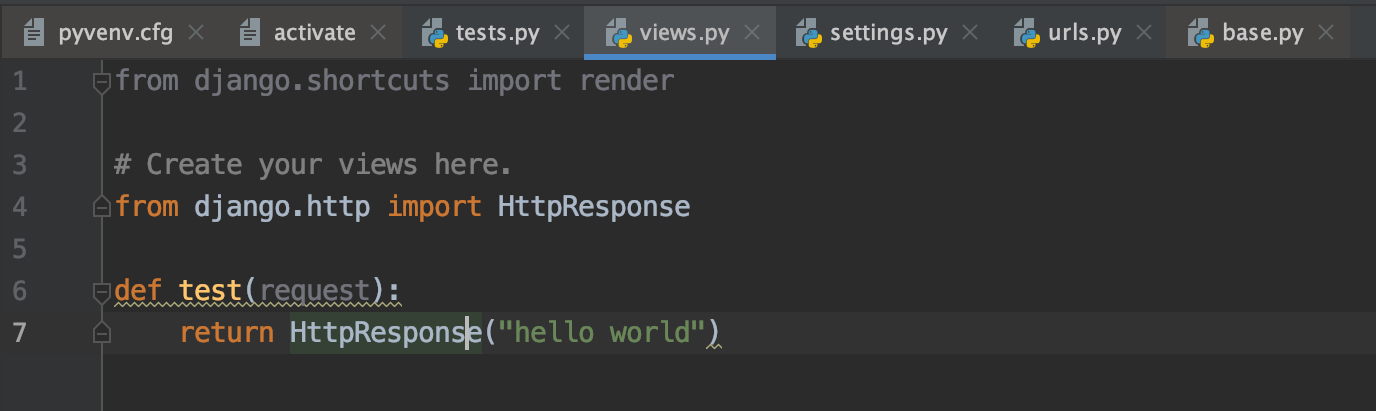
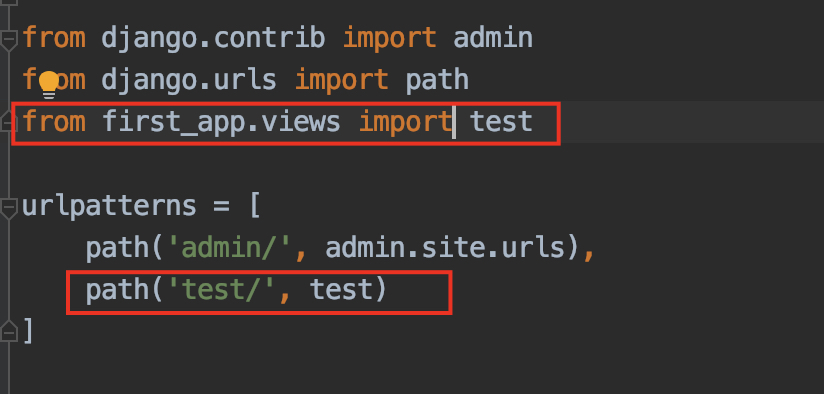
在first_app中的views添加下面图一代码,在first_project中的urls中添加下图二中的代码
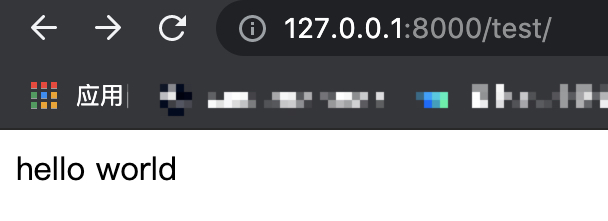
启动服务
在这个例子中,定义了函数视图,但是不推荐用,因为这样就失去了用Django的意义
要用官方推荐的方法,对项目的理解和扩展能力来讲会更好
5. 路由分发例子
新建first_app/urls.py文件


1 from django.http import HttpResponse
2
3 def index(request):
4     return HttpResponse("i am first app")
from django.urls import path
from . import views

urlpatterns = [
    path('', views.index),
]
from django.contrib import admin
from django.urls import path, include
from first_app import urls as first_app_urls

urlpatterns = [
    path('admin/', admin.site.urls),
    path('first_app/', include(first_app_urls))
]
分发到子app中路由时,需要调用include函数
5. 正则匹配路由
from django.urls import path
from . import views

urlpatterns = [
    path('<int:num>/', views.index),
]
其他代码不变
这样在请求url时可以匹配到127.0.0.1:8000/test/1/这个url中test后面的1了
6. 模版视图
a.函数视图
推荐在每个app中新建templates
# first_app/views.py
from django.template.response import TemplateResponse

def index(request, *args, **kwargs):
    return TemplateResponse(request, 'first_app/index.html')
<!-- fist_app/template/fist_app/index.html -->
<!DOCTYPE html>
<html lang="en">
<head>
    <meta charset="UTF-8">
    <title>Title</title>
</head>
<body>
<p style="background-color: blue">Hello</p>
</body>
</html>
# fist_project/settings.py
INSTALLED_APPS = [
    'django.contrib.admin',
    'django.contrib.auth',
    'django.contrib.contenttypes',
    'django.contrib.sessions',
    'django.contrib.messages',
    'django.contrib.staticfiles',
    'first_app.apps.FirstAppConfig' #新加行
]
效果图

⚠️不提倡用函数视图,只是了解有这种方法
b.模版视图
# fist_app/views.py
from django.views.generic import TemplateView

class TestView(TemplateView):# 继承TemplateView
    template_name = 'first_app/index.html' # 只需要重新定义下这个参数,即html路径
# first_app/urls.py
from django.urls import path
from . import views

urlpatterns = [
    path('<int:num>/', views.TestView.as_view()), # as_view函数就转成视图,也可以穿参数
]
效果和函数视图一样
c.渲染模版
# first_app/views.py
from django.views.generic import TemplateView

class TestView(TemplateView):# 继承TemplateView
    template_name = 'first_app/index.html' # 只需要重新定义下这个参数,即html路径

    def get_context_data(self, **kwargs):# 这个函数用来渲染模版
        return {'word': 'hello world'}
<!-- 两个大括号是模版语言 -->
<!DOCTYPE html>
<html lang="en">
<head>
    <meta charset="UTF-8">
    <title>Title</title>
</head>
<body>
<p style="background-color: green">{{ word }}</p>
</body>
</html>
效果和上面一样