一、引言
我们使用Code First的方式来生成数据库表,我们先讲解如何在控制台项目中生成数据库表。
在前面的文章中,我们是直接在控制台项目中安装的Mircosoft.EntityFrameworkCore,在真实的项目中,我们很少这样使用,都是采用分层的结构,将EF Core有关的操作放在一个单独的类库项目里,下面的例子中我们就以这种分层的结构来进行讲解。项目结构如下图所示:

项目结构:
- EFCoreTest.Con:控制台项目,用来运行程序,在项目中会引用EFCoreTest.Data。
- EFCoreTest.Data:类库项目,基于.Net Standard。存放的是与EF Core相关的内容。
- EFCoreTest.Model:类库项目,基于.Net Standard。存放项目中使用到的实体类。
1、添加实体类
我们首先在EFCoreTest.Model类库项目里添加Student实体:
namespace EFCoreTest.Model
{
    public class Student
    {
        public int Id { get; set; }

        public string Name { get; set; }

        public int Age { get; set; }

        public int Gender { get; set; }
    }
}
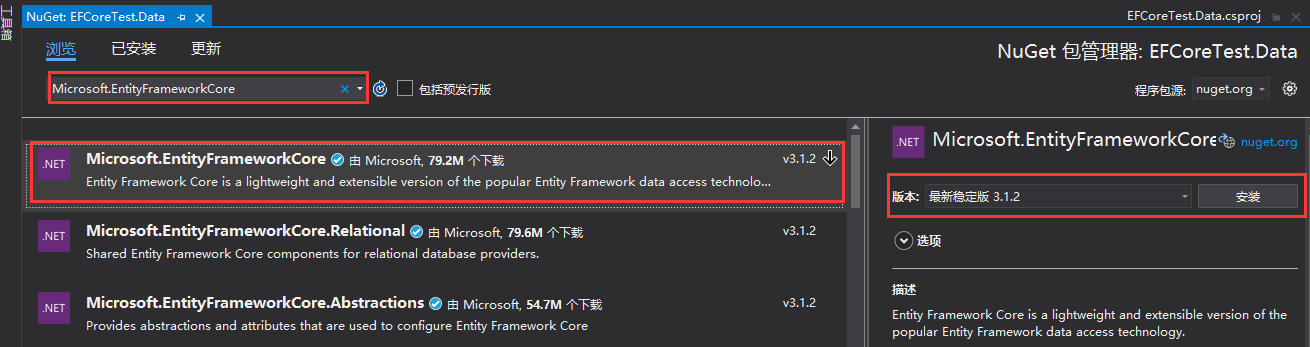
2、添加Mircosoft.EntityFrameworkCore
我们在EFCoreTest.Data类库里面添加Mircosoft.EntityFrameworkCore包:
我们使用SqlServer数据库,所以我们还要安装Microsoft.EntityFrameworkCore.sqlServer包:

安装完成以后我们添加EFCoreTest.Model的引用,然后添加数据上下文类,该类继承自DbContext:
using EFCoreTest.Model;
using Microsoft.EntityFrameworkCore;

namespace EFCoreTest.Data
{
    /// <summary>
    /// 数据上下文类,继承自DbContext
    /// </summary>
    public class EFCoreDbContext:DbContext
    {
        /// <summary>
        /// 重写OnConfiguring方法
        /// </summary>
        /// <param name="optionsBuilder"></param>
        protected override void OnConfiguring(DbContextOptionsBuilder optionsBuilder)
        {
            // 使用SqlServer数据库,传递连接字符串
            optionsBuilder.UseSqlServer("Data Source=.;Initial Catalog=EFTestDb;User ID=sa;Password=123456;");
            base.OnConfiguring(optionsBuilder);
        }

        /// <summary>
        /// 重写OnModelCreating,主要做一些配置
        /// 例如设置生成的表名、主键、字符长度
        /// </summary>
        /// <param name="modelBuilder"></param>
        protected override void OnModelCreating(ModelBuilder modelBuilder)
        {
            // 设置生成的表名
            modelBuilder.Entity<Student>().ToTable("T_Student");
            // 设置主键,可以不设置,会默认把Id字段当成主键
            modelBuilder.Entity<Student>().HasKey(p => p.Id);
            // 设置Name字段的最大长度
            modelBuilder.Entity<Student>().Property("Name").HasMaxLength(32);
            base.OnModelCreating(modelBuilder);
        }

        // DbSet属性
        public DbSet<Student> Students { get; set; }
    }
}
这些工作做好以后,我们就可以用来生成数据库表了。
二、生成数据库表
我们下面以三种方式来生成数据库表。首先在控制台项目中添加EFCoreTest.Data的引用。
1、代码生成
我们可以使用代码来生成数据库,这样在程序启动的时候调用生成数据库的代码就能自动生成数据库了。代码如下:
using EFCoreTest.Data;
using System;

namespace EFCoreTest.Con
{
    class Program
    {
        static void Main(string[] args)
        {
            Console.WriteLine("Hello World!");

            EFCoreDbContext dbContext = new EFCoreDbContext();
            bool tfTrue = dbContext.Database.EnsureCreated();
            if (tfTrue)
            {
                Console.WriteLine("数据库创建成功!");
            }
            else
            {
                Console.WriteLine("数据库创建失败!");
            }

            Console.ReadKey();
        }
    }
}
运行程序:

输出结果提示我们创建成功了,在去数据库里面看看:
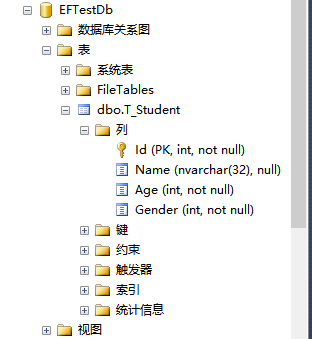
我们看到数据库和表都已经生成了,而且表里面的字段属性是按照我们在代码里面的设置生成的。
注意:如果这时候在程序启动的时候在去生成数据库就会报错:

2、程序包管理器控制台迁移
除了使用代码的方式生成,我们还可以使用数据迁移命令来生成数据库表,分为下面的三个步骤。
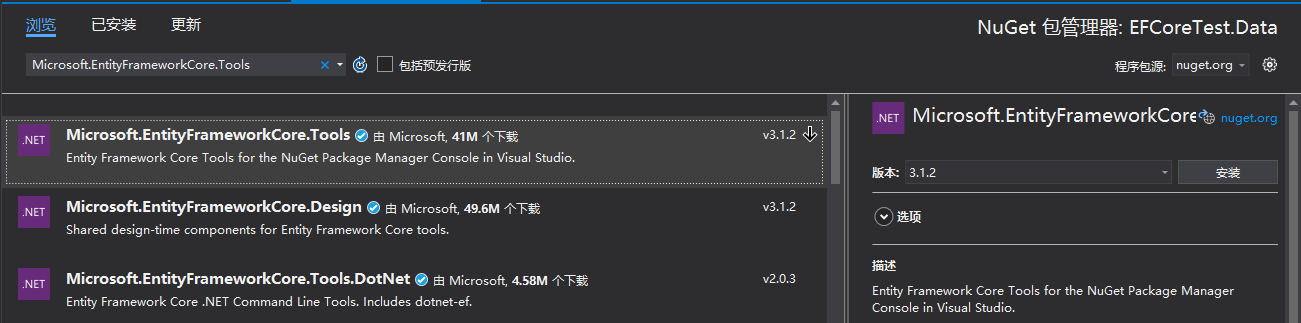
1、安装Microsoft.EntityFrameworkCore.Tools包
要使用数据迁移命令,首先需要安装Microsoft.EntityFrameworkCore.Tools包:
2、添加迁移
首先在数据上下文类的OnModelCreating()方法里面添加一些种子数据,这样生成数据库以后,表里面就有一些基础数据:
using EFCoreTest.Model;
using Microsoft.EntityFrameworkCore;

namespace EFCoreTest.Data
{
    /// <summary>
    /// 数据上下文类,继承自DbContext
    /// </summary>
    public class EFCoreDbContext:DbContext
    {
        /// <summary>
        /// 重写OnConfiguring方法
        /// </summary>
        /// <param name="optionsBuilder"></param>
        protected override void OnConfiguring(DbContextOptionsBuilder optionsBuilder)
        {
            // 使用SqlServer数据库,传递连接字符串
            optionsBuilder.UseSqlServer("Data Source=.;Initial Catalog=EFTestDb;User ID=sa;Password=123456;");
            base.OnConfiguring(optionsBuilder);
        }

        /// <summary>
        /// 重写OnModelCreating,主要做一些配置
        /// 例如设置生成的表名、主键、字符长度
        /// </summary>
        /// <param name="modelBuilder"></param>
        protected override void OnModelCreating(ModelBuilder modelBuilder)
        {
            // 设置生成的表名
            modelBuilder.Entity<Student>().ToTable("T_Student");
            // 设置主键,可以不设置,会默认把Id字段当成主键
            modelBuilder.Entity<Student>().HasKey(p => p.Id);
            // 设置Name字段的最大长度
            modelBuilder.Entity<Student>().Property("Name").HasMaxLength(32);


            base.OnModelCreating(modelBuilder);

            // 添加种子数据
            modelBuilder.Entity<Student>().HasData(
                new Student()
                {
                    Id = 1,
                    Name = "Tom",
                    Age = 24,
                    Gender = 1
                },
                new Student()
                {
                    Id = 2,
                    Name = "Jack",
                    Age = 23,
                    Gender = 2
                },
                new Student()
                {
                    Id = 3,
                    Name = "Kevin",
                    Age = 26,
                    Gender = 2
                }
                );
        }

        // DbSet属性
        public DbSet<Student> Students { get; set; }
    }
}
然后使用下面的命令来添加迁移:
Add-Migration Initial
- Add-Migration:是迁移命令。
- Initial:可以理解成是给这次迁移起的一个别名,这个名称可以任意起,只要保证每次迁移的时候不重名即可。
如下图所示:
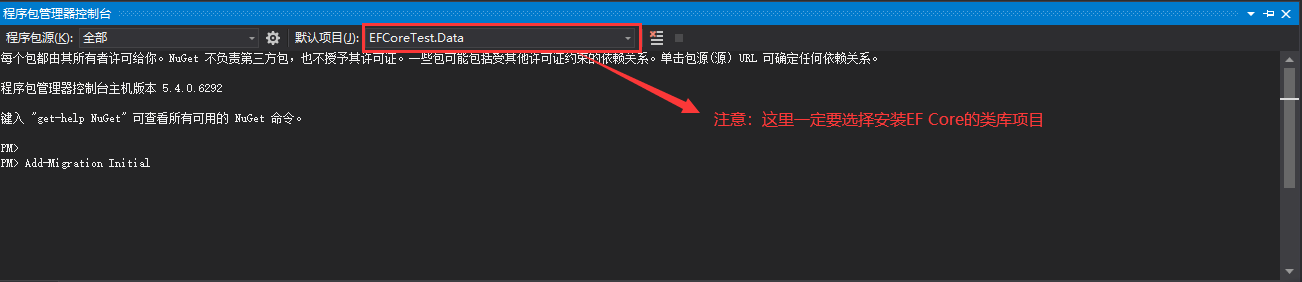
执行这条命令:
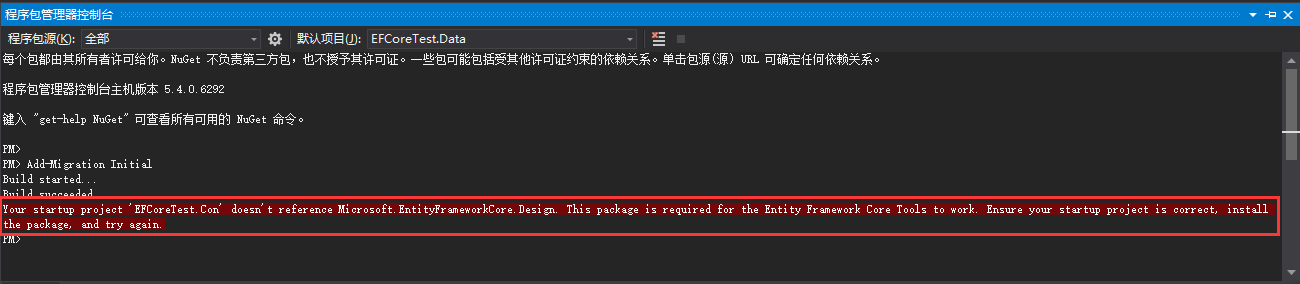
我们看到执行报错了,报错信息提示我们程序的启动项里面也要安装Mircosoft.EntityFrameworkCore.Tools包,我们在控制台程序里面安装这个包,然后在执行迁移命令:

可以看到,这次执行成功了。成功以后会生成一个Migrations文件夹,这个文件夹下面有两个类文件:
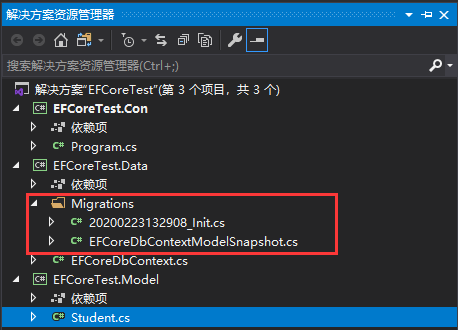
20200223132908_Init.cs文件是根据这次迁移生成的文件,里面记录着这次迁移发生的改变:
using Microsoft.EntityFrameworkCore.Migrations;

namespace EFCoreTest.Data.Migrations
{
    public partial class Init : Migration
    {
        protected override void Up(MigrationBuilder migrationBuilder)
        {
            migrationBuilder.CreateTable(
                name: "T_Student",
                columns: table => new
                {
                    Id = table.Column<int>(nullable: false)
                        .Annotation("SqlServer:Identity", "1, 1"),
                    Name = table.Column<string>(maxLength: 32, nullable: true),
                    Age = table.Column<int>(nullable: false),
                    Gender = table.Column<int>(nullable: false)
                },
                constraints: table =>
                {
                    table.PrimaryKey("PK_T_Student", x => x.Id);
                });

            migrationBuilder.InsertData(
                table: "T_Student",
                columns: new[] { "Id", "Age", "Gender", "Name" },
                values: new object[] { 1, 24, 1, "Tom" });

            migrationBuilder.InsertData(
                table: "T_Student",
                columns: new[] { "Id", "Age", "Gender", "Name" },
                values: new object[] { 2, 23, 2, "Jack" });

            migrationBuilder.InsertData(
                table: "T_Student",
                columns: new[] { "Id", "Age", "Gender", "Name" },
                values: new object[] { 3, 26, 2, "Kevin" });
        }

        protected override void Down(MigrationBuilder migrationBuilder)
        {
            migrationBuilder.DropTable(
                name: "T_Student");
        }
    }
}
里面有下面的两个方法:
- Up:该方法是要应用到数据库的配置。
- Down:该方法相当于是做回滚操作,执行这个方法,可以恢复到上一个状态。
每进行一次迁移就会生成一个这样的文件。
EFCoreDbContextModelSnapshot.cs是根据在OnModelCreating()方法中的配置生成的文件:
// <auto-generated />
using EFCoreTest.Data;
using Microsoft.EntityFrameworkCore;
using Microsoft.EntityFrameworkCore.Infrastructure;
using Microsoft.EntityFrameworkCore.Metadata;
using Microsoft.EntityFrameworkCore.Storage.ValueConversion;

namespace EFCoreTest.Data.Migrations
{
    [DbContext(typeof(EFCoreDbContext))]
    partial class EFCoreDbContextModelSnapshot : ModelSnapshot
    {
        protected override void BuildModel(ModelBuilder modelBuilder)
        {
#pragma warning disable 612, 618
            modelBuilder
                .HasAnnotation("ProductVersion", "3.1.2")
                .HasAnnotation("Relational:MaxIdentifierLength", 128)
                .HasAnnotation("SqlServer:ValueGenerationStrategy", SqlServerValueGenerationStrategy.IdentityColumn);

            modelBuilder.Entity("EFCoreTest.Model.Student", b =>
                {
                    b.Property<int>("Id")
                        .ValueGeneratedOnAdd()
                        .HasColumnType("int")
                        .HasAnnotation("SqlServer:ValueGenerationStrategy", SqlServerValueGenerationStrategy.IdentityColumn);

                    b.Property<int>("Age")
                        .HasColumnType("int");

                    b.Property<int>("Gender")
                        .HasColumnType("int");

                    b.Property<string>("Name")
                        .HasColumnType("nvarchar(32)")
                        .HasMaxLength(32);

                    b.HasKey("Id");

                    b.ToTable("T_Student");

                    b.HasData(
                        new
                        {
                            Id = 1,
                            Age = 24,
                            Gender = 1,
                            Name = "Tom"
                        },
                        new
                        {
                            Id = 2,
                            Age = 23,
                            Gender = 2,
                            Name = "Jack"
                        },
                        new
                        {
                            Id = 3,
                            Age = 26,
                            Gender = 2,
                            Name = "Kevin"
                        });
                });
#pragma warning restore 612, 618
        }
    }
}
3、更新数据库
执行完上面的步骤,我们执行更新数据库的命令:
Update-Database
如下图所示:

执行成功,查看数据库数据:
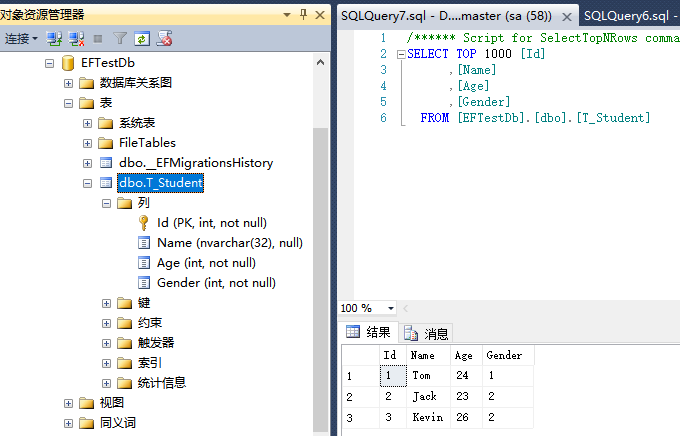
T_Student表已经生成了,而且表里面也有添加的种子数据,到此迁移就完成了。
3、命令行迁移
除了上面的两种方式,还可以使用命令行进行迁移,这种方式主要在Web项目里面比较常用。

使用下面的命令安装:
dotnet tool install --global dotnet-ef
如下图所示:
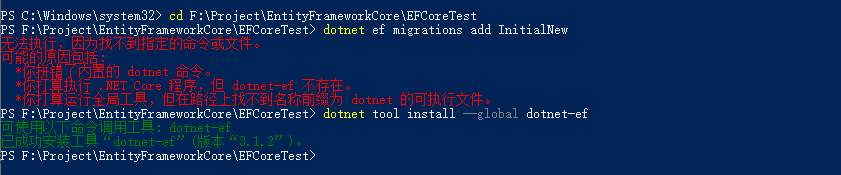
安装完成以后我们在执行命令:
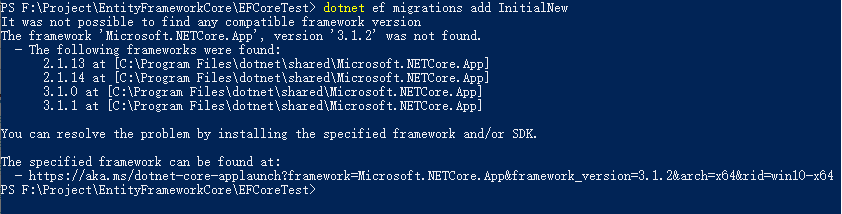
因为我本机的.NET SDK的版本是3.1.1,刚才安装的dotent-ef的版本是3.1.2,版本不兼容,我们下载最新的.NET SDK,然后安装。