网格视图GridView的排列方式与矩阵类似,当屏幕上有很多元素(文字、图片或其他元素)需要按矩阵格式进行显示时,就可以使用GridView控件来实现。
本文将以一个具体的实例来说明如何使用GridView控件实现手机屏幕上各个应用软件图标的摆放,以及应用软件名称的显示。
完成后的程序运行效果如图1所示。

1.界面布局
通过查看GridView的API帮助文档(http://developer.android.com/reference/android/widget/GridView.html),可以了解到GridView的常用xml属性如图2所示。
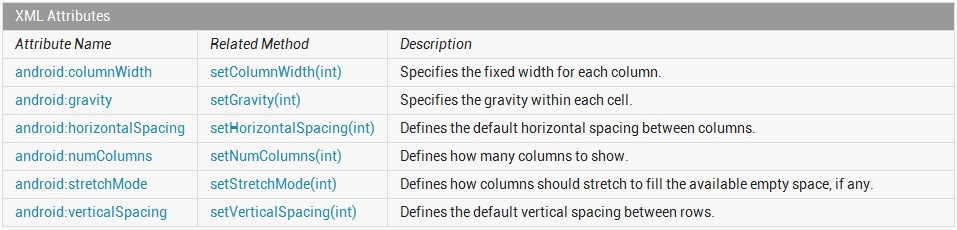
图2 GridView的常用xml属性
其中,android:columnWidth[int]用于设置每列的宽度;android:gravity[int]用于设置每个网格的比重;android:horizontalSpacing[int]用于设置网格之间列的默认水平距离;android:numColumn[int]用于设置列数;android:stretchMode[int]用于设置列应该以何种方式填充可用空间;android:verticalSpacing[int]用于设置网格之间行的默认垂直距离。
了解了上述的GridView常用xml属性之后,我们就可以完成对主界面的xml布局文件编写了。在xml布局文件中,我们使用LinearLayout对整个界面进行垂直布局,然后在该布局中添加一个GridView控件即可。具体的xml布局文件源码如下:
    <LinearLayout xmlns:android="http://schemas.android.com/apk/res/android"
      xmlns:tools="http://schemas.android.com/tools"
      android:orientation="vertical"
      android:layout_width="match_parent"
      android:layout_height="match_parent" >

      <GridView
          android:id="@+id/gridView"
          android:layout_width="match_parent"
          android:layout_height="wrap_content"
          android:numColumns="4"
          android:horizontalSpacing="10dp"
          android:verticalSpacing="10dp">
      </GridView>
  </LinearLayout>
在GridView控件中,我们通过android:numColumns="4"指定了网格的列数为4;通过android:horizontalSpacing="10dp"和android:verticalSpacing="10dp"指定了网格之间的水平距离和垂直距离都为10dp。
2.网格元素布局
如图1所示,在每个网格内,我们都需要显示两项内容:应用软件图标以及应用软件名称。因此,我们还需要对网格内元素进行相应的布局。
我们可以在项目工程的layout目录下新建一个名为“griditeminfo.xml”的xml布局文件,完成对网格内元素的布局。在该xml布局文件中,我们使用相对布局RelativeLayout对网格内的元素进行排列,将一个ImageView控件以水平居中的形式放置在网格内(上方),用来显示应用程序的图标;将一个TextView控件以水平居中的形式放置在网格内(下方),用来显示应用程序的名称。具体的griditeminfo.xml源码如下:
    <?xml version="1.0" encoding="utf-8"?>
  <RelativeLayout xmlns:android="http://schemas.android.com/apk/res/android"
      android:layout_width="match_parent"
      android:layout_height="wrap_content"    >

      <ImageView
          android:id="@+id/itemImage"
          android:layout_width="wrap_content"
          android:layout_height="wrap_content"
          android:layout_centerHorizontal="true"    >
      </ImageView>

      <TextView
          android:id="@+id/itemName"
          android:layout_below="@+id/itemImage"
          android:layout_width="wrap_content"
          android:layout_height="wrap_content"
          android:layout_centerHorizontal="true"    >
      </TextView>

  </RelativeLayout>
3.资源储存
在该实例中,我们需要对众多的应用软件图标以及应用软件名称进行储存。很显然,应用软件图标以及应用软件名称之间存在着一一对应的关系,我们可以使用HashMap分别对应用软件图标以及应用软件名称进行存储,然后再将HashMap添加到ArrayList中,便可以完成资源的储存了。具体实现方法如下:
    //将图标图片和图标名称存入ArrayList中
  //Author:博客园-依旧淡然
  ArrayList<HashMap<String, Object>> item = new ArrayList<HashMap<String, Object>>();
  for (int i = 0; i < resIds.length; i++) {
      HashMap<String, Object> map = new HashMap<String, Object>();
      map.put("itemImage", resIds[i]);
      map.put("itemName", name[i]);
      item.add(map);
  }
其中,数组resIds[]储存着应用软件图标的资源id;数组name[]储存着应用软件名称,并通过for循环遍历语句将其存入了HashMap中。
4.简单适配器SimpleAdapter
简单适配器SimpleAdapter继承自BaseAdapter,用于将静态数据映射到xml文件中定义好的视图当中。比如可以指定静态数据为由Map组成的ArrayList。在ArrayList中每个条目对应List中的一行,Map可以包含多项数据。
SimpleAdapter的构造方法如下:
public SimpleAdapter (Context context, List<? extends Map<String, ?>> data, int resource, String[] from, int[] to);
其中,参数context用于指定SimpleAdapter所关联的上下文对象;参数data用于指定Map列表;参数resource用于指定资源标识符(即列表项的视图布局);参数from用于指定Map列表中每项数据所对应的标签;参数to用于指定Map列表中每项数据在布局文件中所要匹配的对象。
在该实例中,实现SimpleAdapter的构造方法如下所示:
SimpleAdapter simpleAdapter = new SimpleAdapter(this, item,
      R.layout.activity_main_griditeminfo, new String[] {
         "itemImage", "itemName" }, new int[] { R.id.activity_main_griditeminfo_itemImage,
          R.id.activity_main_griditeminfo_itemName }) {
};
实现了简单适配器SimpleAdapter之后,我们还需要将该简单适配器SimpleAdapter添加到GridView对象当中去,可以通过如下方法实现:
mGridView.setAdapter(simpleAdapter);
5.事件监听
在实际的应用当中,我们需要对用户的操作进行监听,即需要知道用户选择了哪一个应用软件。
在网格控件GridView中,常用的事件监听器有两个:OnItemSelectedListener和OnItemClickListener。其中,OnItemSelectedListener用于项目选择事件监听,OnItemClickListener用于项目点击事件监听。
要实现这两个事件监听很简单,继承OnItemSelectedListener和OnItemClickListener接口,并实现其抽象方法即可。其中,需要实现的OnItemClickListener接口的抽象方法如下:
public void onItemClick(AdapterView<?> parent, View view, int position, long id);
需要实现的OnItemSelectedListener接口的抽象方法有两个,分别如下:
public void onItemSelected(AdapterView<?> parent, View view, int position, long id);
public void onNothingSelected(AdapterView<?> parent);