参考:
http://www.php230.com/weixin1456193048.html 【upsync模块说明、性能评测】
https://www.jianshu.com/p/76352efc5657
https://www.jianshu.com/p/c3fe55e6a5f2
根源问题
nginx reload是有一定损耗的,如果你使用的是长连接的话,那么当reload nginx时长连接所有的worker进程会进行优雅退出,并当该worker进程上的所有连接都释放时,进程才真正退出。
Consul+Consul-template的问题
动态nginx负载均衡的配置,可以通过Consul+Consul-template方式,但是这种方案有个缺点:每次发现配置变更都需要reload nginx,而reload是有一定损耗的。而且,如果你需要长连接支持的话,那么当reloadnginx时长连接所在worker进程会进行优雅退出,并当该worker进程上的所有连接都释放时,进程才真正退出(表现为worker进程处于worker process is shutting down)。因此,如果能做到不reload就能动态更改upstream,那么就完美了。
解决办法
对于社区版nginx目前有三个选择方式:
- Tengine 的Dyups模块。
- 微博的Upsync+Consul 实现动态负载均衡。
- 使用OpenResty的balancer_by_lua,而又拍云使用其开源的slardar(Consul + balancer_by_lua)实现动态负载均衡。
本文使用upsync模块来解决配置文件修改后,reload nginx进程造成性能下降的问题。
Upsync介绍
Nginx 以其超高的性能与稳定性,在业界获得了广泛的使用,微博的七层就大量使用了 Nginx 。结合 Nginx 的健康检查模块,以及动态 reload 机制,可以近乎无损的服务的升级上线与扩容。这个时候扩容的频次比较低,大多数情况下是有计划的扩容。
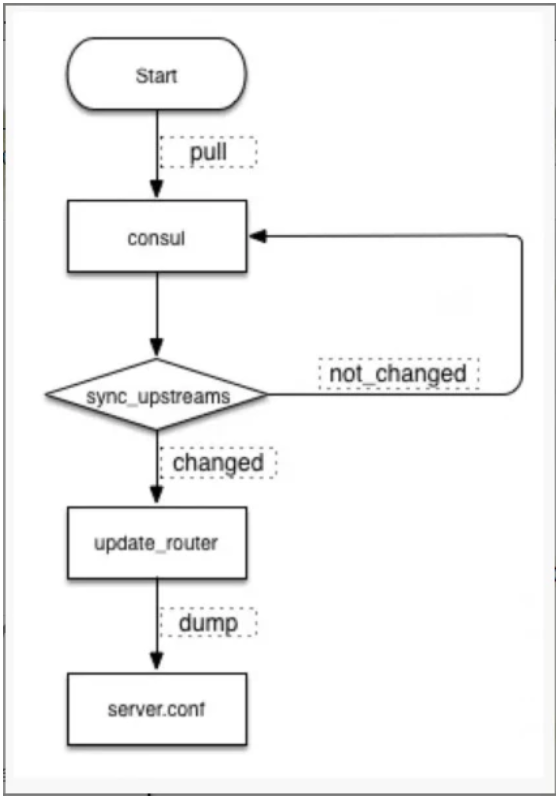
Upsync,开发了模块 nginx-upsync-module,它的功能是拉取 consul 的后端 server 的列表,并更新 Nginx 的路由信息。此模块不依赖于任何第三方模块。 consul 作为 Nginx 的 db,利用 consul 的 KV 服务,每个 Nginx work 进程独立的去拉取各个 upstream 的配置,并更新各自的路由。流程图如下:
应用案例:
模块已经应用在微博的各类业务中,下面图表对比分析使用模块前后的 QPS 与耗时变化。

从数据可以得出,reload 操作时造成 nginx 的请求处理能力下降约 10%,Nginx 本身的耗时会增长 50%+。若是频繁的扩容缩容,reload 操作造成的开销会更加明显。
upsync模块+consul 来实现动态负载均衡
这里我们使用的是upsync模块+consul 来实现动态负载均衡。操作笔记如下:
consul的命令很简单,官方文档有详细的样例供参考,这里略过。
实验环境:
3台centos7.3机器
cat /etc/hosts 如下:
192.168.5.71 node71
192.168.5.72 node72
192.168.5.73 node73
consul 我们使用3节点都是server角色。如果集群内某个节点宕机的话,集群会自动重新选主的。
nginx-Upsync模块:新浪微博开源的,,它的功能是拉取 consul 的后端 server 的列表,并更新 Nginx 的路由信息。且reload对nginx性能影响很少。
1、安装nginx+ nginx-upsync-module(3台机器上都执行安装)
nginx-upsync-module模块: https://github.com/weibocom/nginx-upsync-module
nginx版本:1.13.8
yum install gcc gcc-c++ make libtool zlib zlib-devel openssl openssl-devel pcre pcre-devel -y
cd /root/
git clone https://github.com/weibocom/nginx-upsync-module.git
# 建议使用git clone代码编译,刚开始我使用release的tar.gz 编译nginx失败了
groupadd nginx
useradd -g nginx -s /sbin/nologin nginx
mkdir -p /var/tmp/nginx/client/
mkdir -p /usr/local/nginx
tar xf nginx-1.13.8.tar.gz
cd /root/nginx-1.13.8
./configure --prefix=/usr/local/nginx --user=nginx --group=nginx --with-http_ssl_module --with-http_flv_module --with-http_stub_status_module --with-http_gzip_static_module --with-http_realip_module --http-client-body-temp-path=/var/tmp/nginx/client/ --http-proxy-temp-path=/var/tmp/nginx/proxy/ --http-fastcgi-temp-path=/var/tmp/nginx/fcgi/ --http-uwsgi-temp-path=/var/tmp/nginx/uwsgi --http-scgi-temp-path=/var/tmp/nginx/scgi --with-pcre --add-module=/root/nginx-upsync-module
make && make install
echo 'export PATH=/usr/local/nginx/sbin:$PATH' >> /etc/profile
source /etc/profile
2、配置nginx虚拟主机
在node1上配置虚拟主机:
cat /usr/local/nginx/conf/nginx.conf 内容如下:
user nginx;
worker_processes 4;
events {
worker_connections 1024;
}
http {
include mime.types;
default_type application/octet-stream;
sendfile on;
tcp_nopush on;
keepalive_timeout 65;
gzip on;
server {
listen 80;
server_name 192.168.5.71;
location / {
root /usr/share/nginx/html;
index index.html index.htm;
}
}
}
创建网页文件:
echo 'node71' > /usr/share/nginx/html/index.html
在node3上启动虚拟主机:
cat /usr/local/nginx/conf/nginx.conf 内容如下:
user nginx;
worker_processes 4;
events {
worker_connections 1024;
}
http {
include mime.types;
default_type application/octet-stream;
sendfile on;
tcp_nopush on;
keepalive_timeout 65;
gzip on;
server {
listen 80;
server_name 192.168.5.73;
location / {
root /usr/share/nginx/html;
index index.html index.htm;
}
}
}
创建网页文件:
echo 'node73' > /usr/share/nginx/html/index.html
在node2上配置虚拟主机:
此处的node2作为LB负载均衡+代理服务器使用
cat /usr/local/nginx/conf/nginx.conf 内容如下:
user nginx;
worker_processes 1;
error_log logs/error.log notice;
pid logs/nginx.pid;
events {
worker_connections 1024;
}
http {
include mime.types;
default_type application/octet-stream;
log_format main '$remote_addr - $remote_user [$time_local] "$request" '
'$status $body_bytes_sent "$http_referer" '
'"$http_user_agent" "$http_x_forwarded_for"'
'$upstream_addr $upstream_status $upstream_response_time $request_time';
access_log logs/access.log main;
sendfile on;
tcp_nopush on;
keepalive_timeout 65;
gzip on;
upstream pic_backend {
# 兜底假数据
# server 192.168.5.72:82;
# upsync模块会去consul拉取最新的upstream信息并存到本地的文件中
upsync 192.168.5.72:8500/v1/kv/upstreams/pic_backend upsync_timeout=6m upsync_interval=500ms upsync_type=consul strong_dependency=off;
upsync_dump_path /usr/local/nginx/conf/servers/servers_pic_backend.conf;
}
# LB对外信息
server {
listen 80;
server_name 192.168.5.72;
location = / {
proxy_pass http://pic_backend;
proxy_set_header Host $host;
proxy_set_header X-Real-IP $remote_addr;
proxy_set_header X-Forwarded-For $proxy_add_x_forwarded_for;
add_header real $upstream_addr;
}
location = /upstream_show {
upstream_show;
}
location = /upstream_status {
stub_status on;
access_log off;
}
}
# 兜底的后端服务器
server {
listen 82;
server_name 192.168.5.72;
location / {
root /usr/share/nginx/html82/;
index index.html index.htm;
}
}
}
创建网页文件:
mkdir /usr/share/nginx/html82 -p
echo 'fake data in SLB_72' > /usr/share/nginx/html82/index.html
创建upsync_dump_path(consul、upsync存放upstream主机信息使用到这个目录)
mkdir /usr/local/nginx/conf/servers/
3、安装consul(3台机器上都执行安装)
cd /root/
mkdir /usr/local/consul/
unzip consul_1.0.0_linux_amd64.zip
mv consul /usr/local/consul/
mkdir /etc/consul.d
cd /usr/local/consul/
echo 'export PATH=/usr/local/consul/:$PATH' >> /etc/profile
source /etc/profile
node71上:
/usr/local/consul/consul agent -server -bootstrap-expect 3 -ui -node=node71 -config-dir=/etc/consul.d --data-dir=/etc/consul.d -bind=192.168.5.71 -client 0.0.0.0
node72上:
/usr/local/consul/consul agent -server -bootstrap-expect 3 -ui -node=node72 -config-dir=/etc/consul.d --data-dir=/etc/consul.d -bind=192.168.5.72 -client 0.0.0.0 -join 192.168.5.71
意思是把本节点加入到192.168.5.71这个ip的节点中
node73上:
/usr/local/consul/consul agent -server -bootstrap-expect 3 -ui -node=node73 -config-dir=/etc/consul.d --data-dir=/etc/consul.d -bind=192.168.5.73 -client 0.0.0.0 -join 192.168.5.71
意思是把本节点加入到192.168.5.71这个ip的节点中
这样的话,就在3台主机前台启动了consul程序。
可以在任一台主机上执行:
consul members 列出当前集群的节点状态

consul info 列出当前集群的节点详细信息 (输出信息太多,自己运行时候看去吧)
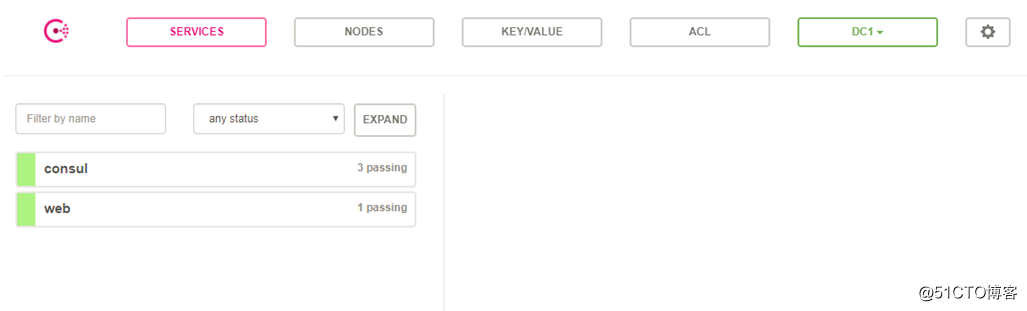
访问consul自带的web界面
http://192.168.5.71/upstream_show (3个节点都开了webui,因此我们访问任意节点都行)
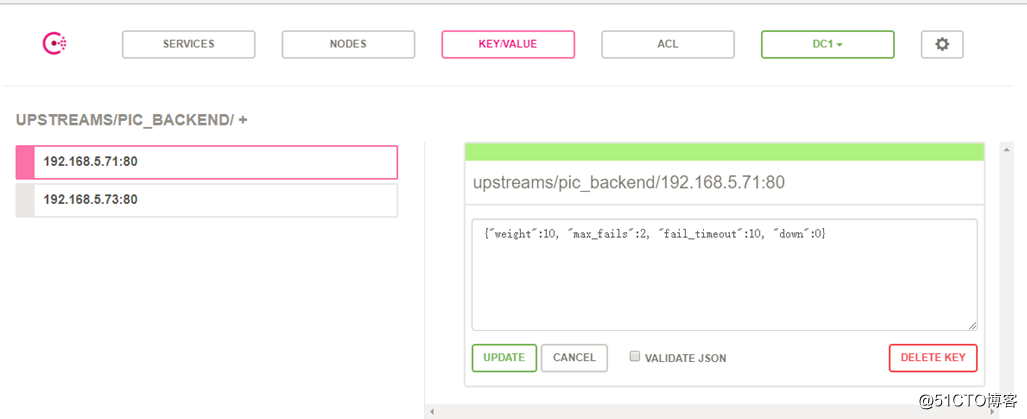
在任一节点上执行如下命令,即可添加2个key-value信息:
curl -X PUT -d '{"weight":10, "max_fails":2, "fail_timeout":10, "down":0}' http://192.168.5.71:8500/v1/kv/upstreams/pic_backend/192.168.5.71:80
curl -X PUT -d '{"weight":10, "max_fails":2, "fail_timeout":10, "down":0}' http://192.168.5.71:8500/v1/kv/upstreams/pic_backend/192.168.5.73:80
在web界面,就可看到如下所示:
删除的命令是:
curl -X DELETE http://192.168.5.71:8500/v1/kv/upstreams/pic_backend/192.168.5.71:80
curl -X DELETE http://192.168.5.71:8500/v1/kv/upstreams/pic_backend/192.168.5.73:80
调整后端服务的参数:
curl -X PUT -d '{"weight":10, "max_fails":2, "fail_timeout":10, "down":0}' http://192.168.5.71:8500/v1/kv/upstreams/test/192.168.5.71:80
4、测试consul+nginx调度
在node1、node2、node3上都执行 /usr/local/nginx/sbin/nginx 启动nginx服务
访问http://192.168.5.72/upstream_show
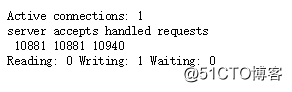
访问http://192.168.5.72/upstream_status
刚才我们在第三步的时候,执行了如下2条命令,自动在consul里面加了2行内容。
curl -X PUT -d '{"weight":10, "max_fails":2, "fail_timeout":10, "down":0}' http://192.168.5.71:8500/v1/kv/upstreams/pic_backend/192.168.5.71:80
curl -X PUT -d '{"weight":10, "max_fails":2, "fail_timeout":10, "down":0}' http://192.168.5.71:8500/v1/kv/upstreams/pic_backend/192.168.5.73:80
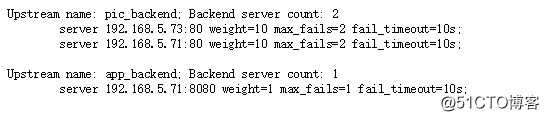
我们node2的nginx在启动的时候,会去nginx.conf里面配置的consul地址去寻找对应的upstream信息。同时会dump一份upstream的配置到/usr/local/nginx/conf/servers目录下。
[root@node72 /usr/local/nginx/conf/servers ]# cat servers_pic_backend.conf
server 192.168.5.73:80 weight=10 max_fails=2 fail_timeout=10s;
server 192.168.5.71:80 weight=10 max_fails=2 fail_timeout=10s;
我们可以写个curl脚本测试下,如下
for i in {1..100} ;do curl http://192.168.5.72/; done > /root/log
grep -c node71 /root/log ;grep -c node73 /root/log
可以看到curl是轮询请求到后端的node1和node3上去的。

或者使用for i in {1..100} ;do curl -s -I http://192.168.5.72/|tail -2 |head -1; done
如果要下线后端主机进行发布的话,只要把down参数置为1即可,类似如下:
curl -X PUT -d '{"weight":2, "max_fails":2, "fail_timeout":10, "down":1}' http://192.168.5.71:8500/v1/kv/upstreams/test/192.168.5.73:80
如果发布完成并验证后,需要上线,可以再次把down参数置为0:
curl -X PUT -d '{"weight":2, "max_fails":2, "fail_timeout":10, "down":0}' http://192.168.5.71:8500/v1/kv/upstreams/test/192.168.5.73:80
如果调整在线调整后端服务的upstream参数:
curl -X PUT -d '{"weight":2, "max_fails":2, "fail_timeout":10, "down":0}' http://192.168.5.71:8500/v1/kv/upstreams/test/192.168.5.73:80
说明:
1、每次去拉取 consul 都会设置连接超时,由于 consul 在无更新的情况下默认会 hang 五分钟,所以响应超时配置时间应大于五分钟。大于五分钟之后,consul 依旧没有返回,便直接做超时处理。
2、由于upsync模块会在pull新数据时候,自动在本地存一份upstream配置的副本。因此即便我们上面的3个consul进程全部宕掉了,nginx服务短时间内也不会受到影响。只要我们的监控完善及时将consul进程启动即可。
此外,还可使用nginx +consulconsul-template这种架构来控制nginx的配置
具体可以参考:
https://www.jianshu.com/p/9976e874c099
https://www.jianshu.com/p/a4c04a3eeb57?utm_campaign=maleskine&utm_content=note&utm_medium=seo_notes&utm_source=recommendation
https://www.cnblogs.com/MrCandy/p/7152312.html
https://github.com/hashicorp/consul-template
官方提供的nginx参考模板:https://github.com/hashicorp/consul-template/blob/master/examples/nginx.md
转自:https://blog.51cto.com/lee90/2056182