整体架构
1.为什么要用?
首先在原来项目中都是基于yaml文件来进行部署发布的,而目前项目大部分微服务化或者模块化,会分成很多个组件来部署,每个组件可能对应一个deployment.yaml,一个service.yaml,一个Ingress.yaml还可能存在各种依赖关系,这样一个项目如果有5个组件,很可能就有15个不同的yaml文件,这些yaml分散存放,如果某天进行项目恢复的话,很难知道部署顺序,依赖关系等,而所有这些包括
- 基于yaml配置的集中存放
- 基于项目的打包
- 组件间的依赖
都可以通过helm来进行解决。
2.Helm 基本概念
Helm 可以理解为 Kubernetes 的包管理工具,可以方便地发现、共享和使用为Kubernetes构建的应用,它包含几个基本概念
- Chart:一个 Helm 包,其中包含了运行一个应用所需要的镜像、依赖和资源定义等,还可能包含 Kubernetes 集群中的服务定义
- Release: 在 Kubernetes 集群上运行的 Chart 的一个实例。在同一个集群上,一个 Chart 可以安装很多次。每次安装都会创建一个新的 release。例如一个 MySQL Chart,如果想在服务器上运行两个数据库,就可以把这个 Chart 安装两次。每次安装都会生成自己的 Release,会有自己的 Release 名称。
- Repository:用于发布和存储 Chart 的仓库。
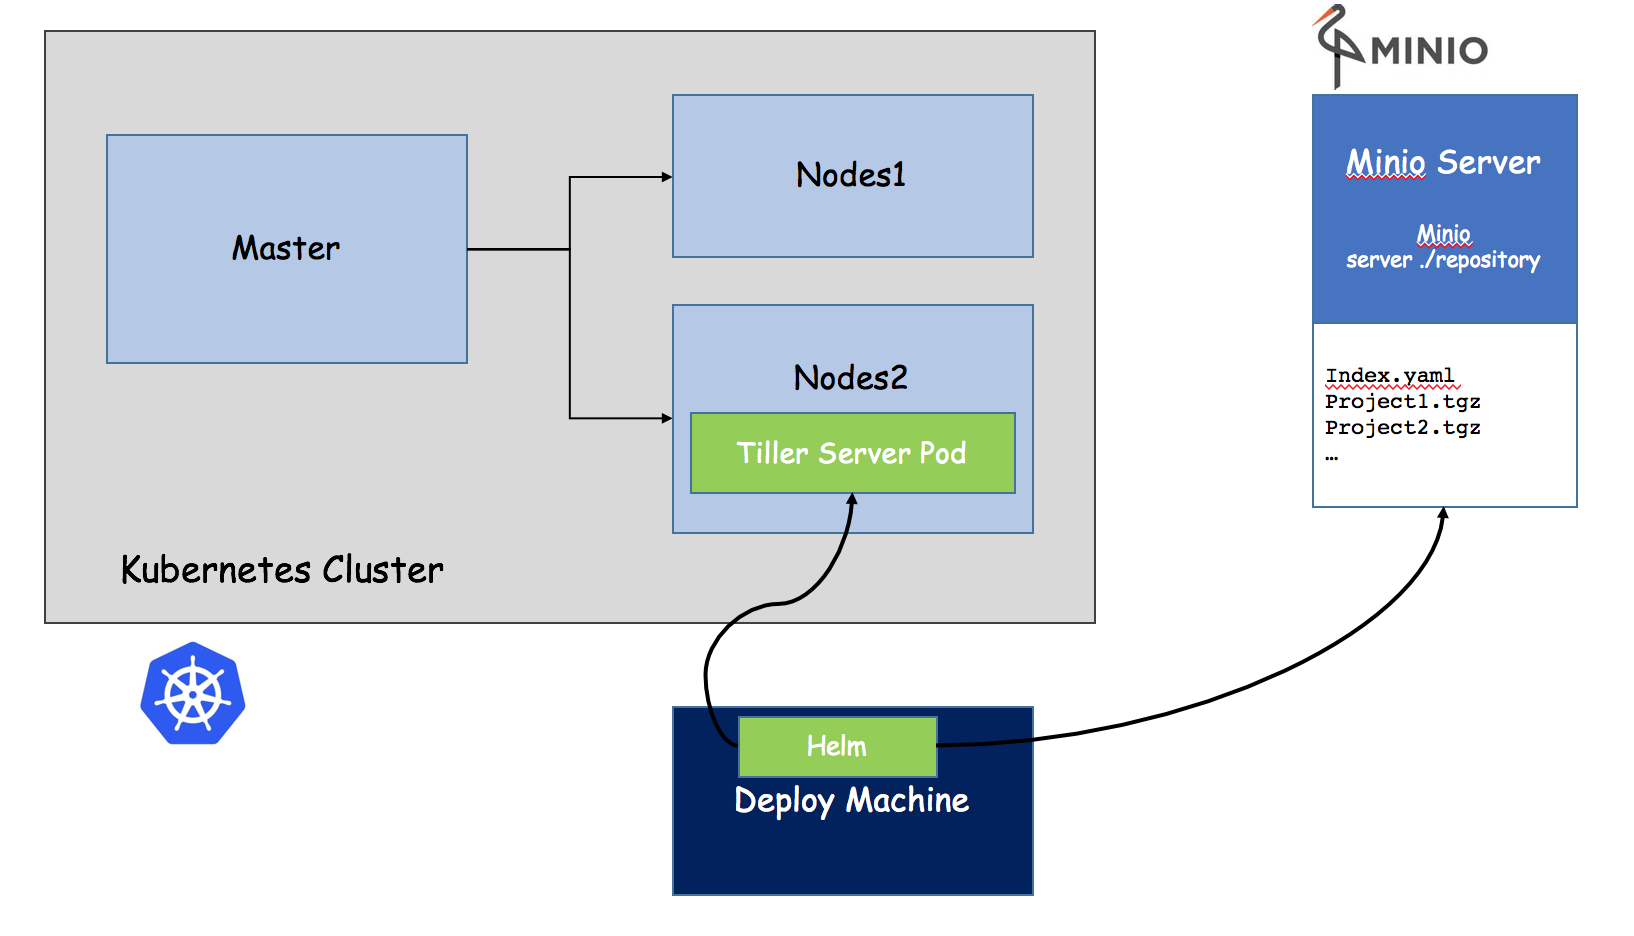
3.Helm 组件及架构
Helm 采用客户端/服务器架构,有如下组件组成:
- Helm CLI 是 Helm 客户端,可以在本地执行
- Tiller 是服务器端组件,在 Kubernetes 群集上运行,并管理 Kubernetes 应用程序的生命周期
- Repository 是 Chart 仓库,Helm客户端通过HTTP协议来访问仓库中Chart的索引文件和压缩包。

4.Helm的安装
在下列网站下载helm的相关版本
https://github.com/kubernetes/helm/releases
tar -xvzf  $HELM.tar.gz

mv linux-amd64/helm /usr/local/bin/helm
在K8s节点上配置.kube/config(我是因为之前没搞这些,大家如果搞过就直接忽略)
[root@k8s-node-1 ~]# kubectl config set-cluster kubernetes --server=http://192.168.0.104:8080
Cluster "kubernetes" set.


[root@k8s-node-1 ~]# kubectl config set-credentials admin
User "admin" set.

[root@k8s-node-1 ~]# kubectl config set-context kubernetes
> --cluster=kubernetes
> --user=admin
Context "kubernetes" set.


[root@k8s-node-1 ~]# kubectl config use-context kubernetes
Switched to context "kubernetes".
- 运行安装
先创建用户和角色。
apiVersion: v1
kind: ServiceAccount
metadata:
  name: tiller
  namespace: kube-system
---
apiVersion: rbac.authorization.k8s.io/v1beta1
kind: ClusterRoleBinding
metadata:
  name: tiller
roleRef:
  apiGroup: rbac.authorization.k8s.io
  kind: ClusterRole
  name: cluster-admin
subjects:
  - kind: ServiceAccount
    name: tiller
    namespace: kube-system
[root@k8s-node-1 ~]# helm init --service-account tiller --skip-refresh
$HELM_HOME has been configured at /root/.helm.

Tiller (the Helm server-side component) has been installed into your Kubernetes Cluster.
Happy Helming!
然后去查看
[root@k8s-node-1 ~]# kubectl get pod -n kube-system -l app=helm
NAME                             READY     STATUS              RESTARTS   AGE
tiller-deploy-3018021184-dxpfj   0/1       ContainerCreating   0          26s
[root@k8s-node-1 ~]# kubectl describe pods tiller-deploy-3018021184-dxpfj -n kube-system
Name:        tiller-deploy-3018021184-dxpfj
Namespace:    kube-system
Node:        k8s-node-1/192.168.0.105
Start Time:    Fri, 23 Feb 2018 18:41:28 +0800
Labels:        app=helm
        name=tiller
        pod-template-hash=3018021184
Status:        Pending
IP:
Controllers:    ReplicaSet/tiller-deploy-3018021184
Containers:
  tiller:
    Container ID:
    Image:        gcr.io/kubernetes-helm/tiller:v2.8.1
    Image ID:
    Ports:        44134/TCP, 44135/TCP
    State:        Waiting
      Reason:        ContainerCreating
    Ready:        False
    Restart Count:    0
    Liveness:        http-get http://:44135/liveness delay=1s timeout=1s period=10s #success=1 #failure=3
    Readiness:        http-get http://:44135/readiness delay=1s timeout=1s period=10s #success=1 #failure=3
    Volume Mounts:
      /var/run/secrets/kubernetes.io/serviceaccount from tiller-token-xng0h (ro)
    Environment Variables:
      TILLER_NAMESPACE:        kube-system
      TILLER_HISTORY_MAX:    0
Conditions:
  Type        Status
  Initialized     True
  Ready     False
  PodScheduled     True
Volumes:
  tiller-token-xng0h:
    Type:    Secret (a volume populated by a Secret)
    SecretName:    tiller-token-xng0h
QoS Class:    BestEffort
Tolerations:    <none>
Events:
  FirstSeen    LastSeen    Count    From            SubObjectPath        Type        Reason        Message
  ---------    --------    -----    ----            -------------        --------    ------        -------
  1m        1m        1    {default-scheduler }                Normal        Scheduled    Successfully assigned tiller-deploy-3018021184-dxpfj to k8s-node-1
  1m        1m        1    {kubelet k8s-node-1}    spec.containers{tiller}    Normal        Pulling        pulling image "gcr.io/kubernetes-helm/tiller:v2.8.1"
发现需要gcr.io/kubernetes-helm/tiller:v2.8.1
一番折腾后运行后完成,因为找不到2.8.1版本,所以最后搞了个2.6.0版本
[root@k8s-master helm]# helm init --service-account tiller --upgrade -i index.tenxcloud.com/kubernetes-helm/tiller:v2.6.0  --skip-refresh
Creating /root/.helm
Creating /root/.helm/repository
Creating /root/.helm/repository/cache
Creating /root/.helm/repository/local
Creating /root/.helm/plugins
Creating /root/.helm/starters
Creating /root/.helm/cache/archive
Creating /root/.helm/repository/repositories.yaml
Adding stable repo with URL: https://kubernetes-charts.storage.googleapis.com
Adding local repo with URL: http://127.0.0.1:8879/charts
$HELM_HOME has been configured at /root/.helm.

Tiller (the Helm server-side component) has been installed into your Kubernetes Cluster.
Happy Helming!
- 问题解决
先解决两个错误:
- unable to do port forwarding: socat not found.
[root@k8s-master hello-svc]# helm version
Client: &version.Version{SemVer:"v2.8.1", GitCommit:"6af75a8fd72e2aa18a2b278cfe5c7a1c5feca7f2", GitTreeState:"clean"}
E0224 14:13:16.077226    7416 portforward.go:331] an error occurred forwarding 37271 -> 44134: error forwarding port 44134 to pod 76a7312e49220a229e443546a4b32d3e0406f09fd9b3646b3d30f6833e121375, uid : unable to do port forwarding: socat not found.
Error: cannot connect to Tiller
解决办法在node节点安装socat
yum install socat
- 版本不一致
重新下载一致的版本包,和images的版本保持一致
5.项目中如何使用
-
针对每个项目形成一个chart,最后形成一个Chart Package
比如下面针对hello-svc这个基于tomcat的项目,先生成一个chart的结构
- 创建chart及部署
[root@k8s-master ~]# helm create hello-svc
Creating hello-svc
按照我们自己的需求修改模板中的deployment.yaml,service.yaml和values.yaml文件
[root@k8s-master templates]# cat deployment.yaml
apiVersion: extensions/v1beta1
kind: Deployment
metadata:
  name: tomcatjmx
spec:
  replicas: {{.Values.replicas}}
  template:
    metadata:
      labels:
        tomcat-app: "tomcatjmx"
        version: "1"
    spec:
      containers:
      - name: tomcatjmx
        image: tomcat:{{.Values.images.dockerTag}}
        ports:
        - containerPort: {{.Values.images.Port}}
          name: tomcatport
        - containerPort: 35135
          name: jmx
[root@k8s-master templates]# cat service.yaml
apiVersion: v1
kind: Service
metadata:
  name: {{.Values.service.name}}
  labels:
    tomcat-app: tomcatjmx
spec:
  ports:
  - port: {{.Values.service.Port}}
    protocol: TCP
    targetPort: 8080
    name: http
  - name: jmx
    protocol: TCP
    port: 35135
    targetPort: {{.Values.service.targetPort}}
  type: NodePort
  selector:
    tomcat-app: tomcatjmx
[root@k8s-master hello-svc]# cat values.yaml
# Default values for hello-svc.
# This is a YAML-formatted file.
# Declare variables to be passed into your templates.

replicas: 1

images:
  dockerTag: jmxv4
  Port: 8080

service:
  name: tomcatjmxsvc
  Port: 80
  targetPort: 35135
相应的NOTES.txt也进行调整直到验证没有问题,验证完成通过install安装
helm install --dry-run --debug ./
[root@k8s-master hello-svc]# helm install ./
NAME:   kindly-worm
LAST DEPLOYED: Sat Feb 24 14:45:58 2018
NAMESPACE: default
STATUS: DEPLOYED

RESOURCES:
==> v1/Service
NAME          CLUSTER-IP     EXTERNAL-IP  PORT(S)                       AGE
tomcatjmxsvc  10.254.25.181  <nodes>      80:32733/TCP,35135:30714/TCP  1s

==> v1beta1/Deployment
NAME       DESIRED  CURRENT  UP-TO-DATE  AVAILABLE  AGE
tomcatjmx  1        1        1           0          1s


NOTES:
1. Get the application URL by running these commands:
  export POD_NAME=$(kubectl get pods -l "app=hello-svc,release=kindly-worm" -o jsonpath="{.items[0].metadata.name}")
  echo "Visit http://127.0.0.1:8080 to use your application"
  kubectl port-forward $POD_NAME 8080:80

[root@k8s-master hello-svc]# helm list
NAME           REVISION    UPDATED                     STATUS      CHART              NAMESPACE
kindly-worm    1           Sat Feb 24 14:45:58 2018    DEPLOYED    hello-svc-0.1.0    default
- 形成一个chart Package
打包形成一个tgz文件,估计是每个项目一个chart,对应一个tgz
helm package ./
-
Chart Package的集中管理和存放
上面我们是从本地的目录结构中的chart去进行部署,如果要集中管理chart,就需要涉及到repository的问题,因为helm repository都是指到外面的地址,接下来我们可以通过minio建立一个企业私有的存放仓库。
Minio提供对象存储服务。它的应用场景被设定在了非结构化的数据的存储之上了。众所周知,非结构化对象诸如图像/音频/视频/log文件/系统备份/镜像文件…等等保存起来管理总是不那么方便,size变化很大,类型很多,再有云端的结合会使得情况更加复杂,minio就是解决此种场景的一个解决方案。Minio号称其能很好的适应非结构化的数据,支持AWS的S3,非结构化的文件从数KB到5TB都能很好的支持。
Minio的使用比较简单,只有两个文件,服务端minio,客户访问端mc,比较简单。
在项目中,我们可以直接找一台虚拟机作为Minio Server,提供服务,当然minio也支持作为Pod部署。
1.安装配置Minio
下载
在https://dl.minio.io/client/mc/release/linux-amd64/ 下载客户端程序mc和服务端程序minio
启动minio服务
minio server ./repository
针对使用得客户端加入security和token信息
./mc config host add myminio http://192.168.44.108:9000 B0SW3MZ00J7OCG2JCG5D nZrG2olrz+aDbhbzVhft6JivkkoPQe2gp5JaG+XO
创建一个bucket同时设置权限
mc mb myminio/minio-helm-repo

mc policy download myminio/minio-helm-repo
安装完成后通过浏览器访问minio的界面,http://192.168.44.108:9000/

2.将我们上面创建的chart Package传入Minio的Repository
index.yaml为了让helm对里面的包进行索引,找到各种entry,每个entry是一个项目,每个项目对应一个chart Package.
在本地建立一个index.yaml,然后上传,将来在使用的时候可以通过程序实现自动添加。
[root@k8s-master minio-helm-repo]# cat index.yaml
apiVersion: v1
entries:
  hello-svc:
  - apiVersion: v1
    description: Distributed object storage server built for cloud applications and  devops.
    digest: 8440f6f064ed91a75194e77d4b2be99c491c1cb04fb34bca4a36a5be67e1ef2c
    name: hello-svc
    urls:
    - http://192.168.44.108:9000/minio-helm-repo/hello-svc-0.1.0.tgz
    version: 0.1.0
将之前的tgz package和index文件都传入。
./mc cp ./index.yaml myminio/minio-helm-repo
./index.yaml:       601 B / 601 B ┃▓▓▓▓▓▓▓▓▓▓▓▓▓▓▓▓▓▓▓▓▓▓▓▓▓▓▓▓▓▓▓▓▓▓▓▓▓▓▓▓▓▓▓▓▓▓▓▓▓▓▓┃ 100.00% 47.73 KB/s 0s


./mc cp /root/hello-svc/hello-svc-0.1.0.tgz myminio/minio-helm-repo
...-svc-0.1.0.tgz:  1.50 KB / 1.50 KB ┃▓▓▓▓▓▓▓▓▓▓▓▓▓▓▓▓▓▓▓▓▓▓▓▓▓▓▓▓▓▓▓▓▓▓▓▓▓▓▓▓▓▓▓▓▓▓▓┃ 100.00% 48.00 KB/s 0s
3.设置Helm
在helm中加入repository,加入完成后可以通过helm repo list进行罗列。修改了index.yaml后也需要用helm repo update进行更新。
[root@k8s-master helm]# helm repo add myrepo http://192.168.44.108:9000/minio-helm-repo
"myrepo" has been added to your repositories


[root@k8s-master helm]# helm repo update
Hang tight while we grab the latest from your chart repositories...
...Skip local chart repository
...Unable to get an update from the "stable" chart repository (https://kubernetes-charts.storage.googleapis.com):
    Get https://kubernetes-charts.storage.googleapis.com/index.yaml: dial tcp: lookup kubernetes-charts.storage.googleapis.com on [::1]:53: read udp [::1]:59458->[::1]:53: read: connection refused
...Successfully got an update from the "myrepo" chart repository
Update Complete. ⎈ Happy Helming!⎈
-
基于Minio的Repository进行Helm的部署
好了,一切就绪,先search一下
[root@k8s-master helm]# helm search hello
WARNING: Repo "stable" is corrupt or missing. Try 'helm repo update'.NAME                VERSION    DESCRIPTION
local/hello-svc     0.1.0      A Helm chart for Kubernetes
myrepo/hello-svc    0.1.0      Distributed object storage server built for clo...


[root@k8s-master helm]# helm install myrepo/hello-svc
NAME:   quelling-hound
LAST DEPLOYED: Sat Feb 24 17:14:23 2018
NAMESPACE: default
STATUS: DEPLOYED

RESOURCES:
==> v1/Service
NAME          CLUSTER-IP      EXTERNAL-IP  PORT(S)                       AGE
tomcatjmxsvc  10.254.180.188  <nodes>      80:31790/TCP,35135:31132/TCP  2s

==> v1beta1/Deployment
NAME       DESIRED  CURRENT  UP-TO-DATE  AVAILABLE  AGE
tomcatjmx  1        1        1           0          2s


NOTES:
1. Get the application URL by running these commands:
  export POD_NAME=$(kubectl get pods -l "app=hello-svc,release=quelling-hound" -o jsonpath="{.items[0].metadata.name}")
  echo "Visit http://127.0.0.1:8080 to use your application"
  kubectl port-forward $POD_NAME 8080:80
这里search能搜索到但是部署不上去的问题折腾了一下,最后原因是那个Index.yaml文件写得有问题。再度更新后成功部署。