实验十 泛型程序设计技术
实验时间2018-11-1
1、实验目的与要求
(1) 理解泛型概念;
(2) 掌握泛型类的定义与使用;
(3) 掌握泛型方法的声明与使用;
(4) 掌握泛型接口的定义与实现;
(5)了解泛型程序设计,理解其用途。
2、实验内容和步骤
实验1: 导入第8章示例程序,测试程序并进行代码注释。
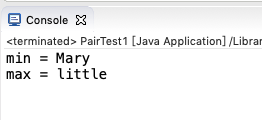
测试程序1:
l 编辑、调试、运行教材311、312页 代码,结合程序运行结果理解程序;
l 在泛型类定义及使用代码处添加注释;
l 掌握泛型类的定义及使用。
import ArrayAlg;
/**
* @version 1.01 2012-01-26
* @author Cay Horstmann
*/
public class PairTest1
{
public static void main(String[] args)
{
String[] words = { "Mary", "had", "a", "little", "lamb" };
Pair<String> mm = ArrayAlg.minmax(words);
System.out.println("min = " + mm.getFirst());
System.out.println("max = " + mm.getSecond());
}
}
class ArrayAlg
{
/**
* Gets the minimum and maximum of an array of strings.
* @param a an array of strings
* @return a pair with the min and max value, or null if a is null or empty
*/
public static Pair<String> minmax(String[] a)
{
if (a == null || a.length == 0) return null;
String min = a[0];
String max = a[0];
for (int i = 1; i < a.length; i++)
{
if (min.compareTo(a[i]) > 0) min = a[i];
if (max.compareTo(a[i]) < 0) max = a[i];
}
return new Pair<>(min, max);
}
}

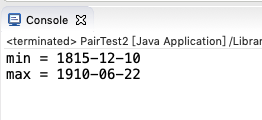
测试程序2:
编辑、调试运行教材315页 PairTest2,结合程序运行结果理解程序;
在泛型程序设计代码处添加相关注释;
掌握泛型方法、泛型变量限定的定义及用途。
import java.time.*;
/**
* @version 1.02 2015-06-21
* @author Cay Horstmann
*/
public class PairTest2
{
public static void main(String[] args)
{
LocalDate[] birthdays =
{
LocalDate.of(1906, 12, 9), // G. Hopper
LocalDate.of(1815, 12, 10), // A. Lovelace
LocalDate.of(1903, 12, 3), // J. von Neumann
LocalDate.of(1910, 6, 22), // K. Zuse
};
Pair<LocalDate> mm = ArrayAlg.minmax(birthdays);
System.out.println("min = " + mm.getFirst());
System.out.println("max = " + mm.getSecond());
}
}
class ArrayAlg
{
/**
Gets the minimum and maximum of an array of objects of type T.
@param a an array of objects of type T
@return a pair with the min and max value, or null if a is
null or empty
*/
public static <T extends Comparable> Pair<T> minmax(T[] a)
{
if (a == null || a.length == 0) return null;
T min = a[0];
T max = a[0];
for (int i = 1; i < a.length; i++)
{
if (min.compareTo(a[i]) > 0) min = a[i];
if (max.compareTo(a[i]) < 0) max = a[i];
}
return new Pair<>(min, max);
}
}

测试程序3:
用调试运行教材335页 PairTest3,结合程序运行结果理解程序;
了解通配符类型的定义及用途。
/**
* @version 1.01 2012-01-26
* @author Cay Horstmann
*/
public class PairTest3
{
public static void main(String[] args)
{
Manager ceo = new Manager("Gus Greedy", 800000, 2003, 12, 15);
Manager cfo = new Manager("Sid Sneaky", 600000, 2003, 12, 15);
Pair<Manager> buddies = new Pair<>(ceo, cfo);
printBuddies(buddies);
ceo.setBonus(1000000);
cfo.setBonus(500000);
Manager[] managers = { ceo, cfo };
Pair<Employee> result = new Pair<>();
minmaxBonus(managers, result);
System.out.println("first: " + result.getFirst().getName()
+ ", second: " + result.getSecond().getName());
maxminBonus(managers, result);
System.out.println("first: " + result.getFirst().getName()
+ ", second: " + result.getSecond().getName());
}
public static void printBuddies(Pair<? extends Employee> p)
{
Employee first = p.getFirst();
Employee second = p.getSecond();
System.out.println(first.getName() + " and " + second.getName() + " are buddies.");
}
public static void minmaxBonus(Manager[] a, Pair<? super Manager> result)
{
if (a.length == 0) return;
Manager min = a[0];
Manager max = a[0];
for (int i = 1; i < a.length; i++)
{
if (min.getBonus() > a[i].getBonus()) min = a[i];
if (max.getBonus() < a[i].getBonus()) max = a[i];
}
result.setFirst(min);
result.setSecond(max);
}
public static void maxminBonus(Manager[] a, Pair<? super Manager> result)
{
minmaxBonus(a, result);
PairAlg.swapHelper(result); // OK--swapHelper captures wildcard type
}
// Can't write public static <T super manager> ...
}
class PairAlg
{
public static boolean hasNulls(Pair<?> p)
{
return p.getFirst() == null || p.getSecond() == null;
}
public static void swap(Pair<?> p) { swapHelper(p); }
public static <T> void swapHelper(Pair<T> p)
{
T t = p.getFirst();
p.setFirst(p.getSecond());
p.setSecond(t);
}
}

实验2:编程练习:
编程练习1:实验九编程题总结
实验九编程练习1总结
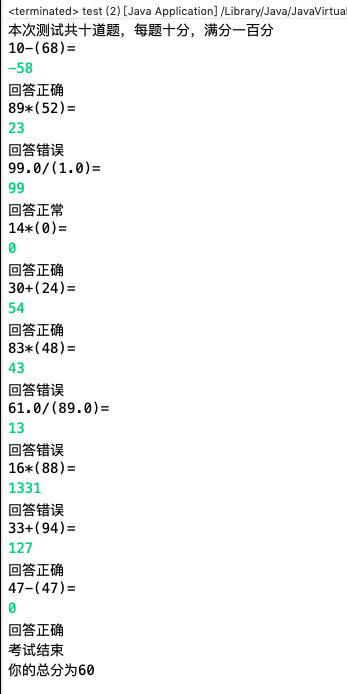
程序总体结构说明:计算器我当时才看到题目就是首先想到的是使用math.random来生成随机数以此来生成算数式,然后设置四个函数进行调用。只不过在随机生成加减乘除的时候使用的语句自己也觉得过于复杂了一点,依旧是使用了math.random来输出一个随机数,然后对其乘以10后取整,以case1234来分别调用加减乘除四个函数,并同时定义了计数器cnt,在一轮匀速成功后,cnt++,并且cnt<10.
模块说明:
目前程序设计存在的困难与问题:对于循环的利用基本熟练,但是写出来的语句有时候还是太过于冗长繁琐,还需要多多练习。
package 人员身份证;
import java.util.*;
import java.io.FileNotFoundException;
import java.io.PrintWriter;
public class test{
public static void main (String[] args)
{
Scanner in=new Scanner(System.in);
PrintWriter output = null;
try {
output = new PrintWriter("ss.txt");
} catch (Exception e) {
//e.printStackTrace();
}
int score;
int a=(int)Math.round(Math.random()*100);
int b=(int)Math.round(Math.random()*100);
int Input = in.nextInt();
int i=(int)Math.round(Math.random()*10);
while(i<5)
{
for (int cnt=0;cnt<10;cnt++)
{
switch(i) {
case'1':
plus(a,b);
break;
case'2':
minus(a,b);
break;
case'3':
multiple(a,b);
break;
case'4':
division(a,b);
break;
}
}
break;
}
}
public static void plus(int a,int b)
{
Scanner in=new Scanner(System.in);
int out=a+b;
boolean correction;
int Input=in.nextInt();
System.out.println("请输入答案"+(a)+(b));
if(Input==a+b) {
correction=true;
System.out.println("答案正确");
}
else
{
System.out.println("答案错误");
}
}
public static void minus(int a,int b)
{
Scanner in=new Scanner(System.in);
boolean correction;
int Input=in.nextInt();
System.out.println("请输入答案"+a+"-"+b);
if(Input==a-b) {
correction=true;
System.out.println("答案正确");
}
else
{
System.out.println("答案错误");
}
}
public static void multiple(int a,int b)
{
Scanner in=new Scanner(System.in);
boolean correction;
int Input=in.nextInt();
System.out.println("请输入答案"+a+"*"+b);
if(Input==a*b) {
correction=true;
System.out.println("答案正确");
}
else
{
System.out.println("答案错误");
}
}
public static void division(int a,int b)
{
Scanner in=new Scanner(System.in);
boolean correction;
int Input=in.nextInt();
System.out.println("请输入答案"+a+"/"+b);
if(Input==a/b) {
correction=true;
System.out.println("答案正确");
}
else
{
System.out.println("答案错误");
}
}
}

程序总体结构说明:在上面的基础上加入了异常调试语句。
模块说明:函数:plus,minus,multiple,division
异常调试语句:PrintWriter output = null;
try {
output = new PrintWriter("ss.txt");
} catch (Exception e) {
//e.printStackTrace();
}
目前程序设计存在的困难与问题:接着后来老师讲了异常处理,于是在程序中又加入了异常调试的语句。一开始并不是很理解异常调试语句的作用,后来看了书大概理解了ava把程序运行时可能遇到的错误分为两类:非致命异常:通过某种修正后程序还能继续执行。这类错误叫作异常。如:文件不存在、无效的数组下标、空引用、网络断开、打印机脱机、磁盘满等。 Java中提供了一种独特的处理异常的机制,通过异常来处理程序设计中出现的错误。致命异常:程序遇到了非常严重的不正常状态,不能简单恢复执行,是致命性错误。如:内存耗尽、系统内部错误等。这种错误程序本身无法解决。异常调试,运用还不是很熟练。
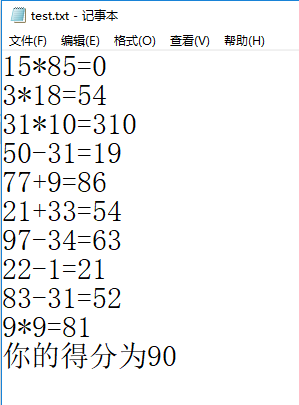
编程练习2:采用泛型程序设计技术改进实验九编程练习2,使之可处理实数四则运算,其他要求不变。
package 异常;
public class Demo<T> {
private T a;
private T b;
public Demo() {
a = null;
b = null;
}
public Demo(T a, T b) {
this.a = a;
this.b = b;
}
public int demo1(int a, int b) {
return a + b;
}
public int demo2(int a, int b) {
return a - b;
}
public int demo3(int a, int b) {
return a * b;
}
public int demo4(int a, int b) {
return a / b;
}
}
Demo
package 异常;
import java.io.PrintWriter;
import java.util.Scanner;
public class Test {
public static void main(String[] args) {
@SuppressWarnings("resource")
Scanner in = new Scanner(System.in);
Demo demo=new Demo();
PrintWriter output = null;
try {
output = new PrintWriter("test.txt");
} catch (Exception e) {
e.printStackTrace();
}
int sum = 0;
for (int i = 0; i < 10; i++) {
int a = (int) Math.round(Math.random() * 100);
int b = (int) Math.round(Math.random() * 100);
int c = (int) Math.round(Math.random() * 3);
switch (c) {
case 0:
System.out.println(a + "+" + b + "=");
int d0 = in.nextInt();
output.println(a + "+" + b + "=" + d0);
if (d0 == demo.demo1(a, b)) {
sum += 10;
System.out.println("恭喜答案正确");
} else {
System.out.println("抱歉,答案错误");
}
break;
case 1:
while (a < b) {
int x = a;
a = b;
b = x;
}
System.out.println(a + "-" + b + "=");
int d1 = in.nextInt();
output.println(a + "-" + b + "=" + d1);
if (d1 == demo.demo2(a, b)) {
sum += 10;
System.out.println("恭喜答案正确");
} else {
System.out.println("抱歉,答案错误");
}
break;
case 2:
System.out.println(a + "*" + b + "=");
int d2 = in.nextInt();
output.println(a + "*" + b + "=" + d2);
if (d2 == demo.demo3(a, b)) {
sum += 10;
System.out.println("恭喜答案正确");
} else {
System.out.println("抱歉,答案错误");
}
break;
case 3:
while (b == 0 || a % b != 0) {
a = (int) Math.round(Math.random() * 100);
b = (int) Math.round(Math.random() * 100);
}
System.out.println(a + "/" + b + "=");
int d3 = in.nextInt();
output.println(a + "/" + b + "=" + d3);
if (d3 == demo.demo4(a, b)) {
sum += 10;
System.out.println("恭喜答案正确");
} else {
System.out.println("抱歉,答案错误");
}
break;
}
}
System.out.println("你的得分为" + sum);
output.println("你的得分为" + sum);
output.close();
}
}

本周学习总结:类型擦除指的是通过类型参数合并,将泛型类型实例关联到同一份字节码上。编译器只为泛型类型生成一份字节码,并将其实例关联到这份字节码上,因此泛型类型中的静态变量是所有实例共享的。此外,需要注意的是,一个static方法,无法访问泛型类的类型参数,因为类还没有实例化,所以,若static方法需要使用泛型能力,必须使其成为泛型方法。类型擦除的关键在于从泛型类型中清除类型参数的相关信息,并且再必要的时候添加类型检查和类型转换的方法。在使用泛型时,任何具体的类型都被擦除,唯一知道的是你在使用一个对象。比如:List<String>和List<Integer>在运行事实上是相同的类型。他们都被擦除成他们的原生类型,即List。因为编译的时候会有类型擦除,所以不能通过同一个泛型类的实例来区分方法,如下面的例子编译时会出错,因为类型擦除后,两个方法都是List类型的参数,因此并不能根据泛型类的类型来区分方法。
泛型程序设计(Generic programming)意味着编写的代码可以被很多不同的类型的对象所重用。
使用泛型机制编写的程序代码要比那些杂乱地使用Object变量然后再进行强制类型转换的代码具有更好的安全性和可读性。泛型对于集合类特别有用,像ArrayList就是一个无处不在的集合类。
泛型提供了一个很好的方案:
类型参数(type parameters)ArrayList类有一个类型参数来指示元素的类型
ArrayList<String> files=new ArrayList<>();
1
这样的代码具有很好地可读性,人们一下就能知道这个ArrayList中的元素是什么类型的了。
这也正是类型参数的魅力所在,除此之外还有安全性。
get的时候不需要进行强制类型转换编译器就能知道返回值类型为String