在写这篇博客之前我查了很久发现全网都没有一篇写httpserver源码解析的
所以今天就由我来为大家解析一下httpserver的源码。(这里我会去掉其中的https部分的源码,只讲http部分,对httpserver中https的实现感兴趣的读者可以尝试自己去阅读,这部分并不复杂)
第一次在没有参考资料的情况下写这么长一篇源码解析,可能会有很多错误和讲不清楚的地方,希望大家尽量指出来。
本文链接 https://www.cnblogs.com/fatmanhappycode/p/12614428.html
httpserver的简单使用例子
大家最好先跟着我构建这样一个小demo,跑起来之后再一步一步去看源码
/**
 * @author 肥宅快乐码
 */
public class HttpServerSample {

    private static void serverStart() throws IOException {
        HttpServerProvider provider = HttpServerProvider.provider();
        // 监听端口8080,连接排队队列,如果队列中的连接超过这个数的话就会拒绝连接
        HttpServer httpserver =provider.createHttpServer(new InetSocketAddress(8080), 100);
        // 监听路径为RestSample,请求处理后回调RestGetHandler里的handle方法
        httpserver.createContext("/RestSample", new RestGetHandler());
        // 管理工作线程池
        ExecutorService executor = new ThreadPoolExecutor(10,200,60, TimeUnit.SECONDS, new LinkedBlockingQueue<>(), new ThreadPoolExecutor.AbortPolicy());
        httpserver.setExecutor(executor);
        httpserver.start();
        System.out.println("server started");
    }

    public static void main(String[] args) throws IOException {
        serverStart();
    }
}

/**
 * 回调类,里面的handle方法主要完成将包装好的请求头返回给客户端的功能
 */
class RestGetHandler implements HttpHandler {
    @Override
    public void handle(HttpExchange he) throws IOException {
        String requestMethod = he.getRequestMethod();
        // 如果是get方法
        if ("GET".equalsIgnoreCase(requestMethod)) {
            // 获取响应头,接下来我们来设置响应头信息
            Headers responseHeaders = he.getResponseHeaders();
            // 以json形式返回,其他还有text/html等等
            responseHeaders.set("Content-Type", "application/json");
            // 设置响应码200和响应body长度,这里我们设0,没有响应体
            he.sendResponseHeaders(200, 0);
            // 获取响应体
            OutputStream responseBody = he.getResponseBody();
            // 获取请求头并打印
            Headers requestHeaders = he.getRequestHeaders();
            Set<String> keySet = requestHeaders.keySet();
            Iterator<String> iter = keySet.iterator();
            while (iter.hasNext()) {
                String key = iter.next();
                List values = requestHeaders.get(key);
                String s = key + " = " + values.toString() + "
";
                responseBody.write(s.getBytes());
            }
            // 关闭输出流
            responseBody.close();
        }
    }
}
httpserver初始化及启动源码
初始化
① 最开始我们通过 HttpServerProvider provider = HttpServerProvider.provider(); 创建了一个HttpServerProvider,也就是这里的DefaultHttpServerProvider
// HttpServerProvider.java
public static HttpServerProvider provider () {
    // 这里我们删掉了其他部分,只留下172、173两行
    // 这里创建了一个DefaultHttpServerProvider
    provider = new sun.net.httpserver.DefaultHttpServerProvider();
    return provider;
}
② 之后我们调用 HttpServer httpserver =provider.createHttpServer(new InetSocketAddress(8080), 100); ,
也就是调用了DefaultHttpServerProvider的createHttpServer创建一个HttpServerImpl,当然这里也可以用createHttpsServer创建一个HttpsServerImpl,但是前面说了我们这篇不分析https,所以这里忽略了createHttpsServer方法
还有这里创建ServerImpl的构造方法我们暂时不讲,留到后面再讲
// DefaultHttpServerProvider.java
public HttpServer createHttpServer (InetSocketAddress addr, int backlog) throws IOException {
    return new HttpServerImpl (addr, backlog);
}

// HttpServerImpl.java
HttpServerImpl (
    InetSocketAddress addr, int backlog
) throws IOException {
    server = new ServerImpl (this, "http", addr, backlog);
}
③ 接下来我们创建了一个监听路径 httpserver.createContext("/RestSample", new RestGetHandler());
// HttpServer.java
public abstract HttpContext createContext (String path, HttpHandler handler) ;

// HttpContextImpl.java
public HttpContextImpl createContext (String path, HttpHandler handler) {
    // 这里调用的server是ServerImpl类的对象
    return server.createContext (path, handler);
}
这里成功返回了一个HttpContextImpl对象,这个我们后面会说,这里我们要知道的是,HttpServerImpl调用的是ServerImpl的实现
到这里我们差不多可以聊一下httpserver的主要结构了:
主要结构

HttpServer是这里的祖先类,它是一个抽象类,抽象了一个HttpServer应该有的方法
而HttpsServer和我们想象的不一样,它和HttpServer不是平行关系,而是HttpServer的子类,它在HttpServer的基础上加了setHttpsConfigurator和getHttpsConfigurator这两个方法而已
HttpServerImpl和HttpsServerImpl虽然都是实现类,但是它们的方法都是调用ServerImpl的方法,都是围绕ServerImpl的
所以我们也可以把ServerImpl看做这个项目的核心类
④ 之后设置一下工作线程池,初始化任务就完成了
ExecutorService executor = new ThreadPoolExecutor(10,200,60, TimeUnit.SECONDS, new LinkedBlockingQueue<>(), new ThreadPoolExecutor.AbortPolicy());
httpserver.setExecutor(executor);
启动
httpserver.start();
启动自然和我们刚刚聊的结构一样都是从HttpServer开始一层调一层调用到ServerImpl的方法的:
// HttpServer.java
public abstract void start () ;

// HttpServerImpl.java
public void start () {
    server.start();
}

// ServerImpl.java
public void start () {
    // server未绑定端口或处于已启动或已关闭状态
    // 顺便先提一下,这里就可以留意到,ServerImpl作为一个核心类,管理了各种各样的状态(state)等
    if (!bound || started || finished) {
        throw new IllegalStateException ("server in wrong state");
    }
    // 如果没有设置线程池,那就用默认的,默认的话等于没有用线程池,是直接execute的,所以尽可能直接创建线程池
    if (executor == null) {
        executor = new DefaultExecutor();
    }
    // 创建了一个Dispatcher线程,用来分发任务,如Accept或者Readable
    Thread t = new Thread (dispatcher);
    // 设置一下状态
    started = true;
    // 运行线程
    t.start();
}
ServerImpl结构图
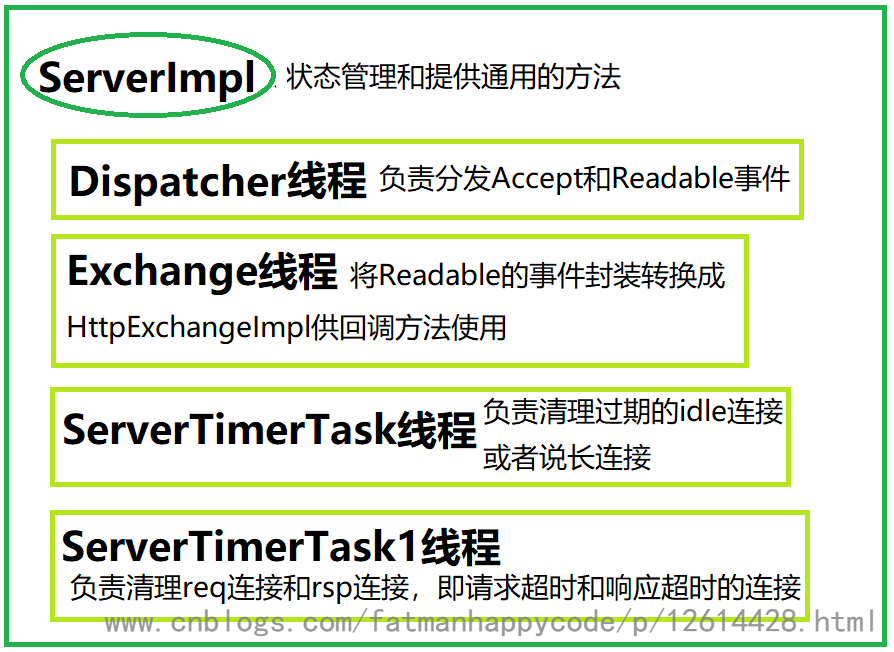
前面我们说过,ServerImpl是这整个项目的核心部分,它管理了httpserver的状态,提供了各种接口以及通用的方法,它也负责了几个内部类线程的启动
所以,接下来我们会分为ServerImpl、Dispatcher、Exchange、ServerTimerTask与ServerTimerTask1四个部分来讲解
ServerImpl
主要属性
(https相关的我去掉了)
比较长,大家稍微过一眼有个印象,之后遇到的时候再回来看就行
// http或https
private String protocol;

private Executor executor;

// 负责接收连接用的类(这个本来在209行附近,我把它提上来了)
private Dispatcher dispatcher;

// ContextList这个类只是封装了一个List<HttpContextImpl>及一些方法,如限制监听的context(路径)的数目和查找context的方法
private ContextList contexts;

private InetSocketAddress address;

// nio相关的那些类
private ServerSocketChannel schan;
private Selector selector;
private SelectionKey listenerKey;

// 负责管理之前提到的idle连接,也就是长连接的set
// 长连接时,连接如果没有任务,就加进去. 如果超过一定时间没有任务,则主动断开长连接
private Set<HttpConnection> idleConnections;
// 管理所有的连接,方便在stop等情况下直接断开所有连接
private Set<HttpConnection> allConnections;
// 管理req连接和rsp连接,防止请求或响应超时,超时时由定时线程断开连接
private Set<HttpConnection> reqConnections;
private Set<HttpConnection> rspConnections;

// 这两个之后6.4的Exchange的addEvent方法部分我们再说
private List<Event> events;
private final Object loLock = new Object();

// 各种状态,相信大家看得懂是什么意思
private volatile boolean finished = false;
private volatile boolean terminating = false;
private boolean bound = false;
private boolean started = false;

// 系统时间,会由ServerTimerTask进行更新
private volatile long time;
// 这个似乎并没有任何用
private volatile long subticks = 0;
// 这个是用来记录一共更新了多少次time的,相当于时间戳一样的东西
private volatile long ticks;

// 把HttpServer包装进来,方便调用
private HttpServer wrapper;

// 这个的意思是ServerTimerTask每隔多长时间定期run一下,因为ServerTimerTask是一个定时任务线程
// 默认是10000ms也就是10秒一次
private final static int CLOCK_TICK = ServerConfig.getClockTick();
// 这个是允许长连接驻留的时间,默认是30秒
private final static long IDLE_INTERVAL = ServerConfig.getIdleInterval();
// 允许最大长连接数,默认200
private final static int MAX_IDLE_CONNECTIONS = ServerConfig.getMaxIdleConnections();
// ServerTimerTask1的定期时间,默认是1秒
private final static long TIMER_MILLIS = ServerConfig.getTimerMillis ();
// 最后这两个默认为-1,至于为什么是-1后面ServerTimerTask部分我们会说
private final static long MAX_REQ_TIME = getTimeMillis(ServerConfig.getMaxReqTime());
private final static long MAX_RSP_TIME=getTimeMillis(ServerConfig.getMaxRspTime());
private final static boolean REQ_RSP_CLEAN_ENABLED = MAX_REQ_TIME != -1 || MAX_RSP_TIME != -1;

// ServerTimerTask和ServerTimerTask1的对象,跑起来就是ServerTimerTask和ServerTimerTask1线程了
private Timer timer, timer1;

private Logger logger;
构造方法
这就是刚刚2.1小节中提到的ServerImpl的构造方法,没什么要讲的,无非就是初始化了变量并启动了ServerTimerTask和ServerTimerTask1线程
ServerImpl (
        HttpServer wrapper, String protocol, InetSocketAddress addr, int backlog
    ) throws IOException {

        this.protocol = protocol;
        this.wrapper = wrapper;
        this.logger = Logger.getLogger ("com.sun.net.httpserver");
        ServerConfig.checkLegacyProperties (logger);
        this.address = addr;
        contexts = new ContextList();
        schan = ServerSocketChannel.open();
        if (addr != null) {
            ServerSocket socket = schan.socket();
            socket.bind (addr, backlog);
            bound = true;
        }
        selector = Selector.open ();
        schan.configureBlocking (false);
        listenerKey = schan.register (selector, SelectionKey.OP_ACCEPT);
        dispatcher = new Dispatcher();
        idleConnections = Collections.synchronizedSet (new HashSet<HttpConnection>());
        allConnections = Collections.synchronizedSet (new HashSet<HttpConnection>());
        reqConnections = Collections.synchronizedSet (new HashSet<HttpConnection>());
        rspConnections = Collections.synchronizedSet (new HashSet<HttpConnection>());
        time = System.currentTimeMillis();
        timer = new Timer ("server-timer", true);
        // 可以看到,在初始化阶段两个定时任务就已经启动了
        timer.schedule (new ServerTimerTask(), CLOCK_TICK, CLOCK_TICK);
        if (timer1Enabled) {
            timer1 = new Timer ("server-timer1", true);
            timer1.schedule (new ServerTimerTask1(),TIMER_MILLIS,TIMER_MILLIS);
            logger.config ("HttpServer timer1 enabled period in ms:  "+TIMER_MILLIS);
            logger.config ("MAX_REQ_TIME:  "+MAX_REQ_TIME);
            logger.config ("MAX_RSP_TIME:  "+MAX_RSP_TIME);
        }
        events = new LinkedList<Event>();
        logger.config ("HttpServer created "+protocol+" "+ addr);
    }
当然ServerImpl有很多通用的方法,但是这里我们不讲,等到用到它们的时候我们再讲,这样比较方便了解这些通用方法的具体用途
Dispatcher
先来看它的run方法
run()
public void run() {
    // 如果已经完全关闭服务器,那就不用任何处理了
    while (!finished) {
        try {
            // ================这段大概就是把处理完成返回结果完毕的连接注册进idle长连接里面,后面流程经过再细讲=====================================
            List<Event> list = null;
            synchronized (lolock) {
                if (events.size() > 0) {
                    list = events;
                    events = new LinkedList<Event>();
                }
            }

            if (list != null) {
                for (Event r: list) {
                    handleEvent (r);
                }
            }

            for (HttpConnection c : connsToRegister) {
                reRegister(c);
            }
            connsToRegister.clear();
            // ========================================================================================================================

            // 阻塞,超过1000ms就继续运行
            selector.select(1000);

            /* process the selected list now  */
            Set<SelectionKey> selected = selector.selectedKeys();
            Iterator<SelectionKey> iter = selected.iterator();
            while (iter.hasNext()) {
                SelectionKey key = iter.next();
                iter.remove ();

                // 这里listenrKey是accept事件,相当于key.isAcceptable()
                if (key.equals (listenerKey)) {
                     // 如果正在关闭服务器,那就不用处理了,直接把新的连接continue然后remove掉就可以了
                    if (terminating) {
                        continue;
                    }
                    SocketChannel chan = schan.accept();

                    // 根据需要开启TCPNoDelay,也就是关闭Nagle算法,减小缓存带来的延迟
                    if (ServerConfig.noDelay()) {
                        chan.socket().setTcpNoDelay(true);
                    }

                    if (chan == null) {
                        continue; /* cancel something ? */
                    }
                    chan.configureBlocking (false);
                    SelectionKey newkey = chan.register (selector, SelectionKey.OP_READ);
                    // 创建connection并把channel放进去
                    HttpConnection c = new HttpConnection ();
                    c.selectionKey = newkey;
                    c.setChannel (chan);
                    // 把connection缓存到Key中
                    newkey.attach (c);
                    // 请求开始,注册到reqConnections中
                    requestStarted (c);
                    allConnections.add (c);
                } else {
                    try {
                        if (key.isReadable()) {
                            boolean closed;
                            SocketChannel chan = (SocketChannel)key.channel();
                            // 这里把刚刚attach缓存的connection取出来了
                            HttpConnection conn = (HttpConnection)key.attachment();

                            // 这里的这种先取消注册并设置为阻塞的读取方式与多次读取有关
                            // 因为后面是先读头部,之后再读取body等其他部分的
                            key.cancel();
                            chan.configureBlocking (true);
                            // 如果这个connection是之前保存着的空闲长连接,那么直接移出idleConnections中
                            // 并加入reqConnections开始请求(因为io流都初始化好了,可以直接用)
                            if (idleConnections.remove(conn)) {
                                // 加入reqConnections开始请求
                                requestStarted (conn);
                            }
                            // 调用handle进行后续处理
                            handle (chan, conn);
                        } else {
                            assert false;
                        }
                    } catch (CancelledKeyException e) {
                        handleException(key, null);
                    } catch (IOException e) {
                        handleException(key, e);
                    }
                }
            }
            // 调用select去掉cancel了的key
            selector.selectNow();
        } catch (IOException e) {
            logger.log (Level.FINER, "Dispatcher (4)", e);
        } catch (Exception e) {
            logger.log (Level.FINER, "Dispatcher (7)", e);
        }
    }
    try {selector.close(); } catch (Exception e) {}
}
这里稍微总结一下,Dispatcher的run主要就是完成socket连接的Accept和Readable事件的分发功能,其中accept分发给它自己,它自己创建channel并注册,自己创建连接并缓存。而Readable事件则在经过简单处理后交给handle去调用Exchange线程继续进行后续任务
handle(SocketChannel, HttpConnection)
public void handle (SocketChannel chan, HttpConnection conn)
throws IOException
{
    try {
        // 构造一个Exchange后让executor线程池去执行,这里相当于一个异步任务
·       // 在将任务交给executor后,dispatcher就可以返回了
        Exchange t = new Exchange (chan, protocol, conn);
        executor.execute (t);
    } catch (HttpError e1) {
        logger.log (Level.FINER, "Dispatcher (4)", e1);
        closeConnection(conn);
    } catch (IOException e) {
        logger.log (Level.FINER, "Dispatcher (5)", e);
        closeConnection(conn);
    }
}
Exchange
既然前面把任务丢给了Exchange,那么接下来我们就来看Exchange的run方法在做什么
run()
public void run () {
     // context对应着这个http请求访问的路径和处理器,
     // 而一个未解析http请求自然context为null,也就是不知道这个请求是想请求哪个路径的
    context = connection.getHttpContext();
    boolean newconnection;

    try {
        // 这里是已经解析过的http请求才会进去,因为它们有context
        // 为什么会有解析过的http请求呢?想想长连接,前面Dispatcher的75、76行我们提到过
        // 长连接也就是idleConnection会缓存那些io流在connection里面,当然也包括context
        //(但是只是存在,并不代表context不需要重新解析,毕竟再次请求时请求的资源链接不一定相同)
        if (context != null ) {
            this.rawin = connection.getInputStream();
            this.rawout = connection.getRawOutputStream();
            newconnection = false;
        } else {

            newconnection = true;
            if (https) {
                // . . . . . .

            } else {
                // 这里Request的两种stream都封装了一些读写方法,比较繁琐所以不分析了
                rawin = new BufferedInputStream(
                    new Request.ReadStream (
                        ServerImpl.this, chan
                ));
                rawout = new Request.WriteStream (
                    ServerImpl.this, chan
                );
            }
            connection.raw = rawin;
            connection.rawout = rawout;
        }
        Request req = new Request (rawin, rawout);
        requestLine = req.requestLine();
        // 读取请求的一行后,如果请求为空就关闭connection
        // 那么什么情况为空呢?大家都知道,http请求大体分三部分,
        // 1.三次握手连接,被封装成socket的accept
        // 2.开始发送内容,被封装成socket的readable事件
        // 那么四次挥手呢?其实也是readable,但是其内容为空
        // 所以这里其实是挥手关闭连接的意思
        if (requestLine == null) {
            closeConnection(connection);
            return;
        }

        // 获取请求类型(GET/POST...)
        int space = requestLine.indexOf (' ');
        if (space == -1) {
            reject (Code.HTTP_BAD_REQUEST,
                    requestLine, "Bad request line");
            return;
        }
        String method = requestLine.substring (0, space);

        // 获取请求的url
        int start = space+1;
        space = requestLine.indexOf(' ', start);
        if (space == -1) {
            reject (Code.HTTP_BAD_REQUEST,
                    requestLine, "Bad request line");
            return;
        }
        String uriStr = requestLine.substring (start, space);
        URI uri = new URI (uriStr);

        // http请求版本(1.0/1.1...)
        start = space+1;
        String version = requestLine.substring (start);

        Headers headers = req.headers();

        // 如果是采用Transfer-encoding,那么解析body的方式不同,
        // 而且Context-Length将被忽略,所以标记为长度clen = -1
        // 具体可以去了解一下Transfer-encoding
        String s = headers.getFirst ("Transfer-encoding");
        long clen = 0L;
        if (s !=null && s.equalsIgnoreCase ("chunked")) {
            clen = -1L;
        } else {
            // 没用Transfer-encoding而用了Content-Length
            s = headers.getFirst ("Content-Length");
            if (s != null) {
                clen = Long.parseLong(s);
            }
            if (clen == 0) {
                // 如果主体长度为0,那么请求已经结束,这里将connection从
                // reqConnections中移出,并添加当前时间,加入rspConnections
                requestCompleted (connection);
            }
        }

        // 这里就是最开始ServerImpl属性(可以回去看)里ContextList里封装的方法
        // 用来查询是否有匹配的context路径
        ctx = contexts.findContext (protocol, uri.getPath());
        if (ctx == null) {
            reject (Code.HTTP_NOT_FOUND,
                    requestLine, "No context found for request");
            return;
        }
        connection.setContext (ctx);

        // 如果没有回调方法,也就是最开始demo里自定义的RestGetHandler类
        if (ctx.getHandler() == null) {
            reject (Code.HTTP_INTERNAL_ERROR,
                    requestLine, "No handler for context");
            return;
        }

        // 相当于http请求的完整封装,后面再包上一层HttpExchangeImpl就是
        // RestGetHandler类里的回调方法handle的参数了
        tx = new ExchangeImpl (
            method, uri, req, clen, connection
        );

        // 看看有没有connection:close参数,1.0默认close,需要手动开启keep-alive
        String chdr = headers.getFirst("Connection");
        Headers rheaders = tx.getResponseHeaders();
        if (chdr != null && chdr.equalsIgnoreCase ("close")) {
            tx.close = true;
        }
        if (version.equalsIgnoreCase ("http/1.0")) {
            tx.http10 = true;
            if (chdr == null) {
                tx.close = true;
                rheaders.set ("Connection", "close");
            } else if (chdr.equalsIgnoreCase ("keep-alive")) {
                rheaders.set ("Connection", "keep-alive");
                int idle=(int)(ServerConfig.getIdleInterval()/1000);
                int max=ServerConfig.getMaxIdleConnections();
                String val = "timeout="+idle+", max="+max;
                rheaders.set ("Keep-Alive", val);
            }
        }

        // 是新连接而不是长连接的话,给connection赋值一下
        if (newconnection) {
            connection.setParameters (
                rawin, rawout, chan, engine, sslStreams,
                sslContext, protocol, ctx, rawin
            );
        }

        // 如果客户端发出expect:100-continue,意思就是客户端想要post东西(一般是比较大的),询问是否同意
        // 返回响应码100后客户端才会继续post数据
        String exp = headers.getFirst("Expect");
        if (exp != null && exp.equalsIgnoreCase ("100-continue")) {
            logReply (100, requestLine, null);
            sendReply (
                Code.HTTP_CONTINUE, false, null
            );
        }

        // 获取一下系统自带的过滤器sf或者用户自定义的过滤器uf,这里都默认为无
        List<Filter> sf = ctx.getSystemFilters();
        List<Filter> uf = ctx.getFilters();
        // 构造成一个链表,以链表的形式一层一层调用过滤器
        Filter.Chain sc = new Filter.Chain(sf, ctx.getHandler());
        Filter.Chain uc = new Filter.Chain(uf, new LinkHandler (sc));

        // 初始化一下包装的io流,这里我把getRequestBody拿过来,两个大同小异
        /**
         *public InputStream getRequestBody () {
         *     if (uis != null) {
         *         return uis;
         *     }
         *     if (reqContentLen == -1L) {
         *         uis_orig = new ChunkedInputStream (this, ris);
         *         uis = uis_orig;
         *     } else {
         *         uis_orig = new FixedLengthInputStream (this, ris, reqContentLen);
         *         uis = uis_orig;
         *     }
         *     return uis;
         *}
         */
        tx.getRequestBody();
        tx.getResponseBody();
        if (https) {
            uc.doFilter (new HttpsExchangeImpl (tx));
        } else {
            // 开始执行过滤方法,参数和我刚刚提到的一样,就是包成HttpExchangeImpl的ExchangeImpl
            // 接下来我们就往这里看
            uc.doFilter (new HttpExchangeImpl (tx));
        }

    } catch (IOException e1) {
        logger.log (Level.FINER, "ServerImpl.Exchange (1)", e1);
        closeConnection(connection);
    } catch (NumberFormatException e3) {
        reject (Code.HTTP_BAD_REQUEST,
                requestLine, "NumberFormatException thrown");
    } catch (URISyntaxException e) {
        reject (Code.HTTP_BAD_REQUEST,
                requestLine, "URISyntaxException thrown");
    } catch (Exception e4) {
        logger.log (Level.FINER, "ServerImpl.Exchange (2)", e4);
        closeConnection(connection);
    }
}
doFilter()
// Filter.java的Chain内部类
public void doFilter (HttpExchange exchange) throws IOException {
    // 递归调用直到没有filter时,调用自定义的回调方法,也就是RestGetHandler的handle方法
    if (!iter.hasNext()) {
        handler.handle (exchange);
    } else {
        Filter f = iter.next();
        f.doFilter (exchange, this);
    }
}
我重新贴一遍demo里的RestGetHandler给大家看(17和32行的注释有改动,注意看):
/**
 * 回调类,里面的handle方法主要完成将包装好的请求头返回给客户端的功能
 */
class RestGetHandler implements HttpHandler {
    @Override
    public void handle(HttpExchange he) throws IOException {
        String requestMethod = he.getRequestMethod();
        // 如果是get方法
        if ("GET".equalsIgnoreCase(requestMethod)) {
            // 获取响应头,接下来我们来设置响应头信息
            Headers responseHeaders = he.getResponseHeaders();
            // 以json形式返回,其他还有text/html等等
            responseHeaders.set("Content-Type", "application/json");
            // 设置响应码200和响应body长度,这里我们设0,没有响应体,这里也初始化了io流
            // 这里如果为0,则初始化ChunkedOutputStream或UndefLengthOutputStream
            // 如果不为0,则初始化FixedLengthOutputStream
            he.sendResponseHeaders(200, 0);
            // 获取响应体
            OutputStream responseBody = he.getResponseBody();
            // 获取请求头并打印
            Headers requestHeaders = he.getRequestHeaders();
            Set<String> keySet = requestHeaders.keySet();
            Iterator<String> iter = keySet.iterator();
            while (iter.hasNext()) {
                String key = iter.next();
                List values = requestHeaders.get(key);
                String s = key + " = " + values.toString() + "
";
                responseBody.write(s.getBytes());
            }
            // 关闭输出流,也就是关闭ChunkedOutputStream
            // 接下来看这里
            responseBody.close();
        }
    }
}
在回调方法完成返回数据给客户端的任务后,调用了close方法
close()
这里我们重点关注最后一行代码
public void close () throws IOException {
        if (closed) {
            return;
        }
        flush();
        try {
            writeChunk();
            out.flush();
            LeftOverInputStream is = t.getOriginalInputStream();
            if (!is.isClosed()) {
                is.close();
            }
        } catch (IOException e) {

        } finally {
            closed = true;
        }

        WriteFinishedEvent e = new WriteFinishedEvent (t);
        // 这里我们只关注最后一行,其他的不关注
        // 这行调用了addEvent方法
        t.getHttpContext().getServerImpl().addEvent (e);
    }
addEvent()
// 这里就调用了4.1中ServerImpl的属性的第28、29、30行的内容
void addEvent (Event r) {
    // 而这里的锁,就是防止Dispatcher的run方法最前面那里
    // 防止它取出events时与这里的add产生冲突
    synchronized (lolock) {
        events.add (r);
        // 这里的wakeup就是往管道里输入一个字节唤醒Dispatcher里
        // 的selector.select(1000),让它不再阻塞,去取出events
        selector.wakeup();
    }
}
到这里Exchange的工作就完成了,接下来我来稍微总结一下:
- 首先Exchange对http请求进行解析和封装,匹配相应的context的handle,初始化一下io流
- 然后Exchange调用相应的回调handle方法进行处理
- handle方法一般都是我们自己写的响应方法,我这里自定义的RestGetHandler的handle方法负责把请求头作为内容响应回去,也就是下图这种效果
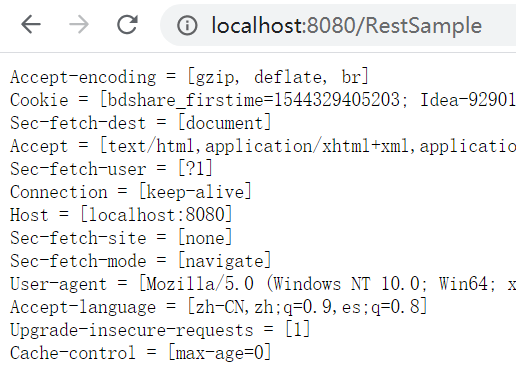
- 然后handle方法调用io流的close关闭io流,表示响应结束
- 并调用addEvent方法把ExchangeImpl封装成event放进List里面,至于为什么要这么做我们接下来继续分析
既然有地方加入List,那自然有地方取出List,回忆一下,我们刚刚见到List<Event>的主要有两个地方
一个是ServerImpl属性里的28~30行,也就是说它是ServerImpl的属性
还有一个地方则是Dispatcher类的run方法里,我说了后面再细讲,大家可以回去瞄一眼在什么位置
接下来我们就来讲这个部分:
public void run() {
    // 如果已经完全关闭服务器,那就不用任何处理了
    while (!finished) {
        try {
            // 这里就把events取出来放到list里面了,并把events重新赋值空对象
            List<Event> list = null;
            // 还记得我们刚刚说过,lolock锁是防止addEvent操作和取操作冲突的
            synchronized (lolock) {
                if (events.size() > 0) {
                    list = events;
                    events = new LinkedList<Event>();
                }
            }

            // 之后遍历取出每个event,并调用handleEvent方法
            if (list != null) {
                for (Event r: list) {
                    // 接下来看这里
                    handleEvent (r);
                }
            }

            for (HttpConnection c : connsToRegister) {
                reRegister(c);
            }
            connsToRegister.clear();
handleEvent(Event)
/**
 * 处理event,将长连接加入等待重新注册的connectionsToRegister列表中
 */
private void handleEvent (Event event) {
    ExchangeImpl t = event.exchange;
    HttpConnection c = t.getConnection();
    try {
        if (event instanceof WriteFinishedEvent) {
            if (terminating) {
                finished = true;
            }
            // 完成响应,处理一些状态,可以自己去看,没几行
            responseCompleted (c);
            LeftOverInputStream is = t.getOriginalInputStream();
            if (!is.isEOF()) {
                t.close = true;
            }
            // 如果空闲的连接超过MAX_IDLE_CONNECTIONS(默认200,可以看之前ServerImpl的属性),
            // 则不能再添加了,并且关闭连接
            if (t.close || idleConnections.size() >= MAX_IDLE_CONNECTIONS) {
                c.close();
                allConnections.remove (c);
            } else {
                if (is.isDataBuffered()) {
                    requestStarted (c);
                    handle (c.getChannel(), c);
                } else {
                    // 将连接加入connectionsToRegister列表中等待重新注册进
                    connectionsToRegister.add (c);
                }
            }
        }
    } catch (IOException e) {
        logger.log (
                Level.FINER, "Dispatcher (1)", e
        );
        c.close();
    }
}
之后就是遍历connectionsToRegister列表并将连接注册进idleConnections长连接set中
for (HttpConnection c : connsToRegister) {
    // 接下来看这里
    reRegister(c);
}
connsToRegister.clear();
reRegister()
/**
 * 把之前cancel的key重新用非阻塞的方式监听起来
 * 并且把连接加入idleConnections空闲连接中
 */
void reRegister (HttpConnection connection) {
    try {
        SocketChannel chan = connection.getChannel();
        chan.configureBlocking (false);
        SelectionKey key = chan.register (selector, SelectionKey.OP_READ);
        key.attach (connection);
        connection.time = getTime() + IDLE_INTERVAL;
        idleConnections.add (connection);
    } catch (IOException e) {
        logger.log(Level.FINER, "Dispatcher(8)", e);
        connection.close();
    }
}
就这样,完成响应的请求就在idleConnection中缓存起来
整体流程图
从一个HTTP请求讲起
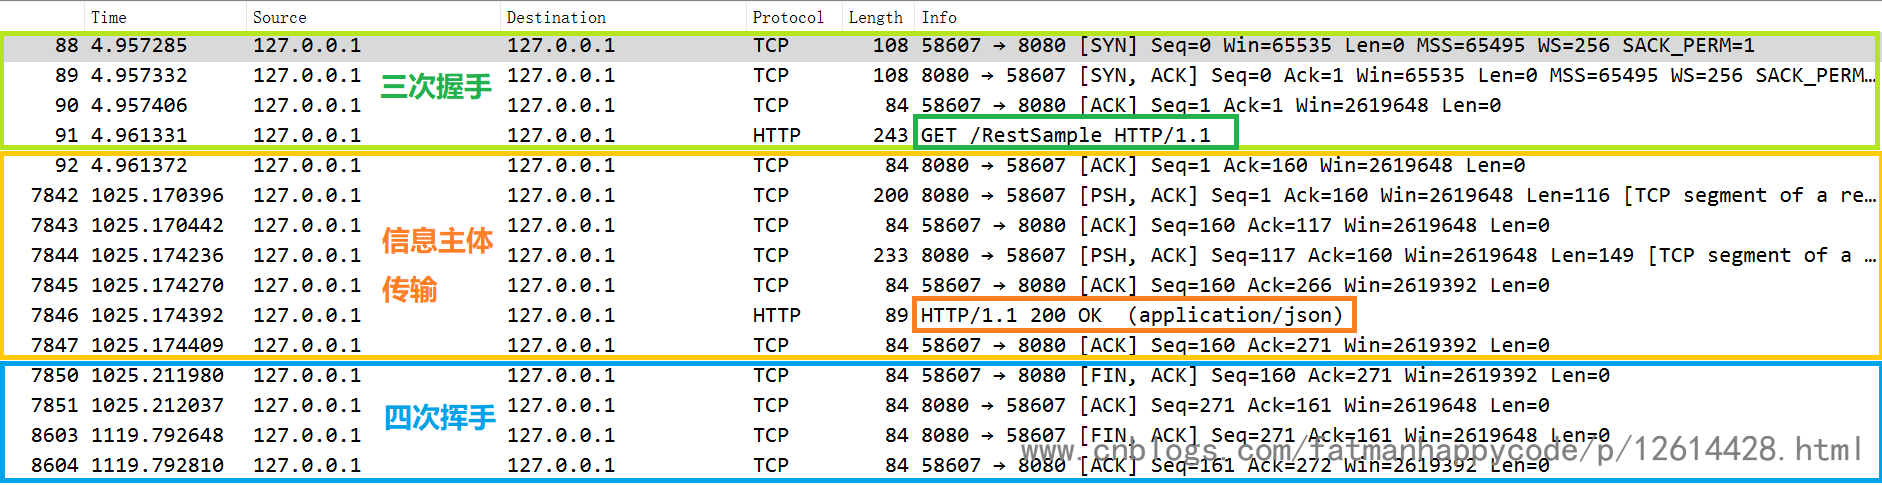
上面是我抓的包,可以看到一个http请求一共三部分组成,第一部分是tcp三次握手连接服务端,第二部分是传输信息主体,第三部分就是tcp四次挥手断开连接
而这三部分的tcp操作都对应抽象成了socket的操作,所谓socket,其实就是对tcp和udp的一个上层抽象,方便程序员调用的
其中最明显的,就是accept对应三次握手操作了
所以接下来,我们的流程图就会从一次http请求开始,展示这三个部分分别对应项目的哪些部分,让读者有一个更清晰的理解

如果还是不理解的话,建议对着图重新看一遍这篇文章
最后,在这个过程中,有调用到ServerImpl的requestStarted()方法,以及我没有标出来的requestCompleted和close时调用的responseCompleted(这两个这篇文章里没有,可以自己追踪去看一下在哪里调用了),这些方法都是对ServerImpl的属性:
private Set<HttpConnection> idleConnections;
// 管理所有的连接,方便在stop等情况下直接断开所有连接
private Set<HttpConnection> allConnections;
// 管理req连接和rsp连接,防止请求或响应超时,超时时由定时线程断开连接
private Set<HttpConnection> reqConnections;
private Set<HttpConnection> rspConnections;
做了一系列添加删除操作代表请求开始,请求结束,响应开始,响应结束和代表长连接被缓存起来等,那么这些到底有什么用呢?缓存connection吗?并不是。connection是缓存在key里面的,通过attachment获得。其实他们的真实作用是方便在超时的时候由定时任务去清理它们。
定时任务ServerTimerTask和ServerTimerTask1
// 前面我们在ServerImpl的构造方法说过,这两个定时任务都已经运行了
// 这个负责清理长连接的是10秒(ServerImpl里的CLOCK_TICK)运行一次
class ServerTimerTask extends TimerTask {
    public void run () {
        LinkedList<HttpConnection> toClose = new LinkedList<HttpConnection>();
        time = System.currentTimeMillis();
        ticks ++;
        synchronized (idleConnections) {
            for (HttpConnection c : idleConnections) {
                if (c.time <= time) {
                    toClose.add (c);
                }
            }
            for (HttpConnection c : toClose) {
                idleConnections.remove (c);
                allConnections.remove (c);
                // 这里调用HTTPConnection的close方法,方法里清理输入输出流和关闭channel等
                c.close();
            }
        }
    }
}

// 这个是每秒(TIMER_MILLIS)执行一次
class ServerTimerTask1 extends TimerTask {

    // runs every TIMER_MILLIS
    public void run () {
        LinkedList<HttpConnection> toClose = new LinkedList<HttpConnection>();
        time = System.currentTimeMillis();
        synchronized (reqConnections) {
            if (MAX_REQ_TIME != -1) {
                for (HttpConnection c : reqConnections) {
                    if (c.creationTime + TIMER_MILLIS + MAX_REQ_TIME <= time) {
                        toClose.add (c);
                    }
                }
                for (HttpConnection c : toClose) {
                    logger.log (Level.FINE, "closing: no request: " + c);
                    reqConnections.remove (c);
                    allConnections.remove (c);
                    c.close();
                }
            }
        }
        toClose = new LinkedList<HttpConnection>();
        synchronized (rspConnections) {
            if (MAX_RSP_TIME != -1) {
                for (HttpConnection c : rspConnections) {
                    if (c.rspStartedTime + TIMER_MILLIS +MAX_RSP_TIME <= time) {
                        toClose.add (c);
                    }
                }
                for (HttpConnection c : toClose) {
                    logger.log (Level.FINE, "closing: no response: " + c);
                    rspConnections.remove (c);
                    allConnections.remove (c);
                    c.close();
                }
            }
        }
    }
}
本来只是想简单写一个httpserver玩玩的,但是查了网上很多资料,发现代码质量有些参差不齐,所以就干脆直接参考了jdk里的httpserver的源码了,总体感觉很简洁。当然如果没有特殊需要的话,还是读集合类juc之类的源码比较有价值一些。
最后老习惯再附一图:
熬夜变垃圾!(;´Д`)