1.创建一个maven工程
2.引入activiti依赖以及SQLserver依赖
 <!-- https://mvnrepository.com/artifact/org.activiti/activiti-engine -->
        <dependency>
            <groupId>org.activiti</groupId>
            <artifactId>activiti-engine</artifactId>
            <version>6.0.0</version>
        </dependency>

 <!-- https://mvnrepository.com/artifact/com.microsoft.sqlserver/mssql-jdbc -->
        <dependency>
            <groupId>com.microsoft.sqlserver</groupId>
            <artifactId>mssql-jdbc</artifactId>
            <version>7.4.1.jre8</version>
            <scope>test</scope>
        </dependency>
3.创建工作流使用的表(6.0后是28张表)
方式一:使用java代码创建工作流使用的表
    /**
     * 通过代码创建工作流使用的表
     */
    @Test
    public void createTable() {
        //创建引擎配置
        ProcessEngineConfiguration configuration = ProcessEngineConfiguration.createStandaloneProcessEngineConfiguration();
        configuration.setJdbcDriver("com.microsoft.sqlserver.jdbc.SQLServerDriver");
        configuration.setJdbcUrl("jdbc:sqlserver://localhost:1433;databaseName=Activiti");
        configuration.setJdbcUsername("sa");
        configuration.setJdbcPassword("123456");

        //不自动创建表 需要表存在 DB_SCHEMA_UPDATE_TRUE = "false";
        //先删除表 再创建表 DB_SCHEMA_UPDATE_CREATE_DROP = "create-drop";
        //如果表不存在  先创建表 DB_SCHEMA_UPDATE_TRUE="true"
        configuration.setDatabaseSchemaUpdate(ProcessEngineConfiguration.DB_SCHEMA_UPDATE_TRUE);

        //创建工作流核心对象  工作流引擎
        ProcessEngine processEngine = configuration.buildProcessEngine();
        System.out.println(processEngine);
    }
方式二:通过加载配置文件创建
首先在resources文件夹下创建activiti.cfg.xml配置文件
<beans xmlns="http://www.springframework.org/schema/beans"
       xmlns:context="http://www.springframework.org/schema/context" xmlns:tx="http://www.springframework.org/schema/tx"
       xmlns:xsi="http://www.w3.org/2001/XMLSchema-instance"
       xsi:schemaLocation="http://www.springframework.org/schema/beans http://www.springframework.org/schema/beans/spring-beans.xsd
http://www.springframework.org/schema/context http://www.springframework.org/schema/context/spring-context-2.5.xsd
http://www.springframework.org/schema/tx http://www.springframework.org/schema/tx/spring-tx-3.0.xsd">

    <bean id="processEngineConfiguration" class="org.activiti.engine.impl.cfg.StandaloneProcessEngineConfiguration">
        <!-- 连接数据的配置 -->
        <property name="jdbcDriver" value="com.microsoft.sqlserver.jdbc.SQLServerDriver"/>
        <property name="jdbcUrl" value="jdbc:sqlserver://localhost:1433;databaseName=activiti"/>
        <property name="jdbcUsername" value="sa"/>
        <property name="jdbcPassword" value="123456"/>
        <!--  不自动创建表,需要表存在 "false";
              先删除表,再创建表  "create-drop";
              如果表不存在,先创建表"true";
        -->
        <property name="databaseSchemaUpdate" value="true"/>
    </bean>
</beans>
然后通过java代码创建
    /**
     * 通过配置文件方式配置数据库在创建表
     */
    @Test
    public void createTable2() {
        ProcessEngineConfiguration
                .createProcessEngineConfigurationFromResource("activiti.cfg.xml")
                .buildProcessEngine();
    }
方式二三:与方法二类似
先创建配置文件
然后通过java代码创建
    /**
     * 可替换createTable2
     * 他可以自动检索配置文件activiti.cfg.xml
     */
    @Test
    public void createTable3() {
        ProcessEngine processEngine = ProcessEngines.getDefaultProcessEngine();
    }
创建完成后数据库会建立如下28张表
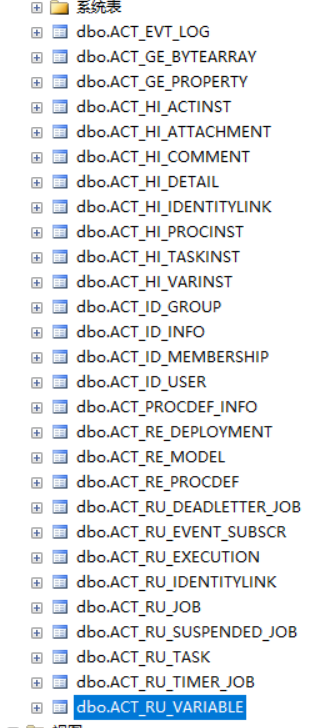
各表含义
Activiti的数据库表名都以ACT_开头,第二部门是表的用例的双字符标识
ACT_RE_ *:RE代表存储库。 具有此前缀的表包含静态信息,例如流程定义和流程资源(图像,规则等)。
ACT_RU_ *:RU代表运行时。 这些是包含流程实例,用户任务,变量,作业等的运行时数据的运行时表.Activiti仅在流程实例执行期间存储运行时数据,并在流程实例结束时删除记录。 这使运行时表保持小而快。
ACT_ID_ *:ID代表身份。 这些表包含身份信息,例如用户,组等。
ACT_HI_ *:HI代表历史。 这些是包含历史数据的表,例如过去的流程实例,变量,任务等。
ACT_GE_ *:一般数据,用于各种用例。