一 MySql
1.1 如何选择MySql的版本
1.2 MySql单实例安装
(1) 建立mysql用户
首先以root身份登陆到linux系统,然后执行如下命令创建mysql用户及用户组
|
[root@test3 ~]# groupadd mysql [root@test3 ~]# useradd -s /sbin/nologin -g mysql -M mysql [root@test3 ~]# tail -1 /etc/passwd mysql:x:1210:1210::/home/mysql:/sbin/nologin [root@test3 ~]# mkdir tools #建立专门放置安装包的目录,养成规范的习惯 [root@test3 ~]# cd tools/ [root@test3 tools]# wget http://mysql.ntu.edu.tw/Downloads/MySQL-5.1/mysql-5.1.62.tar.gz |
(2) 解压安装
|
[root@test3 mysql-5.1.62]#./configure --prefix=/usr/local/mysql --with-unix-socket-path=/usr/local/mysql/tmp/mysql.sock #指定MySQL socket文件存放目录 --localstatedir=/usr/local/mysql/data #设定mysql数据文件存放路径 --enable-assembler #允许使用汇编模式(优化性能) --with-mysqld-ldflags=-all-static #服务器使用静态库(优化性能) --with-client-ldflags=-all-static #客户端使用静态库(优化性能) --enable-thread-safe-client #以线程方式编译客户端 --with-mysqld-user=mysql #指定mysql系统运行的用户 --with-big-tables --without-debug #使用非debug模式 --with-pthread #强制使用pthread线程序库编译 --with-extra-charsets=complex --with-readline --with-ssl --with-embedded-server --enable-local-infile --with-plugins=partition,innobase --with-plugin-PLUGIN
./configure --prefix=/usr/local/mysql --with-unix-socket-path=/usr/local/mysql/tmp/mysql.sock --localstatedir=/usr/local/mysql/data --enable-assembler --with-mysqld-ldflags=-all-static --with-client-ldflags=-all-static --enable-thread-safe-client --with-mysqld-user=mysql --with-big-tables --without-debug --with-pthread --with-extra-charsets=complex --with-readline --with-ssl --with-embedded-server --enable-local-infile --with-plugins=partition,innobase --with-plugin-PLUGIN
#在执行./configure的时候遇到: configure: error: No curses/termcap library found 原因:缺少ncurses安装包 解决:yum install -y ncurses-devel,然后再执行./configure |
(3) 创建配置文件
|
[root@test3 mysql-5.1.62]# cd support-files/ [root@test3 support-files]# ll *.cnf -rw-r--r-- 1 root root 4714 09-03 16:31 my-huge.cnf -rw-r--r-- 1 root root 19763 09-03 16:31 my-innodb-heavy-4G.cnf -rw-r--r-- 1 root root 4688 09-03 16:31 my-large.cnf -rw-r--r-- 1 root root 4699 09-03 16:31 my-medium.cnf -rw-r--r-- 1 root root 2467 09-03 16:31 my-small.cnf [root@test3 support-files]# /bin/cp my-small.cnf /etc/my.cnf #用模板文件直接复制为配置文件 |
(4) 创建数据文件
|
[root@test3 ~]# mkdir /usr/local/mysql/data #创建数据文件目录 [root@test3 ~]# chown -R mysql /usr/local/mysql/ #授权mysql用户访问mysql安装目录 [root@test3 ~]# /usr/local/mysql/bin/mysql_install_db --user=mysql #安装mysql数据文件 |
(5) 启动数据库
|
方法一: [root@test3 ~]# cp tools/mysql-5.1.62/support-files/mysql.server /usr/local/mysql/bin/ [root@test3 ~]# chmod 700 /usr/local/mysql/bin/mysql.server #使脚本可执行 [root@test3 ~]# /usr/local/mysql/bin/mysql.server start Starting MySQL.. [确定] [root@test3 ~]# netstat -tupnl |grep 3306 tcp 0 0 0.0.0.0:3306 0.0.0.0:* LISTEN 23990/mysqld
方法二:按照安装mysql时候的提示 /usr/local/mysql/bin/mysqld_safe --user=mysql & |
(6) 配置mysql命令全局使用路径
|
方法一: [root@test3 ~]# echo 'export PATH=$PATH:/usr/local/mysql/bin' >> /etc/profile [root@test3 ~]# source /etc/profile 方法二: 把mysql的启动命令拷贝到/usr/local/sbin/ |
(7) 配置/etc/init.d/mysqld start方式启动数据库
|
[root@test3 ~]# cp tools/mysql-5.1.62/support-files/mysql.server /etc/init.d/mysqld [root@test3 ~]# chmod 700 /etc/init.d/mysqld [root@test3 ~]# /etc/init.d/mysqld start Starting MySQL. [确定] |
(8) 设置mysql开机启动
|
方法一: [root@test3 ~]# chkconfig --add mysqld [root@test3 ~]# chkconfig --list |grep mysqld mysqld 0:关闭 1:关闭 2:启用 3:启用 4:启用 5:启用 6:关闭 方法二: 把启动命令放到/etc/rc.local里面 |
(9) 为root设置密码
|
[root@test3 ~]# mysqladmin -uroot password "123456" [root@test3 ~]# mysql ERROR 1045 (28000): Access denied for user 'root'@'localhost' (using password: NO) |
(10) 清理多余用户
|
[root@test3 ~]# mysql -uroot -p"123456" Welcome to the MySQL monitor. Commands end with ; or g. Your MySQL connection id is 5 Server version: 5.1.62 Source distribution
Copyright (c) 2000, 2011, Oracle and/or its affiliates. All rights reserved.
Oracle is a registered trademark of Oracle Corporation and/or its affiliates. Other names may be trademarks of their respective owners.
Type 'help;' or 'h' for help. Type 'c' to clear the current input statement.
mysql> select user,host from mysql.user; +------+-------------------+ | user | host | +------+-------------------+ | root | 127.0.0.1 | | | localhost | | root | localhost | | | test3.localdomain | | root | test3.localdomain | +------+-------------------+ 5 rows in set (0.00 sec) mysql> drop user ""@localhost; Query OK, 0 rows affected (0.00 sec)
mysql> drop user ""@test3.localdomain; Query OK, 0 rows affected (0.00 sec)
mysql> drop user "root"@test3.localdomain; Query OK, 0 rows affected (0.00 sec)
mysql> select user,host from mysql.user; +------+-----------+ | user | host | +------+-----------+ | root | 127.0.0.1 | | root | localhost | +------+-----------+ 2 rows in set (0.00 sec) |
遇到的问题:
|
连接数据库的时候提示:mysql: error while loading shared libraries: libmysqlclient.so.16: cannot open shared object file: No such file or directory 首先查看libmysqlclient.so.16文件是否存在,不存在要去下载一个 解决方案一:vi /etc/ld.so.conf 增加一行/usr/local/mysql/lib/mysql 解决方案二:ln -s /usr/local/mysql/lib/mysql/libmysqlclient.so.16 /usr/lib/ 但是还是有问题,应该是因为我之前卸载了系统自带的mysql,而/usr/bin下的mysql这个脚本还是旧的原因,所以需要/bin/cp /usr/local/mysql/bin/mysql /usr/bin/ |
二 Php安装配置(结合的是apache)
2.1 查看以下软件包是否安装
|
[root@test3 ~]# rpm -qa zlib libxml libjpeg freetype libpng gd curl libiconv zlib-devel libxml2-devel libjpeg-devel freetype-devel libpng-devel gd-devel curl-devel zlib-1.2.3-7.el5 freetype-2.2.1-31.el5_8.1 libpng-1.2.10-17.el5_8 libpng-1.2.10-17.el5_8 zlib-1.2.3-7.el5 libjpeg-6b-37 gd-2.0.33-9.4.el5_4.2 curl-7.15.5-15.el5 zlib-devel-1.2.3-7.el5 libjpeg-6b-37 freetype-2.2.1-31.el5_8.1
如果没有安装可以使用yum的方式安装: [root@test3 ~]# yum install zlib libxml libjpeg freetype libpng gd curl libiconv zlib-devel libxml2-devel libjpeg-devel freetype-devel libpng-devel gd-devel curl-devel |
2.2 libiconv的安装(可选择的还有libmcrypt(与加密相关)库,Mhash库,mcrypt库)
|
1. libiconv wget http://ftp.gnu.org/pub/gnu/libiconv/libiconv-1.14.tar.gz tar zxf libiconv-1.14.tar.gz cd libiconv-1.14 ./configure --prefix=/usr/local/libiconv make make install cd ../
2. libmcrypt wget "http://downloads.sourceforge.net/mcrypt/libmcrypt-2.5.8.tar.gz?modtime=1171868460&big_mirror=0" tar zxf libmcrypt-2.5.8.tar.gz cd libmcrypt-2.5.8 ./configure make make install sleep 2 /sbin/ldconfig cd libltdl/ ./configure --enable-ltdl-install make make install cd ../../
3. Mhash wget "http://downloads.sourceforge.net/mhash/mhash-0.9.9.9.tar.gz?modtime=1175740843&big_mirror=0" tar zxf mhash-0.9.9.9.tar.gz cd mhash-0.9.9.9/ ./configure make make install sleep 2 cd ../ rm -f /usr/lib/libmcrypt.* rm -f /usr/lib/libmhash* ln -s /usr/local/lib/libmcrypt.la /usr/lib/libmcrypt.la ln -s /usr/local/lib/libmcrypt.so /usr/lib/libmcrypt.so ln -s /usr/local/lib/libmcrypt.so.4 /usr/lib/libmcrypt.so.4 ln -s /usr/local/lib/libmcrypt.so.4.4.8 /usr/lib/libmcrypt.so.4.4.8 ln -s /usr/local/lib/libmhash.a /usr/lib/libmhash.a ln -s /usr/local/lib/libmhash.la /usr/lib/libmhash.la ln -s /usr/local/lib/libmhash.so /usr/lib/libmhash.so ln -s /usr/local/lib/libmhash.so.2 /usr/lib/libmhash.so.2 ln -s /usr/local/lib/libmhash.so.2.0.1 /usr/lib/libmhash.so.2.0.1 ln -s /usr/local/bin/libmcrypt-config /usr/bin/libmcrypt-config
4.mcrypt wget "http://downloads.sourceforge.net/mcrypt/mcrypt-2.6.8.tar.gz?modtime=1194463373&big_mirror=0" tar zxf mcrypt-2.6.8.tar.gz cd mcrypt-2.6.8/ /sbin/ldconfig ./configure make make install cd ../ sleep 2 |
2.3 php的安装
|
[root@test3 php-5.3.10]#./configure > --prefix=/application/php5.3.10 > --with-apxs2=/application/apache/bin/apxs #这个需要指定bin/apxs的路径,通过apxs来来增加php模块到apache中 > --with-mysql=/usr/local/mysql #指定mysql的路径 > --with-xmlrpc > --with-openssl > --with-zlib > --with-freetype-dir > --with-gd > --with-jpeg-dir > --with-png-dir > --with-iconv=/usr/local/libiconv > --enable-short-tags > --enable-sockets > --enable-zend-multibyte > --enable-soap > --enable-mbstring > --enable-static > --enable-gd-native-ttf > --with-curl > --with-xsl > --enable-ftp > --with-libxml-dir #下面的参数适合Nagios的PHP环境 --enable-sigchild --enable-pcntl --enable-bcmath
[root@test3 php-5.3.10]#make && make install
[root@test3 php-5.3.10]# ls php.ini* php.ini-development (开发版) php.ini-production (产品版) [root@test3 php-5.3.10]# diff php.ini-development php.ini-production 521c521 < error_reporting = E_ALL | E_STRICT --- > error_reporting = E_ALL & ~E_DEPRECATED 538c538 < display_errors = On --- > display_errors = Off 549c549 < display_startup_errors = On --- > display_startup_errors = Off 593c593 < track_errors = On --- > track_errors = Off 611c611 < html_errors = On --- > html_errors = Off 1318c1318 < mysqlnd.collect_memory_statistics = On --- > mysqlnd.collect_memory_statistics = Off 1587c1587 < session.bug_compat_42 = On --- > session.bug_compat_42 = Off 1596c1596 < session.bug_compat_warn = On --- > session.bug_compat_warn = Off
#开发版与产品版相比,多开了一些方便调试的开关 #注意PHP5.2与PHP5.3安装之间的差别。php5.2开启fastcgi的参数是--enable-fastcgi,而php5.3开启的参数则是--enable-fpm |
2.4 Php的配置
|
[root@test3 php-5.3.10]#/bin/cp php.ini-production /application/php5.3.10/lib/php.ini [root@test3 conf]# cp httpd.conf httpd.conf.qinbf.20131111-2 [root@test3 conf]# vi httpd.conf #在大约311行,增加 AddType application/x-httpd-php .php .php3 AddType application/x-httpd-php-source .phps
#在大约166行,修改 <IfModule dir_module> DirectoryIndex index.php index.html #增加了默认的首页文件index.php </IfModule> |
2.5 php测试
|
测试:php和apache
如果不关闭虚拟主机的配置文件,那么htdocs里面的首页文件不会生效,默认会显示在第一个虚拟主机的站点。所以要测试的话,要么关闭虚拟主机配置文件,要么把默认站点的首页文件移动到第一个虚拟主机的配置目录中。
测试:php和mysql的连接 (在浏览器输入ip/test_mysql.php即可看到)
[root@test3 www]# vi test_mysql.php <?php //$link_id=mysql_connect('','?',''); $link_id=mysql_connect('localhost','root','qbf19880328') or mysql_error(); //$link_id=mysql_connect('localhost','test',''); if($link_id){ echo "mysql successful by qinbf !"; }else{ echo mysql_error(); } //php? /* php? */ ?> |
三 建立属于自己的博客网站
3.1 下载解压
|
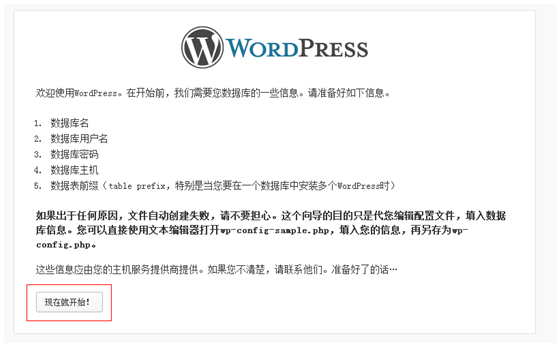
[root@test3 blog]# wget http://cn.wordpress.org/wordpress-3.7.1-zh_CN.zip [root@test3 blog]# unzip wordpress-3.7.1-zh_CN.zip 在浏览器中其实已经可以打开index.php文件,但是还是缺少wp-config.php文件 |
3.2 创建数据库
|
[root@test3 blog]# mysql -uroot -p Enter password: Welcome to the MySQL monitor. Commands end with ; or g. Your MySQL connection id is 12 Server version: 5.1.62 Source distribution
Copyright (c) 2000, 2011, Oracle and/or its affiliates. All rights reserved.
Oracle is a registered trademark of Oracle Corporation and/or its affiliates. Other names may be trademarks of their respective owners.
Type 'help;' or 'h' for help. Type 'c' to clear the current input statement.
mysql> create database wordpress DEFAULT CHARACTER SET gbk COLLATE gbk_chinese_ci; Query OK, 1 row affected (0.19 sec) #建立一个GBK数据库(默认是拉丁文字符集)
mysql> show databases; +--------------------+ | Database | +--------------------+ | information_schema | | mysql | | test | | wordpress | +--------------------+ 4 rows in set (0.14 sec) mysql> grant select,insert,delete,update,create on wordpress.* to wordpress@localhost identified by '123456'; Query OK, 0 rows affected (0.16 sec) #安装blog后,记得要撤销create,保留select,insert,update,delete的授权 revoke create on wordpress.* from wordpress@’localhot’;
mysql> flush privileges; #刷新权限 Query OK, 0 rows affected (0.11 sec)
mysql> select user,host from mysql.user; +-----------+-----------+ | user | host | +-----------+-----------+ | root | 127.0.0.1 | | root | localhost | | wordpress | localhost | +-----------+-----------+ 3rows in set (0.04 sec) mysql> show grants for wordpress@localhost; #查看授权 +------------------------------------------------------------------------------------------------------------------+ | Grants for wordpress@localhost | +------------------------------------------------------------------------------------------------------------------+ | GRANT USAGE ON *.* TO 'wordpress'@'localhost' IDENTIFIED BY PASSWORD '*B492CDBF83DDE8AF7B2D2249ABFE0301E091503A' | | GRANT SELECT, INSERT, UPDATE, DELETE, CREATE ON `wordpress`.* TO 'wordpress'@'localhost' | +------------------------------------------------------------------------------------------------------------------+ 2 rows in set (0.03 sec) |
3.3 创建配置文件
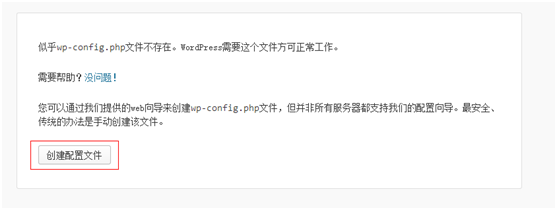
当界面无法下一步创建的时候,选择使用直接创建wp-config.php文件
|
[root@test3 blog]# cp wp-config-sample.php wp-config.php 修改配置文件如下: /** WordPress数据库的名称 */ define('DB_NAME', 'wordpress');
/** MySQL数据库用户名 */ define('DB_USER', 'wordpress');
/** MySQL数据库密码 */ define('DB_PASSWORD', '123456');
/** MySQL主机 */ define('DB_HOST', 'localhost');
/** 创建数据表时默认的文字编码 */ define('DB_CHARSET', 'gbk');
/** 数据库整理类型。如不确定请勿更改 */ define('DB_COLLATE', ''); |
3.4 博客站点目录的特殊设置
|
[root@test3 html]# chown root.root blog -R [root@test3 html]# chmod 755 blog -R #为了防止apache出现了漏洞,仅给所有程序root属主和组
[root@test3 blog]# mkdir -p wp-content/uploads [root@test3 blog]# chown daemon.daemon wp-content/uploads/ -R #授权文件上传目录,如果是集群要放在公共存储 #经过测试,wordpress前端禁止*.php,*.sh,*.bat等文件上传 |
四 php扩展缓存加速等查件安装配置
4.1 查看lamp版本
|
1. 查看linux系统版本 [root@test3 ~]# cat /etc/redhat-release CentOS release 5.8 (Final)
2.查看apache版本 [root@test3 ~]# /application/apache/bin/apachectl -v Server version: Apache/2.2.25 (Unix) Server built: Sep 3 2013 18:25:54
3. 查看php版本 [root@test3 ~]# /application/php/bin/php -v PHP 5.3.10 (cli) (built: Nov 12 2013 00:24:52) Copyright (c) 1997-2012 The PHP Group Zend Engine v2.3.0, Copyright (c) 1998-2012 Zend Technologies 4. 查看mysql版本 [root@test3 tmp]# mysqladmin -uroot -p'123456' -S /usr/local/mysql/tmp/mysql.sock version mysqladmin Ver 8.41 Distrib 5.0.95, for redhat-linux-gnu on x86_64 Copyright (c) 2000, 2011, Oracle and/or its affiliates. All rights reserved.
Oracle is a registered trademark of Oracle Corporation and/or its affiliates. Other names may be trademarks of their respective owners.
Server version 5.1.62 Protocol version 10 Connection Localhost via UNIX socket UNIX socket /usr/local/mysql/tmp/mysql.sock Uptime: 8 min 23 sec
Threads: 1 Questions: 1 Slow queries: 0 Opens: 16 Flush tables: 1 Open tables: 4 Queries per second avg: 0.1 |
4.2 解决Perl编译问题
|
[root@test3 ~]# echo 'LC_ALL=C' >> /etc/profile [root@test3 ~]# tail -1 /etc/profile LC_ALL=C [root@test3 ~]# source /etc/profile [root@test3 ~]# echo $LC_ALL C |
4.3 eACCelerator的安装
eACCelerator是一个自由的开放源代码的php加速、优化和动态内容缓存的扩展模块,它可以提升php程序的缓存性能,降低php程序在解析时对服务器的性能开销。eACCelerator还有对PHP优化作用,加快其执行效率,使PHP程序代码效率提高1-10倍。
|
phpize是什么? phpize是用来扩展php扩展模块的,通过phpize可以建立php的外挂模块。比如想在原来编译好的php中加入memcache等扩展模块,可以使用phpize。使用方式如下: |
|
[root@test3 tools]# wget http://sourceforge.net/projects/eaccelerator/files/latest/download [root@test3 tools]# unzip eaccelerator-0.9.6.1.zip [root@test3 tools]# cd eaccelerator-0.9.6.1 [root@test3 eaccelerator-0.9.6.1]# /application/php/bin/phpize Configuring for: PHP Api Version: 20090626 Zend Module Api No: 20090626 Zend Extension Api No: 220090626 Cannot find autoconf. Please check your autoconf installation and the $PHP_AUTOCONF environment variable. Then, rerun this script #出现这个错误是因为没有安装m4和autoconf包,可以尝试使用yum install或者源码安装这两个包,然后重新执行/application/php/bin/phpize [root@test3 eaccelerator-0.9.6.1]# yum install m4 autoconf [root@test3 eaccelerator-0.9.6.1]# /application/php/bin/phpize Configuring for: PHP Api Version: 20090626 Zend Module Api No: 20090626 Zend Extension Api No: 220090626 [root@test3 eaccelerator-0.9.6.1]# ./configure --enable-eaccelerator=shared --with-php-config=/application/php/bin/php-config [root@test3 eaccelerator-0.9.6.1]# make && make install |
实践测试:
提示:
1) php5.3.10可用eaccelerator-0.9.6版本,如果使用eaccelerator-0.9.5.2版本会在make阶段报如下错误:make: ***[optimize.lo] Error 1
2) php5.2.6可用eaccelerator-0.9.5.2版本
4.4 安装memcache缓存扩展模块
软件说明:
Memcache是一个高性能的分布式的内存对象缓存系统,通过在内存里维护一个统一的巨大的hash表,它能够用来存储各种格式的数据,包括图像、视频、文件以及数据库检索的结果等。简单的说就是将数据调用到内存中,然后从内存中读取,从而大大提高读取速度。
Memcache分为服务端软件(名字如:memcached-1.4.3.tar.gz)和客户端插件(名字如:memcache-2.2.5.tar.gz)两部分。本文是客户端插件在php服务中的安装。
|
[root@test3 tools]# wget http://pecl.php.net/get/memcache-2.2.5.tgz [root@test3 tools]# tar zxf memcache-2.2.5.tgz [root@test3 tools]# cd memcache-2.2.5 [root@test3 memcache-2.2.5]# /application/php/bin/phpize [root@test3 memcache-2.2.5]# ./configure --with-php-config=/application/php/bin/php-config [root@test3 memcache-2.2.5]# make && make install [root@test3 memcache-2.2.5]# ll /application/php5.3.10/lib/php/extensions/no-debug-zts-20090626/ 总计 628 -rwxr-xr-x 1 root root 406459 11-14 03:22 eaccelerator.so -rwxr-xr-x 1 root root 222246 11-14 03:44 memcache.so 提示:如果安装memcache-2.2.4,可能报错make:***[memcache.lo] Error 1 解决:cp memcache.loT memcache.lo |
4.5 安装PDO_MYSQL扩展模块
PDO扩展为PHP访问数据库定义了一个轻量级的、一致性的接口,它提供了一个数据访问抽象层,这样,无论是用什么数据库,都可以通过一致的函数执行查询和获取数据。
|
[root@test3 tools]# wget http://lcmp.googlecode.com/files/PDO_MYSQL-1.0.2.tgz [root@test3 tools]# tar zxf PDO_MYSQL-1.0.2.tgz [root@test3 tools]# cd PDO_MYSQL-1.0.2 [root@test3 PDO_MYSQL-1.0.2]# /application/php/bin/phpize [root@test3 PDO_MYSQL-1.0.2]# ./configure --with-php-config=/application/php/bin/php-config --with-pdo-mysql=/usr/local/mysql [root@test3 PDO_MYSQL-1.0.2]#make && make install |
4.6 安装图像处理程序及imageMagick软件
4.6.1 安装imageMagick软件
|
[root@test3 tools]# wget http://www.imagemagick.org/download/ImageMagick-6.8.7-5.tar.gz [root@test3 tools]# tar zxf ImageMagick-6.8.7-5.tar.gz [root@test3 tools]#cd ImageMagick-6.8.7-5.tar.gz [root@test3 tools]#./configure [root@test3 tools]#make && make install 因为此步不是php的扩展,所以没有.so文件 |
4.6.2 安装image php扩展插件
image插件需要imageMagick的支持,不先安装imageMagick会报错。是一个供php调用imageMagick功能的扩展,进行图片的创建与修改压缩等操作,都集成在imagick这个扩展中。
|
[root@test3 tools]# wget http://pecl.php.net/get/imagick-3.0.1.tgz [root@test3 tools]# tar zxf imagick-3.0.1.tgz [root@test3 tools]# cd imagick-3.0.1 [root@test3 imagick-3.0.1]# ./configure --with-php-config=/application/php/bin/php-config [root@test3 imagick-3.0.1]# make && make install |
#make的过程中遇到checking for MagickWand.h header file... configure: error: Cannot locate header file MagickWand.h的报错,解决如下:(imagick-2.3.0.tgz没有遇到这个问题)
|
今天在新服上安装php imagick,
环境如下: php 5.3.20 ImageMagick-6.8.3-8 imagick-3.1.0RC2 可是出错了一个问题.就是死说找不到MagickWand.h:
checking for MagickWand.h header file... configure: error: Cannot locate header file MagickWand.h
可是我明明正确安装了ImageMagick的呀.GOOGLE了半天,也解决不了这个问题.后面对照另一个服务器上的ImageMagick才发现,原来ImageMagick 6.8这个版后的目录结构变了,旧版本头文件是放在/usr/local/include/ImageMagick目录的,而ImageMagick 6.8则是放在/usr/local/include/ImageMagick-6
添加软连接
命令如下:
ln -s /usr/local/include/ImageMagick-6 /usr/local/include/ImageMagick
后来发现imagick-3.1.0RC2编译不通过,于是降低版本,使用imagick-3.01
make && make && install
搞掂! 更新:
最终解决方法:(以下是对于imagick操作的)
yum install pkgconfig
export PKG_CONFIG_PATH=/usr/local/lib/pkgconfig/
rm -rf Makefile config.status config.h
./configure
make
make install |
4.7 安装Zend缓存及加速扩展模块
Zend Optimizer使用优化代码的方法来提高PHP应用程序的执行速度,要比不使用的要快40%到100%。(对于PHP 5.2或更早的版本有效,对5.3版本无效)
4.8 安装xcache缓存加速扩展模块
Xcache是一个又快又稳定的PHP opcode缓存器,能够快速跟进PHP版本。
Xcache的2个特点:
将PHP代码进行编译,这样可以不用重复读取PHP文件,加速整个程序的运行效率
可以缓存数据到内存中,直接可以方便调用,例如你的一些不会经常改动的数据,只用一次从数据库读取出来后保存到Xcache中,就不用再去使用数据库了。
|
wget http://xcache.lighttpd.net/pub/Releases/3.0.0/xcache-3.0.0.tar.gz tar zxf xcache-3.0.0.tar.gz cd xcache-3.0.0 /application/php/bin/phpize ./configure --enable-xcache --with-php-config=/application/php/bin/php-config make make install ll /application/php5.3.10/lib/php/extensions/no-debug-zts-20090626/ |
4.9 配置相关php扩展插件模块
4.9.1 修改php的配置文件
(1) 修改/application/php/lib/php.ini 查找;extension_dir=”./”,修改为/application/php5.3.10/lib/php/extension/no-debug-zts-20090626
|
[root@test3 ~]# cd /application/php/lib/ [root@test3 lib]# ls php php.ini [root@test3 lib]# cp php.ini php.ini.20131115
[root@test3 lib]# sed -i 's#; extension_dir = "./"#extension_dir = "/application/php5.3.10/lib/php/extension/no-debug-zts-20090626/"#g' php.ini
[root@test3 lib]# grep "extension_dir =" php.ini extension_dir = "/application/php5.3.10/lib/php/extensions/no-debug-zts-20090626/" ; extension_dir = "ext" ;sqlite3.extension_dir = |
(2) 在php.ini的最后几行添加:
|
cat >>/application/php/lib/php.ini << EOF ;--cache ext start by qinbf 2013-11-15-- extension = memcache.so extension = pdo_mysql.so extension = imagick.so ;--cache ext end by qinbf 2013-11-15-- EOF [root@test3 lib]# tail -5 php.ini ;--cache ext start by qinbf 2013-11-15-- extension = memcache.so extension = pdo_mysql.so extension = imagick.so ;--cache ext end by qinbf 2013-11-15-- |
4.10 配置eAccelerator插件
4.10.1配置eaccelerator缓存目录
|
[root@test3 lib]# mkdir -p /tmp/eaccelerator [root@test3 lib]# egrep "User|Group" /application/apache/conf/httpd.conf # User/Group: The name (or #number) of the user/group to run httpd as. User daemon Group daemon [root@test3 lib]# chown daemon.daemon -R /tmp/eaccelerator |
4.10.2 配置eaccelerator参数
注意:[eaccelerator]要放在Zend配置内容之前
|
[root@oldboy lib]# cat >> /application/php/lib/php.ini<<EOF [eaccelerator] extension=eaccelerator.so eaccelerator.shm_size="64" eaccelerator.cache_dir="/tmp/eaccelerator" eaccelerator.enable="1" eaccelerator.optimizer="1" eaccelerator.check_mtime="1" eaccelerator.debug="0" eaccelerator.filter="" eaccelerator.shm_max="0" eaccelerator.shm_ttl="3600" eaccelerator.shm_prune_period="3600" eaccelerator.shm_only="0" eaccelerator.compress="1" eaccelerator.compress_level="9" EOF
[root@test3 lib]# tail -20 php.ini ;--cache ext start by qinbf 2013-11-15-- extension = memcache.so extension = pdo_mysql.so extension = imagick.so ;--cache ext end by qinbf 2013-11-15-- [eaccelerator] extension=eaccelerator.so eaccelerator.shm_size="64" eaccelerator.cache_dir="/tmp/eaccelerator" eaccelerator.enable="1" eaccelerator.optimizer="1" eaccelerator.check_mtime="1" eaccelerator.debug="0" eaccelerator.filter="" eaccelerator.shm_max="0" eaccelerator.shm_ttl="3600" eaccelerator.shm_prune_period="3600" eaccelerator.shm_only="0" eaccelerator.compress="1" eaccelerator.compress_level="9" [root@test3 lib]# /application/php/bin/php -v PHP 5.3.10 (cli) (built: Nov 12 2013 00:24:52) Copyright (c) 1997-2012 The PHP Group Zend Engine v2.3.0, Copyright (c) 1998-2012 Zend Technologies with eAccelerator v0.9.6.1, Copyright (c) 2004-2010 eAccelerator, by eAccelerator
[root@test3 lib]# ll /tmp/eaccelerator/ 总计 64 drwxrwxrwx 18 root root 4096 11-14 07:10 0 drwxrwxrwx 18 root root 4096 11-14 07:10 1 drwxrwxrwx 18 root root 4096 11-14 07:10 2 drwxrwxrwx 18 root root 4096 11-14 07:10 3 drwxrwxrwx 18 root root 4096 11-14 07:10 4 drwxrwxrwx 18 root root 4096 11-14 07:10 5 drwxrwxrwx 18 root root 4096 11-14 07:10 6 drwxrwxrwx 18 root root 4096 11-14 07:10 7 drwxrwxrwx 18 root root 4096 11-14 07:10 8 drwxrwxrwx 18 root root 4096 11-14 07:10 9 drwxrwxrwx 18 root root 4096 11-14 07:10 a drwxrwxrwx 18 root root 4096 11-14 07:10 b drwxrwxrwx 18 root root 4096 11-14 07:10 c drwxrwxrwx 18 root root 4096 11-14 07:10 d drwxrwxrwx 18 root root 4096 11-14 07:10 e drwxrwxrwx 18 root root 4096 11-14 07:10 f |
4.11 修改php.ini配置xcache
一般认为xcache和eaccelerator功能相近,安装一个即可。如果想同时安装,那么eaccelerator的配置内容必须在xcache之后。
|
;xcache config by qinbf 20131115--------------------- [xcache-common] ;; install as zend extension (recommended), normally "$extension_dir/xcache.so" ;zend_extension = /usr/local/lib/php/extensions/non-debug-non-zts-xxx/xcache.so ; zend_extension_ts = /usr/local/lib/php/extensions/non-debug-zts-xxx/xcache.so ;; For windows users, replace xcache.so with php_xcache.dll ;zend_extension_ts = c:/php/extensions/php_xcache.dll ;; or install as extension, make sure your extension_dir setting is correct extension = xcache.so ;; or win32: ; extension = php_xcache.dll
;xcache config by qinbf 20131115----------------------
[xcache.admin] [xcache.admin] xcache.admin.enable_auth = On
xcache.admin.user = "mOo" ; xcache.admin.pass = md5($your_password) xcache.admin.pass = ""
[xcache] [xcache] ; ini only settings, all the values here is default unless explained
; select low level shm/allocator scheme implemenation xcache.shm_scheme = "mmap" ; to disable: xcache.size=0 ; to enable : xcache.size=64M etc (any size > 0) and your system mmap allows xcache.size = 128M ; set to cpu count (cat /proc/cpuinfo |grep -c processor) xcache.count = 2 ; just a hash hints, you can always store count(items) > slots xcache.slots = 8K ; ttl of the cache item, 0=forever xcache.ttl = 86400 ; interval of gc scanning expired items, 0=no scan, other values is in seconds xcache.gc_interval = 3600
; same as aboves but for variable cache xcache.var_size = 0 xcache.var_count = 1 xcache.var_slots = 8K ; default ttl xcache.var_ttl = 0 xcache.var_maxttl = 0 xcache.var_gc_interval = 300
否则会报错: [root@oldboy lib]# /application/php/bin/php -v PHP Warning: Cannot load module 'XCache' because conflicting module 'eAccelerator' is already loaded in Unknown on line 0 PHP 5.3.10 (cli) (built: Apr 7 2012 22:42:50) Copyright (c) 1997-2012 The PHP Group Zend Engine v2.3.0, Copyright (c) 1998-2012 Zend Technologies with eAccelerator v0.9.6, Copyright (c) 2004-2010 eAccelerator, by eAccelerator
正常情况下:
|


五 Apache服务优化
5.1 配置Apache日志轮询
|
apache自带的日志轮询工具也是可以使用的,但是老师测试会丢日志,所以采用cronolog来配置日志轮询
tar zxf cronolog-1.6.2.tar.gz cd cronolog-1.6.2 ./configure make make install <VirtualHost *:80> ServerAdmin qinbf@etiantian.com DocumentRoot "/var/html/www" ServerName www.etiantian.com ServerAlias etiantian.com ErrorLog "logs/www.etiantiancom-error_log" # CustomLog "logs/www.etiantiancom-access_log" common CustomLog "|/usr/local/sbin/cronolog /application/apache/logs/access_www_%w.log" combined #注意这里要写全路径,%w表示按周轮询 </VirtualHost> |
5.2 错误页面优雅显示
|
[root@test3 bin]# grep "ErrorDocument 404" /application/apache/conf/httpd.conf #ErrorDocument 404 /missing.html #ErrorDocument 404 "/cgi-bin/missing_handler.pl" #可以指定404错误提示的页面,可以是URL,也可以是脚本或者文件 |
5.3 mod_deflate文件压缩功能
5.3.1 mod_deflate模块介绍
mod_deflate模块提供了DEFLATE输出过滤器,允许服务器在将输出内容发送到客户端之前进行压缩,提升用户体验。
5.3.2 mod_deflate安装检查
(1)编译安装httpd情况时是否已经安装mod_deflate,命令为:
|
[root@test3 ~]# /application/apache/bin/apachectl -l |grep mod_deflate mod_deflate.c |
(2)如果是以DSO方式编译的(--enable-so开启DSO编译方式),则查看方法为:
|
[root@test3 ~]# ls /application/apache/modules/ |grep mod_deflate mod_deflate.so [root@test3 ~]# grep mod_deflate.so /application/apache/conf/httpd.conf LoadModule deflate_module modules/mod_deflate.so [root@test3 ~]# /application/apache/bin/apachectl -M |grep deflate deflate_module(dynamic) #static是表示在编译的时候就已经安装了 Syntax OK |
特别说明:以上两种情况不能同时存在,否则会有冲突
5.3.3 mod_deflate安装
|
cd /root/tools/httpd-2.2.25/modules/filters /application/apache/bin/apxs -c -a -i mod_deflate.c ll /application/apache/modules/mod_deflate.so
#如果提示冲突,要把/application/apache/conf/httpd.conf文件中,LoadModule deflate_module modules/mod_deflate.so这句命令注释掉。 |
5.3.4 mod_deflate应用
|
<ifmodule mod_deflate.c> DeflateCompressionLevel 9 SetOutputFilter DEFLATE DeflateFilterNote Input instream DeflateFilterNote Output outstream DeflateFilterNote Ratio ratio #Logformat ‘ “%r” %{outstream}n/%{instream}n (%{ratio}n%%)’ deflate #CustomLog logs/deflate_log.log deflate </ifmodule>
#把以上这段代码嵌入到/application/apache/conf/extra/httpd-vhosts.conf的/var/html/www配置内容里面(也可以配置到全局目录里面)
<VirtualHost *:80> ServerAdmin qinbf@etiantian.com DocumentRoot "/var/html/www" ServerName www.etiantian.com ServerAlias etiantian.com ErrorLog "logs/www.etiantiancom-error_log" CustomLog "logs/www.etiantiancom-access_log" common <ifmodule mod_deflate.c> DeflateCompressionLevel 9 SetOutputFilter DEFLATE DeflateFilterNote Input instream DeflateFilterNote Output outstream DeflateFilterNote Ratio ratio #Logformat ‘ “%r” %{outstream}n/%{instream}n (%{ratio}n%%)’ deflate #CustomLog logs/deflate_log.log deflate </ifmodule>
</VirtualHost>
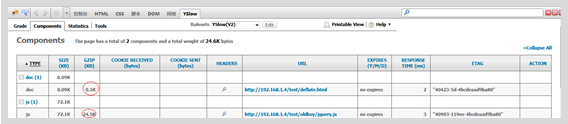
测试:把老师的test_deflate.tar.gz压缩包上传到/var/html/www下,然后解压,不需要做任何移动。打开Firefox开发专版,访问192.168.1.4/test/deflate.html,打开firebug,在YSlow中可以看到测试结果。 |
5.4 mod_expires缓存功能
Expire其实就是通过header报文来指定特定类型的文件在浏览器中的缓存时间。大多数的图片,flash在发布后都不是需要经常修改的,做了缓存以后这样的浏览器以后就不需要再从服务器下载这些文件而是直接从缓存中读取,这样再访问页面的速度会大大加快。
|
在刚才的mod_deflate模块配置内容下面加入以下配置: ExpiresActive on ExpiresDefault "access plus 12 month" ExpiresByType text/html "access plus 12 months" ExpiresByType text/css "access plus 12 months" ExpiresByType image/gif "access plus 12 months" ExpiresByType image/jpeg "access plus12 12 months" ExpiresByType image/jpg "access plus 12 months" ExpiresByType image/png "access plus 12 months" EXpiresByType application/x-shockwave-flash "access plus 12 months" EXpiresByType application/x-javascript "access plus 12 months" ExpiresByType video/x-flv "access plus 12 months" [root@test3 www]# curl -I 192.168.1.4/01.jpg HTTP/1.1 200 OK Date: Sun, 17 Nov 2013 03:51:45 GMT Server: Apache/2.2.25 (Unix) DAV/2 PHP/5.3.10 Last-Modified: Sun, 07 Nov 2010 12:20:20 GMT ETag: "40904-486f3-4947587f66900" Accept-Ranges: bytes Content-Length: 296691 Cache-Control: max-age=31104000 Expires: Wed, 12 Nov 2014 03:51:45 GMT Vary: Accept-Encoding Content-Type: image/jpeg |
5.5 更改Apache默认用户
创建一个用户例如Apache(最好起一个不常用的名字),用于子进程和子线程。
|
useradd -M -s /sbin/nologin apache vi /application/apache/conf/httpd.conf User apache Group apache |
5.6 worker模式提升并发数
5.7 屏蔽apache版本等敏感信息
|
(1) 修改httpd.conf文件,打开httpd-default.conf模块 (2) 修改httpd-default.conf文件,ServerSignature Off以及ServerTokens Prod之后apachectl graceful使设置生效 |
5.8 apache目录文件权限设置(root,目录755,文件644)
|
[root@test3 html]# ll 总计 12 drwxr-xr-x 2 root root 4096 09-03 18:51 bbs drwxr-xr-x 5 root root 4096 11-12 01:53 blog drwxr-xr-x 3 root root 4096 11-17 11:43 www |
提示:在网站架构中,应把资源文件,包括用户上传的图片,福建等和程序分离,最好把上传程序也分离,这样就可以从容授权了。
5.9 开启httpd-mpm.conf增加连接数
5.10 apache防盗链功能
5.11 禁止目录Index
|
Option FollowSymLinks 这一个参数去掉Index选项 |
5.12 禁止用户覆盖(重载)
|
AllowOverride None #禁止用户覆盖(重载) #加快服务器速度,因为它不再为每个请求寻找每个目录访问控制问价(.htaccess) |
5.13 关闭CGI
|
ScriptAlias /cgi-bin/ "/application/apache2.2.25/cgi-bin/" <Directory "/application/apache2.2.25/cgi-bin"> AllowOverride None Options None Order allow,deny Allow from all </Directory> |
删除以上内容
5.14 避免使用.htaccess文件(分布式配置文件)
首先从性能上,就应该避免使用.htaccess文件
5.15 apache安装模块
|
(mod_evasive20防DDOS、mod_limitipconn(针对单站点)配置、mod_security防SQL注入等 makejail http://www.floc.net/makejail 是一个自动把建立jail所需要的程序放到jail内的软件 mod_security http://www.modsecurity.org 是apache的一个模块,他有请求过滤,日志审计等功能,可以防止SQL Injection,跨站脚本攻击,很不错的一个模块 |
16. 正确途径取得源代码,勤打apache补丁
17. apache日志授予root700权限
|
chown -R root.root logs chmod -R 700 logs |
18. 系统内核参数优化
19. 禁止PHP解析指定站点目录
20. 使用tmps文件系统替代频繁访问的目录
21尽可能减少HTTP请求数
22. 使用CDN做网站加速
23. apache程序架构优化
|
1) 程序页面服务器 2)图片附件服务器 3)上传服务器 三者的功能尽量分离 a) 分离最佳方式是分别使用独立的服务器(需要程序支持) b) 次选方案在前端负载均衡器通过haproxy/nginx根据目录或扩展名请求后面对应的服务器 |
六 apache服务Forbidden 403问题精彩讲解
403 Forbidden资源不可用。服务器理解客户的请求,但拒绝处理它。通常由于服务器上文件或目录的权限设置导致。
原因1(重要)
apache配置文件中没有对站点目录的权限许可配置,这通常是在初始安装apache后,更改了默认的apache站点目录导致。如编译安装apache(假定安装目录为/application/apache2.2.23/)后,将站点目录更改为其他的路径:/var/html,则会报403错误
原因2
站点目录下无首页文件,而apache的配置又禁止了目录浏览,就会提示403错误
原因3
Directory目录权限问题: Order中allow,deny的顺序以及限制
原因4
站点目录权限问题:站点目录需要apache的用户有访问的权限(把/var/html的属主和属组设为root,那么就要给755权限,否则apache的用户无法读取文件)
七 Nginx深入应用实践
7.1 关于Nginx模块
Nginx使用不同的模块实现不同的功能,主要有2组重要的模块:
(1) Nginx core modules(必需的)
包括Main、Events
(2) Standard HTTP modules(虽然不是必需的,但是缺省都会安装,不建议改动)
典型的包括
Core、Access、FastCGI、Gzip、Log、Proxy、Rewrite、Upstream
7.2 Nginx目录结构
|
/application/nginx |-- client_body_temp |-- conf | |-- fastcgi.conf #fastcgi配置文件 | |-- fastcgi.conf.default #default文件均属于备份文件 | |-- fastcgi_params | |-- fastcgi_params.default | |-- koi-utf | |-- koi-win | |-- mime.types | |-- mime.types.default | |-- nginx.conf #Nginx主配置文件 | |-- nginx.conf.default | |-- nginx.conf.qinbf-20131101 | |-- scgi_params | |-- scgi_params.default | |-- uwsgi_params | |-- uwsgi_params.default | `-- win-utf |-- fastcgi_temp |-- html | |-- 50x.html #错误优雅显示文件 | `-- index.html |-- logs | |-- access.log #访问日志 | |-- error.log #错误日志 | `-- nginx.pid |-- proxy_temp |-- sbin | `-- nginx |-- scgi_temp `-- uwsgi_temp
9 directories, 22 files |
7.3 Nginx.conf配置文件
|
worker_processes 1; #ps -ef |grep nginx可以查看到nginx的子线程数
events { worker_connections 1024; #可以理解为最大并发数 }
http { include mime.types; default_type application/octet-stream; sendfile on; keepalive_timeout 65;
server { #一个server相当于apache的一个vhost,可以复制多个server模块配置多个主机 listen 80; server_name localhost;
location / { #相当于htdocs root html; index index.html index.htm; }
error_page 500 502 503 504 /50x.html; #优雅显示页面 location = /50x.html { root html;
}
}
} |
7.4 基于域名的虚拟主机配置
|
http { 10 include mime.types; 11 default_type application/octet-stream; 12 sendfile on; 13 keepalive_timeout 65; 14 15 server { 16 listen 80; 17 server_name www.etiantian.org; 18 19 location / { 20 root html; 21 index index.html index.htm; 22 } 23 24 error_page 500 502 503 504 /50x.html; 25 location = /50x.html { 26 root html; 27 28 } 29 30 } 31 32 }
然后检查语法,优雅重启 [root@test2 conf]# /application/nginx/sbin/nginx -t nginx: the configuration file /application/nginx-1.2.9/conf/nginx.conf syntax is ok nginx: configuration file /application/nginx-1.2.9/conf/nginx.conf test is successful [root@test2 conf]# /application/nginx/sbin/nginx -s reload [root@test2 conf]# netstat -tupnl |grep 80 tcp 0 0 0.0.0.0:80 0.0.0.0:* LISTEN 21475/nginx
配置虚拟主机流程: 1) 复制server标签段,到结尾,注意放到http的结束大括号前 2) 更改server_name及对应网页的根目录 3) 创建对应网页的根目录,并建立测试文件 4) 检查语法,重启服务 5) 在host文件做解析 6) 浏览器访问 |
7.5 禁止ip访问
为防止域名恶意解析到自己的服务器上,必须要配置禁止ip访问
|
server { listen 80 default; return 500; } #这段配置,是将访问没有配置为本服务器虚拟主机的域名,默认返回500错误
#也可以利用rewrite规则,把恶意解析到本服务器的域名访问流量,导入到自己的站点 server { listen 80 default; rewrite ^(.*) http://www.etiantian.com permanent; } #域名解析到本地服务器,但是并未为该域名配置本地服务器的虚拟主机,将跳转到rewrite定义的站点上
#server_name _; 这个的含义代表输入ip地址直接访问的结果 #listen 80 default_server; default_server这个参数用于nginx 0.8版本之后 |
7.6 nginx日志配置及切割
目前还没有比较好的Nginx日志切割工具
|
日志的格式定义: log_format commonlog '$remote_addr - $remote_user [$time_local] "$request" ' '$status $body_bytes_sent "$http_referer" ' '"$http_user_agent" "$http_x_forwarded_for"';
server { listen 80; server_name www.etiantian.com;
location / { root /data0/www/www; index index.html index.htm; }
error_page 500 502 503 504 /50x.html; location = /50x.html { root html;
}
access_log /app/logs/www_access.log commonlog; #日志格式的调用 } |
|
192.168.1.1 - - [22/Nov/2013:00:27:32 +0800] "GET /favicon.ico HTTP/1.1" 404 570 "-" "Mozilla/5.0 (Windows NT 6.1; WOW64) AppleWebKit/537.36 (KHTML, like Gecko) Chrome/28.0.1500.95 Safari/537.36" "-"
|

日志切割脚本
|
#!/bin/bash date=`date +%Y%m%d` Nginx_Dir="/application/nginx" Nginx_Logs="/app/logs" Log_Name="www_access"
cd /tmp [ -d $Nginx_Logs ] && cd $Nginx_Logs || exit 1 [ -f $Log_Name.log ] && /bin/mv $Log_Name.log ${Log_Name}.${date}.log || exit 1 if [ $? -eq 0 -a -f $Nginx_Dir/logs/nginx.pid ] then kill -USR1 `cat $Nginx_Dir/logs/nginx.pid` #把nginx的日志重命名相当于删除文件,需要重启nginx服务 fi
然后每天晚上12点切割 crontab -e 00 00 * * * /bin/sh /root/scripts/cut_nginx_log.sh >/dev/null 2>&1 |
|
统计IP并排序 awk '{print $1}' www_access.log | sort | uniq -c | sort -rn -k 1 | head |
7.7 Nginx配置文件优化
|
worker_processes 1;
events { worker_connections 1024; }
http { include mime.types; default_type application/octet-stream; sendfile on; keepalive_timeout 65; log_format commonlog '$remote_addr - $remote_user [$time_local] "$request" ' '$status $body_bytes_sent "$http_referer" ' '"$http_user_agent" "$http_x_forwarded_for"';
include extra/www.conf; include extra/bbs.conf; include extra/blog.conf; include extra/default.conf;
} |
模仿apache配置文件,把虚拟主机的配置写在extra目录的配置文件内,然后用include的方式调用。
7.8 Nginx别名及连接状态信息配置
|
#别名其实就是以相应的别名配置虚拟主机,然后利用rewrite规则,跳转到主域名上。 专门写一个配置文件内容如下: server { listen 80; server_name etiantian.com;
rewrite ^(.*) http://www.etiantian.com permanent;
}
然后在nginx文件将调用此文件:include extra/www_alias.conf |
即是配置一个虚拟主机文件,内容如下:
|
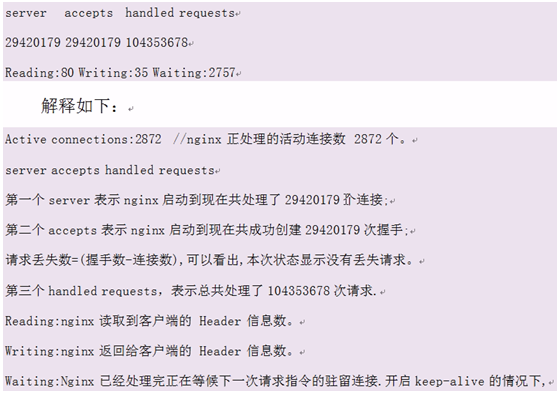
server { listen 80; server_name status.etiantian.com;
location / { stub_status on; access_log off; } } 然后在nginx.conf文件中调用此配置文件
|

八 动态语言php应用(fastCGI应用)
8.1 FastCGI介绍
FastCGI是语言无关的,可伸缩架构的CGI开放扩展,其主要行为是将CGI解释器进程保持在内存中并因此获得较高的性能。它还支持分布式的运算, 即 FastCGI 程序可以在网站服务器以外的主机上执行并且接受来自其它网站服务器来的请求。即nginx和FastCGI是独立的,而不像apache和php那样是密不可分的。
FastCGI用于结合nginx和PHP,类似于apache和php结合的模块。
8.2 FastCGI原理
1、Web Server启动时载入FastCGI进程管理器(IIS ISAPI或Apache Module)
2、FastCGI进程管理器自身初始化,启动多个CGI解释器进程(可见多个php-cgi)并等待来自Web Server的连接。
3、当客户端请求到达Web Server时,FastCGI进程管理器选择并连接到一个CGI解释器。Web server将CGI环境变量和标准输入发送到FastCGI子进程php-cgi。
4、FastCGI子进程完成处理后将标准输出和错误信息从同一连接返回Web Server。当FastCGI子进程关闭连接时,请求便告处理完成。FastCGI子进程接着等待并处理来自FastCGI进程管理器(运行在Web Server中)的下一个连接。 在CGI模式中,php-cgi在此便退出了。
在上述情况中,你可以想象CGI通常有多慢。每一个Web请求PHP都必须重新解析php.ini、重新载入全部扩展并重初始化全部数据结构。使用FastCGI,所有这些都只在进程启动时发生一次。一个额外的好处是,持续数据库连接(Persistent database connection)可以工作。
8.3 检查以下软件包是否安装
|
[root@test3 ~]# rpm -qa zlib libxml libjpeg freetype libpng gd curl libiconv zlib-devel libxml2-devel libjpeg-devel freetype-devel libpng-devel gd-devel curl-devel zlib-1.2.3-7.el5 freetype-2.2.1-31.el5_8.1 libpng-1.2.10-17.el5_8 libpng-1.2.10-17.el5_8 zlib-1.2.3-7.el5 libjpeg-6b-37 gd-2.0.33-9.4.el5_4.2 curl-7.15.5-15.el5 zlib-devel-1.2.3-7.el5 libjpeg-6b-37 freetype-2.2.1-31.el5_8.1
如果没有安装可以使用yum的方式安装: [root@test3 ~]# yum install zlib libxml libjpeg freetype libpng gd curl libiconv zlib-devel libxml2-devel libjpeg-devel freetype-devel libpng-devel gd-devel curl-devel openldap-devel libxslt-devel |
附上CentOS下常见编译PHP的错误及解决办法
|
configure: error: xml2-config not found. Please check your libxml2 installation. yum install libxml2-devel
configure: error: Cannot find OpenSSL’s yum install openssl-devel
configure: error: Please reinstall the libcurl distribution -
easy.h should be in /include/curl/ yum install curl-devel configure: error: libjpeg.(a|so) not found yum install libjpeg-devel
configure: error: libpng.(a|so) not found. yum install libpng-devel
configure: error: libXpm.(a|so) not found. yum install libXpm-devel
configure: error: freetype.h not found. yum install freetype-devel
configure: error: utf8_mime2text() has new signature, but U8T_CANONICAL is missing. This should not happen. Check config.log for additional information. yum install libc-client-devel
configure: error: mcrypt.h not found. Please reinstall libmcrypt. yum install libmcrypt-devel
configure: error: Please reinstall libmhash – I cannot find mhash.h yum install mhash-devel
configure: error: Cannot find MySQL header files under /usr. Note that the MySQL client library is not bundled anymore! yum install mysql-devel configure: error: Please reinstall ming distribution. libming.(a|so) not found - temp remove the config for ‘–with-ming=/opt/ming/’
configure: error: Cannot find pspell yum install pspell-devel
configure: error: cannot find mm library Download from http://www.ossp.org/pkg/lib/mm/ wget ftp://ftp.ossp.org/pkg/lib/mm/mm-1.4.2.tar.gz Extract it: tar -zxvf mm-1.4.2.tar.gz ./configure make make install
configure: error: Cannot find libtidy yum install libtidy-devel yum install libtidy change path at configure: ‘–with-tidy=/usr’
configure: error: not found. Please reinstall the expat distribution. yum install expat-devel
configure: error: xslt-config not found. Please reinstall the libxslt >= 1.1.0 distribution yum install libxslt-devel
*Tips: To uninstall, just enter: yum remove {package-name} |
8.4 libiconv、libmcrypt、Mhash、mcrypt的安装
|
1. libiconv wget http://ftp.gnu.org/pub/gnu/libiconv/libiconv-1.14.tar.gz tar zxf libiconv-1.14.tar.gz cd libiconv-1.14 ./configure --prefix=/usr/local/libiconv make make install cd ../
2. libmcrypt wget "http://downloads.sourceforge.net/mcrypt/libmcrypt-2.5.8.tar.gz?modtime=1171868460&big_mirror=0" tar zxf libmcrypt-2.5.8.tar.gz cd libmcrypt-2.5.8 ./configure make make install sleep 2 /sbin/ldconfig cd libltdl/ ./configure --enable-ltdl-install make make install cd ../../
3. Mhash wget "http://downloads.sourceforge.net/mhash/mhash-0.9.9.9.tar.gz?modtime=1175740843&big_mirror=0" tar zxf mhash-0.9.9.9.tar.gz cd mhash-0.9.9.9/ ./configure make make install sleep 2 cd ../ rm -f /usr/lib/libmcrypt.* rm -f /usr/lib/libmhash* ln -s /usr/local/lib/libmcrypt.la /usr/lib/libmcrypt.la ln -s /usr/local/lib/libmcrypt.so /usr/lib/libmcrypt.so ln -s /usr/local/lib/libmcrypt.so.4 /usr/lib/libmcrypt.so.4 ln -s /usr/local/lib/libmcrypt.so.4.4.8 /usr/lib/libmcrypt.so.4.4.8 ln -s /usr/local/lib/libmhash.a /usr/lib/libmhash.a ln -s /usr/local/lib/libmhash.la /usr/lib/libmhash.la ln -s /usr/local/lib/libmhash.so /usr/lib/libmhash.so ln -s /usr/local/lib/libmhash.so.2 /usr/lib/libmhash.so.2 ln -s /usr/local/lib/libmhash.so.2.0.1 /usr/lib/libmhash.so.2.0.1 ln -s /usr/local/bin/libmcrypt-config /usr/bin/libmcrypt-config
4.mcrypt wget "http://downloads.sourceforge.net/mcrypt/mcrypt-2.6.8.tar.gz?modtime=1194463373&big_mirror=0" tar zxf mcrypt-2.6.8.tar.gz cd mcrypt-2.6.8/ /sbin/ldconfig ./configure make make install cd ../ sleep 2 |
8.5 php5.3.27的编译参数(结合的是nginx)
|
./configure --prefix=/application/php5.3.27 --with-mysql=/usr/local/mysql --with-iconv-dir=/usr/local/libiconv --with-freetype-dir --with-jpeg-dir --with-png-dir --with-zlib --with-libxml-dir=/usr --enable-xml --disable-rpath --enable-safe-mode --enable-bcmath --enable-shmop --enable-sysvsem --enable-inline-optimization --with-curl --with-curlwrappers --enable-mbregex --enable-fpm --enable-mbstring --with-mcrypt --with-gd --enable-gd-native-ttf --with-openssl --with-mhash --enable-pcntl --enable-sockets --with-ldap --with-ldap-sasl --with-xmlrpc --enable-zip --enable-soap --enable-short-tags --enable-zend-multibyte --enable-static --with-xsl --with-fpm-user=nginx --with-fpm-group=nginx --enable-ftp #--enable-discard-path #--enable-fastcgi #--enable-force-cgi-redirect #--with-libevent-dir 这个参数在php5.3.10中是支持的 --enable-fpm这个参数时开启fastcgi的,是nginx结合php用的参数,在apache编译的参数中是没有的
要记得先安装8.2步骤中的那些软件包,否则在安装过程中可能会遇到各种各样的问题 |
8.6 PHP的配置
|
1. php.ini的配置 [root@test2 php-5.3.27]# pwd /root/tools/php-5.3.27 [root@test2 php-5.3.27]# /bin/cp php.ini-production /application/php5.3.27/lib/php.ini 2. php-fpm [root@test2 etc]# pwd /application/php5.3.27/etc [root@test2 etc]# ls php-fpm.conf.default php-fpm.conf.default [root@test2 tools]# cp php-fpm.conf.5.3.10 /application/php5.3.27/etc/php-fpm.conf #用老师改好的文件复制为/application/php5.3.27/etc/php-fpm.conf
[root@test2 tools]# /application/php/sbin/php-fpm -t [29-Nov-2013 00:28:11] NOTICE: configuration file /application/php5.3.27/etc/php-fpm.conf test is successful #检查语法
[root@test2 tools]# pkill php-fpm [root@test2 tools]# /application/php/sbin/php-fpm #重启服务
[root@test2 tools]# ps -ef |grep php-fpm root 17875 1 1 00:29 ? 00:00:00 php-fpm: master process (/application/php5.3.27/etc/php-fpm.conf) nginx 17876 17875 0 00:29 ? 00:00:00 php-fpm: pool www nginx 17877 17875 0 00:29 ? 00:00:00 php-fpm: pool www nginx 17878 17875 0 00:29 ? 00:00:00 php-fpm: pool www nginx 17879 17875 0 00:29 ? 00:00:00 php-fpm: pool www nginx 17880 17875 0 00:29 ? 00:00:00 php-fpm: pool www nginx 17881 17875 0 00:29 ? 00:00:00 php-fpm: pool www nginx 17882 17875 0 00:29 ? 00:00:00 php-fpm: pool www nginx 17883 17875 0 00:29 ? 00:00:00 php-fpm: pool www nginx 17884 17875 0 00:29 ? 00:00:00 php-fpm: pool www nginx 17885 17875 0 00:29 ? 00:00:00 php-fpm: pool www nginx 17886 17875 0 00:29 ? 00:00:00 php-fpm: pool www nginx 17887 17875 0 00:29 ? 00:00:00 php-fpm: pool www nginx 17888 17875 0 00:29 ? 00:00:00 php-fpm: pool www nginx 17889 17875 0 00:29 ? 00:00:00 php-fpm: pool www nginx 17890 17875 0 00:29 ? 00:00:00 php-fpm: pool www nginx 17891 17875 0 00:29 ? 00:00:00 php-fpm: pool www root 17893 2685 0 00:29 pts/0 00:00:00 grep php-fpm [root@test2 tools]# netstat -tupnl |grep 9000 tcp 0 0 127.0.0.1:9000 0.0.0.0:* LISTEN 17875/php-fpm [root@test2 tools]# [root@test2 tools]# lsof -i :9000 COMMAND PID USER FD TYPE DEVICE SIZE/OFF NODE NAME php-fpm 17875 root 7u IPv4 177862 0t0 TCP localhost.localdomain:cslistener (LISTEN) php-fpm 17876 nginx 0u IPv4 177862 0t0 TCP localhost.localdomain:cslistener (LISTEN) php-fpm 17877 nginx 0u IPv4 177862 0t0 TCP localhost.localdomain:cslistener (LISTEN) php-fpm 17878 nginx 0u IPv4 177862 0t0 TCP localhost.localdomain:cslistener (LISTEN) php-fpm 17879 nginx 0u IPv4 177862 0t0 TCP localhost.localdomain:cslistener (LISTEN) php-fpm 17880 nginx 0u IPv4 177862 0t0 TCP localhost.localdomain:cslistener (LISTEN) php-fpm 17881 nginx 0u IPv4 177862 0t0 TCP localhost.localdomain:cslistener (LISTEN) php-fpm 17882 nginx 0u IPv4 177862 0t0 TCP localhost.localdomain:cslistener (LISTEN) php-fpm 17883 nginx 0u IPv4 177862 0t0 TCP localhost.localdomain:cslistener (LISTEN) php-fpm 17884 nginx 0u IPv4 177862 0t0 TCP localhost.localdomain:cslistener (LISTEN) php-fpm 17885 nginx 0u IPv4 177862 0t0 TCP localhost.localdomain:cslistener (LISTEN) php-fpm 17886 nginx 0u IPv4 177862 0t0 TCP localhost.localdomain:cslistener (LISTEN) php-fpm 17887 nginx 0u IPv4 177862 0t0 TCP localhost.localdomain:cslistener (LISTEN) php-fpm 17888 nginx 0u IPv4 177862 0t0 TCP localhost.localdomain:cslistener (LISTEN) php-fpm 17889 nginx 0u IPv4 177862 0t0 TCP localhost.localdomain:cslistener (LISTEN) php-fpm 17890 nginx 0u IPv4 177862 0t0 TCP localhost.localdomain:cslistener (LISTEN) php-fpm 17891 nginx 0u IPv4 177862 0t0 TCP localhost.localdomain:cslistener (LISTEN) #检查服务的运行情况 |
8.7 整合PHP和Nginx
|
server { listen 80; server_name blog.etiantian.org; root /data0/www/blog; index index.php index.html index.htm;
location ~ .*.(php|php5)?$ #以php或者php5结尾的文件 { #fastcgi_pass unix:/tmp/php-cgi.sock; fastcgi_pass 127.0.0.1:9000; #交给本机的9000端口处理 fastcgi_index index.php; #首页文件 include fastcgi.conf; } } |
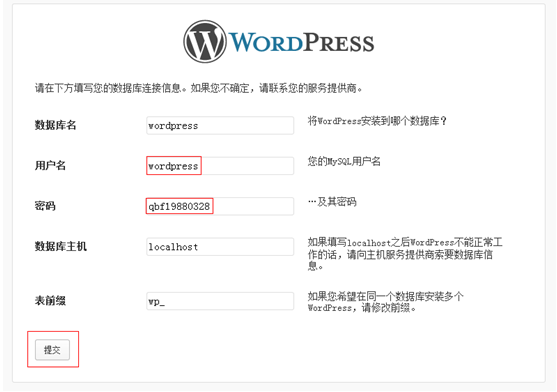
8.8 安装wordpress博客
|
1.建立博客数据库(默认是拉丁字符集) (1)创建数据库 create database wordpress; 也可按下面方式创建库: 建立一个名为wordpress的GBK数据库 create database wordpress DEFAULT CHARACTER SET gbk COLLATE gbk_chinese_ci;
(2)授权用户 grant select,insert,delete,update,create on wordpress.* to wordpress@localhost identified by '19880328'; flush privileges;
chown nginx.nginx blog -R
只需要编辑该文件的数据库名、数据库用户名、密码即可。 特别注意的是在编辑wp-config.php文件的时候,应该是数据root用户编辑的,要改为nginx.nginx。在浏览器端配置完标题用户之后,blog整个目录下的文件都可以改root权限,但是wp-config.php文件必须是nginx.nginx权限。
mysql> use wordpress; Database changed mysql> revoke create on wordpress.* from wordpress@'localhost'; Query OK, 0 rows affected (0.00 sec)
作业:对wordpress的博客使用伪静态 |