Retrofit是什么
官网介绍是A type-safe HTTP client for Android and Java,是一个 RESTful 的 HTTP 网络请求框架的封装,但网络请求不是Retrofit来完成的,它只是封装了请求参数、Header、Url、返回结果处理等信息,而请求是由OkHttp3来完成的。
入门
Retrofit入门非常简单,首先需要在build.gradle引用相关依赖
implementation 'com.squareup.retrofit2:retrofit:2.5.0'
定义一个HTTP API接口类
public interface GitHubService {
  @GET("users/{user}/repos")
  Call<List<Repo>> listRepos(@Path("user") String user);
}
使用Retrofit类生成GitHubService 接口实现
Retrofit retrofit = new Retrofit.Builder()
    .baseUrl("https://api.github.com/")
    .build();

GitHubService service = retrofit.create(GitHubService.class);
发送HTTP请求,返回Response可以同步或者异步处理
Call<List<Repo>> repos = service.listRepos("octocat");
// 同步
List<Repo> data = repos.execute();
// 异步
repos.enqueue(new Callback<List<Repo>>() {
            @Override
            public void onResponse(Call<List<Repo>> call, Response<List<Repo>> response) {
                List<Repo> data = response.body();
            }

            @Override
            public void onFailure(Call<List<Repo>> call, Throwable t) {
                t.printStackTrace();
            }
        });
Retrofit入门就是这几步,当然在实际使用的时候肯定没有那么简单,可以根据具体需求来处理,之前写过一篇文章Retrofit+Rxjava的封装,具体可以去看看。
解读
Retrofit库有四个module,包含retrofit,adapter,convert,mock等,我们先来看看Retrofit整体结构,先对它有个大体的了解。
- 请求方法
Retrofit定义了请求注解类,支持请求方法包含GET、POST、HEAD、OPTIONS、PUT、DELETE、PATCH请求,当然你也可以直接使用HTTP自定义请求。例如以GET请求为例,
@Documented
@Target(METHOD)
@Retention(RUNTIME)
public @interface GET {
  /**
   * A relative or absolute path, or full URL of the endpoint. This value is optional if the first
   * parameter of the method is annotated with {@link Url @Url}.
   * <p>
   * See {@linkplain retrofit2.Retrofit.Builder#baseUrl(HttpUrl) base URL} for details of how
   * this is resolved against a base URL to create the full endpoint URL.
   */
  String value() default "";
}
GET定义了一个value,这个值是相关请求的path,而我们在创建Retrofit的时候已经传入一个baseUrl,这两个会组装成真正的请求url。如果想使用HTTP自定义,可以这样定义:
HTTP(method = "DELETE", path = "remove/", hasBody = true)
- 请求参数
Retrofit定义了请求参数注解类,包含Body、Field、FieldMap、Header、HeaderMap、Part、PartMap、Query、QueryMap、QueryName。以Query为例,例如 http://api.github.com/list?page=10,可以写成下面的代码。
@GET("/list")
Call<ResponseBody> list(@Query("page") int page);
使用POST的时候,绝大多数的服务端接口都需要做加密、鉴权和校验,可以使用@Field来处理参数
@POST("/list")
Call<ResponseBody> list(@Field("page") int page);
而Map结尾的注解参数类,其实就是数据集,如@QueryMap Map<String, String> map
- Converter
在Retrofit中,无论是发送数据和接收数据,都是通过OKHttp的RequestBody和ResponseBody来实现的。在实际项目中,有时候原始的RequestBody或是ResponseBody并不能满足我们的需求(如接口加密),就需要对它进行转换。而且Retrofit官方给了以下几个常用的转换库。
- Gson: com.squareup.retrofit2:converter-gson
- Jackson: com.squareup.retrofit2:converter-jackson
- Moshi: com.squareup.retrofit2:converter-moshi
- Protobuf: com.squareup.retrofit2:converter-protobuf
- Wire: com.squareup.retrofit2:converter-wire
- Simple XML: com.squareup.retrofit2:converter-simplexml
- Scalars (primitives, boxed, and String): com.squareup.retrofit2:converter-scalars
这对于一般的使用来说确实够用了,但是如果我们对安全性要求比较高,或者编码不太一样的话,这些库就没法使用了,于是我们就需要自定义ConverterFactory。Retrofit已经为我们提供了自定义Converter.Factory的接口,我们只需要实现它给的接口即可。
public final class ProtoConverterFactoryCompat extends Converter.Factory {
    public static ProtoConverterFactoryCompat create() {
        return new ProtoConverterFactoryCompat(null);
    }

    /**
     * Create an instance which uses {@code registry} when deserializing.
     */
    public static ProtoConverterFactoryCompat createWithRegistry(ExtensionRegistryLite registry) {
        return new ProtoConverterFactoryCompat(registry);
    }

    private final ExtensionRegistryLite registry;

    private ProtoConverterFactoryCompat(ExtensionRegistryLite registry) {
        this.registry = registry;
    }

    @Override
    public Converter<ResponseBody, ?> responseBodyConverter(Type type, Annotation[] annotations,
                                                            Retrofit retrofit) {
        if (!(type instanceof Class<?>)) {
            return null;
        }
        Class<?> c = (Class<?>) type;
        if (!MessageLite.class.isAssignableFrom(c)) {
            return null;
        }

        Parser<MessageLite> parser = null;
        try {
            parser = ProtoJavas.getParser(c);
        } catch (NoSuchMethodException e) {
            e.printStackTrace();
        } catch (IllegalAccessException e) {
            e.printStackTrace();
        } catch (InvocationTargetException e) {
            e.printStackTrace();
        }
        if (parser == null)
            throw new IllegalArgumentException(
                    "Found a protobuf message but " + c.getName() + " had no PARSER field.");

        return new ProtoResponseBodyConverterCompat<>(parser, registry);
    }

    @Override
    public Converter<?, RequestBody> requestBodyConverter(Type type,
                                                          Annotation[] parameterAnnotations, Annotation[] methodAnnotations, Retrofit retrofit) {
        if (!(type instanceof Class<?>)) {
            return null;
        }
        if (!MessageLite.class.isAssignableFrom((Class<?>) type)) {
            return null;
        }
        return new ProtoRequestBodyConverterCompat<>();
    }
原理
- 初始化
Retrofit采用了Builder模式,进行了一系列的初始化操作,在build里面把我们初始化传入的参数进行整合,返回给我们一个Retrofit对象。
public Retrofit build() {
  if (baseUrl == null) {
    throw new IllegalStateException("Base URL required.");
  }

  okhttp3.Call.Factory callFactory = this.callFactory;
  if (callFactory == null) {
    callFactory = new OkHttpClient();
  }

  Executor callbackExecutor = this.callbackExecutor;
  if (callbackExecutor == null) {
    callbackExecutor = platform.defaultCallbackExecutor();
  }

  // Make a defensive copy of the adapters and add the default Call adapter.
  List<CallAdapter.Factory> callAdapterFactories = new ArrayList<>(this.callAdapterFactories);
  callAdapterFactories.addAll(platform.defaultCallAdapterFactories(callbackExecutor));

  // Make a defensive copy of the converters.
  List<Converter.Factory> converterFactories = new ArrayList<>(
      1 + this.converterFactories.size() + platform.defaultConverterFactoriesSize());

  // Add the built-in converter factory first. This prevents overriding its behavior but also
  // ensures correct behavior when using converters that consume all types.
  converterFactories.add(new BuiltInConverters());
  converterFactories.addAll(this.converterFactories);
  converterFactories.addAll(platform.defaultConverterFactories());

  return new Retrofit(callFactory, baseUrl, unmodifiableList(converterFactories),
      unmodifiableList(callAdapterFactories), callbackExecutor, validateEagerly);
}
这里面我们主要看下面这个几个参数。
- callFactory对okhttp的自定义,比如拦截器公共参数的设置等
- callbackExecutor 可不设置,会根据平台来创建默认的
- converterFactories存储对转换的支持,在我们请求服务器数据是返回的时候自动解析成我们需要的bean类型
- callAdapterFactories 添加适配器支持,可设置Rxjava的支持
- 接口类
前面已经说了如何使用retrofit,首先创建了一个server接口,使用的时候肯定不是接口实现的,但它是如何使用的呢?其实retrofit使用了动态代理来实现的。下面看看它的源码
public <T> T create(final Class<T> service) {
  Utils.validateServiceInterface(service);
  if (validateEagerly) {
    eagerlyValidateMethods(service);
  }
  return (T) Proxy.newProxyInstance(service.getClassLoader(), new Class<?>[] { service },
      new InvocationHandler() {
        private final Platform platform = Platform.get();
        private final Object[] emptyArgs = new Object[0];

        @Override public Object invoke(Object proxy, Method method, @Nullable Object[] args)
            throws Throwable {
          // If the method is a method from Object then defer to normal invocation.
          if (method.getDeclaringClass() == Object.class) {
            return method.invoke(this, args);
          }
          if (platform.isDefaultMethod(method)) {
            return platform.invokeDefaultMethod(method, service, proxy, args);
          }
          return loadServiceMethod(method).invoke(args != null ? args : emptyArgs);
        }
      });
}

ServiceMethod<?> loadServiceMethod(Method method) {
  ServiceMethod<?> result = serviceMethodCache.get(method);
  if (result != null) return result;

  synchronized (serviceMethodCache) {
    result = serviceMethodCache.get(method);
    if (result == null) {
      result = ServiceMethod.parseAnnotations(this, method);
      serviceMethodCache.put(method, result);
    }
  }
  return result;
}
ServiceMethod中保存方法缓存,如果没有就新创建然后添加到缓存里,并且这里返回的是一个动态代理InvocationHandler。
- 请求处理
Retrofit 通过invoke为我们构造了一个 OkHttpCall ,实际上每一个 OkHttpCall 都对应于一个请求,它主要完成最基础的网络请求,而我们在接口的返回中看到的 Call 默认情况下就是 OkHttpCall 了,如果我们添加了自定义的 callAdapter,那么它就会将 OkHttp 适配成我们需要的返回值,并返回给我们。
@Override ReturnT invoke(Object[] args) {
  return callAdapter.adapt(
      new OkHttpCall<>(requestFactory, args, callFactory, responseConverter));
}
最后通过OkHttpCall.execute发起网络请求
@Override public void enqueue(final Callback<T> callback) {
  checkNotNull(callback, "callback == null");

  okhttp3.Call call;
  Throwable failure;

  synchronized (this) {
    if (executed) throw new IllegalStateException("Already executed.");
    executed = true;

    call = rawCall;
    failure = creationFailure;
    if (call == null && failure == null) {
      try {
        call = rawCall = createRawCall();
      } catch (Throwable t) {
        throwIfFatal(t);
        failure = creationFailure = t;
      }
    }
  }

  if (failure != null) {
    callback.onFailure(this, failure);
    return;
  }

  if (canceled) {
    call.cancel();
  }

  call.enqueue(new okhttp3.Callback() {
    @Override public void onResponse(okhttp3.Call call, okhttp3.Response rawResponse) {
      Response<T> response;
      try {
        response = parseResponse(rawResponse);
      } catch (Throwable e) {
        throwIfFatal(e);
        callFailure(e);
        return;
      }

      try {
        callback.onResponse(OkHttpCall.this, response);
      } catch (Throwable t) {
        t.printStackTrace();
      }
    }

    @Override public void onFailure(okhttp3.Call call, IOException e) {
      callFailure(e);
    }

    private void callFailure(Throwable e) {
      try {
        callback.onFailure(OkHttpCall.this, e);
      } catch (Throwable t) {
        t.printStackTrace();
      }
    }
  });
}
看到 OkHttpCall 其实也是封装了 okhttp3.Call,在这个方法中,我们通过 okhttp3.Call 发起了请求。而parseResponse 主要完成了由 okhttp3.Response 向 retrofit.Response 的转换,同时也处理了对原始返回的解析。
总结
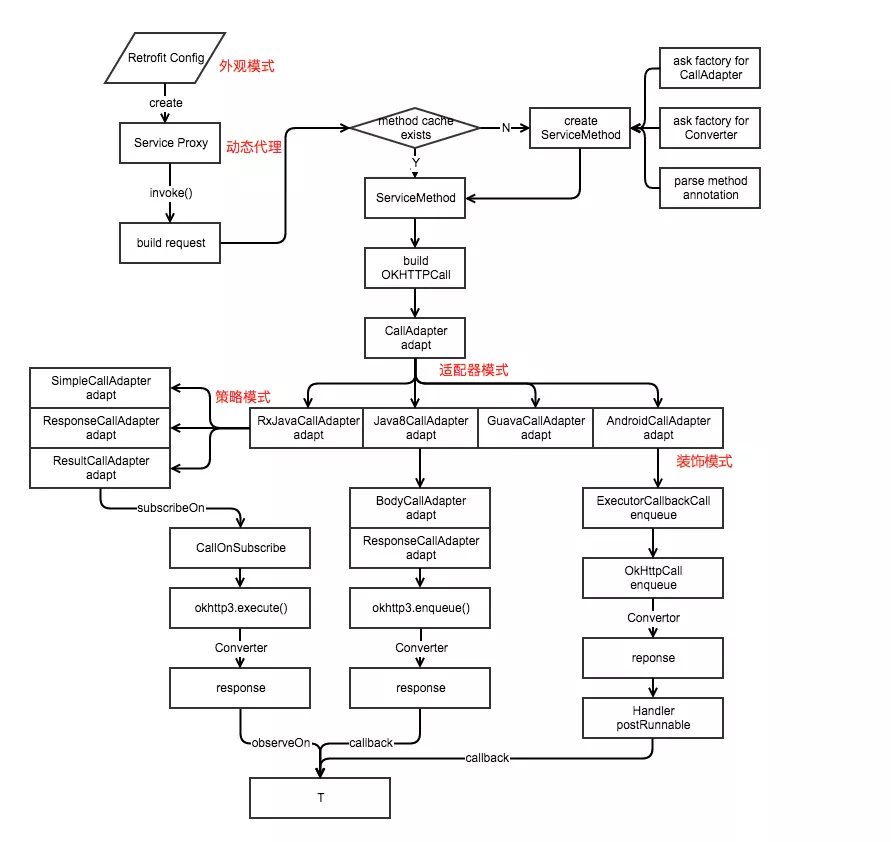
- Retrofit通过动态代理,用MethodHandler完成接口方法。
- Retrofit的MethodHandler通过RequestFactoryParser.parse解析,获得接口方法的参数和注解的值,传入到OkHttpCall,OkHttpCall生成okhttp3.Call完成Http请求并使用Converter解析数据回调。
- Retrofit通过工厂设置CallAdapter和Converter,CallAdapter包装转换Call,Converter转换(解析)服务器返回的数据、接口方法的注解参数。