本文转自:http://www.codeproject.com/Articles/604197/SSIS-By-coding
Introduction
SSIS better known as “SQL Server Integration Services (SSIS)”, is a component of SQL Server. According to Wikipedia:-
“SSIS is a platform for data integration and workflow applications. It features a fast and flexible data warehousing tool used for data extraction, transformation, and loading (ETL). The tool may also be used to automate maintenance of SQL Server databases and updates to multidimensional cube data.”
In this write-up, I will demonstrate data transfer between two tables on same server using C#, creating package entirely through coding in step by step process. Though it very easy to create SSIS package through GUI (you just need to set few properties and your package is ready to execute), here I am demonstrating coding way to create SSIS package.
You Going to Learn (Index)
- Create two table in Database (Source and Destination)
- Setup Initial task for SSIS project
- Create SSIS Package
- Create Source And Destination Connection Manager object
- Create DATA Flow Task (Pipeline) – Heart of package
- Create Source Data source and assign Source Connection Manager
- Create Destination Data source and assign Destination Connection Manager
- Create Path between Source Output and Destination
- Input Map source output column to destination input column
- Save package and execute Actual Code
Step by Step
1. Create two table in Database (Source and Destination)
Create two dummy table by name SourceTable and DestinationTable1, with same fields like this:-
CREATE TABLE [dbo].[SourceTable](
    [ID] [int] NOT NULL,
    [Name] [varchar](20) NULL,
    [Age] [int] NULL
) ON [PRIMARY]
GO
SET ANSI_PADDING OFF
GO
CREATE TABLE [dbo].[DestinationTable1](
    [ID] [int] NOT NULL,
    [Name] [varchar](20) NULL,
    [Age] [int] NULL
) ON [PRIMARY]
Also I have filled some dummy data into the source table
| ID | Name | Age |
| 1 | Alok | 30 |
| 2 | Ashish | 30 |
| 3 | Jasdeep | 30 |
| 4 | Ritesh | 35 |
2. Setup Initial task for SSIS project
- Create
C# window form based project. Nothing fancy - Add button on the form and include
OnClickevent handler, we will do all the programming in the event handler - Now include supporting SSIS DotNet Assemblies into the project, for that right click on the References in Solution Explorer Browse to %Program Files%Microsoft SQL Server100SDKAssemblies Include following files
- Microsoft.SQLServer.DTSPipelineWrap
- Microsoft.SqlServer.DTSRuntimeWrap
- Microsoft.SqlServer.ManagedDTS
- Close add assemblies dialog and save the solution.
3. Create SSIS Package
Following code will create will create the package object
Package objPackage = new Package();
            objPackage.Name = "SSISExample";
            objPackage.PackageType = DTSPackageType.DTSDesigner100;
            objPackage.VersionBuild = 1;
Above, we have created SSIS Package object and given its name “SSISExample” and defined package type as DTSPackageType.DTSDesigner100, there are lot of other option too,Have a look here (here we meant to say we are creating Designer oriented package)
4. Create Source And Destination Connection Manager object
Before we move forward, its good to have over connection manager up and running, here I am creating two Oledb connections to same database, this connection will be used byOleDB Source and OleDB Destination.
var connectingString =
@"Data Source=localhost;Integrated Security=SSPI;Initial Catalog=TestDB;Provider=SQLNCLI10.1;Persist Security Info=True;";

ConnectionManager oleDBConnSrc = objPackage.Connections.Add("OLEDB");
oleDBConnSrc.ConnectionString = connectingString;
oleDBConnSrc.Name = "SourceConnection";

ConnectionManager oleDBDestination = objPackage.Connections.Add("OLEDB");
oleDBDestination.ConnectionString = connectingString;
oleDBDestination.Name = "DestinationConnection";
Here I have provided connectingString contain the connection string of SQL Database I am connecting to. One thing you should take care, the user from which you are loggingTo Database should have write access right on it. oleDBConnSrc and oleDBDestination are two ConnectionManager object.
5. Create DATA Flow Task (Pipeline) – Heart of package
Now we come to most important part of the package, the actual battleground where all the import/export is done. Though it backend name is Pipeline, how on designer screen it known by name “Data Flow Task”, all the coding of our source and destination will done inside this Data Flow Task, and it’s pretty simple to create.
//Create DataFlowTask in the package
TaskHost dataFlowTaskHost = (TaskHost)objPackage.Executables.Add("SSIS.Pipeline.2");
dataFlowTaskHost.Name = @"SSISPipeline";
dataFlowTaskHost.FailPackageOnFailure = true;
dataFlowTaskHost.FailParentOnFailure = true;
dataFlowTaskHost.DelayValidation = false;
dataFlowTaskHost.Description = @"Data Flow Task";

 //-----------Data Flow Inner component starts----------------
 MainPipe dataFlowTask = dataFlowTaskHost.InnerObject as MainPipe;
From our package object we will add Pipeline object using objPackage.Executables.Add() method and passing "SSIS.Pipeline.2" as object name to create,' and provide default properties to task object. Now we get MainPipe of created dataFlowTaskHost, and rest of the component is attached to this MainPipe (dataFlowTask).
6. Create Source Data source and assign Source Connection Manager
Our pipeline has been successfully created in step 5, now using its mainpipe we will add the source oledb connection
// Create and configure an OLE DB source component.
IDTSComponentMetaData100 sourceOleDB = dataFlowTask.ComponentMetaDataCollection.New();
sourceOleDB.ComponentClassID = "DTSAdapter.OLEDBSource.2";
CManagedComponentWrapper srcDesignTime = sourceOleDB.Instantiate();

// The ProvideComponentProperties method creates a default output.
srcDesignTime.ProvideComponentProperties();
sourceOleDB.Name = "TestDB DATA Source";
Here, we create object in the dataFlowTask object, and assign ComponentClassID = "DTSAdapter.OLEDBSource.2", to tell package that we are adding OLEDBSource adapter.After that we instantiate it design time component, and get’s it properties which we will assign subsequently
// Assign the connection manager.
sourceOleDB.RuntimeConnectionCollection[0].ConnectionManagerID = oleDBConnSrc.ID;
 sourceOleDB.RuntimeConnectionCollection[0].ConnectionManager =
 DtsConvert.GetExtendedInterface(oleDBConnSrc);
Now assign Source DB adapter with source connection manager, above code do that bit, now we will set property for table to open in read mode
 // Set the custom properties of the source.
 srcDesignTime.SetComponentProperty("AccessMode", 0); // Mode 0 : OpenRowset / Table - View
 srcDesignTime.SetComponentProperty("OpenRowset", "[dbo].[SourceTable]");

 // Connect to the data source, and then update the metadata for the source.
 srcDesignTime.AcquireConnections(null);
 srcDesignTime.ReinitializeMetaData();
 srcDesignTime.ReleaseConnections();
Here AccessMode=0 denote we are opening database in view mode and OpenRowSet property denote the table we want to open
7. Create Destination Data source and assign Destination Connection Manager
Code is similar to that’s of Source Adapter, except we will pass ComponentClassID as "DTSAdapter.OleDbDestination", AccessMode = 3 and OpenRowSet Propertly contain the Destination Table
IDTSComponentMetaData100 destinationOleDb =
dataFlowTask.ComponentMetaDataCollection.New();
destinationOleDb.ComponentClassID = "DTSAdapter.OleDbDestination";

CManagedComponentWrapper destDesignTime = destinationOleDb.Instantiate();
destDesignTime.ProvideComponentProperties();

// Assign the connection manager.
destinationOleDb.RuntimeConnectionCollection[0].ConnectionManagerID = oleDBDestination.ID;
destinationOleDb.RuntimeConnectionCollection[0].ConnectionManager =
DtsConvert.GetExtendedInterface(oleDBDestination);
// Set the custom properties of the source.

destDesignTime.SetComponentProperty("AccessMode", 3);
destDesignTime.SetComponentProperty("OpenRowset",
"[dbo].[DestinationTable1]");
// Connect to the data source, and then update the metadata for the source.
destDesignTime.AcquireConnections(null);
destDesignTime.ReinitializeMetaData();
destDesignTime.ReleaseConnections();
8. Create Path between Source Output and Destination Input
Now our source and destination adapter are ready. Also Source output column is ready, now we connection source output column with destination input column, so that destination become aware what comings its way. For that we will add path between them
    // Create the path from source to destination
IDTSPath100 pathDestination = dataFlowTask.PathCollection.New();
pathDestination.AttachPathAndPropagateNotifications(sourceOleDB.OutputCollection[0],
destinationOleDb.InputCollection[0]);
Here AttachPathAndPropagateNotifications method of initialize destination input from sourceoledb output, since we have only one output from the source db, we safely assume its array position at 0, similarly for destination
9. Map source output column to destination input column
// Get the destination's default input and virtual input.
IDTSInput100 destinationinput = destinationOleDb.InputCollection[0];
IDTSVirtualInput100 vdestinationinput = destinationinput.GetVirtualInput();

// Iterate through the virtual input column collection.
foreach (IDTSVirtualInputColumn100 vColumn in
vdestinationinput.VirtualInputColumnCollection)
{
  IDTSInputColumn100 vCol = destDesignTime.SetUsageType(destinationinput.ID, vdestinationinput, vColumn.LineageID, DTSUsageType.UT_READWRITE);

 // check if the column exist in the destination table
  string cinputColumnName = vColumn.Name;
  var columnExist = (from item in destinationinput.ExternalMetadataColumnCollection.Cast<IDTSExternalMetadataColumn100>()
                     where item.Name == cinputColumnName
                     select item).Count();
 // if yes map it
 if (columnExist > 0)
 destDesignTime.MapInputColumn(destinationinput.ID, vCol.ID,
                               destinationinput.ExternalMetadataColumnCollection[vColumn.Name].ID);
 }
Here we get destination input column, mark them available in design view, then search for matching column name is destination table, if we found match, we map the column using MapInputColumn method
10. Save package and Execute Package
SSIS file is actually XML file, if you rename the dtsx file to xml, you can view all the property set by us, we will save it, and view it in the Business Intelligence studio
Microsoft.SqlServer.Dts.Runtime.Application app = new Microsoft.SqlServer.Dts.Runtime.Application();
app.SaveToXml(string.Format(@"c:workSamplePackageSamplePackage{0}.dtsx",
                             DateTime.Now.ToString("hhmmss")),
                             objPackage, null);
objPackage.Execute();
objPackage.Dispose();
app = null;
ScreenShot
If we open the above created package file in Business Intelligence studio, it would look like this :-
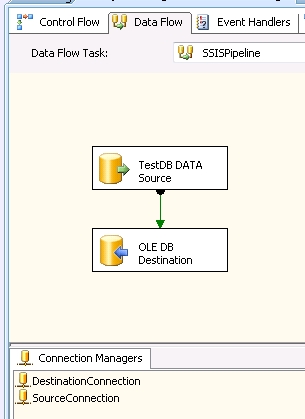
You could clearly see the two Connection manager, which we have added. Also source and Destination connection we have created., now if you run this, its show something like this :-

It say 4 rows has been transferred from source database to destination database, here have look at the destination table
