需要借助"Windows Service Wrapper"小工具,项目地址: https://github.com/kohsuke/winsw
下载地址: http://repo.jenkins-ci.org/releases/com/sun/winsw/winsw/2.1.2/winsw-2.1.2-bin.exe
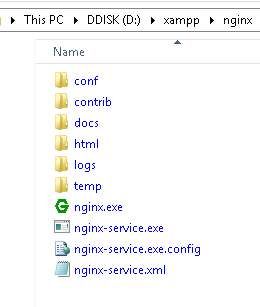
下载winsw-2.1.2-bin.exe该工具后,将其放在 Nginx安装目录下,并重命名为nginx-service.exe,创建配置文件nginx-service.xml(名字要和工具名一样),
创建nginx-service.exe.config(为支持NET 4.0 runtime,默认只支持NET 2.0 runtime)
文件结构如下:
nginx-service.xml 内容如下:
<service>
  <id>nginx</id>
  <name>Nginx Service</name>
  <description>High Performance Nginx Service</description>
  <logpath>D:
ginx-1.9.3logs</logpath>
  <log mode="roll-by-size">
    <sizeThreshold>10240</sizeThreshold>
    <keepFiles>8</keepFiles>
  </log>
  <executable>D:
ginx-1.9.3
ginx.exe</executable>
  <startarguments>-p D:
ginx-1.9.3
ginx</startarguments>
  <stopexecutable>D:
ginx-1.9.3
ginx.exe</stopexecutable>
  <stoparguments>-p D:
ginx-1.9.3
ginx -s stop</stoparguments>
</service>
nginx-service.exe.config 内容如下:
<configuration>
   <startup>
     <supportedRuntime version="v2.0.50727" />
     <supportedRuntime version="v4.0" />
  </startup>
  <runtime>
     <generatePublisherEvidence enabled="false"/>
  </runtime>
</configuration>
在cmd中运行如下命令安装windows服务
nginx-service.exe install  #安装Windows服务
nginx-service.exe uninstall  #卸载Windows服务

nginx-service.exe start  #启动Windows服务
nginx-service.exe stop  #停止Windows服务