一、AOP简介
AOP面向切面编程,是将一种横向抽取机制,将多个类中需要使用的方法提取出来。
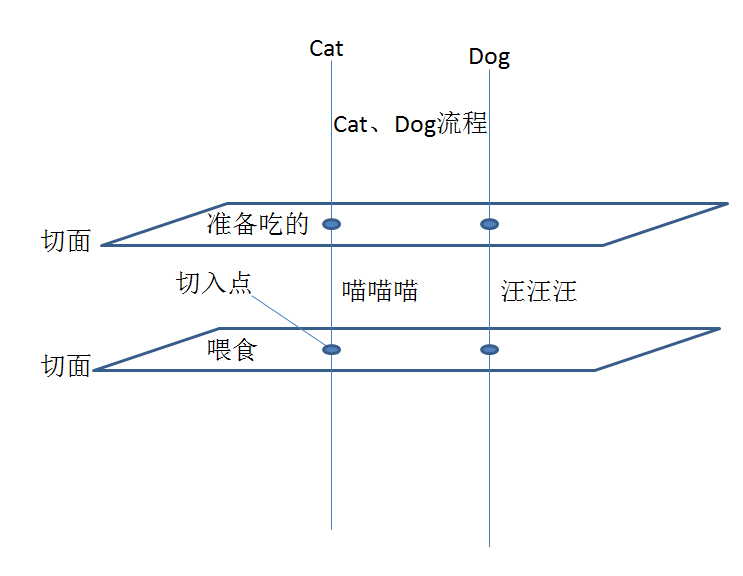
例如,这里有两个类,一个Cat,一个Dog,动物都需要吃饭睡觉,如果按照传统的思想。
给两类中都添加吃饭和睡觉的方法,如果有成百上千个类呢?是不是很麻烦而且容易出错。
那么我们将这些方法(切面)提取出来,当Cat和Dog到达合适的时候(切入点)
就将提取出来的方法插入到执行流程中。
有没有感觉这个有点像代理模式,我们先用静态代理来实现这个想法。
假设动物的一天是起床->饲养员准备吃的->动物叫(要吃饭了)->饲养员喂食物。
按照传统的思路是每个动物都写上所有方法,这样很臃肿,我们采用AOP的思想。
首先所有动物都要吃东西,所以饲养员准备吃的这个方法和喂食这个方法可以提取出来。
Animal接口
public interface Animal {
    public void eat();

}
Cat.java
public class Cat implements Animal{

    @Override
    public void eat() {
        // TODO Auto-generated method stub
        System.out.println("喵喵喵");
    }
}
Dog.java
public class Dog implements Animal{

    @Override
    public void eat() {
        // TODO Auto-generated method stub
        System.out.println("汪汪汪");
    }
}
Proxy.java(代理类)
public class Proxy implements Animal{
    private Animal ani;

    public Proxy(Animal ani) {
        this.ani = ani;
    }

    @Override
    public void eat() {
        // TODO Auto-generated method stub
        System.out.println("准备饲料");//切面
        ani.eat();                //执行流程
        System.out.println("喂食");//切面
    }
}
测试:
public class Main {
    public static void main(String[] args) {
        Proxy proxy = new Proxy(new Cat());
        proxy.eat();
    }
}
运行结果:
准备饲料
喵喵喵
喂食
可以看到,面向切面将重复的部分提取出去了,到了合适的时机(例如猫在喵喵后才喂食)在将方法切入进流程中。
传统的思想就相当于一个动物配一个饲养员,面向切面就相当于所有动物共用一个饲养员。
二、动态代理
静态代理可以实现这种思想,但是一旦需求多了,后期需要添加很多代码,对规模较大的情况不适用。
这时就需要使用动态代理。想像一下每次进入某个地方需要刷卡,然后进入,同时后台还要进行记录。
我们就可以把检查和记录提出出来。
2.1基于JDK的动态代理
使用动态代理我们首先来创建接口
Person.java
public interface Person {
        public void intoLib(); //去图书馆
        public void intoTeachingBuilding(); //去教学楼
}
Person的实现类Studetn.java
public class Student implements Person{
    public void intoLib(){
        System.out.println("进入图书馆");
    }

    public void intoTeachingBuilding() {
        System.out.println("进入教学楼");
    }
}
我们在来编写切面
Check.java
public class Check {
    public void enter() {
        System.out.println("进门检查");
    }

    public void log() {
        System.out.println("记录");
    }
}
动态代理类 DP.java
import java.lang.reflect.InvocationHandler;
import java.lang.reflect.Method;
import java.lang.reflect.Proxy;

public class DP implements InvocationHandler{

    private Person per;
    public Object bind(Person per) {//将代理对象绑定
        this.per = per;
        //返回代理后的对象              获取类加载器             被代理对象所有接口              自身
        return Proxy.newProxyInstance(DP.class.getClassLoader(), per.getClass().getInterfaces(), this);
    }

    //返回的代理后的对象,每次调用方法都由invoke处理
    @Override
    public Object invoke(Object proxy, Method method, Object[] args) throws Throwable {
        // TODO Auto-generated method stub
        // 切面
        Check check = new Check();
        check.enter();//进门检查
        Object obj = method.invoke(per, args);//执行被代理对象的方法
        check.log();//记录
        return obj;
    }
}
测试:
public class Main {
    public static void main(String[] args) {
          DP dp  =  new  DP() ;
          Person stu = (Person) dp.bind(new Student());
          stu.intoLib();
          stu.intoTeachingBuilding();
    }
}
运行结果:
进门检查
进入图书馆
记录
进门检查
进入教学楼
记录
2.2基于CGLIB的动态代理
JDK固然可以实现动态代理,但还有有其局限性,比如被代理需要实现一些接口。
在对没有实现接口的类进行动态代理可以使用CGLIB。
CGLIB(Cod Generation Library)是一款高性能开源的代码包,采用字节码技术对代理对象生成一个子类并对其增强来实现。
CGLIB意见集成到Spring核心包中。(AOP包不要忘记导入)
首先创建被代理类Studetn.java
public class Student{
    public void intoLib(){
        System.out.println("进入图书馆");
    }

    public void intoTeachingBuilding() {
        System.out.println("进入教学楼");
    }
}
接着创建切面Check.java
public class Check {
    public void enter() {
        System.out.println("进门检查");
    }

    public void log() {
        System.out.println("记录");
    }
}
接着通过CGLIB创建代理对象
import java.lang.reflect.Method;

import org.springframework.cglib.proxy.Enhancer;
import org.springframework.cglib.proxy.MethodInterceptor;
import org.springframework.cglib.proxy.MethodProxy;

import com.srping.aop.dp.Check;

public class CGLIB implements MethodInterceptor{
    public Object bind(Object obj) {
        //创建增强对象
        Enhancer enhancer = new Enhancer();
        //设代理对象为父类,用于生成子类并对子类增强
        enhancer.setSuperclass(obj.getClass());
        //设置回调
        enhancer.setCallback(this);
        //返回创建的代理类
        return enhancer.create();
    }

    //类似动态代理的 invoke
    @Override
    public Object intercept(Object proxy, Method method, Object[] args, MethodProxy methodProxy) throws Throwable {
        // TODO Auto-generated method stub
        //切面
        Check check = new Check();
        check.enter();//进门检查
        Object obj = methodProxy.invokeSuper(proxy, args);//执行被代理对象的方法
        check.log();//记录
        return obj;
    }
}
最后测试
public class Main {
    public static void main(String[] args) {
          CGLIB cglib = new CGLIB();
          Student stu = (Student)cglib.bind(new Student());
          stu.intoLib();
          stu.intoTeachingBuilding();
    }
}
运行结果:
进门检查
进入图书馆
记录
进门检查
进入教学楼
记录
三、 基于Spring代理类实现AOP
Spring中有一个ProxyFactoryBena可以实现代理,
Spring根据切入分类:
org. aopalliance.intercept.MethodInterceptor (环绕通知)
org.springframework.aop.MethodBeforeAdvice (前置通知)
org.springframework.aop.AfterReturningAdvice (后置通知)
org .springframework.aop.ThrowsAdvice (异常通知)
ProxyFactoryBean属性
target:被代理的目标。
proxyTargetClass:设置是否对类进行代理。
proxyInterfaces:代理实现的接口,可以是多个(多个时采用<list><vaue>...</list>)
(如果设置的是对类进行代理,则该属性可以不设置)
interceptorNames:设置需要织入的advice。
singleton:返会的代理类是否为单例。
optimize:设置为true时,强制使用CGLIB。
我们来看一个例子
创建接口:
public interface Person {
        public void intoLib(); //去图书馆
        public void intoTeachingBuilding(); //去教学楼
}
实现接口的类Studetn.java
public class Student implements Person{
    public void intoLib(){
        System.out.println("进入图书馆");
    }

    public void intoTeachingBuilding() {
        System.out.println("进入教学楼");
    }
}
切面设置环绕通知
import org.aopalliance.intercept.MethodInterceptor;
import org.aopalliance.intercept.MethodInvocation;


//环绕通知
public class Check implements MethodInterceptor{
    public void enter() {
        System.out.println("进门检查");
    }

    public void log() {
        System.out.println("记录");
    }

    @Override
    public Object invoke(MethodInvocation me) throws Throwable {
        // TODO Auto-generated method stub
        enter();//进门检查
        Object obj = me.proceed();//执行被代理对象自身被调用方法
        log();//记录
        return obj;
    }
}
beans.xml配置
<?xml  version="1.0"  encoding="UTF-8"?>
<beans  xmlns="http://www.springframework.org/schema/beans"
        xmlns:context="http://www.springframework.org/schema/context"
        xmlns:xsi = "http://www.w3.org/2001/XMLSchema-instance"
              xsi:schemaLocation="http://www.springframework.org/schema/beans
            http://www.springframework.org/schema/beans/spring-beans-4.3.xsd
            http://www.springframework.org/schema/context
             http://www.springframework.org/schema/context/spring-context-4.3.xsd" >


    <!-- 开启注解 -->
    <!--  <context:annotation-config/>  -->
    <!-- 配置Bean的实例 -->

    <!-- 1.目标类,即被代理的类 -->
    <bean id = "student" class = "com.spring.aop.proxyFactoryBean.Student">
    </bean>
    <!-- 2.通知(切面) -->
    <bean id = "check" class = "com.spring.aop.proxyFactoryBean.Check">
    </bean>
    <!-- 3.使用ProxyFactoryBena定义一个代理类 -->
    <bean id = "proxy" class = "org.springframework.aop.framework.ProxyFactoryBean">

        <!-- 3.1指定代理方法  false为不进行类代理,代理的是接口。true反之-->
        <property name="proxyTargetClass" value = "false"></property>
        <!-- 3.2 指定代理实现的接口  如果是proxyTargetClass = true 则该属性可不设置-->
        <property name="proxyInterfaces" value="com.spring.aop.proxyFactoryBean.Person"></property>
        <!-- 3.3指定目标对象,即被代理类  -->
        <property name = "target" ref = "student"></property>
        <!-- 3.4指定通知adivce -->
        <property name="interceptorNames" value = "check"></property>

    </bean>
</beans>
测试:
import org.springframework.context.ApplicationContext;
import org.springframework.context.support.ClassPathXmlApplicationContext;

public class Main {
    public static void main(String[] args) {
         ApplicationContext ac = new ClassPathXmlApplicationContext("beans.xml");
         Person stu = (Person)ac.getBean("proxy"); //由于本例采用代理接口,所以只能强转为Person接口。
         stu.intoLib();                //如果想强转为Student,需要采用类代理,proxyTargetClass设置为true
         stu.intoTeachingBuilding();
    }
}
运行结果:
二月 11, 2019 8:43:56 下午 org.springframework.context.support.ClassPathXmlApplicationContext prepareRefresh
信息: Refreshing org.springframework.context.support.ClassPathXmlApplicationContext@25f38edc: startup date [Mon Feb 11 20:43:56 CST 2019]; root of context hierarchy
二月 11, 2019 8:43:56 下午 org.springframework.beans.factory.xml.XmlBeanDefinitionReader loadBeanDefinitions
信息: Loading XML bean definitions from class path resource [beans.xml]
进门检查
进入图书馆
记录
进门检查
进入教学楼
记录
如果采用类代理,则可以将接口全部去掉。
然后可以将xml文件中的“proxyTargetClass”改为trey、将“proxyInterfaces”去掉。
<!-- 1.目标类,即被代理的类 -->
    <bean id = "student" class = "com.spring.aop.proxyFactoryBean.Student">
    </bean>
    <!-- 2.通知(切面) -->
    <bean id = "check" class = "com.spring.aop.proxyFactoryBean.Check">
    </bean>
    <!-- 3.使用ProxyFactoryBena定义一个代理类 -->
    <bean id = "proxy" class = "org.springframework.aop.framework.ProxyFactoryBean">

        <!-- 3.1指定代理方法  ture为进行类代理,不进行接口代理。false反之-->
        <property name="proxyTargetClass" value = "true"></property>

        <!-- 3.3指定目标对象,即被代理类  -->
        <property name = "target" ref = "student"></property>
        <!-- 3.4指定通知adivce -->
        <property name="interceptorNames" value = "check"></property>

    </bean>
测试:
import org.springframework.context.ApplicationContext;
import org.springframework.context.support.ClassPathXmlApplicationContext;

public class Main {
    public static void main(String[] args) {
         ApplicationContext ac = new ClassPathXmlApplicationContext("beans.xml");
         //Person stu_ = (Person)ac.getBean("proxy"); //采用类代理是可以强转为接口,也可以强转为类。
         Student stu = (Student)ac.getBean("proxy");
         stu.intoLib();
         stu.intoTeachingBuilding();
    }
}
运行结果:
与上例相同。
四、AspectJ
AspectJ是一个基于Java语言的AOP框架。
使用AspectJ之前需要先导入两个包:
-Spring-aspects-x.x.x.RELEASE.jar
-aspectjweaver-1.8.10.jar
下载地址:https://mvnrepository.com/artifact/org.aspectj/aspectjweaver/1.8.10
4.1AspectJ基于xml实现AOP
先来看下xml中关于AOP的一些元素。
<aop:config>:用于定义切面、切入点、通知等。
<aop:aspect>:<aop:config>的子元素,用于定义一个切面。
id:该切面的唯一标识。
ref:该切面所对应的切面类。
<aop:pointcut>:<aop:config><aop:aspect>的子元素,用于定义一个切入点。
如果切入点配置在切面中,则只对当前切面有效,如果定义在<aop:config>中则对所有切面有效。
id:该切入点的唯一标识。
execution:切入点表达式。
<aop:before>:配置前置通知。
<aop:after-returning>:配置后置通知。
<aop:around>:配置环绕通知。
<aop:after-throwing>:配置异常通知。
<aop:after>:配置最终通知。
poincut:设置一个切入点标识。
pointcut-ref:指定一个切入点表达式。
method:指定当前通知执行的方法。
throwing:指定一个形参名,用于获取抛出的异常,仅对after-thorwing有效。
returning:指定一个形参名,用于获取目标方法的返回值,仅对after-returning有效。
下面来看一个例子
/**
* 创建时间:2019年2月16日 下午8:17:43
* 项目名称:Spring
* @author hcf
* @version 1.0
* @since JDK 1.8.0_201
* 文件名称:UserDao.java
* 类说明: UserDao接口
*/

public interface UserDao {
    public void add();
    public void delete();
    public int test();
}
import org.springframework.stereotype.Repository;

/**
* 创建时间:2019年2月16日 下午8:19:01
* 项目名称:SpringAOP
* @author hcf
* @version 1.0
* @since JDK 1.8.0_201
* 文件名称:UserDaoImple.java
* 说       明:UserDao接口的实现类
*/
@Repository("userDao")
public class UserDaoImple implements UserDao{

    @Override
    public void add() {
        // TODO Auto-generated method stub
        System.out.println("添加用户");
    }

    @Override
    public void delete() {
        // TODO Auto-generated method stub
        System.out.println("删除用户");
    }

    public int test() {
        //int i = 1/0;
        System.out.println("test");
        return 10;
    }
}
import org.aspectj.lang.JoinPoint;
import org.aspectj.lang.ProceedingJoinPoint;
//切面类
/**
* 创建时间:2019年2月16日 下午8:23:50
* 项目名称:Spring
* @author hcf
* @version 1.0
* @since JDK 1.8.0_201
* 文件名称:MyAspect.java
* 说       明:切面类,定义了各种通知。
*/
public class MyAspect {
    //前置通知
    public void myBefore(JoinPoint jp) {
        System.out.println("前置通知------");
        System.out.println("-目标类是:" + jp.getTarget());
        System.out.println("-目标方法是:" + jp.getSignature().getName());
    }

    //后置通知                      returnVal为xml中指定的形参名
    public void myAfter(JoinPoint jp,Object returnVal) {
        System.out.println("后置通知------");
        System.out.println("-目标方法是:" + jp.getSignature().getName());
        System.out.print("-目标方法返回值" + returnVal.toString());
    }

    //环绕通知
    public Object myAround(ProceedingJoinPoint pj) throws Throwable{
        System.out.println("环绕开始------");
        //执行对象本身调用的方法
        Object object = pj.proceed();
        System.out.println("环绕结束------");
        return object;
    }

    //异常通知                          e为xml中指定的形参名
    public void myThrowing(JoinPoint jp, Throwable e) {
        System.out.print("异常通知:" + e.getMessage());
    }

    //最终通知
    public void myFinally() {
        System.out.println("最终通知");
    }
}
beans.xml
<?xml  version="1.0"  encoding="UTF-8"?>
<beans  xmlns="http://www.springframework.org/schema/beans"
        xmlns:context="http://www.springframework.org/schema/context"
        xmlns:aop="http://www.springframework.org/schema/aop"
        xmlns:xsi = "http://www.w3.org/2001/XMLSchema-instance"
              xsi:schemaLocation="http://www.springframework.org/schema/beans
            http://www.springframework.org/schema/beans/spring-beans-4.3.xsd
            http://www.springframework.org/schema/aop
             http://www.springframework.org/schema/aop/spring-aop-4.3.xsd" >
    <!-- 1.目标类 -->
    <bean id = "userDao" class = "com.spring.AspectJ.xml.UserDaoImple"> </bean>
    <!-- 2.切面类 -->
    <bean id = "myAspect" class = "com.spring.AspectJ.xml.MyAspect"></bean>
    <aop:config>
        <!-- 配置切面 -->
        <aop:aspect ref = "myAspect">
            <!-- 配置切入点 并为其指定一个名词 -->
            <aop:pointcut expression = "execution(* com.spring.AspectJ.xml.*.*(..))" id = "myPointCut"/>

            <!-- 设置通知和通知的切入点 -->
            <!-- 前置通知 指定前置通知执行的方法,并设置切入点 -->
            <aop:before method = "myBefore" pointcut-ref = "myPointCut"/>
            <!-- 后置通知 指定后置通知执行的方法,并设置切入点 returning指定后置通知方法的形参名,用于获取目标方法的返回值 -->
            <aop:after-returning method = "myAfter" pointcut-ref = "myPointCut" returning = "returnVal"/>
            <!-- 环绕通知 指定环绕通知执行的方法,并设置切入点-->
            <aop:around method="myAround" pointcut-ref = "myPointCut"/>
            <!-- 异常通知,如果程序没有发生异常则不会被执行  throwing指定异常通知方法的形参名 -->
            <aop:after-throwing method = "myThrowing" pointcut-ref = "myPointCut" throwing = "e" />
            <!-- 最终通知 ,无论如何都会执行-->
            <aop:after method = "myFinally" pointcut-ref = "myPointCut"/>
        </aop:aspect>
    </aop:config>
</beans>
测试:
import org.springframework.context.ApplicationContext;
import org.springframework.context.support.ClassPathXmlApplicationContext;

/**
* 创建时间:2019年2月16日 下午8:50:39
* 项目名称:Spring
* @author hcf
* @version 1.0
* @since JDK 1.8.0_201
* 文件名称:Main.java
* 说       明:  测试AspectJ基于XML实现AOP
*/
public class Main {
    public static void main(String[] args) {
        String beansXmlPathString = "com/spring/AspectJ/xml/beans.xml";
        ApplicationContext ac = new ClassPathXmlApplicationContext(beansXmlPathString);
        UserDao userao = (UserDao)ac.getBean("userDao");
        userao.test();
    }
}
运行结果:
二月 18, 2019 10:36:14 上午 org.springframework.context.support.ClassPathXmlApplicationContext prepareRefresh
信息: Refreshing org.springframework.context.support.ClassPathXmlApplicationContext@300ffa5d: startup date [Mon Feb 18 10:36:14 CST 2019]; root of context hierarchy
二月 18, 2019 10:36:14 上午 org.springframework.beans.factory.xml.XmlBeanDefinitionReader loadBeanDefinitions
信息: Loading XML bean definitions from class path resource [com/spring/AspectJ/xml/beans.xml]
前置通知------
-目标类是:com.spring.AspectJ.xml.UserDaoImple@341b80b2
-目标方法是:test
环绕开始------
test
最终通知
环绕结束------
后置通知------
-目标方法是:test
-目标方法返回值10
我们将 UserDaoImple中test方法中的//int i = 1/0;的注释去掉,然后再运行看下结果:
二月 18, 2019 10:41:25 上午 org.springframework.context.support.ClassPathXmlApplicationContext prepareRefresh
信息: Refreshing org.springframework.context.support.ClassPathXmlApplicationContext@300ffa5d: startup date [Mon Feb 18 10:41:25 CST 2019]; root of context hierarchy
二月 18, 2019 10:41:25 上午 org.springframework.beans.factory.xml.XmlBeanDefinitionReader loadBeanDefinitions
信息: Loading XML bean definitions from class path resource [com/spring/AspectJ/xml/beans.xml]
前置通知------
-目标类是:com.spring.AspectJ.xml.UserDaoImple@341b80b2
-目标方法是:test
环绕开始------
最终通知
异常通知:/ by zeroException in thread "main" java.lang.ArithmeticException: / by zero
    at com.spring.AspectJ.xml.UserDaoImple.test(UserDaoImple.java:30)
由上面两个运行结果可以看出,环绕的是目标方法,前置通知最先执行,后置通知最后执行。
最终通知无论如何都会执行。
4.2AspectJ基于annotation实现AOP
基于注解实现AOP会比较方便,首先我们来了解几个注解。
@Aspect:定义一个切面类。
@Pointcut:定义一个切入点,value指定切入点表达式,还需定义一个空方法为该切入点的名称。
@Before:定义前置通知,value属性用于指定切入点。
@AfterRunning:定义后置通知,value属性指定切入点,returninig属性指定形参名,用于访问方法返回值。
@Around:定义环绕通知。value属性指定切入点。
@AfterThrowing:定义异常通知,valuet同上,Throwing指定一个形参名,用于访问抛出的异常。
@After:定义最终通知,value同上。
下面还是看一个例子理解注解实现AOP
/**
* 创建时间:2019年2月16日 下午8:17:43
* 项目名称:Spring
* @author hcf
* @version 1.0
* @since JDK 1.8.0_201
* 文件名称:UserDao.java
* 类说明: UserDao接口,注解实现
*/

public interface UserDao {
    public void add();
    public void delete();
    public int test();
}
import org.springframework.stereotype.Repository;

/**
* 创建时间:2019年2月16日 下午8:19:01
* 项目名称:SpringAOP
* @author hcf
* @version 1.0
* @since JDK 1.8.0_201
* 文件名称:UserDaoImple.java
* 说       明:UserDao接口的实现类,注解实现AOP
*/
@Repository("userDao")//基于注解实例化Bena
public class UserDaoImple implements UserDao{

    @Override
    public void add() {
        // TODO Auto-generated method stub
        System.out.println("添加用户");
    }

    @Override
    public void delete() {
        // TODO Auto-generated method stub
        System.out.println("删除用户");
    }

    public int test() {
        //int i = 1/0;
        System.out.println("test");
        return 10;
    }
}
import org.aspectj.lang.JoinPoint;
import org.aspectj.lang.ProceedingJoinPoint;
import org.aspectj.lang.annotation.After;
import org.aspectj.lang.annotation.AfterReturning;
import org.aspectj.lang.annotation.AfterThrowing;
import org.aspectj.lang.annotation.Around;
import org.aspectj.lang.annotation.Aspect;
import org.aspectj.lang.annotation.Before;
import org.aspectj.lang.annotation.Pointcut;
import org.springframework.stereotype.Component;
//切面类

/**
* 创建时间:2019年2月17日 下午8:24:15
* 项目名称:Spring
* @author hcf
* @version 1.0
* @since JDK 1.8.0_201
* 文件名称:MyAspect.java
* 说       明: AspectJ注解实现AOP。
*/

//基于注解定义切面,同时定义当前类
@Aspect
@Component
public class MyAspect {
    //定义一个切入点表达式,并设置一个空方法为其命名。
    @Pointcut("execution(* com.spring.AspectJ.annotation.*.*(..))")
    private void myPointCut() {};//定义一个void空方法为切入点命名,类似 id = "myPointCut"

    //前置通知,指定切入点
    @Before("myPointCut()")
    public void myBefore(JoinPoint jp) {
        System.out.println("前置通知------");
        System.out.println("-目标类是:" + jp.getTarget());
        System.out.println("-目标方法是:" + jp.getSignature().getName());
    }

    //后置通知                               returnVal为指定的形参名
    @AfterReturning(value = "myPointCut()" , returning = "returnVal")
    public void myAfter(JoinPoint jp,Object returnVal) {
        System.out.println("后置通知------");
        System.out.println("-目标方法是:" + jp.getSignature().getName());
        System.out.print("-目标方法返回值" + returnVal.toString());
    }

    //环绕通知
    @Around("myPointCut()")
    public Object myAround(ProceedingJoinPoint pj) throws Throwable{
        System.out.println("环绕开始------");
        //执行对象本身方法
        Object object = pj.proceed();
        System.out.println("环绕结束------");
        return object;
    }

    //异常通知                                e为指定的形参名
    @AfterThrowing(value = "myPointCut()", throwing = "e")
    public void myThrowing(JoinPoint jp, Throwable e) {
        System.out.print("异常通知:" + e.getMessage());
    }

    //最终通知
    @After("myPointCut()")
    public void myFinally() {
        System.out.println("最终通知");
    }
}
beans.xml
<?xml  version="1.0"  encoding="UTF-8"?>
<beans xmlns="http://www.springframework.org/schema/beans"
    xmlns:xsi="http://www.w3.org/2001/XMLSchema-instance"
    xmlns:aop="http://www.springframework.org/schema/aop"
    xmlns:context="http://www.springframework.org/schema/context"
    xsi:schemaLocation="http://www.springframework.org/schema/beans http://www.springframework.org/schema/beans/spring-beans.xsd
        http://www.springframework.org/schema/aop http://www.springframework.org/schema/aop/spring-aop-4.3.xsd
        http://www.springframework.org/schema/context http://www.springframework.org/schema/context/spring-context-4.3.xsd">

    <!-- 扫描指定包下@Component @Controller@Service等这些注解,将其对应类注册 -->
     <context:component-scan base-package="com.spring.AspectJ.annotation"></context:component-scan>
    <!-- 开启注解 -->
    <aop:aspectj-autoproxy/>
</beans>
如果UserDaoImple和MyAspect不使用注解注册,则 context:component-scan可以去掉。
但需要手动为其配置bean:
<bean id = "userDao" class = "com.spring.AspectJ.annotation.UserDaoImple"/>
<bean id = "myAspect" class = "com.spring.AspectJ.annotation.MyAspect"/>
切面类首先是一个类,其次它是一个切面类,只要是类通过Spring实例化就要为其注册。
测试:
import org.springframework.context.ApplicationContext;
import org.springframework.context.support.ClassPathXmlApplicationContext;
import org.springframework.context.support.FileSystemXmlApplicationContext;

/**
* 创建时间:2019年2月16日 下午8:50:39
* 项目名称:Spring
* @author hcf
* @version 1.0
* @since JDK 1.8.0_201
* 文件名称:Main.java
* 说       明:  测试AspectJ基于Annotation实现AOP
*/
public class Main {
    public static void main(String[] args) {
        String beansXmlPathString = "com/spring/AspectJ/annotation/beans.xml";
        ApplicationContext ac = new ClassPathXmlApplicationContext(beansXmlPathString);
        com.spring.AspectJ.annotation.UserDao userDao = (com.spring.AspectJ.annotation.UserDao)ac.getBean("userDao");
        userDao.test();
    }
}
运行结果:
二月 18, 2019 11:16:48 上午 org.springframework.context.support.ClassPathXmlApplicationContext prepareRefresh
信息: Refreshing org.springframework.context.support.ClassPathXmlApplicationContext@300ffa5d: startup date [Mon Feb 18 11:16:48 CST 2019]; root of context hierarchy
二月 18, 2019 11:16:48 上午 org.springframework.beans.factory.xml.XmlBeanDefinitionReader loadBeanDefinitions
信息: Loading XML bean definitions from class path resource [com/spring/AspectJ/annotation/beans.xml]
环绕开始------
前置通知------
-目标类是:com.spring.AspectJ.annotation.UserDaoImple@17c1bced
-目标方法是:test
test
环绕结束------
最终通知
后置通知------
-目标方法是:test
-目标方法返回值10