摘要:这篇文章刊登在MSDN杂志网站2011年11月版,是作者Rajesh Lal讲解利用Silverlight 5建立3D模型。是一篇比较基础的入门级文章,适合刚刚学习Silverlight 3D,同时对于XNA没有太多的了解的同学。【注:本文不是完整的翻译,是借助作者的部分内容加上自己的理解,对原文感兴趣的请看下面的地址】
英文原文地址:http://msdn.microsoft.com/en-us/magazine/hh547098.aspx
源码下载:下载地址1(官方下载,需要将Cube3d.Web设为启动项目,SL5下有问题) 下载地址2(无问题,silverlight 5 RTM推荐下载)
文章总共用了三种方法介绍如何建立3D模型,但前两种是基于旧版本的Silverlight,本文着重于讲解基于Silverlight 5的3D建模,所以前两种方法不翻译,有兴趣的同学可以参考原文。
正文:
Silverlight支持右手坐标系,意味着正Z轴是由屏幕指向观察者(如图1)所示。
.png "A Reference Cube, Showing Sides with Perspective")
图1
从图中我们可以看到,水平向右的是正X轴,垂直向上的是正Y轴,垂直屏幕指向观察者的是正Z轴。(补充:关于右手坐标系的判别,伸出右手,四指指向X轴正方向,然后四指向Y轴正方向屈起,大拇指所指的方向即为Z轴的正方向。)
在三维场景中,要将一个物体在屏幕上展示有三个主要的元素:
1.透视
2.变换
3.光的效果
透视是指物体接近我们的部分要比远离我们的部分看起来显得更大。例如在图1中,bd边看起来就比fh边要大。在实际中,透视会产生一个消失点,这意味着如果你把边ae,bf,cg,dh在Z轴扩展,它们就会在很远处聚集于一点。
第二个方面是变换。一个三维物体应该允许沿着三维空间任意方向移动。它们在符合透视规律的情况下可以沿着任意一个单一的轴运动—放大或者缩小。它们可以沿着任意的轴旋转:x,y和z轴。这些为三维物体在屏幕的渲染提供了灵活性。
三维物体最后一个元素是光的效果。三维中的光产生明暗效果(shading),越靠近光源的部分会越亮,并随着距离衰减。在三维渲染中,两种比较有名的方法是单一着色(flat shading)和渐变着色(gradient shading)。我稍后将解释他们有什么不同。光还会产生阴影。
接下来我们讲解一下如何利用Silverlight 5建立三维模型。这种方法是利用XNA类库建立Silverlight 3D程序的。
理解世界矩阵(World Matrix),观察矩阵(View Matrix)和投影矩阵(Projection Matrix)
为了展示一个三维模型,你首先应该理解一个三维物体是怎么从它所处的三维空间转变成我们的屏幕这种二维空间,展示给我们的,这主要有三个方面:
1.世界矩阵
2.观察矩阵
3.投影矩阵
图2向我们展示了这一过程:
.png "The Order in Which a 3D Object Is Mapped to the Screen")
图2
首先三维物体在三维空间(也叫做模型空间)坐标系中有x,y,z三个坐标轴。这三个坐标轴相交于坐标原点(0,0,0)。
对于一个三维立方体来说,前排的右上角的坐标是(1,1,1)(因为是右手坐标系,正Z轴是面向观察者的),后排的左下角的坐标是(-1,-1,-1),如图3所示。模型空间的坐标只能从-1到+1变换。比如我的立方体占用了模型空间75%的大小,我需要将每一个坐标乘以0.75,则现在前排的右上角坐标是(0.75,0.75,0.75),后排的左下角坐标是(-0.75,-0.75,-0.75)。
.png "Coordinates in 3D Space")
图3
当三维物体置于世界(World)空间中时,物体本身不动,但是为了匹配世界坐标系,要将物体的模型矩阵(model Matrix)乘以世界矩阵(world Matrix)。在世界空间中,你可以通过改变物体的坐标来移动三维物体,改变物体的大小,改变角度来旋转物体。为了表达三维物体的世界坐标,你需要将每个顶点坐标乘以世界矩阵。(这里的世界空间可以这样理解,每个三维物体自身有一个衡量自己的模型空间,然后将多个三维物体放在一起组成一个大环境,每个物体在其中的坐标就是世界坐标。)
物体的世界坐标=物体的模型坐标*世界矩阵
下一个因素是摄像机观察坐标,是你观察这个三维物体的位置。在三维空间中改变摄像机观察位置不需要改变三维物体的模型空间和世界空间。计算物体的摄像机观察坐标,需要将物体的世界坐标乘以观察矩阵。
物体的观察坐标=物体的世界坐标*观察矩阵
最后,我们需要在二维的屏幕上渲染这个三维物体,就需要将三维物体投影到二维屏幕上,这时我们需要计算与距离相关的透视视角。我们的三维物体在实际中应该是平行投影的(就是说相对的边是平行的),但是为了展现在二维屏幕上,我们需要利用透视投影展示物体(相对的边最后会汇聚到很远的一个点上),所以我将物体的世界坐标乘以观察矩阵再乘以投影矩阵就得到最后的物体在二维屏幕上的坐标,也叫做WorldViewProjection。
物体最终坐标=物体的世界坐标(world Coordinates)*物体的观察矩阵(view Matrix)*物体的投影矩阵(projection Matrix)
矩阵(The Matrix)
Silverlight 5由于引入了Microsoft.Xna.Framework,所以包含了矩阵结构。它包括一个4x4的齐次矩阵,矩阵的元素是16位浮点数。图4展示了变换矩阵的方法。
.png "A Silverlight 5 Matrix Struct")
图4
矩阵的前三行三列(M11,M12,M13,M21,M22,M23,M31,M32,M33)用于矩阵的缩放和旋转变换,第四行(M41,M42,M43)用于矩阵的平移变换(如表1所示)。
表1
| M11 | M12 | M13 | M14 |
| M21 | M22 | M23 | M24 |
| M31 | M32 | M33 | M34 |
| M41 | M42 | M43 | M44 |
为了更好的理解矩阵,让我们看一看到底如何进行矩阵变换。有五种不同类型的矩阵:4x4的矩阵结构,单位矩阵,平移矩阵,缩放矩阵和旋转矩阵。
单位矩阵(如表2所示)表示三维物体在世界空间内的初始位置。如果你将一个矩阵乘以单位矩阵,那么你还会得到原来的矩阵,没有变化。矩阵结构提供了一个简单的方法Matrix.Identity可以得到单位矩阵。
表2
| 1 | 0 | 0 | 0 |
| 0 | 1 | 0 | 0 |
| 0 | 0 | 1 | 0 |
| 0 | 0 | 0 | 1 |
矩阵结构也提供了一个缩放矩阵的方法,Matrix.CreateScale。缩放矩阵可以用来对物体进行缩放变换,只需将三维物体乘以缩放矩阵,如表3所示。(通过Matrix.CreateScale(float f)方法可以让物体在x,y,z三个轴方向进行同等大小的缩放,利用Matrix.CreateScale(float x,float y,float z)或Matrix.CreateScale(new Vector3(float x,float y,float z))方法可以让物体分别在x,y,z三个轴方向进行不同比例的缩放。)
表3
| Sx | 0 | 0 | 0 |
| 0 | Sy | 0 | 0 |
| 0 | 0 | Sz | 0 |
| 0 | 0 | 0 | 1 |
通过Matrix.CreateTranslate方法可以让物体在世界空间内进行移动。如表4所示。
表4
| 1 | 0 | 0 | 0 |
| 0 | 1 | 0 | 0 |
| 0 | 0 | 1 | 0 |
| Tx | Ty | Tz | 1 |
如果想要旋转矩阵,Silverlight 5为我们提供了很多方法。
Matrix.CreateFromYawPitchRoll
| 1 | 0 | 0 | 0 |
| 0 | Cos θ | Sin θ | 0 |
| 0 | -Sin θ | Cos θ | 0 |
| 0 | 0 | 0 | 1 |
| Rotation X |
| Cos θ | 0 | Sin θ | 0 |
| 0 | 1 | 0 | 0 |
| -Sin θ | 0 | Cos θ | 0 |
| 0 | 0 | 0 | 1 |
| Rotation Y |
| Cos θ | Sin θ | 0 | 0 |
| -Sin θ | Cos θ | 0 | 0 |
| 0 | 0 | 1 | 0 |
| 0 | 0 | 0 | 1 |
| Rotation Z |
学习Silverlight-XNA的三维素材管道(Pipeline)
Silverlight 5和XNA类库提供了一种递进的方法,利用顶点坐标建立渲染在屏幕上的三维物体。这种方法主要有以下五个重要的步骤:
1.顶点缓冲(vertex buffer)
2.WorldViewProjection坐标(前面提到过)
3.材质(shading):顶点(vertex),像素(pixel)和纹理(texture)
4.图形处理:栅格化(rasterize),剪裁(clip),剔除(cull)
5.最终输出:帧缓冲(frame buffer)
.png "Creating 3D Objects with the Silverlight 5 XNA Libraries")
图5
我将简要介绍每一步骤和它的组件。
顶点缓冲(Vertex Buffer):从顶点集中创建一个顶点缓冲,第一步是利用一系列的点创建三维物体的骨骼(skeleton)。每一个顶点至少包含x,y,z三个坐标,但是通常也包含其他的属性,如颜色和纹理。
WorldViewProjection坐标:最终的坐标等于顶点坐标乘以世界矩阵,观察矩阵和投影矩阵。这里,与世界空间,观察空间和投影空间相关的物体被计算和应用。文章的最后两小节会有更详尽的说明。当你获得最终的坐标时,实际的材质渲染工作也已经开始了。
材质(shading):材质包括顶点材质(vertex shading),像素材质(pixel shading)和纹理材质(texture shading)。首先进行的是顶点的着色过程,然后是逐像素的材质渲染,之后是纹理材质的渲染。
栅格化,剪裁和剔除:栅格化是将一幅图片转换成像素点,然后对其进行剪裁和剔除,用来移除模型被隐藏和不可见的部分。(之所以进行剪裁和剔除一方面是为了节省性能,另一方面是为了与实际更相符。有时我们将镜头拉的很近,近到只能看到三维模型的一部分,这时模型的另一部分就在我们的视线之外(对于计算机来说,就是物体处在近平面和远平面之外,如下图),我们就不需要让计算机去绘制在我们视线之外的模型部分,以节省性能。有时场景中有多个物体,距离我们较近的物体会挡住较远的物体,实际情况是我们看不到较远物体被挡住的部分,但是计算机其实并不知道这些,如果我们不进行操作,它还是会把较远物体被遮挡的部分显示出来,与较近物体叠加在一起,这就会造成透视效果(与前面的透视不同),显得不真实,这时就需要进行剔除)
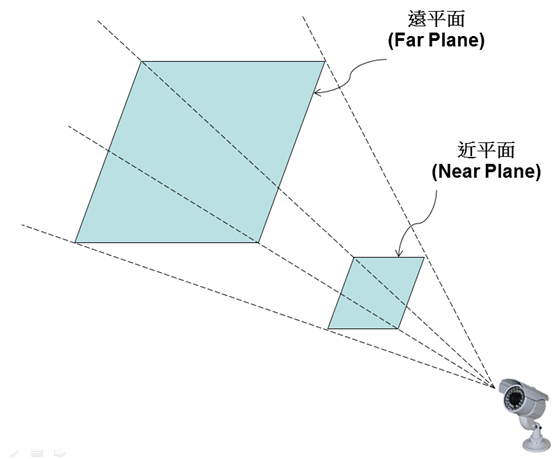
图6
帧缓冲(Frame Buffer):当图像被栅格化,剪裁和剔除以后,就产生了一个最终呈现在屏幕上的帧缓冲。
利用基本元素(Primitive)建立一个立方体
有了矩阵,世界空间,观察空间,投影空间和三维素材管道的知识之后,我们现在就来建立一个三维的立方体模型。
Silverlight 5带来的重大改变就是可以利用硬件加速,也就是GPU加速,这样可以解放CPU渲染物体的压力。我们可以通过在*.Web项目的*.html文件中将EnableGPUAcceleration参数设置为true来让我们的程序使用硬件加速。
 EnableGPUAcceleration

<object data="data:application/x-silverlight-2,"
  type="application/x-silverlight-2" width="100%" height="100%">
  <param name="EnableGPUAcceleration" value="true" />
  <param name="source" value="ClientBin/Cube3d.xap"/>
  <param name="minRuntimeVersion" value="5.0.60211.0" />
</object>
在XAML中,我将在表格(Grid)中插入一个DrawingSurface控件,在GraphicsDevice中的方法DrawPrimitives的帮助下在Silverlight中渲染三维物体。如图7所示。
<DrawingSurface Loaded="OnLoad" SizeChanged="OnSizeChanged" Draw="OnDraw"/>
.png "The DrawPrimitives Method of the GraphicsDevice Class")
图7
之后我会用三个Silverlight提供的方法在DrawlingSurface类中建立和渲染这个立方体模型。OnLoad方法用来建立立方体模型,初始化所有的材质(shader)和观察矩阵,并且观察矩阵在整个程序运行过程中不会改变。我们设定这个三维模型的原点在坐标(0,0,0),并且占用模型空间的75%,它的坐标范围是从(-0.75,-0.75,-0.75)到(0.75,0.75,0.75)。这里,我将会建立一个顶点缓冲,用来支撑顶点集并且初始化shaderStream,pixelStream和imageStream,这些将会在材质的渲染中使用。我也会初始化观察矩阵,也就是摄像机观察模型的角度,这里我们用方法Matrix.CreateLookAt(Vector3 cameraPosition,Vector3 cameraTarget,Vector3 Up)来创建(其中Matrix.CreateLookAt是Silverlight 5提供的建立观察矩阵的函数,cameraPosition是摄像机所在的位置,cameraTarget是摄像机要观察的对象所在的位置,Up是指示摄像机向上的向量,就是想象我们正常拿着摄像机,镜头指向我们要观察的物体,这时候摄像机向上的向量就是Y轴的正方向(0,1,0),如图8所示。假如我们将摄像机放平,如图9所示,这时摄像机向上的向量就是X轴的正方向(1,0,0))。
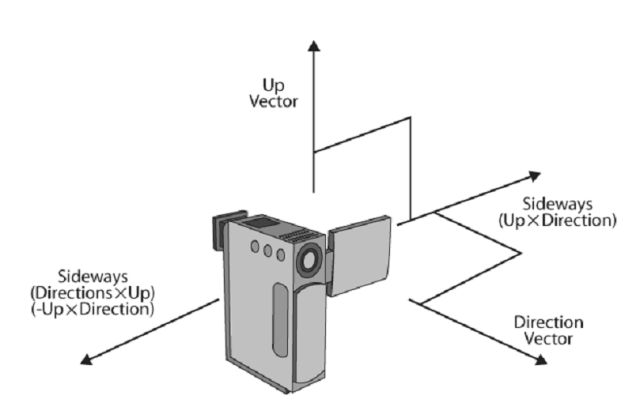
图8
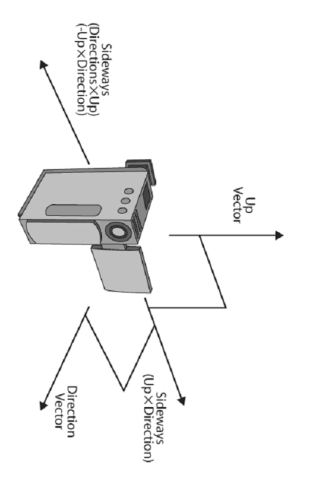
图9
        private void OnLoad(object sender, RoutedEventArgs e)
        {
            try
            {
                vertexBuffer = CreateCube();
                Stream shaderStream = Application.GetResourceStream(new Uri(@"Cube3d;component/shader/shader.vs", UriKind.Relative)).Stream;
                vertexShader = VertexShader.FromStream(resourceDevice, shaderStream);

                Stream pixelStream = Application.GetResourceStream(new Uri(@"Cube3d;component/shader/shader.ps", UriKind.Relative)).Stream;
                pixelShader = PixelShader.FromStream(resourceDevice, pixelStream);

                Stream imageStream = Application.GetResourceStream(new Uri(@"Cube3d;component/scene.jpg", UriKind.Relative)).Stream;
                var image = new BitmapImage();
                image.SetSource(imageStream);
                texture = new Texture2D(resourceDevice, image.PixelWidth, image.PixelHeight, false, SurfaceFormat.Color);
                image.CopyTo(texture);

                Vector3 cameraPosition = new Vector3(0, 0, 5.0f); // the camera's position
                Vector3 cameraTarget = Vector3.Zero; // the place the camera is looking (towards world origin)
                view = Matrix.CreateLookAt(cameraPosition, cameraTarget, Vector3.Up);
            }
            catch
            {
            }
        }
下一步是为三维立方体建立顶点缓冲。我会用下面的代码所示的CreateCube方法,它返回一个VertexBuffer值。我将在三维空间里建立两个矩形,用ABCD组成前面的面,用EFGH组成立方体后面的面。之后我会用VertexPositionColor方法建立一组顶点集。
        VertexBuffer CreateCube()
        {
            // cube vertices
            var vertexCollection = new VertexPositionColor[36];
            // front coordinates
            Vector3 cubeA = new Vector3(-0.75f, 0.75f, 0.75f);
            Vector3 cubeB = new Vector3(0.75f, 0.75f, 0.75f);
            Vector3 cubeC = new Vector3(-0.75f, -0.75f, 0.75f);
            Vector3 cubeD = new Vector3(0.75f, -0.75f, 0.75f);
            // back coordinates
            Vector3 cubeE = new Vector3(-0.75f, 0.75f, -0.75f);
            Vector3 cubeF = new Vector3(0.75f, 0.75f, -0.75f);
            Vector3 cubeG = new Vector3(-0.75f, -0.75f, -0.75f);
            Vector3 cubeH = new Vector3(0.75f, -0.75f, -0.75f);
            //  colors
            Color cRed = Color.FromNonPremultiplied(255, 0, 0, 156);
            Color cGreen = Color.FromNonPremultiplied(0, 255, 0, 156);
            Color cBlue = Color.FromNonPremultiplied(0, 0, 255, 156);
            Color cYellow = Color.FromNonPremultiplied(255, 255, 0, 156);
            Color cBlack = Color.FromNonPremultiplied(0, 0, 0, 156);
            Color cWhite = Color.FromNonPremultiplied(255, 255, 255, 156);
            if (showPrimitives)
            {
                // front
                vertexCollection[0] = new VertexPositionColor(cubeA, cGreen);
                vertexCollection[1] = new VertexPositionColor(cubeB, cGreen);
                vertexCollection[2] = new VertexPositionColor(cubeC, cGreen);
                vertexCollection[3] = new VertexPositionColor(cubeB, cBlue);
                vertexCollection[4] = new VertexPositionColor(cubeD, cBlue);
                vertexCollection[5] = new VertexPositionColor(cubeC, cBlue);
                // back
                vertexCollection[6] = new VertexPositionColor(cubeG, cBlue);
                vertexCollection[7] = new VertexPositionColor(cubeF, cBlue);
                vertexCollection[8] = new VertexPositionColor(cubeE, cBlue);
                vertexCollection[9] = new VertexPositionColor(cubeH, cGreen);
                vertexCollection[10] = new VertexPositionColor(cubeF, cGreen);
                vertexCollection[11] = new VertexPositionColor(cubeG, cGreen);
                // top
                vertexCollection[12] = new VertexPositionColor(cubeE, cRed);
                vertexCollection[13] = new VertexPositionColor(cubeF, cRed);
                vertexCollection[14] = new VertexPositionColor(cubeA, cRed);
                vertexCollection[15] = new VertexPositionColor(cubeF, cYellow);
                vertexCollection[16] = new VertexPositionColor(cubeB, cYellow);
                vertexCollection[17] = new VertexPositionColor(cubeA, cYellow);
                // bottom
                vertexCollection[18] = new VertexPositionColor(cubeH, cRed);
                vertexCollection[19] = new VertexPositionColor(cubeG, cRed);
                vertexCollection[20] = new VertexPositionColor(cubeC, cRed);
                vertexCollection[21] = new VertexPositionColor(cubeD, cYellow);
                vertexCollection[22] = new VertexPositionColor(cubeH, cYellow);
                vertexCollection[23] = new VertexPositionColor(cubeC, cYellow);
                // left
                vertexCollection[24] = new VertexPositionColor(cubeC, cBlack);
                vertexCollection[25] = new VertexPositionColor(cubeG, cBlack);
                vertexCollection[26] = new VertexPositionColor(cubeA, cBlack);
                vertexCollection[27] = new VertexPositionColor(cubeA, cWhite);
                vertexCollection[28] = new VertexPositionColor(cubeG, cWhite);
                vertexCollection[29] = new VertexPositionColor(cubeE, cWhite);
                // right
                vertexCollection[30] = new VertexPositionColor(cubeH, cWhite);
                vertexCollection[31] = new VertexPositionColor(cubeD, cWhite);
                vertexCollection[32] = new VertexPositionColor(cubeB, cWhite);
                vertexCollection[33] = new VertexPositionColor(cubeH, cBlack);
                vertexCollection[34] = new VertexPositionColor(cubeB, cBlack);
                vertexCollection[35] = new VertexPositionColor(cubeF, cBlack);
            }
            else
            {
                // front
                vertexCollection[0] = new VertexPositionColor(cubeA, cGreen);
                vertexCollection[1] = new VertexPositionColor(cubeB, cGreen);
                vertexCollection[2] = new VertexPositionColor(cubeC, cGreen);
                vertexCollection[3] = new VertexPositionColor(cubeB, cGreen);
                vertexCollection[4] = new VertexPositionColor(cubeD, cGreen);
                vertexCollection[5] = new VertexPositionColor(cubeC, cGreen);
                // back
                vertexCollection[6] = new VertexPositionColor(cubeG, cBlue);
                vertexCollection[7] = new VertexPositionColor(cubeF, cBlue);
                vertexCollection[8] = new VertexPositionColor(cubeE, cBlue);
                vertexCollection[9] = new VertexPositionColor(cubeH, cBlue);
                vertexCollection[10] = new VertexPositionColor(cubeF, cBlue);
                vertexCollection[11] = new VertexPositionColor(cubeG, cBlue);
                // top
                vertexCollection[12] = new VertexPositionColor(cubeE, cRed);
                vertexCollection[13] = new VertexPositionColor(cubeF, cRed);
                vertexCollection[14] = new VertexPositionColor(cubeA, cRed);
                vertexCollection[15] = new VertexPositionColor(cubeF, cRed);
                vertexCollection[16] = new VertexPositionColor(cubeB, cRed);
                vertexCollection[17] = new VertexPositionColor(cubeA, cRed);
                // bottom
                vertexCollection[18] = new VertexPositionColor(cubeH, cYellow);
                vertexCollection[19] = new VertexPositionColor(cubeG, cYellow);
                vertexCollection[20] = new VertexPositionColor(cubeC, cYellow);
                vertexCollection[21] = new VertexPositionColor(cubeD, cYellow);
                vertexCollection[22] = new VertexPositionColor(cubeH, cYellow);
                vertexCollection[23] = new VertexPositionColor(cubeC, cYellow);
                // left
                vertexCollection[24] = new VertexPositionColor(cubeC, cBlack);
                vertexCollection[25] = new VertexPositionColor(cubeG, cBlack);
                vertexCollection[26] = new VertexPositionColor(cubeA, cBlack);
                vertexCollection[27] = new VertexPositionColor(cubeA, cBlack);
                vertexCollection[28] = new VertexPositionColor(cubeG, cBlack);
                vertexCollection[29] = new VertexPositionColor(cubeE, cBlack);
                // right
                vertexCollection[30] = new VertexPositionColor(cubeH, cWhite);
                vertexCollection[31] = new VertexPositionColor(cubeD, cWhite);
                vertexCollection[32] = new VertexPositionColor(cubeB, cWhite);
                vertexCollection[33] = new VertexPositionColor(cubeH, cWhite);
                vertexCollection[34] = new VertexPositionColor(cubeB, cWhite);
                vertexCollection[35] = new VertexPositionColor(cubeF, cWhite);
            }
            var vb = new VertexBuffer(resourceDevice, VertexPositionColor.VertexDeclaration,
            vertexCollection.Length, BufferUsage.WriteOnly);
            vb.SetData(0, vertexCollection, 0, vertexCollection.Length, 0);
            return vb;
        }
OnSizeChanged方法是用来更新投影矩阵和屏幕基于表面尺寸的宽高比例的。
        private void OnSizeChanged(object sender, SizeChangedEventArgs e)
        {
            try
            {
                DrawingSurface surface = sender as DrawingSurface;
                float sceneAspectRatio = (float)surface.ActualWidth / (float)surface.ActualHeight;
                projection = Matrix.CreatePerspectiveFieldOfView(MathHelper.PiOver4, sceneAspectRatio, 1.0f, 100.0f);
            }
            catch
            {
            }
        }
最后一个方法是OnDraw方法,用来对三维的立方体模型进行动态的变换(类似于XNA中的Draw)。在这个方法里我应用Matrix.CreateScale方法缩放模型的大小,用Matrix.CreateFromYawPtichRoll方法来旋转模型,用Matrix.CreateTranslate方法来移动模型。也是在这里,我们计算WorldViewProjection矩阵并将它送入vertexShader中对顶点进行渲染,之后pixelShader进一步渲染立方体模型。也可以将这个矩阵送入基于图片的textureShader中进行渲染。最后,GraphicsDevice类用DrawPrimitives方法渲染最终的输出帧。
        void OnDraw(object sender, DrawEventArgs args)
        {
            Matrix position = Matrix.Identity;
            Matrix scale = Matrix.CreateScale(1.0f);
            float xf = 0.0f;
            float yf = 0.0f;
            float zf = 0.0f;
            if ((!cubeXAxis) && (!cubeYAxis) && (!cubeZAxis)) // first time angle
            {
                if (rotateX != 0)
                    xf = (float)rotateX;
                else
                    xf = -0.65f;
                yf = 0.00f;
                zf = 0.0f;
            }
            if (cubeXAxis) xf = MathHelper.PiOver4 * (float)args.TotalTime.TotalSeconds;
            if (cubeYAxis) yf = MathHelper.PiOver4 * (float)args.TotalTime.TotalSeconds;
            if (cubeZAxis) zf = MathHelper.PiOver4 * (float)args.TotalTime.TotalSeconds;
            Matrix rotation = Matrix.CreateFromYawPitchRoll(xf, yf, zf);
            Matrix world;
            if (translateZ != 0)
                world = rotation * Matrix.CreateTranslation(0, 0, (float)translateZ);
            else
                world = scale * rotation * position;
            Matrix worldViewProjection = world * view * projection;
            resourceDevice.Clear(ClearOptions.Target | ClearOptions.DepthBuffer, new Microsoft.Xna.Framework.Color(0, 0, 0, 0), 10.0f, 0);
            resourceDevice.SetVertexBuffer(vertexBuffer);
            resourceDevice.SetVertexShader(vertexShader);
            resourceDevice.SetVertexShaderConstantFloat4(0, ref worldViewProjection);
            resourceDevice.SetPixelShader(pixelShader);
            resourceDevice.Textures[0] = texture;
            resourceDevice.DrawPrimitives(PrimitiveType.TriangleList, 0, 12);
            args.InvalidateSurface();
        }
最后展示的就是程序运行的效果了:
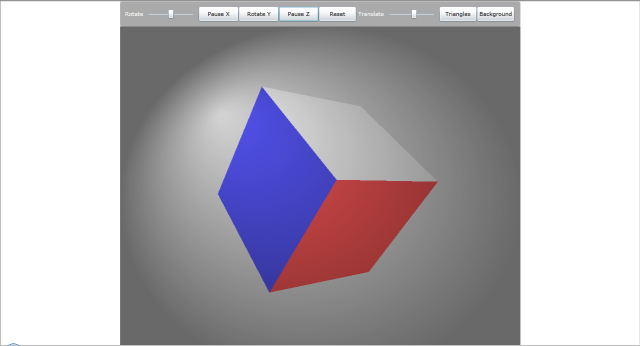
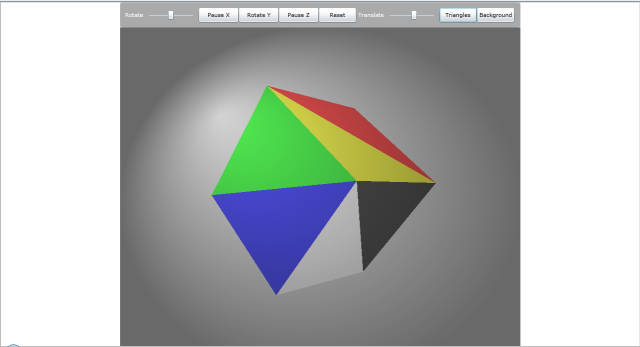
图10
PS:这篇文章主要讲解了利用Silverlight 3D建立三维模型的基本方法,Sivlerlight 5由于引入了XNA框架拥有了强悍的三维建模能力,而不像以前只能借助于间接的方式实现。文中利用建立顶点集的方式建立模型,可以满足一些基本的需要,但是如果要渲染更复杂的模型显然力不从心,之后的篇章将会介绍如何在Silverlight 5中载入在3ds Max或者Maya等软件中创建好的模型。
由于本人英语水平有限,另外有些专业术语可能表达的不准确,还望大家见谅!如果大家发现文章中有措辞不严谨,不正确的地方请留言告诉我,以改进!谢谢大家!
推荐博客:深蓝色右手
附:Silverlight 5与XNA的区别(源于Silverlight 5官方帮助文档)
1.Silverlight只支持Reach Profile格式,而XNA除了支持这个格式还支持HiDef格式。(作者的例子中用的Scene.jpg图片是800*500,在SL5中没有办法用,因为不支持HiDef,所以将其改成了2的幂次方,大家有什么好的方法希望能够一起交流)。
2.Silverlight只支持Shader Model 2.0(不过也基本够用了),而不支持3.0及以上。
3.Silverlight 3D graphics用来自于Microsoft.Xna.Framework的Color和Rectangle,这些相同的名称存在于 System.Windows.Media.Color和System.Windows.Shapes.Rectangle中,而且它们之间不兼容。
4.Silverlight不支持软件渲染3D图形的方式。系统需要兼容的图形设备。