课本:第3章 MenuOS的构造 内容总结
- 计算机的“三大法宝”
- 存储程序计算机
- 函数调用堆栈
- 中断
- 操作系统的“两把宝剑”
- 中断上下文切换:保存现场和恢复现场
- 进程上下文切换
在接触linux内核源代码时,linux是基于一个稳定版的内核Linux-3.18.6。其内核源码的目录结构如下:
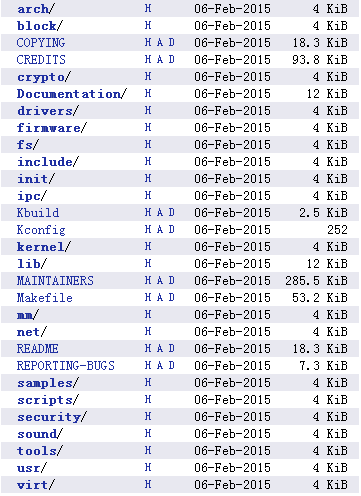
其中,arch目录是与体系结构相关的子目录列表,里面存放了许多CPU体系结构的相关代码。arch目录中的代码在linux内核代码中占比相当庞大,主要是因为arch目录中的代码可以使linux内核支持不同的CPU和体系结构。本课程实验是基于x86构架,所以只需要关心x86目录下的内容。
除了arch目录以外,还有如下几个关键目录:
- block:存放linux存储体系中关于块设备管理的代码。
- crypto:存放常见的加密算法的C语言代码。
- Documentation:存放一些文档。
- drivers:驱动目录,里面分门别类地存放了linux内核支持的所有硬件设备的驱动源代码。
- firmware:固件。
- fs:即file system(文件系统),里面列出了linux支持的各种文件系统的实现。
- include:头文件目录,存放公共头文件。
- init:初始化,存放linux内核启动时的初始化代码,其中main.c文件就在这个目录下,这是整个linux内核启动的起点,main.c中的start_kernel函数是初始化linux内核启动的起点。
- ipc:即inter-process communication(进程间通信),其目录下为linux支持的IPC代码实现。
- kernel:即linux内核,这个文件夹下存放着内核本身需要的一些核心代码文件。
- lib:共用的库文件,里面是一些公用的库函数。在内核编程中不能使用C语言的标准库函数,这里的lib目录下的库函数就是来替代那些标准库函数的。
- mm:即memory management(内存管理),存放linux的内存管理代码。
- net:该目录下是网络相关的代码,例如TCP/IP协议栈等。
- 此外还有一些与声音、安全、脚本、工具相关的目录
了解了内核的基本结构和基本功能,为下面的实验进行打下了基础和铺垫。
实验:跟踪分析Linux内核的启动过程
使用实验楼的shell环境,其已经在虚拟机中搭建好了menuOS,所以我们通过两个简单的命令就可以把linux系统和一个简单的文件系统运行起来:
cd LinuxKernel/
qemu -kernel linux-3.18.6/arch/x86/boot/bzImage -initrd rootfs.img
其中,qemu仿真kernel;bzImage是vmLinux经过gzip压缩后的文件;vmLinux是编译出来的最原始的内核ELF文件;initrd是“initial ramdisk”的缩写,是用来初始化内存根文件系统。根文件系统一般包括内存根文件系统和磁盘文件系统,普通linux用户一般感受不到这个内存根文件系统的存在,因为在普通linux系统在启动时,是boot loader将存储介质中的initrd文件加载到内存,内核启动时先访问initrd文件系统,然后再切换到磁盘文件系统。本次实验简化为只使用了initrd根文件系统,创建了一个rootfs.img,其中只有一个init功能,用menu程序替代init。内核启动完成后进入menu程序。效果如下图所示:
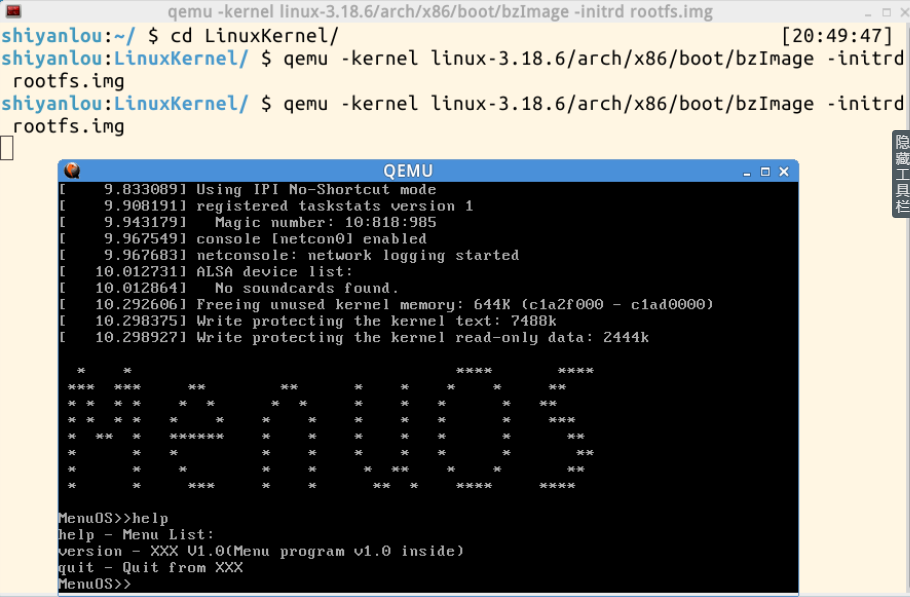
可以看到,menu项目支持3个命令:help、version和quit。
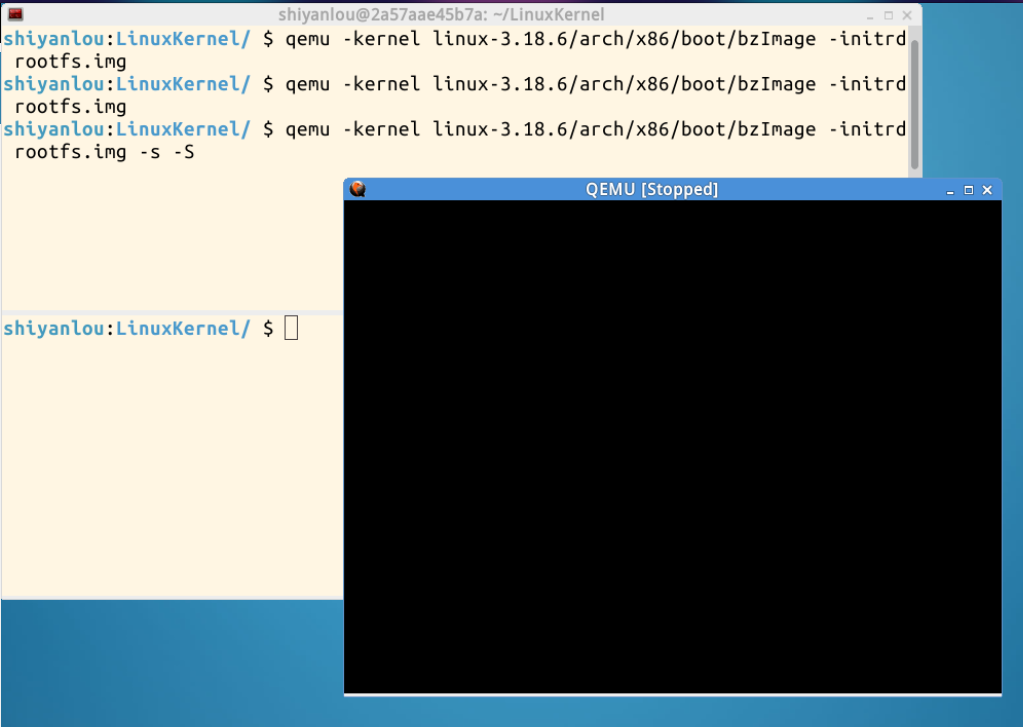
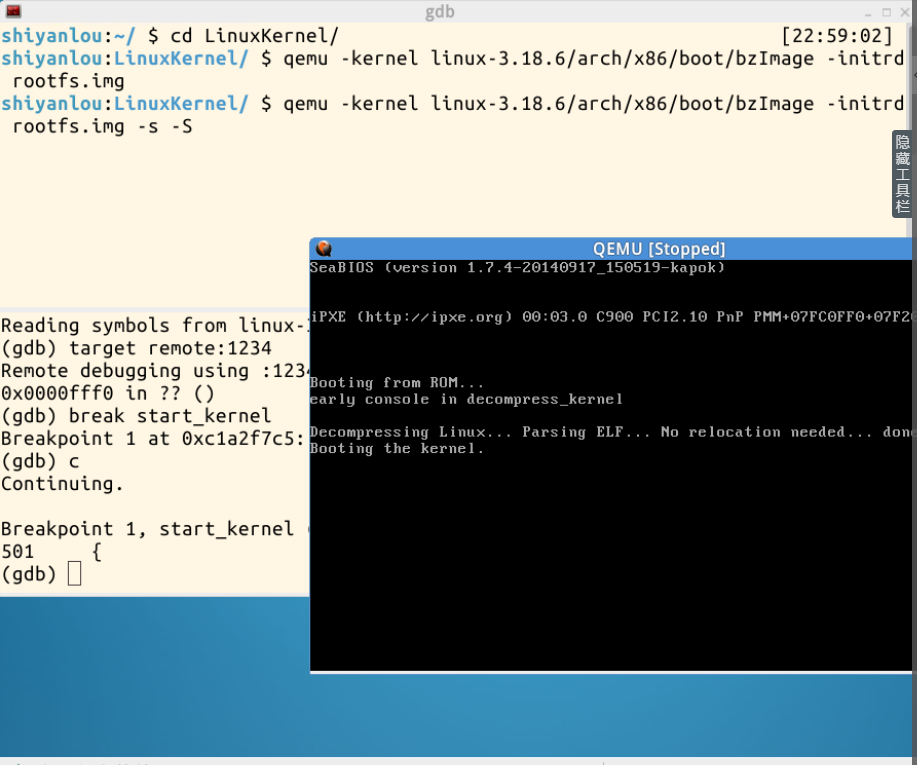
下面,使用gdb跟踪调试内核,输入以下命令:
qemu -kernel linux-3.18.6/arch/x86/boot/bzImage -initrd rootfs.img -s -S # 关于-s和-S选项的说明:
 -S freeze CPU at startup (use ’c’ to start execution)
 -s shorthand for -gdb tcp::1234 若不想使用1234端口,则可以使用-gdb tcp:xxxx来取代-s选项
效果如下:
水平分割窗口,启动gdb,输入以下命令:
gdb
(gdb)file linux-3.18.6/vmlinux # 在gdb界面中targe remote之前加载符号表
(gdb)target remote:1234 # 建立gdb和gdbserver之间的连接,按c 让qemu上的Linux继续运行
(gdb)break start_kernel # 断点的设置可以在target remote之前,也可以在之后
执行效果如下:
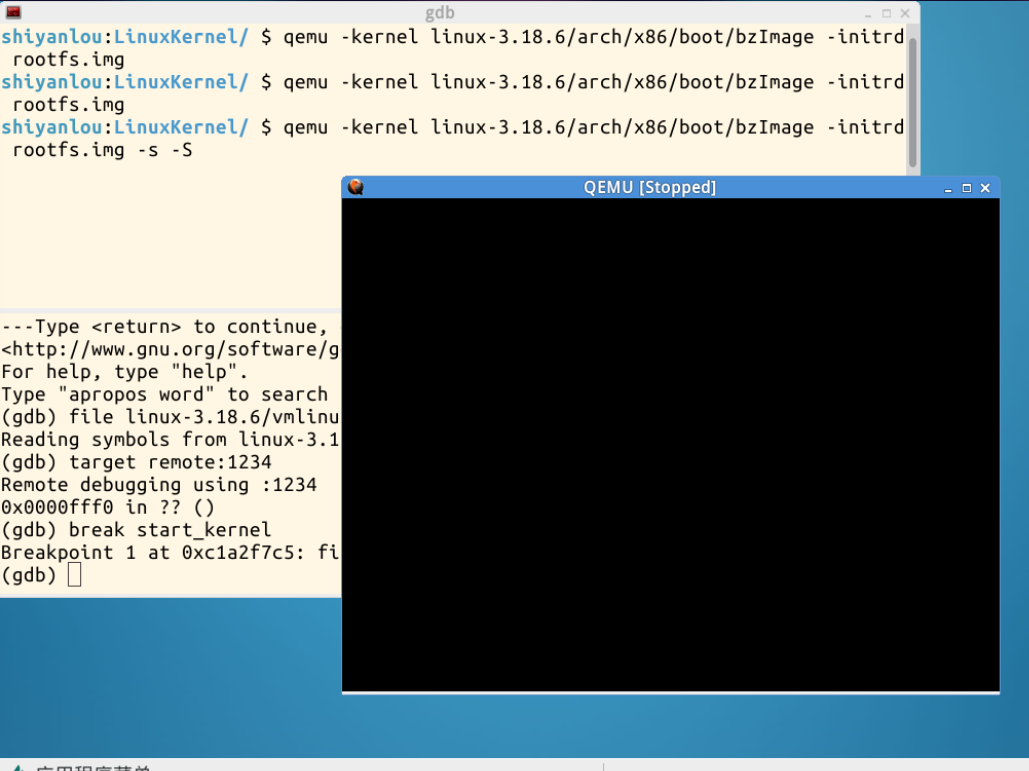
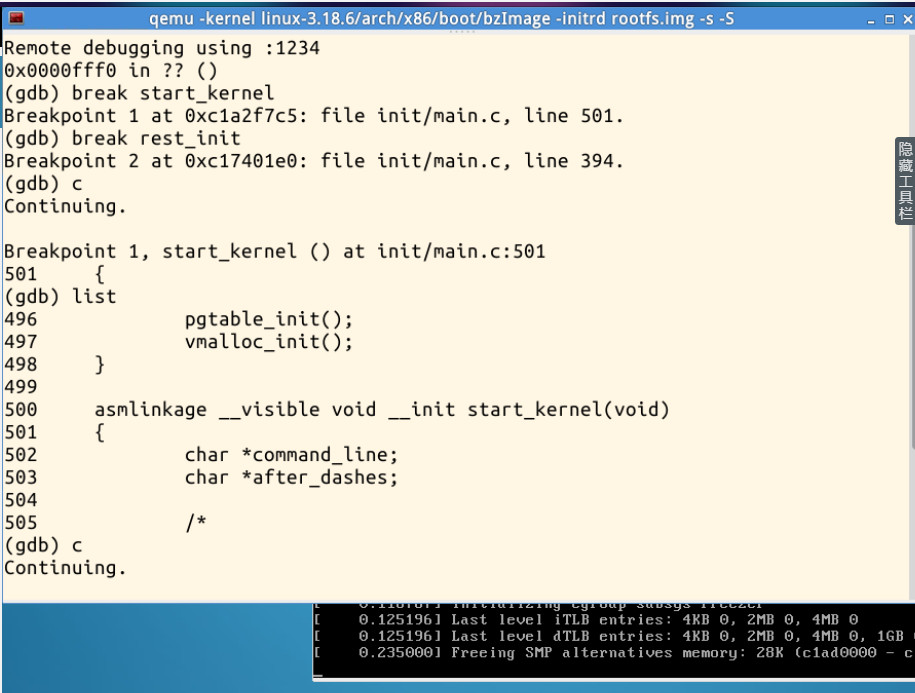
在start_kernel处设置了断点,使用continue命令让程序执行到断点位置,如下图所示:
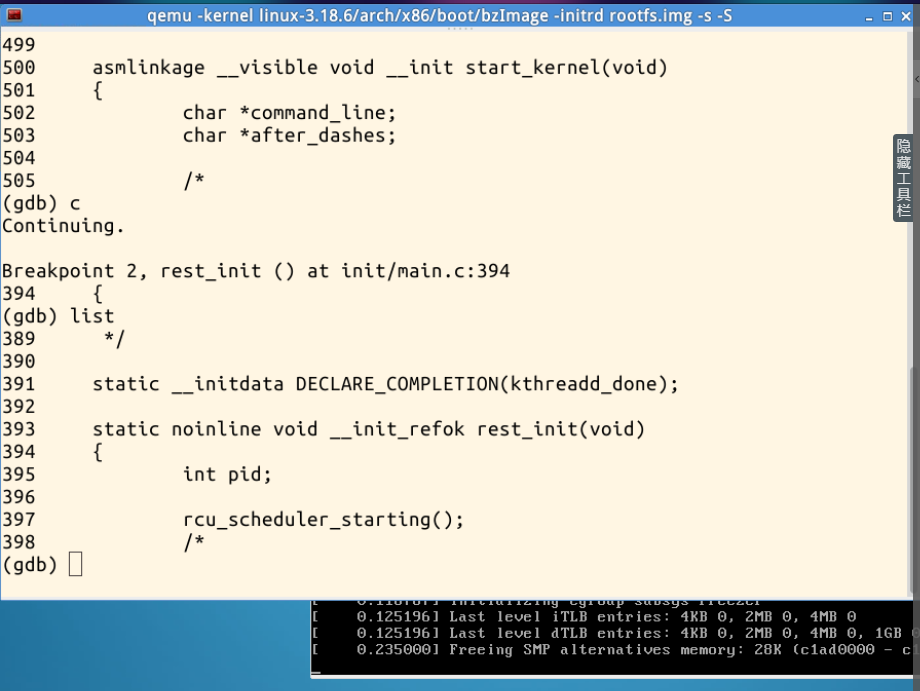
可以看到在程序执行到start_kernel断点处,qemu窗口中的执行效果。下面再在rest_init处为内核代码增加一个断点,执行效果如下:
代码分析
start_kernel()函数
asmlinkage __visible void __init start_kernel(void)
{
    char *command_line;
    char *after_dashes;

    lockdep_init();
    set_task_stack_end_magic(&init_task);
    smp_setup_processor_id();
    debug_objects_early_init();
    boot_init_stack_canary();
    cgroup_init_early();
    local_irq_disable();
    early_boot_irqs_disabled = true;

/*
 * Interrupts are still disabled. Do necessary setups, then
 * enable them
 */
    boot_cpu_init();
    page_address_init();
    pr_notice("%s", linux_banner);
    setup_arch(&command_line);
    mm_init_cpumask(&init_mm);
    setup_command_line(command_line);
    setup_nr_cpu_ids();
    setup_per_cpu_areas();
    smp_prepare_boot_cpu();    /* arch-specific boot-cpu hooks */

    build_all_zonelists(NULL, NULL);
    page_alloc_init();

    pr_notice("Kernel command line: %s
", boot_command_line);
    parse_early_param();
    after_dashes = parse_args("Booting kernel",
                  static_command_line, __start___param,
                  __stop___param - __start___param,
                  -1, -1, &unknown_bootoption);
    if (!IS_ERR_OR_NULL(after_dashes))
        parse_args("Setting init args", after_dashes, NULL, 0, -1, -1,
               set_init_arg);

    jump_label_init();

    /*
     * These use large bootmem allocations and must precede
     * kmem_cache_init()
     */
    setup_log_buf(0);
    pidhash_init();
    vfs_caches_init_early();
    sort_main_extable();
    trap_init();
    mm_init();

    /*
     * Set up the scheduler prior starting any interrupts (such as the
     * timer interrupt). Full topology setup happens at smp_init()
     * time - but meanwhile we still have a functioning scheduler.
     */
    sched_init();
     * Disable preemption - early bootup scheduling is extremely
     * fragile until we cpu_idle() for the first time.
     */
    preempt_disable();
    if (WARN(!irqs_disabled(),
         "Interrupts were enabled *very* early, fixing it
"))
        local_irq_disable();
    idr_init_cache();
    rcu_init();
    context_tracking_init();
    radix_tree_init();
    /*
    init some links before init_ISA_irqs()
    */
    early_irq_init();
    init_IRQ();
    tick_init();
    rcu_init_nohz();
    init_timers();
    hrtimers_init();
    softirq_init();
    timekeeping_init();
    time_init();
    sched_clock_postinit();
    perf_event_init();
    profile_init();
    call_function_init();
    WARN(!irqs_disabled(), "Interrupts were enabled early
");
    early_boot_irqs_disabled = false;
    local_irq_enable();

    kmem_cache_init_late();

    /*
     * HACK ALERT! This is early. We're enabling the console before
     * we've done PCI setups etc, and console_init() must be aware of
     * this. But we do want output early, in case something goes wrong.
     */
    console_init();
    if (panic_later)
        panic("Too many boot %s vars at `%s'", panic_later,
              panic_param);

    lockdep_info();

    /*
     * Need to run this when irqs are enabled, because it wants
     * to self-test [hard/soft]-irqs on/off lock inversion bugs
     * too:
     */
    locking_selftest();

#ifdef CONFIG_BLK_DEV_INITRD
    if (initrd_start && !initrd_below_start_ok &&
        page_to_pfn(virt_to_page((void *)initrd_start)) < min_low_pfn) {
        pr_crit("initrd overwritten (0x%08lx < 0x%08lx) - disabling it.
",
            page_to_pfn(virt_to_page((void *)initrd_start)),
            min_low_pfn);
        initrd_start = 0;
    }
#endif
    page_cgroup_init();
    debug_objects_mem_init();
    kmemleak_init();
    setup_per_cpu_pageset();
    numa_policy_init();
    if (late_time_init)
        late_time_init();
    sched_clock_init();
    calibrate_delay();
    pidmap_init();
    anon_vma_init();
    acpi_early_init();
#ifdef CONFIG_X86 /*与x86硬件相关代码 如果主板支持EFI的话*/
    if (efi_enabled(EFI_RUNTIME_SERVICES))
        efi_enter_virtual_mode();
#endif
#ifdef CONFIG_X86_ESPFIX64
    /* Should be run before the first non-init thread is created */
    init_espfix_bsp();
#endif
    thread_info_cache_init();
    cred_init();
    fork_init(totalram_pages);
    proc_caches_init();
    buffer_init();
    key_init();
    security_init();
    dbg_late_init();
    vfs_caches_init(totalram_pages);
    signals_init();
    /* rootfs populating might need page-writeback */
    page_writeback_init();
    proc_root_init();
    cgroup_init();
    cpuset_init();
    taskstats_init_early();
    delayacct_init();

    check_bugs();

    sfi_init_late();

    if (efi_enabled(EFI_RUNTIME_SERVICES)) {
        efi_late_init();
        efi_free_boot_services();
    }

    ftrace_init();

    /* Do the rest non-__init'ed, we're now alive */
    rest_init();
}
start_kernel()函数分析
start_kernel()函数的作用是内核中各种模块的初始化。其中,start_kernel()函数中set_task_stack_end_magic(&init_task)中的init_task即初始化手工创建的PCB,0号进程即最终的idle进程,idle进程由系统自动创建, 运行在内核态。当系统没有需要执行的进程时就调度到idle进程。
rest_init()函数
static noinline void __init_refok rest_init(void)
{
    int pid;

    rcu_scheduler_starting();
    /*
     * We need to spawn init first so that it obtains pid 1, however
     * the init task will end up wanting to create kthreads, which, if
     * we schedule it before we create kthreadd, will OOPS.
     */
    kernel_thread(kernel_init, NULL, CLONE_FS);
    numa_default_policy();
    pid = kernel_thread(kthreadd, NULL, CLONE_FS | CLONE_FILES);
    rcu_read_lock();
    kthreadd_task = find_task_by_pid_ns(pid, &init_pid_ns);
    rcu_read_unlock();
    complete(&kthreadd_done);

    /*
     * The boot idle thread must execute schedule()
     * at least once to get things moving:
     */
    init_idle_bootup_task(current); /*idle初始化*/
    schedule_preempt_disabled();
    /* Call into cpu_idle with preempt disabled */
    cpu_startup_entry(CPUHP_ONLINE);
}
rest_init()函数分析
通过rest_init()函数新建kernel_init和kthreadd进程,分别为系统的1号进程和2号进程。系统的进程创建遵从“道生一,一生二,二生三,三生万物”的思想,0号进程创建1号进程,创建2号进程,以此类推,层层推进。
总结
start_kernel()函数为内核启动的起点,执行了各种初始化操作,对于本次实验的进行来说,除了实验楼的虚拟机环境偶尔出现了一些小问题,其他方面实验进行的还是比较顺利的,没有遇到什么问题。但是对于内核启动过程的理解还是比较困难的,start_kernel()的各个模块做了非常繁杂的初始化操作,内核得以正常启动。
本次实验结合《庖丁解牛》和对应的实验楼实验以及视频教程配合完成,对于linux内核源码文件的目录结构、作用以及内核启动及初始化的过程有了一个初步的整体了解,但对于其细致的过程还不太明白,内核的启动过程十分复杂。希望在今后的实验过程中,通过一系列实验,对linux内核的工作慢慢有更深一步的认识和理解。
因为本次实验过程中自己电脑的linux虚拟环境出现了一些问题不能正常启动,所以此次实验完全在已经配置好了的实验楼环境中进行,在后面会在自己电脑的环境中再完整的配置一遍内核的启动过程。