转载:http://www.cnblogs.com/yaoyinglong/p/Spring应用教程-1.html
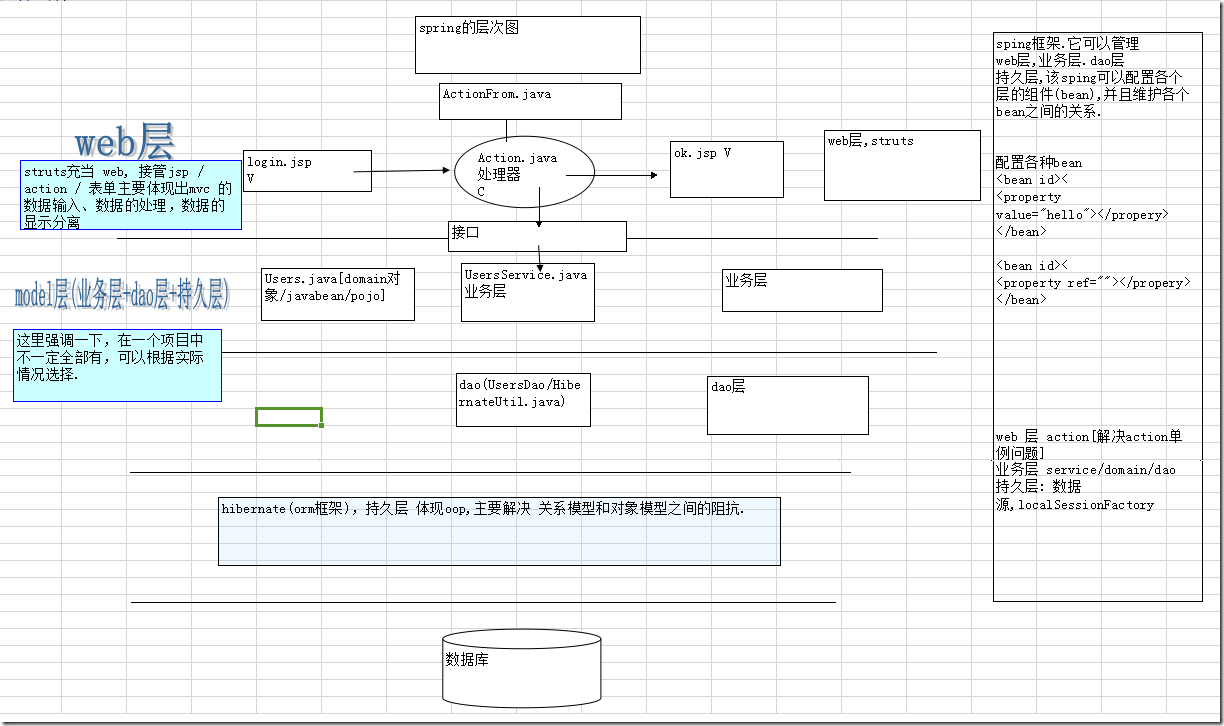
- Spring在整个项目层次中的位置
- 快速入门
- 细节讨论
- bean工厂容器
- ApplicationContext 对象有3种应用方法
- bean生命周期
- 配置bean的细节
- Spring中的Null值
- XML配置文件的简写
- 自动装配bean的属性值
- 分散配置
Spring是Web框架,是容器框架,用于配置bean,并维护bean之间的关系的框架。
1. Spring在整个项目层次中的位置:
2. 快速入门
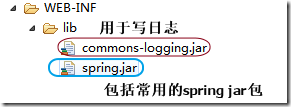
1、引入spring开发包(最小配置)如下:
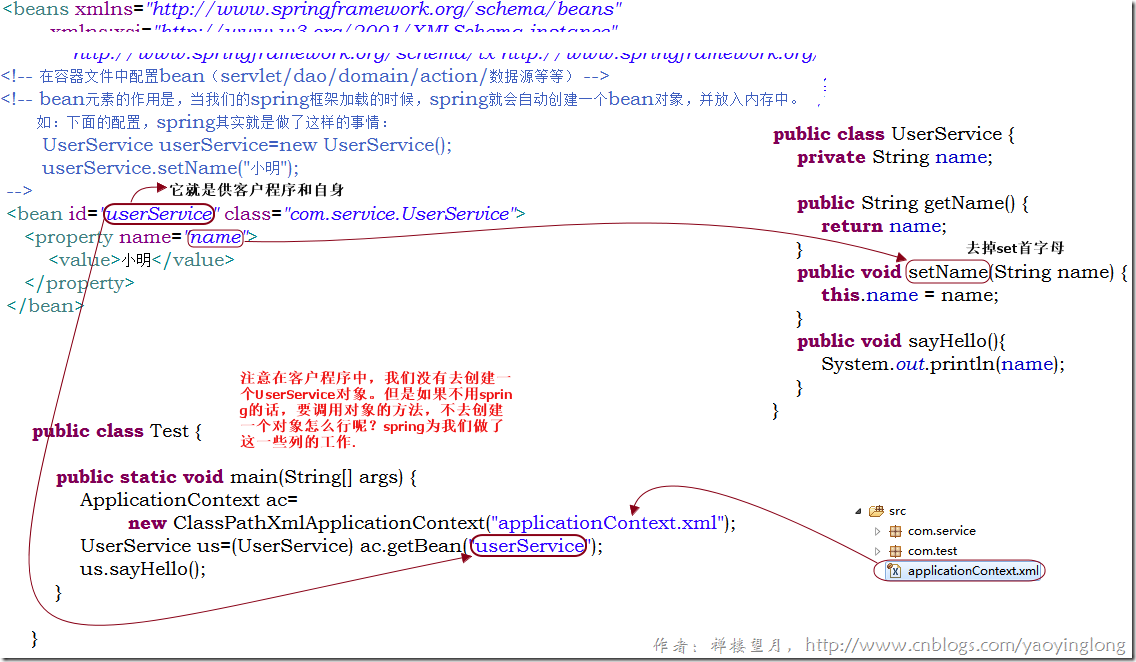
2、创建spring的一个核心文件(如struts中的struts-config.xml)applicationContext.xml文件。该文件一般放在src目录下,该文件需引入xsd文件:可以从下载下来的开发包中的例子中粘贴过来。
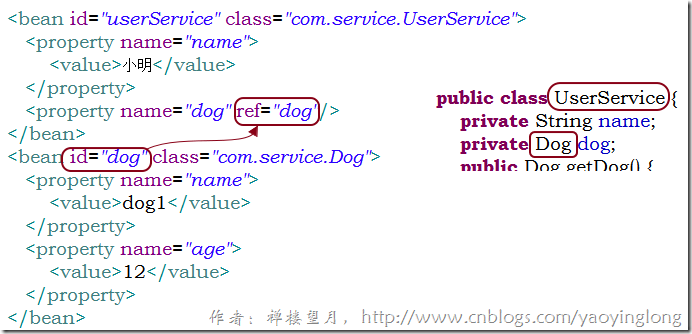
上面我们看了配置单个bean的做法,但是当两个bean之间是嵌套的(就像某人有一只狗),该怎么设置呢?
3. 细节讨论
使用spring ,没有new对象,我们把创建对象的任务交给spring框架
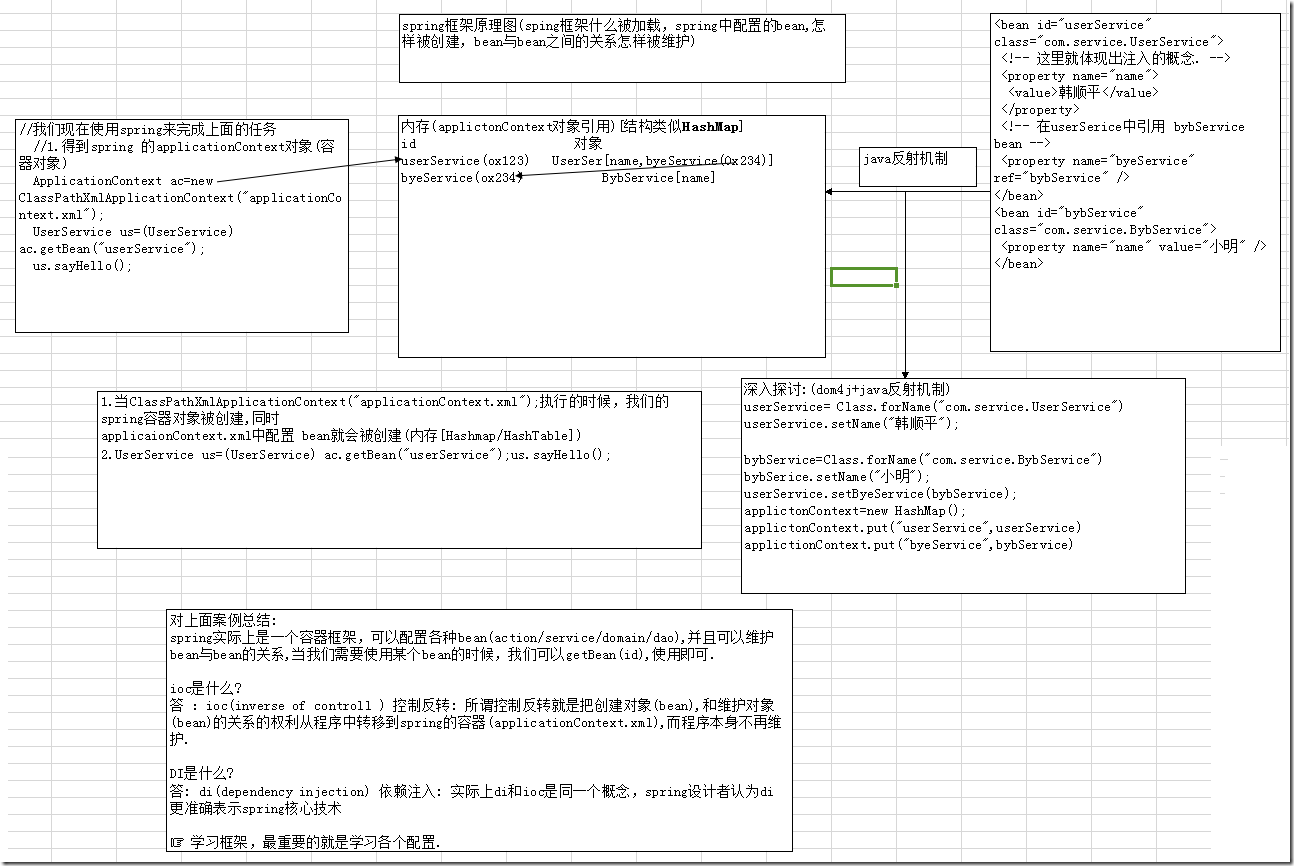
spring的运行原理图:
spring开发提倡接口编程,配合di技术可以层与层的解耦
现在我们体验一下spring的di配合接口编程
例:
建立一个用户验证接口,使用两种不同的验证方法。两种不同的验证方法都继承用户验证接口:
4. bean工厂容器
可以从ApplicationContext 应用上下文容器中获取bean也可以从BeanFactory中获取bean。那他们有什么区别呢?
当从ApplicationContext 中取bean时,是这样的:
怎么验证呢?很简单,因为它是利用反射机制来实现的,所以在实例化对象时会调用该bean的默认构造函数:
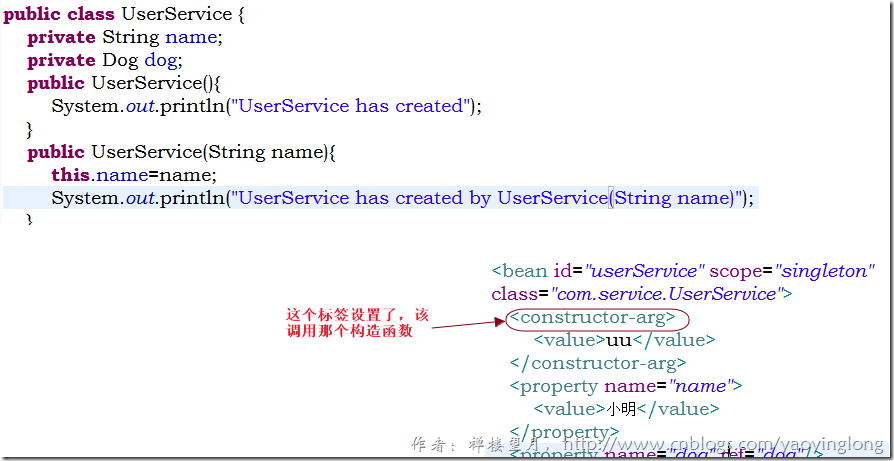
在该bean中加入默认构造函数:
执行该语句时:
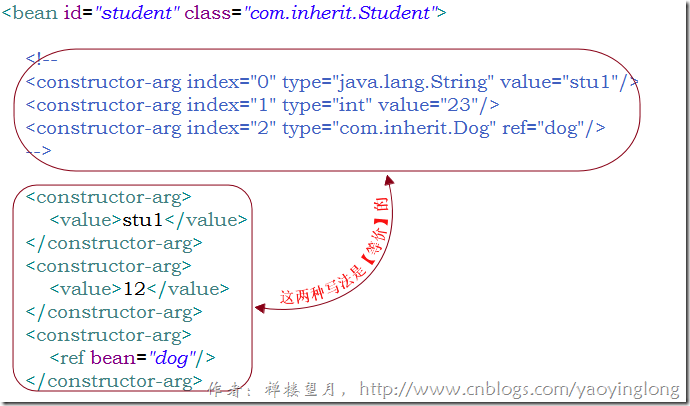
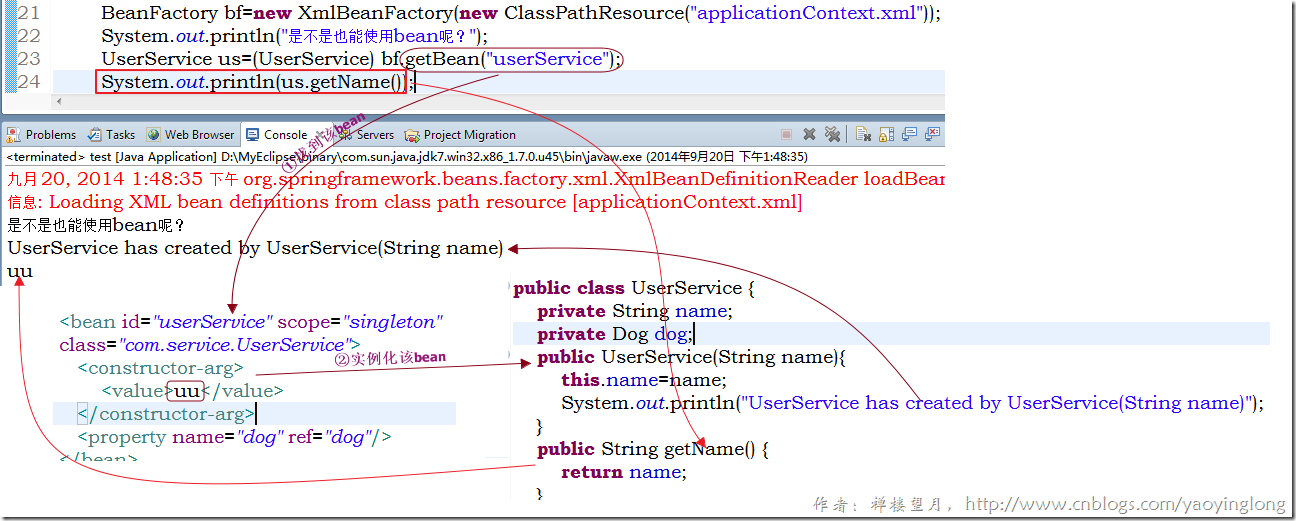
假如我们有需求:用我们自己的构造函数来实例化这个bean。该怎么办呢?→在该bean的配置中添加<constructor-arg>标签(通过构造函数来注入值)
注意:
当从BeanFactory中获取bean时:
当我们开始使用bean时:
由此可见:
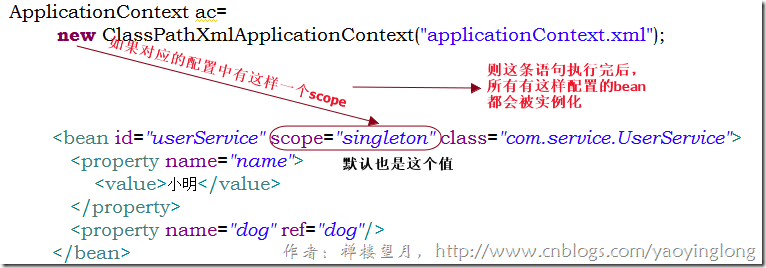
1.如果使用ApplicationContext ,并且配置的bean如果是 singlton(默认),不管你用不用,都被实例化.(好处就是可以预先加载,缺点就是耗内存)
2.如果是 BeanFactory ,则当你获取beanfacotry时候,配置的bean不会被马上实例化,当你使用的时候,才被实例(好处节约内存,缺点就是速度)
3.规定: 一般没有特殊要求,应当使用ApplicatioContext完成(90%)
5. ApplicationContext 对象有3种应用方法
1. ClassPathXmlApplicationContext -> 通过类路径
2. FileSystemXmlApplicationContext -> 通过文件路径
举例:
ApplicationContext ac=new FileSystemXmlApplicationContext("文件路径beans.xml / applicationContext.xml");
3. XmlWebApplicationContext
6. bean生命周期
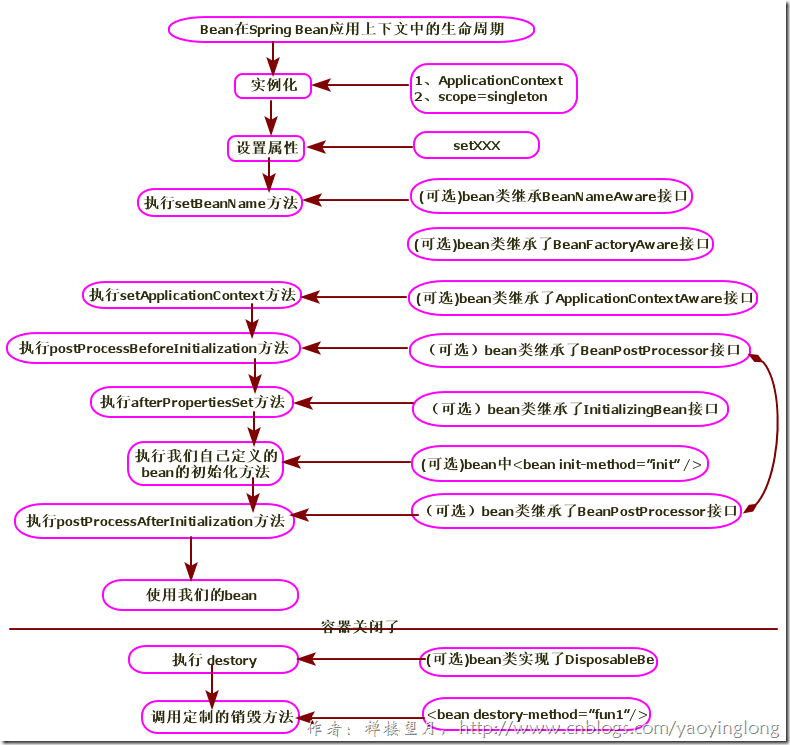
6.1 利用ApplicationContext获取bean时,bean的生命周期
① 实例化(当我们的程序加载beans.xml文件),把我们的bean(前提是scope=singleton)实例化到内存
② 调用set方法设置属性
③ 如果你实现了bean名字关注接口(BeanNameAware) 则,可以通过setBeanName获取Bean的id属性值
④ 如果你实现了bean工厂关注接口(BeanFactoryAware),则可以获取BeanFactory
⑤ 如果你实现了 ApplicationContextAware接口,则调用方法
//该方法传递ApplicationContext
public void setApplicationContext(ApplicationContext arg0) throws BeansException {
System.out.println("setApplicationContext"+arg0);
}
⑥ 如果bean 和 一个BeanPostProcessor(前置处理器)关联,则会自动去调用 Object postProcessBeforeInitialization方法
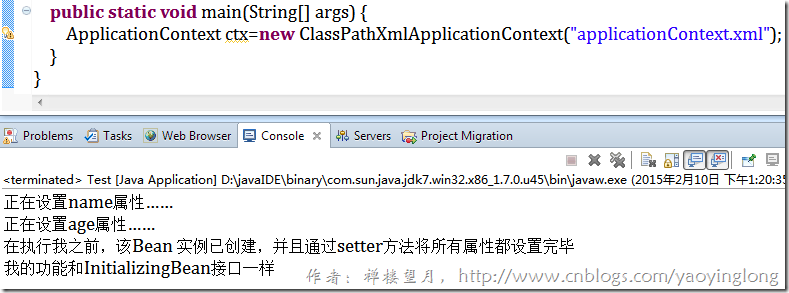
⑦ 如果你实现InitializingBean 接口,则会调用 afterPropertiesSet
⑧ 如果自己在<bean init-method=”init”/> 则可以在bean定义自己的初始化方法.
}
配置:
⑨ 如果bean 和 一个BeanPostProcessor(后置处理器)关联,则会自动去调用 Object postProcessAfterInitialization方法
⑩ 使用我们的bean
11. 容器关闭
12. 可以通过实现DisposableBean 接口来调用方法 destory
13. 可以在<bean destory-method=”fun1”/> 调用定制的销毁方法
12和13的使用和7、8一样。
记住他们的顺序。
小结: 我们实际开发中往往,没有用的这么的过程,常见的是:
1->2->6->10->9->11
6.2 利用BeanFactory获取bean时,bean的生命周期
只经历了以下的接口:
BeanNameAware,BeanFactoryAware,InitializingBean和自己配置的init-method方法。
7. 配置bean的细节
7.1 scope 的说明
singleton(默认):在整个Spring Ioc容器中,使用 scope="singleton" 的bean将只有一个实例。
prototype:每次通过容器的getBean方法获取scope="prototype"的bean时,都将产生一个新的bean实例。
request:每次HTTP请求,使用 scope=" request" 的bean都将产生一个新的bean实例。
session:对于每个HttpSession,使用 scope=" session" 的bean都将产生一个新的bean实例。
global session:每个全局的HttpSession对应一个Bean实例。
![]() ☞ 尽量使用 scope=”singleton” ,不要使用prototype,因为这样对我们的性能影响较大.
☞ 尽量使用 scope=”singleton” ,不要使用prototype,因为这样对我们的性能影响较大.
对有状态的bean应该使用prototype作用域,而对无状态的bean则应该使用singleton作用域。
Spring不能对一个prototype bean的整个生命周期负责。程序每次请求该bean,Spring都会创建一个新的Bean实例,然后交给程序,然后就对该Bean实例不闻不问了。这就意味着,任何配置好的析构生命周期回调方法都将不会被调用。清除prototype作用域的对象并释放任何prototype bean所持有的昂贵资源,都是客户端代码的职责。(让Spring容器释放被prototype作用域bean占用资源的一种可行方式是,通过使用bean的后置处理器,该处理器持有要被清除的bean的引用。)
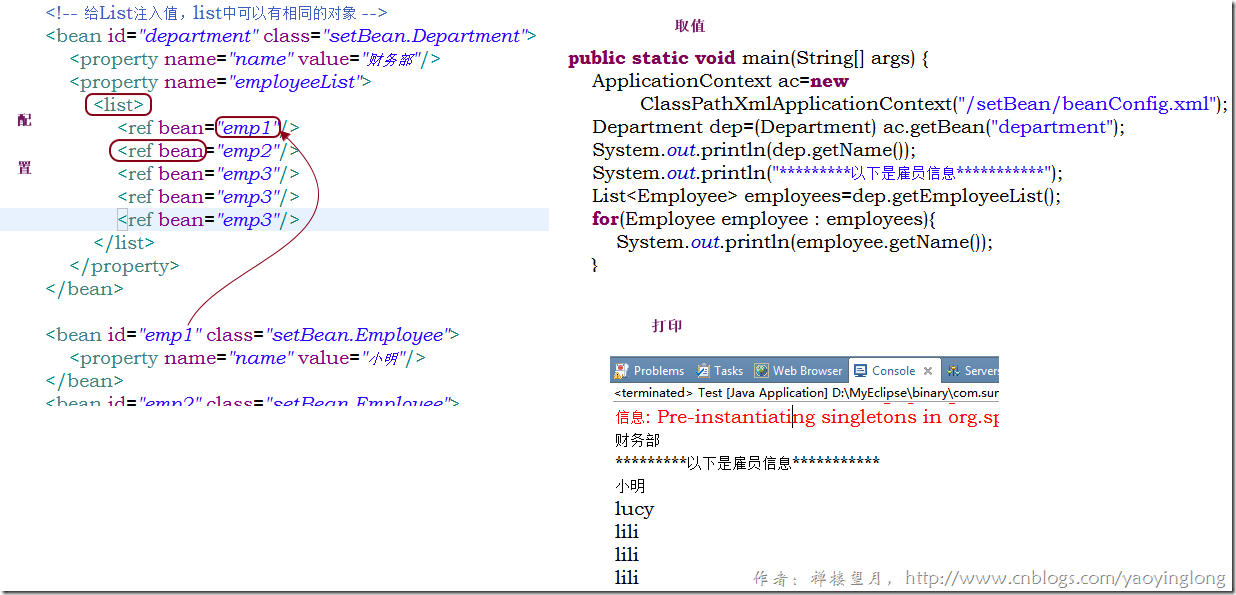
7.2 给集合类型注入值
①给List注入值:
②给数组注入值
和List一样。
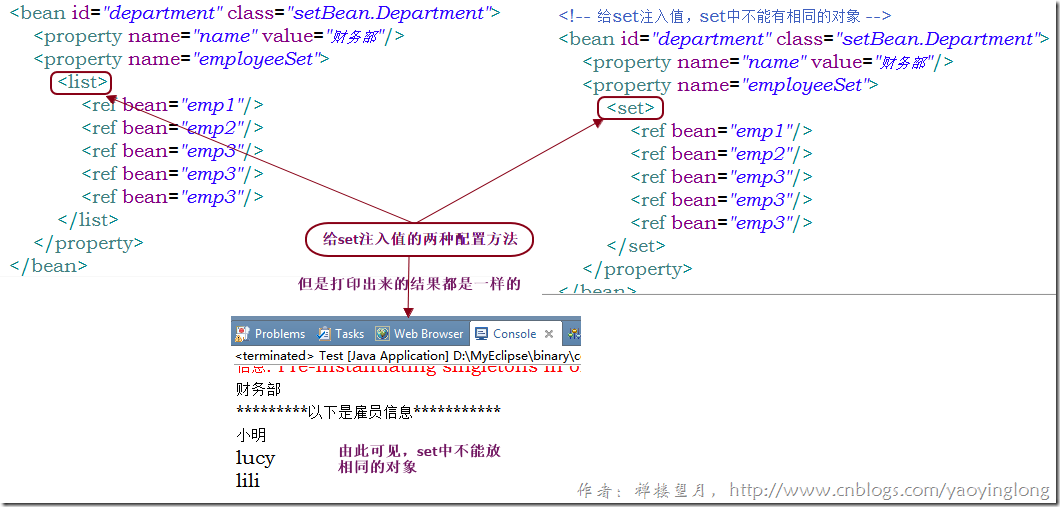
③给set注入值
④向Map注入值
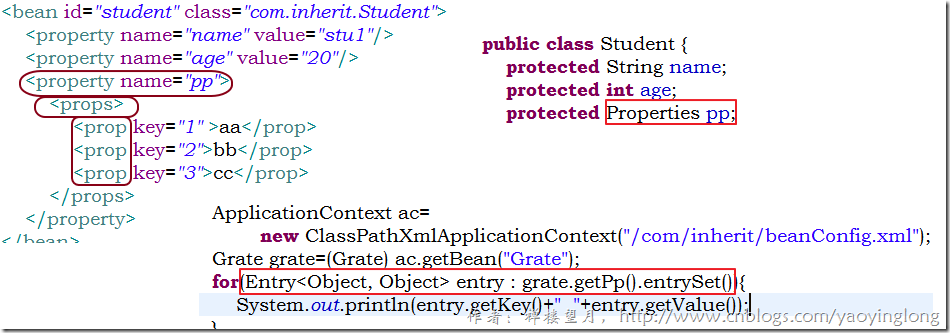
⑤向属性集合注入
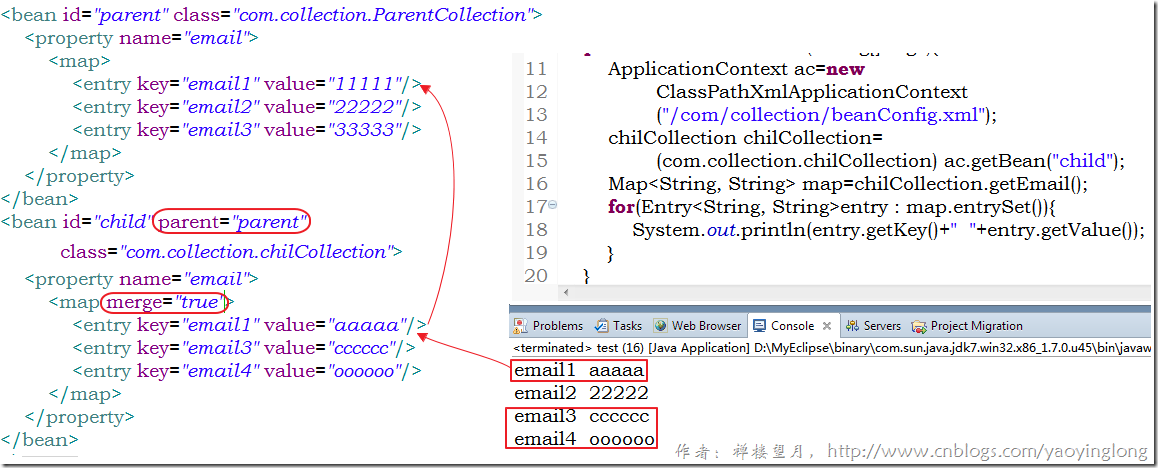
7.3 集合的合并
子集合的值是从其父集合中继承和覆盖而来的。
集合合并只能在spring2.0以后使用并且不同集合是不能合并的。
7.4 强类型集合
在Java5以后才能使用。
public class Foo {
                   private Map<String, Float> accounts;
        public void setAccounts(Map<String, Float> accounts) {
        this.accounts = accounts;
    }
}
<beans>
    <bean id="foo" class="x.y.Foo">
        <property name="accounts">
            <map>
                <entry key="one" value="9.99"/>
                <entry key="two" value="2.75"/>
                <entry key="six" value="3.99"/>
            </map>
        </property>
    </bean>
</beans>
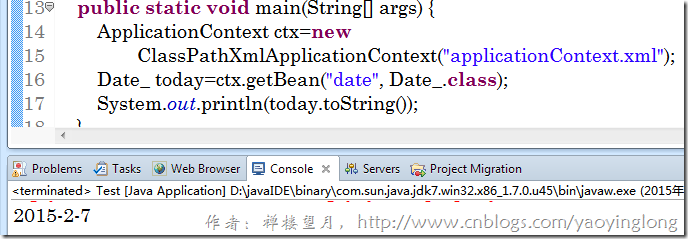
7.5 嵌套Bean
如果某个Bean依赖的Bean不想被Spring容器直接访问,可以使用嵌套bean。
<bean id="date" class="date.Date_">
    <property name="year">
        <bean class="date.Year_">
            <property name="data" value="2015"/>
        </bean>
    </property>
    <property name="month">
        <bean class="date.Month_">
            <property name="data" value="2"/>
        </bean>
    </property>
    <property name="day">
        <bean class="date.Day_">
            <property name="data" value="7"/>
        </bean>
    </property>
</bean>
这样,内部的Bean不能被Spring容器访问,因此不用担心其他程序 修改嵌套的Bean,提高了程序的内聚性,但降低了程序的灵活性。因此只有确定某个Bean实例无需通过Spring容器来访问时,才考虑使用嵌套Bean。
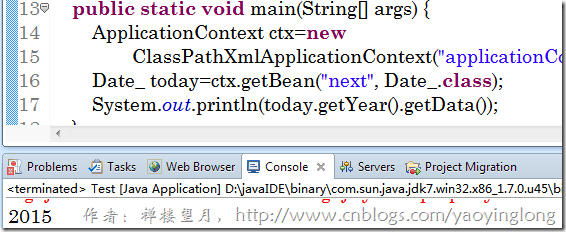
7.6 组合属性注入
public class Date_ {
    private Year_ year=new Year_();
    public Year_ getYear() {
        return year;
    }
    public void setYear(Year_ year) {
        this.year = year;
    }
}
<bean id="next" class="date.Date_">
    <property name="year.data" value="2015"/>
</bean>
7.7 使用抽象Bean
设置属性abstract="true"的Bean是抽象Bean,容器不会创建抽象Bean的实例,也因此,抽象Bean可以没有class属性。
<bean id=" dateTemplate " abstract="true">
</bean>
7.8 使用子Bean
7.8.1 继承自抽象Bean
当我们有大量的Bean要配置到Spring的配置文件中,而这些Bean的大部分配置信息都完全一样,只有少量的信息不一样,这时使用Bean继承是一个很好的办法:
将大部分相同信息配置为Bean模板(抽象Bean)后,将实际的Bean实例配置成为该Bean模板的子Bean即可。
子Bean无法从父Bean继承如下属性:depends-on、autowire、scope、lazy-init,这些属性总是从子Bean中获得,或者采用默认值。子Bean配置可以增加新的配置信息,当子Bean指定的配置信息与父Bean模板信息不一致时,子Bean所制定的配置信息将覆盖父Bean指定的配置信息。
</bean>
如果父Bean配置中有class属性,则子Bean在和父Bean类相同的情况下可以省略掉class属性:
<bean id="dateTemplate" abstract="true" class="date.Date_">
</bean>
![]() 注意,继承自抽象Bean继承只是为了配置参数的复用,并且子Bean的类型不必与抽象Bean的类型(配置了的话)一样。
注意,继承自抽象Bean继承只是为了配置参数的复用,并且子Bean的类型不必与抽象Bean的类型(配置了的话)一样。
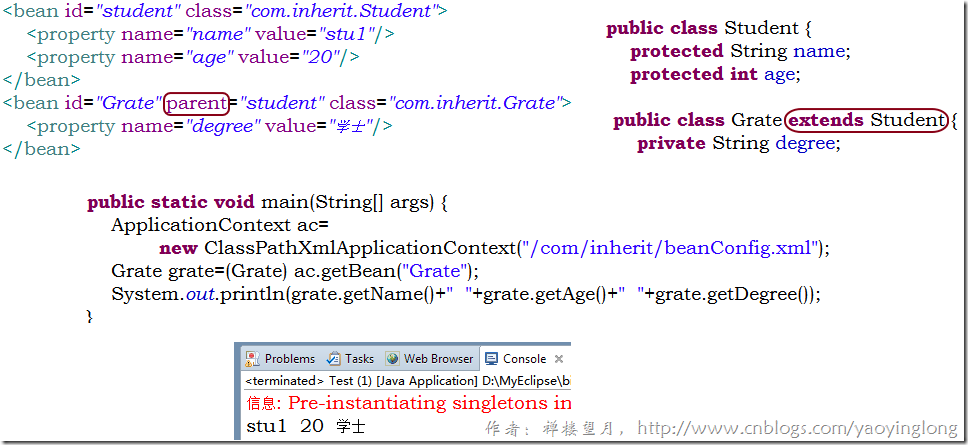
7.8.2 继承实例bean
这种继承与Java语言的继承一样。
7.9 容器中的工厂Bean
实现了FactoryBean接口的Bean成为工厂Bean,并且该Bean只能做为工厂Bean来使用。
}
配置,和普通bean的配置完全一样:
<bean id="briton" class="factoryBean.PersonFactory"/>
测试:
}
由此可见,工厂Bean已经无法作为正常的Bean使用了,客户端请求该工厂Bean的id时,得到是工厂Bean的产品(上面是一个Person)而非工厂Bean的本身。
7.10 获得Bean本身的Id
在前面的程序中,程序总是通过Bean的id从BeanFactory中获取Bean实例。但是现在的需求是,我已经知道了Bean,需要知道配置该Bean时指定的id属性。
BeanNameAware接口提供了setBeanName方法来获取部署在Spring配置文件中的Bean。
}
配置Bean:
<bean id="chinese" class="beanNameAware.Chinese"/>
获取Bean:
}
从程序中我们看到,和获取、使用普通Bean没有任何区别。从程序执行来看,Spring在实例化该Bean的时候,也调用了该Bean的setBeanName方法。
7.11 depengs-on
该属性用于指定当前bean初始化之前或销毁之前需要强制初始化的bean。该属性只对singleton bean有效。指定多个bean是,多个bean之间可以用逗号,空格,分号来分开。
8. Spring中的Null值
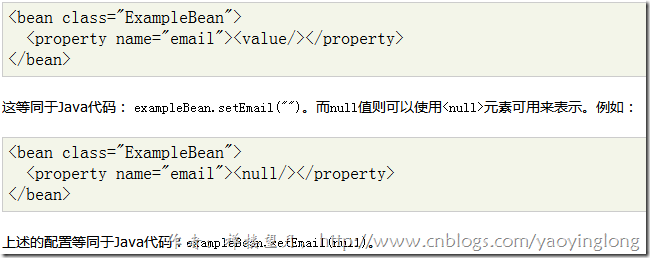
在spring中空值和<null/>是不一样的。
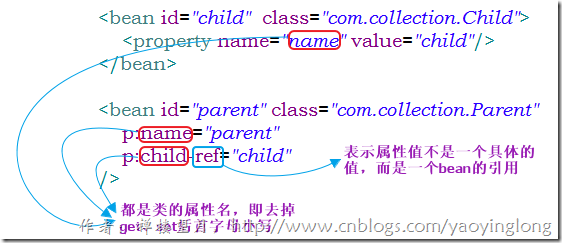
9. XML配置文件的简写
①<property>、<constructor-arg>、<entry>都支持value属性,尽量使用。
②ref也可以是属性。
③使用p命名空间配置属性
xmlns:p="http://www.springframework.org/schema/p"
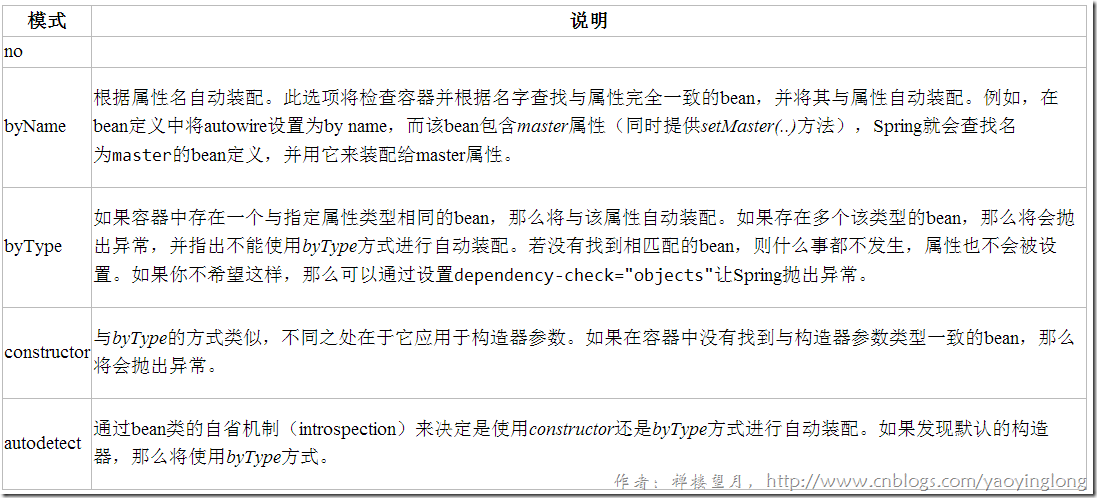
10. 自动装配bean的属性值
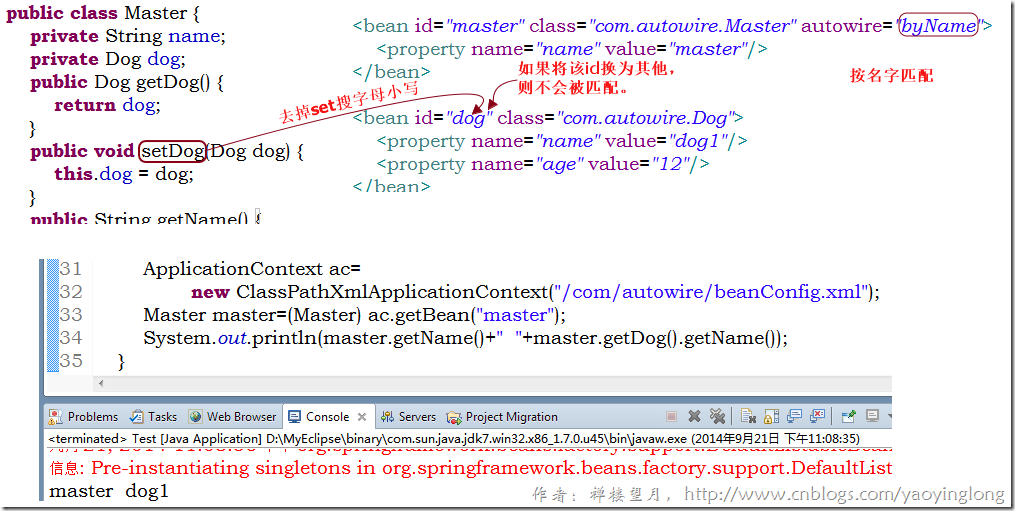
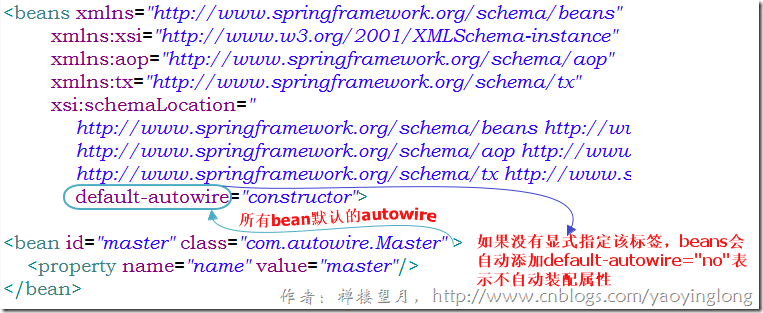
可以通过元素<beans>的default-autowire属性指定,也可以通过<bean>元素的autowire属性
①byName
②byType
寻找和属性的类型相同的bean,找不到,装不上;找到多个,出现异常。
③constructor
④autodetect
再如:
⑤no
不自动装配
11. 分散配置
有两种方法:
①
PropertyPlaceholderConfigurer是个bean工厂后置处理器的实现,可以将BeanFactory定义中的一些属性值放到另一个单独的标准Java Properties文件中。这就允许用户在部署应用时只需要在属性文件中对一些关键属性(例如数据库URL,用户名和密码)进行修改,而不用对主XML定义文件或容器所用文件进行复杂和危险的修改。
考虑下面的XML配置元数据定义,它用占位符定义了DataSource。我们在外部的Properties文件中配置一些相关的属性。在运行时,我们为元数据提供一个PropertyPlaceholderConfigurer,它将会替换dataSource的属性值。


 1 <bean class="org.springframework.beans.factory.config.PropertyPlaceholderConfigurer">
 2  <property name="locations">
 3  <value>classpath:com/foo/jdbc.properties</value>
 4  </property>
 5 </bean>
 6 <bean id="dataSource" destroy-method="close"
 7  class="org.apache.commons.dbcp.BasicDataSource">
 8  <property name="driverClassName" value="${jdbc.driverClassName}"/>
 9  <property name="url" value="${jdbc.url}"/>
10  <property name="username" value="${jdbc.username}"/>
11  <property name="password" value="${jdbc.password}"/>
12 </bean>
实际的值来自于另一个标准Java Properties格式的文件:
jdbc.driverClassName=org.hsqldb.jdbcDriver
jdbc.url=jdbc:hsqldb:hsql://production:9002
jdbc.username=sa
jdbc.password=root
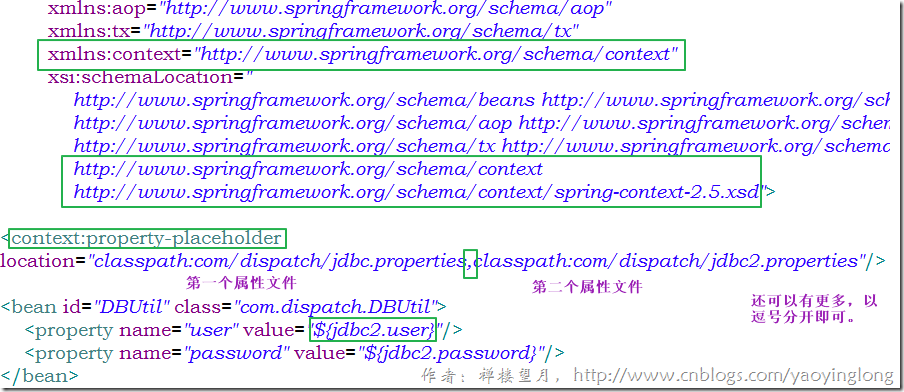
②使用<context:property-placeholder
但是使用这个的时候必须将命名空间引进来,如下所示:


1 <beans xmlns="http://www.springframework.org/schema/beans"
2  xmlns:xsi="http://www.w3.org/2001/XMLSchema-instance"
3  xmlns:context="http://www.springframework.org/schema/context"
4  xsi:schemaLocation="http://www.springframework.org/schema/beans
5  http://www.springframework.org/schema/beans/spring-beans-2.5.xsd
6  http://www.springframework.org/schema/context
7  http://www.springframework.org/schema/context/spring-context-2.5.xsd">
在Spring 2.5中,context名字空间可能采用单一元素属性占位符的方式(多个路径提供一个逗号分隔的列表)
<context:property-placeholder location="classpath:com/foo/jdbc.properties"/>
PropertyPlaceholderConfigurer如果在指定的Properties文件中找不到你想使用的属性,它还会在Java的System类属性中查找。这个行为可以通过设置systemPropertiesMode属性来定制,它有三个值:让配置一直覆盖、让它永不覆盖及让它仅仅在属性文件中找不到该属性时才覆盖。请参考PropertiesPlaceholderConfigurer的JavaDoc以获得更多的信息。









![71450ebd-f68b-4227-b509-a9c8b2127000[1] 71450ebd-f68b-4227-b509-a9c8b2127000[1]](https://images0.cnblogs.com/blog/692756/201502/101448076511800.png)
