一:节点
1.节本基本概念
节点主要有标签,属性,文本【包括文字,空格,换行,回车】。
2.节点的属性
可以使用标签,元素点出来
可以使用标签,点出来
可以使用文本,点出来
nodeType:1--标签,2--属性,3----文本
nodeName:节点名字,标签节点---大写的标签名字,属性节点--小写的属性名字,文本节点--#text
nodeValue:节点的值,标签节点---null,属性节点----属性值,文本节点---文本内容
3.父节点与父元素
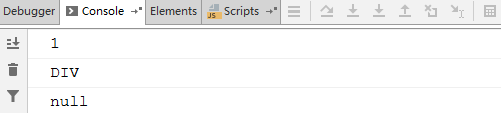
 1 <!DOCTYPE html>
 2 <html lang="en">
 3 <head>
 4     <meta charset="UTF-8">
 5     <title>Title</title>
 6 </head>
 7 <body>
 8     <div id="di">
 9         <soan>这个是一个span</soan>
10         <p>这个是一个p</p>
11         <ul id="uu">
12             <li>111</li>
13             <li>222</li>
14         </ul>
15     </div>
16     <script>
17         var uu = document.getElementById("uu");
18         //找父节点
19         console.log(uu.parentNode);
20         //找父元素
21         console.log(uu.parentElement);
22     </script>
23 </body>
24 </html>
效果:

4.标签节点的属性
 1 <!DOCTYPE html>
 2 <html lang="en">
 3 <head>
 4     <meta charset="UTF-8">
 5     <title>Title</title>
 6 </head>
 7 <body>
 8     <div id="di">
 9         <soan>这个是一个span</soan>
10         <p>这个是一个p</p>
11         <ul id="uu">
12             <li>111</li>
13             <li>222</li>
14         </ul>
15     </div>
16     <script>
17         var uu = document.getElementById("uu");
18         //标签
19         console.log(uu.parentNode.nodeType);  //1
20         console.log(uu.parentNode.nodeName);  //
21         console.log(uu.parentNode.nodeValue);
22     </script>
23 </body>
24 </html>
效果:
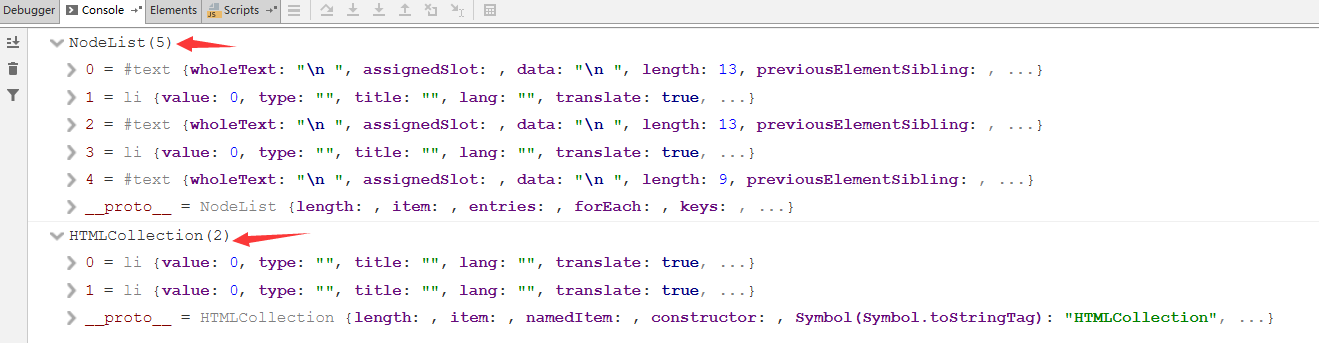
5.子节点与子元素
子节点更多。
 1 <!DOCTYPE html>
 2 <html lang="en">
 3 <head>
 4     <meta charset="UTF-8">
 5     <title>Title</title>
 6 </head>
 7 <body>
 8     <div id="di">
 9         <soan>这个是一个span</soan>
10         <p>这个是一个p</p>
11         <ul id="uu">
12             <li>111</li>
13             <li>222</li>
14         </ul>
15     </div>
16     <script>
17         var uu = document.getElementById("uu");
18         //子节点
19         console.log(uu.childNodes);
20         //子元素
21         console.log(uu.children);
22     </script>
23 </body>
24 </html>
效果:
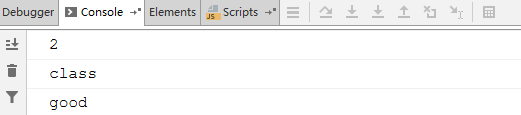
6.属性节点的属性
 1 <!DOCTYPE html>
 2 <html lang="en">
 3 <head>
 4     <meta charset="UTF-8">
 5     <title>Title</title>
 6 </head>
 7 <body>
 8     <div id="di">
 9         <soan>这个是一个span</soan>
10         <p>这个是一个p</p>
11         <ul id="uu" class="good">
12             <li>111</li>
13             <li>222</li>
14         </ul>
15     </div>
16     <script>
17         var uu = document.getElementById("uu");
18         var node = uu.getAttributeNode("class");
19         console.log(node.nodeType);
20         console.log(node.nodeName);
21         console.log(node.nodeValue);
22     </script>
23 </body>
24 </html>
效果:
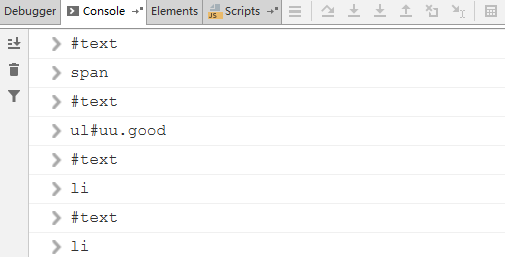
7.12行代码
 1 <!DOCTYPE html>
 2 <html lang="en">
 3 <head>
 4     <meta charset="UTF-8">
 5     <title>Title</title>
 6 </head>
 7 <body>
 8     <div id="di">
 9         <span>这个是一个span</span>
10         <p>这个是一个p</p>
11         <ul id="uu" class="good">
12             <li>111</li>
13             <li>222</li>
14             <li id="current">333</li>
15             <li>444</li>
16         </ul>
17     </div>
18     <script>
19         var di = document.getElementById("di");
20         //第一个字节点
21         console.log(di.firstChild);
22         //第一个子元素
23         console.log(di.firstElementChild);
24         //最后一个子节点
25         console.log(di.lastChild);
26         //最后一个子元素
27         console.log(di.lastElementChild);
28         //摸一个元素的前一个兄弟节点
29         console.log(document.getElementById("current").previousSibling);
30         //摸一个元素的前一个兄弟元素
31         console.log(document.getElementById("current").previousElementSibling);
32         //摸一个元素的后一个兄弟节点
33         console.log(document.getElementById("current").nextSibling);
34         //摸一个元素的后一个兄弟元素
35         console.log(document.getElementById("current").nextElementSibling);
36     </script>
37 </body>
38 </html>
效果:
8.总结
获取节点的代码,在谷歌和火狐得到的都是相关的节点
获取元素的代码在谷歌和火狐的都是相关的元素
从子节点和兄弟节点开始,获取节点的代码在IE8中的得到的是元素,获取元素的代码,在IE8中得到的是undefined,元素的代码,IE中不支持。
二:案例
1.点击按钮,让div下的p变色
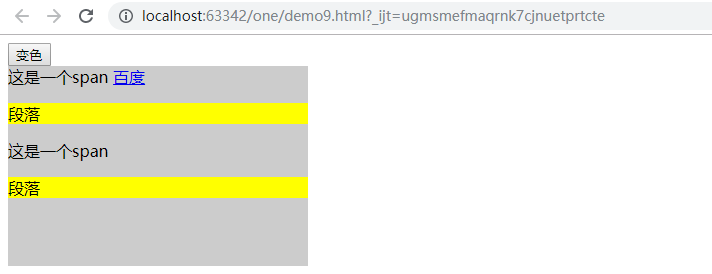
遍历出所有的节点,然后节点的类型是1,名称是大写的P即可。
 1 <!DOCTYPE html>
 2 <html lang="en">
 3 <head>
 4     <meta charset="UTF-8">
 5     <title>Title</title>
 6     <style>
 7         div {
 8             width: 300px;
 9             height: 200px;
10             background-color: #ccc;
11         }
12     </style>
13 </head>
14 <body>
15     <input type="button" value="变色" id="btn">
16     <div id="div">
17         <span>这是一个span</span>
18         <a href="#">百度</a>
19         <p>段落</p>
20         <span>这是一个span</span>
21         <p>段落</p>
22     </div>
23     <script>
24         document.getElementById("btn").onclick=function () {
25             var div = document.getElementById("div");
26             var nodes=div.childNodes;
27             for(var i=0;i<nodes.length;i++){
28                 if(nodes[i].nodeType==1 && nodes[i].nodeName=="P"){
29                     nodes[i].style.backgroundColor='yellow';
30                 }
31             }
32         }
33     </script>
34 </body>
35 </html>
效果:
2.兼容代码【获取第一个子元素】
 1 <!DOCTYPE html>
 2 <html lang="en">
 3 <head>
 4     <meta charset="UTF-8">
 5     <title>Title</title>
 6     <style>
 7         div {
 8             width: 300px;
 9             height: 200px;
10             background-color: #ccc;
11         }
12     </style>
13 </head>
14 <body>
15     <ul>
16         <li></li>
17         <li></li>
18         <li></li>
19         <li></li>
20         <li></li>
21     </ul>
22     <script>
23         // firstElementChild:谷歌与火狐都可以得到第一个元素,但是IE不行,只能使用其支持的firstChild。
24         // 关于firstChild,IE是获取元素,不想是谷歌与火狐一样得到的是节点。IE只支持firstChild。
25
26         //获取第一个子元素
27        function getFirstEleChildByParentEle(parentEle) {
28             if(parentEle.firstElementChild){
29                 //支持,这种是谷歌与火狐得到第一个元素
30                 return parentEle.firstElementChild;
31             }else{
32                 //不支持,所以需要IE8使用别的函数
33                 var node = parentEle.firstChild;
34                 while(node && node.nodeType!=1){
35                     node=node.nextSibling;
36                 }
37             }
38        }
39     </script>
40 </body>
41 </html>
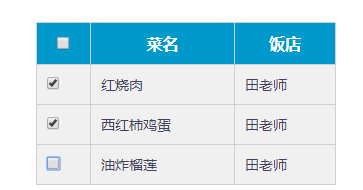
3.全选与全不选
  1 <!DOCTYPE html>
  2 <html lang="en">
  3 <head>
  4     <meta charset="UTF-8">
  5     <title>Title</title>
  6     <style>
  7         * {
  8             padding: 0;
  9             margin: 0;
 10         }
 11
 12         .wrap {
 13             width: 300px;
 14             margin: 100px auto 0;
 15         }
 16
 17         table {
 18             border-collapse: collapse;
 19             border-spacing: 0;
 20             border: 1px solid #c0c0c0;
 21             width: 300px;
 22         }
 23
 24         th,
 25         td {
 26             border: 1px solid #d0d0d0;
 27             color: #404060;
 28             padding: 10px;
 29         }
 30
 31         th {
 32             background-color: #09c;
 33             font: bold 16px "微软雅黑";
 34             color: #fff;
 35         }
 36
 37         td {
 38             font: 14px "微软雅黑";
 39         }
 40
 41         tbody tr {
 42             background-color: #f0f0f0;
 43         }
 44
 45         tbody tr:hover {
 46             cursor: pointer;
 47             background-color: #fafafa;
 48         }
 49     </style>
 50 </head>
 51 <body>
 52 <div class="wrap">
 53     <table>
 54         <thead>
 55             <tr>
 56                 <th>
 57                     <input type="checkbox" id="j_cbAll"/>
 58                 </th>
 59                 <th>菜名</th>
 60                 <th>饭店</th>
 61             </tr>
 62         </thead>
 63         <tbody id="j_tb">
 64             <tr>
 65                 <td>
 66                     <input type="checkbox"/>
 67                 </td>
 68                 <td>红烧肉</td>
 69                 <td>田老师</td>
 70             </tr>
 71             <tr>
 72                 <td>
 73                     <input type="checkbox"/>
 74                 </td>
 75                 <td>西红柿鸡蛋</td>
 76                 <td>田老师</td>
 77             </tr>
 78             <tr>
 79                 <td>
 80                     <input type="checkbox"/>
 81                 </td>
 82                 <td>油炸榴莲</td>
 83                 <td>田老师</td>
 84             </tr>
 85         </tbody>
 86     </table>
 87     <script>
 88         var all = document.getElementById("j_cbAll");
 89         var cks = document.getElementById("j_tb").getElementsByTagName("input");
 90         //点击全选的状态,获取其状态,然后根据本状态设置tbody中的所有复选框的状态
 91         all.onclick=function () {
 92             for(var i=0;i<cks.length;i++){
 93                 cks[i].checked=this.checked;
 94             }
 95         }
 96         //根据下面选中的,决定上面是否选中
 97         //给下面的添加点击事件
 98         for(var j=0;j<cks.length;j++){
 99             cks[j].onclick=function () {
100                 var flag=true;
101                 for(var k=0;k<cks.length;k++){
102                     if(!cks[k].checked){
103                         flag=false;
104                         break;
105                     }
106                 }
107                 all.checked=flag;
108             }
109         }
110     </script>
111 </div>
112 </body>
113 </html>
效果:
三:元素的创建
1.说明
为了提高用户体验
创建方式有三种:
document.write()
对象.innerHTML=""
document.createElement("标签的名字")
2.第一种方式
这种方式,会将原本的东西都给清除掉。
 1 <!DOCTYPE html>
 2 <html lang="en">
 3 <head>
 4     <meta charset="UTF-8">
 5     <title>Title</title>
 6 </head>
 7 <body>
 8     <input type="button" value="单击" id="btn">
 9     <script>
10         document.getElementById("btn").onclick=function () {
11             document.write("<p>这是一个段落</p>")
12         }
13     </script>
14 </body>
15 </html>
效果:

3.第三种方式
<!DOCTYPE html>
<html lang="en">
<head>
    <meta charset="UTF-8">
    <title>Title</title>
    <style>
        div {
             300px;
            height: 200px;
        }
    </style>
</head>
<body>
    <input type="button" value="单击" id="btn">
    <div id="di"></div>
    <script>
        //设置任意元素的中间的文本内容
        function setInnnerText(element,text) {
            if(typeof element.textContent=="undefined"){
                element.innerText=text;
            }else{
                element.textContent=text;
            }
        }

        document.getElementById("btn").onclick=function () {
            var pObj = document.createElement("p");         // 返回p对象
            setInnnerText(pObj,"这是一个p");
            document.getElementById("di").appendChild(pObj);//追加
        }
    </script>
</body>
</html>
四:元素的相关方法
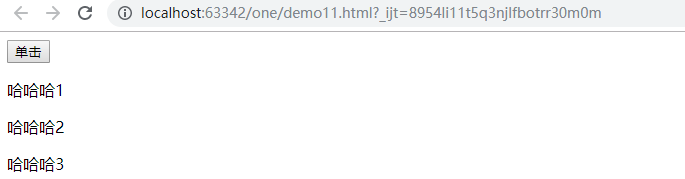
1.在前面插入元素
appendChild这个方式是追加到后面的意思。
要是在某个元素之前,可以使用insertBefore
 1 <!DOCTYPE html>
 2 <html lang="en">
 3 <head>
 4     <meta charset="UTF-8">
 5     <title>Title</title>
 6     <style>
 7         div {
 8             width: 300px;
 9             height: 200px;
10         }
11     </style>
12 </head>
13 <body>
14     <input type="button" value="单击" id="btn">
15     <div id="di"></div>
16     <script>
17        var i=0;
18         document.getElementById("btn").onclick=function () {
19             i++;
20             var pObj = document.createElement("p");         // 返回p对象
21             pObj.innerText="哈哈哈"+i;
22             document.getElementById("di").appendChild(pObj);//追加
23         }
24     </script>
25 </body>
26 </html>
效果:
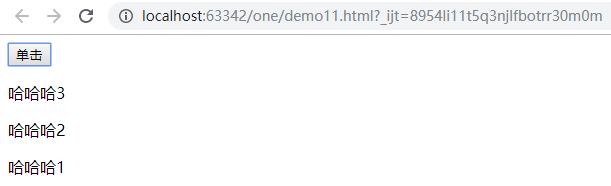
插入前面:
 1 <!DOCTYPE html>
 2 <html lang="en">
 3 <head>
 4     <meta charset="UTF-8">
 5     <title>Title</title>
 6     <style>
 7         div {
 8             width: 300px;
 9             height: 200px;
10         }
11     </style>
12 </head>
13 <body>
14     <input type="button" value="单击" id="btn">
15     <div id="di"></div>
16     <script>
17        var i=0;
18         document.getElementById("btn").onclick=function () {
19             i++;
20             var pObj = document.createElement("p");         // 返回p对象
21             pObj.innerText="哈哈哈"+i;
22             document.getElementById("di").insertBefore(pObj,document.getElementById("di").firstElementChild);//追加
23         }
24     </script>
25 </body>
26 </html>
效果:
2.移除元素
 1 <!DOCTYPE html>
 2 <html lang="en">
 3 <head>
 4     <meta charset="UTF-8">
 5     <title>Title</title>
 6     <style>
 7         div {
 8             width: 300px;
 9             height: 200px;
10         }
11     </style>
12 </head>
13 <body>
14     <input type="button" value="单击" id="btn">
15     <div id="di"></div>
16     <input type="button" value="单击" id="btn2">
17     <script>
18         //添加元素
19         var i=0;
20         document.getElementById("btn").onclick=function () {
21             i++;
22             var pObj = document.createElement("p");         // 返回p对象
23             pObj.innerText="哈哈哈"+i;
24             document.getElementById("di").insertBefore(pObj,document.getElementById("di").firstElementChild);//追加
25         }
26         //
27         document.getElementById("btn2").onclick=function () {
28             //移除第一个元素
29             document.getElementById("di").removeChild(document.getElementById("di").firstElementChild);
30         }
31     </script>
32 </body>
33 </html>
3.删除所有的元素
 1 <!DOCTYPE html>
 2 <html lang="en">
 3 <head>
 4     <meta charset="UTF-8">
 5     <title>Title</title>
 6     <style>
 7         div {
 8             width: 300px;
 9             height: 200px;
10         }
11     </style>
12 </head>
13 <body>
14     <input type="button" value="单击" id="btn">
15     <div id="di"></div>
16     <input type="button" value="单击" id="btn2">
17     <script>
18         //添加元素
19         var i=0;
20         document.getElementById("btn").onclick=function () {
21             i++;
22             var pObj = document.createElement("p");         // 返回p对象
23             pObj.innerText="哈哈哈"+i;
24             document.getElementById("di").insertBefore(pObj,document.getElementById("di").firstElementChild);//追加
25         }
26         //
27         document.getElementById("btn2").onclick=function () {
28             while(document.getElementById("di").firstElementChild){
29                 document.getElementById("di").removeChild(document.getElementById("di").firstElementChild);
30             }
31
32         }
33     </script>
34 </body>
35 </html>
4.绑定多个事件
addEventListener函数,火狐与谷歌支持,但是IE8不支持。里面有三个参数
第一个:事件类型,不加on,字符串类型
第二个:事件处理的函数
第三个:布尔类型,写false
 1 <!DOCTYPE html>
 2 <html lang="en">
 3 <head>
 4     <meta charset="UTF-8">
 5     <title>Title</title>
 6 </head>
 7 <body>
 8     <input type="button" value="单击" id="btn">
 9     <script>
10         document.getElementById("btn").addEventListener("click",function () {
11             console.log("999");
12         },false)
13         document.getElementById("btn").addEventListener("click",function () {
14             console.log("999");
15         },false)
16         document.getElementById("btn").addEventListener("click",function () {
17             console.log("999");
18         },false)
19     </script>
20 </body>
21 </html>
效果:

attachEvent函数,谷歌与火狐不支持,有两个参数,
第一个是事件,需要加on
第二个是函数
程序不写了
5.兼容代码
 1 <!DOCTYPE html>
 2 <html lang="en">
 3 <head>
 4     <meta charset="UTF-8">
 5     <title>Title</title>
 6 </head>
 7 <body>
 8     <input type="button" value="按钮" id="btn"/>
 9     <script>
10         //为任意元素.绑定任意的事件, 任意的元素,事件的类型,事件处理函数
11         function addEventListener(element,type,fn) {
12             //判断浏览器是否支持这个方法
13             if(element.addEventListener){
14                 element.addEventListener(type,fn,false);
15             }else if(element.attachEvent){
16                 element.attachEvent("on"+type,fn);
17             }else{
18                 element["on"+type]=fn;
19             }
20         }
21     </script>
22 </body>
23 </html>