时间模块(time和datetime)
time模块

  1时间模块优先掌握的操作

  时间分为三种格式

  第一种:时间戳 从1970年就要开始计时到现在的秒数
      ~作用:用于时间间隔的计算
1 import time
2 res=time.time()
3 print(res)
# 输出结果:   1595684090.4307303

第二种: 按照某种格式显示时间:2020-07-25 02:30:00
       ~作用:用于展示时间(具体举例)
1 import  time
2 res1=time.strftime("%Y-%m-%d %H:%M:%S %p")#这里注意格式的大小写
3 print(res1)
4 res2=time.strftime("%Y-%m-%d %X %p")#这种简单些  与res1一样
5 print(res2)
# res1 输出结果:2020-07-25 21:46:49 PM
# res2 输出结果:2020-07-25 21:46:49 PM

第三种: 结构化的时间
       ~作用:用于单独的获取时间的某一部分
1 import time
2 res =time.localtime() #提取的是现在所有的时间包括所有
3 print(res)
4
5 res1 = res.tm_year #提取时间 :年 2020
6 res2 =res.tm_mday#提取时间 :天  25
7 print(res1,res2)
# 输出结果:
# time.struct_time(tm_year=2020, tm_mon=7, tm_mday=25,
# tm_hour=21, tm_min=55, tm_sec=29, tm_wday=5, tm_yday=207,
# tm_isdst=0)


datatime模块
  常用的如下:
1 import datetime
2 import  time
3 print(datetime.datetime.now()) #返回 2020-07-25 22:09:11.938874
4 print(datetime.date.fromtimestamp(time.time()) )  # 时间戳直接转成日期格式 2020-07-25
5 print(datetime.datetime.now() )
6 print(datetime.datetime.now() + datetime.timedelta(3)) #当前时间+3天
7 print(datetime.datetime.now() + datetime.timedelta(-3)) #当前时间-3天
8 print(datetime.datetime.now() + datetime.timedelta(hours=3)) #当前时间+3小时
9 print(datetime.datetime.now() + datetime.timedelta(minutes=30)) #当前时间+30分
# 输出结果
2020-07-25 22:09:11.938874
2020-07-25
2020-07-25 22:09:11.938874
2020-07-28 22:09:11.938874
2020-07-22 22:09:11.938874
2020-07-26 01:09:11.938874
2020-07-25 22:39:11.938874


2时间模块需要掌握的操作 :时间格式的转换
struct_time->时间戳
1 import time
2 s_time=time.localtime()
3 print(s_time)
4 print(time.mktime(s_time))

# 输出结果
time.struct_time(tm_year=2020, tm_mon=7, tm_mday=25, tm_hour=22,tm_min=43, tm_sec=9, tm_wday=5, tm_yday=207, tm_isdst=0)
1595688189.0
时间戳->struct_time 和上面的相反
1 import time
2 tp_time=time.time()
3 print(tp_time)
4 print(time.localtime(tp_time))
# 补充:世界标准时间与本地时间
 1 import time
 2 print(time.localtime())
 3 print(time.gmtime()) # 世界标准时间,了解
 4
 5 print(time.localtime(1595688189.0))  #里面填的是秒 从1970年开始进行推算的
 6 print(time.gmtime(1111111)) #里面填的是秒 从1970年开始进行推算的
 7
 8
 9 # struct_time->格式化的字符串形式的时间
10 import time
11 s_time=time.localtime()
12 print(s_time)
13 print(time.strftime('%Y-%m-%d %H:%M:%S',s_time))
14
15 print(time.strptime('1988-03-03 11:11:11','%Y-%m-%d %H:%M:%S'))
16
17 # !!!真正需要掌握的只有一条:format string<------>timestamp
18 # '1988-03-03 11:11:11'+7
19 # format string--->struct_time--->timestamp
20
21 import time
22 struct_time=time.strptime('1988-03-03 11:11:11','%Y-%m-%d %H:%M:%S')
23 timestamp=time.mktime(struct_time)+7*86400
24 print(timestamp)
25
26 # format string<---struct_time<---timestamp
27 import time
28 res=time.strftime('%Y-%m-%d %X',time.localtime(timestamp))
29 print(res)
30
31 time.sleep(3)
了解知识
1 import time
2 print(time.asctime())
3
4
5 import datetime
6 # print(datetime.datetime.now())
7 # print(datetime.datetime.utcnow())
8
9 print(datetime.datetime.fromtimestamp(333333))
补充知识:
 1.0格式化字符串的时间格式
%a    Locale’s abbreviated weekday name.   语言环境的缩写工作日名称。
%A    Locale’s full weekday name.     区域设置的平日名称。
%b    Locale’s abbreviated month name.    语言环境的缩写月份名称。
%B    Locale’s full month name.     语言环境的完整月份名称。
%c    Locale’s appropriate date and time representation.    语言环境的适当日期和时间表示。
%d    Day of the month as a decimal number [01,31].     以十进制数[01,31]表示的月份中的一天。
%H    Hour (24-hour clock) as a decimal number [00,23].  小时(24小时制)为十进制数字[00,23]。

%I    Hour (12-hour clock) as a decimal number [01,12].    小时(12小时制)为十进制数字[01,12]。
%j    Day of the year as a decimal number [001,366].     一年中的天,以十进制数字[001,366]为准。

%m    Month as a decimal number [01,12].     以十进制数字[01,12]表示的月份。
%M    Minute as a decimal number [00,59].     分钟以十进制数字[00,59]表示。
%p    Locale’s equivalent of either AM or PM.    (1)相当于AM或PM的语言环境。 (1)
%S    Second as a decimal number [00,61].    (2) 第二个十进制数字[00,61]。 (2)
%U    Week number of the year (Sunday as the first day of the week) as a decimal number [00,53].
        一年中的周号(星期日为一周的第一天),以十进制数[00,53]。
      All days in a new year preceding the first Sunday are considered to be in week 0.    (3)
                第一个星期日之前的新年所有天数都视为在第0周。(3)
%w    Weekday as a decimal number [0(Sunday),6]. 工作日为十进制数字[o(Sunday),6]。
%W    Week number of the year (Monday as the first day of the week) as a decimal number [00,53].
      一年中的周号(星期一为一周的第一天),以十进制数表示[00,53]。
      All days in a new year preceding the first Monday are considered to be in week 0.    (3)
      在第一个星期一之前的新的AlL天被认为是在o周。 (3)
%x    Locale’s appropriate date representation.   语言环境的适当日期表示形式。

%X    Locale’s appropriate time representation.  语言环境的适当时间表示形式。
%y    Year without century as a decimal number [00,99].   没有世纪的年份作为十进制数字[00,99]。
%Y    Year with century as a decimal number.    以世纪作为十进制数字的年份。
%z    Time zone offset indicating a positive or negative time difference from UTC/GMT of the form +HHMM or -HHMM,
      where H represents decimal hour digits and M represents decimal minute digits [-23:59, +23:59].
      时区偏移量,表示与UTC / GMT的正或负时差,格式为+ HHMM或-HHMM,其中H代表十进制小时数字,M代表十进制分钟数字[-23:59,+23:59]。

%Z    Time zone name (no characters if no time zone exists).   时区名称(如果不存在时区,则没有字符)。

%%    A literal '%' character.文字的字符。
2.0 时间格式转换
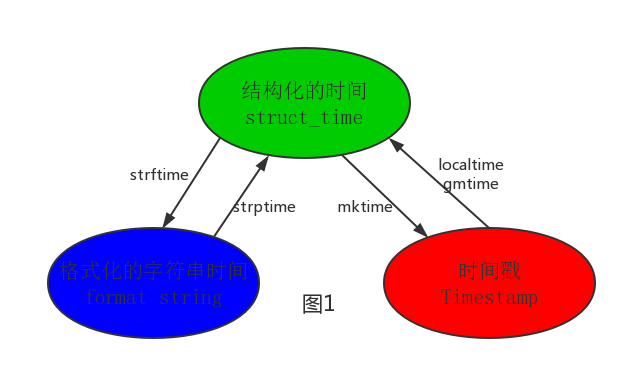
其中计算机认识的时间只能是'时间戳'格式,而程序员可处理的或者说人类能看懂的时间有: '格式化的时间字符串','结构化的时间' ,
于是有了下图的转换关系

 1 #--------------------------按图1转换时间
 2 # localtime([secs])
 3 # 将一个时间戳转换为当前时区的struct_time。secs参数未提供,则以当前时间为准。
 4 time.localtime()
 5 time.localtime(1473525444.037215)
 6
 7 # gmtime([secs]) 和localtime()方法类似,gmtime()方法是将一个时间戳转换为UTC时区(0时区)的struct_time。
 8
 9 # mktime(t) : 将一个struct_time转化为时间戳。
10 print(time.mktime(time.localtime()))#1473525749.0
11
12
13 # strftime(format[, t]) : 把一个代表时间的元组或者struct_time(如由time.localtime()和
14 # time.gmtime()返回)转化为格式化的时间字符串。如果t未指定,将传入time.localtime()。如果元组中任何一个
15 # 元素越界,ValueError的错误将会被抛出。
16 print(time.strftime("%Y-%m-%d %X", time.localtime()))#2016-09-11 00:49:56
17
18 # time.strptime(string[, format])
19 # 把一个格式化时间字符串转化为struct_time。实际上它和strftime()是逆操作。
20 print(time.strptime('2011-05-05 16:37:06', '%Y-%m-%d %X'))
21 #time.struct_time(tm_year=2011, tm_mon=5, tm_mday=5, tm_hour=16, tm_min=37, tm_sec=6,
22 #  tm_wday=3, tm_yday=125, tm_isdst=-1)
23 #在这个函数中,format默认为:"%a %b %d %H:%M:%S %Y"。

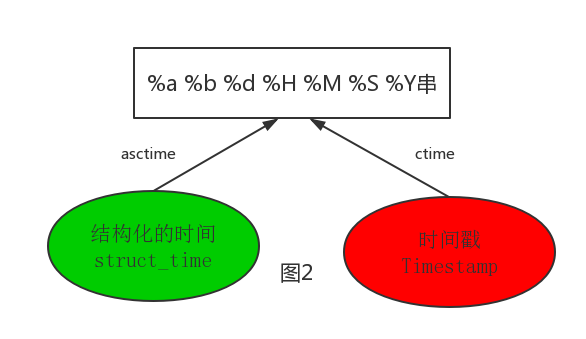
1 1 #--------------------------按图2转换时间
2 2 # asctime([t]) : 把一个表示时间的元组或者struct_time表示为这种形式:'Sun Jun 20 23:21:05 1993'。
3 3 # 如果没有参数,将会将time.localtime()作为参数传入。
4 4 print(time.asctime())#Sun Sep 11 00:43:43 2016
5 5
6 6 # ctime([secs]) : 把一个时间戳(按秒计算的浮点数)转化为time.asctime()的形式。如果参数未给或者为
7 7 # None的时候,将会默认time.time()为参数。它的作用相当于time.asctime(time.localtime(secs))。
8 8 print(time.ctime())  # Sun Sep 11 00:46:38 2016
9 9 print(time.ctime(time.time()))  # Sun Sep 11 00:46:38 2016
random模块
基础使用
优先掌握
 1 import  random
 2 res=random.random()  #(0,1)----float    大于0且小于1之间的小数
 3 print(res)
 4
 5 res1=random.randint(1,10) # [1,10]    大于等于1且小于等于10之间的整数
 6 print(res1)
 7
 8 res2=random.randrange(1,10) # [1,10) 大于等于1且小于10之间的整数
 9 print(res2)
10
11 res3=random.choice([111, 'aaa', [4, 5]]) # 1或者"aaa"或者[4,5]
12 print(res3)
13
14 res4=random.uniform(1, 3) #大于1小于3的小数,如1.927109612082716
15 print(res4)
16
17 item=[1,2,3,4,5,6,7,8,9,10] #说白了就是 打乱item的顺序,相当于"洗牌"
18 random.shuffle(item)
19 print(item)
20
21
22
23 # 应用:随机验证码
24
25 import random
26
27 res=''
28 for i in range(6):
29     # 从26大写字母中随机取出一个 =l1
30     l1=chr(random.randint(65,90))
31     # 从10个数字中随机取出一个
32     l2=str(random.randint(0,9))
33     # 随机字符 l3
34     l3=random.choice([l1,l2])
35     res+=l3
36
37 print(res)
38
39
40 #  用函数进行编写
41
42 import random
43 def make_code(size=4):
44     res=''
45     for i in range(size):
46         s1=chr(random.randint(65,90))  #这里面的是ASCAll码
47         s2=str(random.randint(0,9))
48         res+=random.choice([s1,s2])
49     return res
50
51 print(make_code(6))
汇总(需自己查找) 推荐:https://www.w3school.com.cn/python/index.asp
 1 random 模块有一组如下的方法:
 2
 3 方法    描述
 4 seed()    初始化随机数生成器。
 5 getstate()    返回随机数生成器的当前内部状态。
 6 setstate()    恢复随机数生成器的内部状态。
 7 getrandbits()    返回表示随机位的数字。
 8 randrange()    返回给定范围之间的随机数。
 9 randint()    返回给定范围之间的随机数。
10 choice()    返回给定序列中的随机元素。
11 choices()    返回一个列表,其中包含给定序列中的随机选择。
12 shuffle()    接受一个序列,并以随机顺序返回此序列。
13 sample()    返回序列的给定样本。
14 random()    返回 0 与 1 之间的浮点数。
15 uniform()    返回两个给定参数之间的随机浮点数。
16 triangular()    返回两个给定参数之间的随机浮点数,您还可以设置模式参数以指定其他两个参数之间的中点。
17 betavariate()    基于 Beta 分布(用于统计学)返回 0 到 1 之间的随机浮点数。
18 expovariate()    基于指数分布(用于统计学),返回 0 到 1 之间的随机浮点数,如果参数为负,则返回 0 到 -1 之间的随机浮点数。
19 gammavariate()    基于 Gamma 分布(用于统计学)返回 0 到 1 之间的随机浮点数。
20 gauss()    基于高斯分布(用于概率论)返回 0 到 1 之间的随机浮点数。
21 lognormvariate()    基于对数正态分布(用于概率论)返回 0 到 1 之间的随机浮点数。
22 normalvariate()    基于正态分布(用于概率论)返回 0 到 1 之间的随机浮点数。
23 vonmisesvariate()    基于 von Mises 分布(用于定向统计学)返回 0 到 1 之间的随机浮点数。
24 paretovariate()    基于 Pareto 分布(用于概率论)返回 0 到 1 之间的随机浮点数。
25 weibullvariate()    基于 Weibull 分布(用于统计学)返回 0 到 1 之间的随机浮点数。
sys模块
常用:
1 sys.argv           命令行参数List,第一个元素是程序本身路径(掌握)
2 sys.exit(n)        退出程序,正常退出时exit(0)
3 sys.version        获取Python解释程序的版本信息
4 sys.maxint         最大的Int值
5 sys.path           返回模块的搜索路径,初始化时使用PYTHONPATH环境变量的值(掌握)
6 sys.platform       返回操作系统平台名称
打印进度条
知识储备:
#进度条的效果
[#             ](1)
[##            ](2)
[###           ](3)
[####          ](4)

其实我们看到的不是一个个的增加  而是(2)覆盖(1)>>>(3)覆盖(2)>>>(4)覆盖(3)
1 #打印%
2  print('%s%%' %(100)) #第二个%号代表取消第一个%的特殊意义

3  #可传参来控制宽度
4  print('[%%-%ds]' %50) #[%-50s]
5  print(('[%%-%ds]' %50) %'#')
6  print(('[%%-%ds]' %50) %'##')
7  print(('[%%-%ds]' %50) %'###')
 1 ###1.0打印进度条
 2
 3 import time
 4
 5 recv_size=0
 6 total_size=333333
 7
 8 while recv_size < total_size:
 9
10     recv_size+=1024
11     time.sleep(0.01)
12     percent=recv_size/total_size
13     res=int(50*percent)*'#'
14     print("
[%-50s] %d%%"%(res,int(100*percent)),end="")
 1 ##################
 2 #  打印进度条   2.0#
 3 ##################
 4
 5 import time
 6
 7 def progress(percent):
 8     if percent > 1:
 9         percent = 1
10     res = int(50 * percent) * '>'
11     print('
[%-50s] %d%%' % (res, int(100 * percent)), end='')
12
13 recv_size=0
14 total_size=1025011
15
16 while recv_size < total_size:
17     time.sleep(0.01) # 下载了1024个字节的数据
18
19     recv_size+=1024 # recv_size=2048
20
21     # 打印进度条
22     # print(recv_size)
23     percent = recv_size / total_size  # 1024 / 333333
24     progress(percent)
shutil模块
shutil模块:(无需重点掌握,了解即可)
高级文件,文件夹,压缩包,处理模块
  分类:
 1 shutil.copyfileobj(fsrc, fdst[, length])     将文件内容拷贝到另一个文件中
 2
 3 shutil.copyfile(src, dst)     拷贝文件
 4
 5 shutil.copymode(src, dst)    仅拷贝权限。内容、组、用户均不变
 6
 7 shutil.copystat(src, dst)     仅拷贝状态的信息,包括:mode bits, atime, mtime, flags
 8
 9 shutil.copy(src, dst)          拷贝文件和权限
10
11 shutil.copy2(src, dst)         拷贝文件和状态信息
12
13 shutil.ignore_patterns(*patterns)
14
15 shutil.copytree(src, dst, symlinks=False, ignore=None) 递归的去拷贝文件夹
16
17 shutil.rmtree(path[, ignore_errors[, onerror]])   递归的去删除文件
18
19 shutil.move(src, dst)     递归的去移动文件,它类似mv命令,其实就是重命名。
20
21 shutil.make_archive(base_name, format,...)
22
23 创建压缩包并返回文件路径,例如:zip、tar
24
25 创建压缩包并返回文件路径,例如:zip、tar
26
27     base_name: 压缩包的文件名,也可以是压缩包的路径。只是文件名时,则保存至当前目录,否则保存至指定路径,
28     如 data_bak                       =>保存至当前路径
29     如:/tmp/data_bak =>保存至/tmp/
30     format:    压缩包种类,“zip”, “tar”, “bztar”,“gztar”
31     root_dir:    要压缩的文件夹路径(默认当前目录)
32     owner:    用户,默认当前用户
33     group:    组,默认当前组
34     logger:    用于记录日志,通常是logging.Logger对象
#将 /Users/wupeiqi/Downloads/test 下的文件打包放置当前程序目录
import shutil
ret = shutil.make_archive("wwwwwwwwww", 'gztar', root_dir='/Users/wupeiqi/Downloads/test')


#将 /Users/wupeiqi/Downloads/test 下的文件打包放置 /Users/wupeiqi/目录
import shutil
ret = shutil.make_archive("/Users/wupeiqi/wwwwwwwwww", 'gztar', root_dir='/Users/wupeiqi/Downloads/test')
实践:
import  shutil

# 将文件内容拷贝到另一个文件中
# shutil.copyfileobj(open('old.txt','r',encoding="utf-8"), open('new.txt', 'w',encoding="utf-8"))

# 拷贝文件
# shutil.copyfile('old.txt','new.txt')

# 仅拷贝权限。内容、组、用户均不变
# shutil.copymode('f1.log', 'f2.log')  # 目标文件必须存在

# 仅拷贝状态的信息,包括:mode bits, atime, mtime, flags
# shutil.copystat('f1.log', 'f2.log') #目标文件必须存在

# 拷贝文件和权限
# import shutil
# shutil.copy('f1.log', 'f2.log')

# 拷贝文件和状态信息
# import shutil
# shutil.copy2('f1.log', 'f2.log')

# 递归的去拷贝文件夹
# import shutil

# shutil.copytree('folder1', 'folder2', ignore=shutil.ignore_patterns('*.pyc', 'tmp*'))
#目标目录不能存在,注意对folder2目录父级目录要有可写权限,ignore的意思是排除

'''
通常的拷贝都把软连接拷贝成硬链接,即对待软连接来说,创建新的文件
import shutil
shutil.copytree('f1', 'f2', symlinks=True, ignore=shutil.ignore_patterns('*.pyc', 'tmp*'))

'''

# 递归的去删除文件
# import shutil
# shutil.rmtree('folder1')
#

# 递归的去移动文件,它类似mv命令,其实就是重命名。
# import shutil
# shutil.move('folder1', 'folder3')


# shutil 对压缩包的处理是调用 ZipFile 和 TarFile 两个模块来进行的,详细:

# zipfile压缩解压缩

import zipfile
# 压缩
z = zipfile.ZipFile('laxi.zip', 'w')
z.write('a.log')
z.write('data.data')
z.close()

# 解压
z = zipfile.ZipFile('laxi.zip', 'r')
z.extractall(path='.')
z.close()

import zipfile

# 压缩
z = zipfile.ZipFile('laxi.zip', 'w')
z.write('a.log')
z.write('data.data')
z.close()

# 解压
z = zipfile.ZipFile('laxi.zip', 'r')
z.extractall(path='.')
z.close()


# tarfile压缩解压缩
import tarfile

# 压缩
>>> t=tarfile.open('/tmp/egon.tar','w')
>>> t.add('/test1/a.py',arcname='a.bak')
>>> t.add('/test1/b.py',arcname='b.bak')
>>> t.close()


# 解压
>>> t=tarfile.open('/tmp/egon.tar','r')
>>> t.extractall('/egon')
>>> t.close()
json 和 pickle模块
1.0 什么是序列化和反序列化
 1 内存中的数据类型---->序列化---->特定的格式(json格式或者pickle格式)
 2     内存中的数据类型<----反序列化<----特定的格式(json格式或者pickle格式)
 3
 4 以前常用办法:
 5     {'aaa':111} --->  序列化 str({'aaa':111})  ----->   "{'aaa':111}"
 6
 7     {'aaa':111} <--- 反序列化 eval("{'aaa':111}")  <-----  "{'aaa':111}"
 8 编程举例:
 9     l1={'aaa':111} #字典 dict
10     #序列化
11     l2=str(l1)
12     print(l2,type(l2))
13     # 反序列化
14     l3=eval(l2)
15     print(l3,type(l3))
2.0 为何要序列化
1  序列化得到结果=>特定的格式的内容有两种用途
2   1、可用于存储=》用于存档
3   2、传输给其他平台使用=》跨平台数据交互
4        python                 java
5         列表     特定的格式      数组
6
7   强调:
8       针对用途1的特定一格式:可是一种专用的格式=》pickle只有python可以识别
9       针对用途2的特定一格式:应该是一种通用、能够被所有语言识别的格式=》json
3、如何序列化与反序列化
 1 示范1
 2 import json
 3 # 序列化
 4 json_res=json.dumps([1,'aaa',True,False])
 5 # print(json_res,type(json_res)) # "[1, "aaa", true, false]"
 6
 7 # 反序列化
 8 l=json.loads(json_res)
 9 print(l,type(l))
10
11
12 示范2:
13 import json
14
15 序列化的结果写入文件的复杂方法
16 json_res=json.dumps([1,'aaa',True,False])
17 # print(json_res,type(json_res)) # "[1, "aaa", true, false]"
18 with open('test.json',mode='wt',encoding='utf-8') as f:
19     f.write(json_res)
20
21 将序列化的结果写入文件的简单方法
22 with open('test.json',mode='wt',encoding='utf-8') as f:
23     json.dump([1,'aaa',True,False],f)
24
25
26 从文件读取json格式的字符串进行反序列化操作的复杂方法
27 with open('test.json',mode='rt',encoding='utf-8') as f:
28     json_res=f.read()
29     l=json.loads(json_res)
30     print(l,type(l))
31
32 从文件读取json格式的字符串进行反序列化操作的简单方法
33 with open('test.json',mode='rt',encoding='utf-8') as f:
34     l=json.load(f)
35     print(l,type(l))
36
37
38 json验证: json格式兼容的是所有语言通用的数据类型,不能识别某一语言的所独有的类型
39 json.dumps({1,2,3,4,5})
40
41 json强调:一定要搞清楚json格式,不要与python混淆
42 l=json.loads('[1, "aaa", true, false]')
43 l=json.loads("[1,1.3,true,'aaa', true, false]")
44 print(l[0])
45
46 了解
47 l = json.loads(b'[1, "aaa", true, false]')
48 print(l, type(l))
49
50 with open('test.json',mode='rb') as f:
51     l=json.load(f)
52
53
54 res=json.dumps({'name':'哈哈哈'})
55 print(res,type(res))
56
57 res=json.loads('{"name": "u54c8u54c8u54c8"}')
58 print(res,type(res))
4.0猴子补丁
 1 在入口处打猴子补丁
 2 import json
 3 import ujson
 4
 5 def monkey_patch_json():
 6     json.__name__ = 'ujson'
 7     json.dumps = ujson.dumps
 8     json.loads = ujson.loads
 9
10 monkey_patch_json() # 在入口文件出运行
11
12
13 import ujson as json # 不行
14
15 后续代码中的应用
16 json.dumps()
17 json.dumps()
18 json.dumps()
19 json.dumps()
20 json.dumps()
21 json.dumps()
22 json.dumps()
23 json.dumps()
24 json.loads()
25 json.loads()
26 json.loads()
27 json.loads()
28 json.loads()
29 json.loads()
30 json.loads()
31 json.loads()
32 json.loads()
33 json.loads()
34 json.loads()
5.0 pickle模块
1 import pickle
2 res=pickle.dumps({1,2,3,4,5})
3 print(res,type(res))
4
5 s=pickle.loads(res)
6 print(s,type(s))
6.0 configparser 模块
 1 import configparser
 2
 3 config=configparser.ConfigParser()
 4 config.read('test.ini')
 5
 6 1、获取sections
 7 print(config.sections())
 8
 9 2、获取某一section下的所有options
10 print(config.options('section1'))
11
12 3、获取items
13 print(config.items('section1'))
14
15 4、
16 res=config.get('section1','user')
17 print(res,type(res))
18
19 res=config.getint('section1','age')
20 print(res,type(res))
21
22
23 res=config.getboolean('section1','is_admin')
24 print(res,type(res))
25
26
27 res=config.getfloat('section1','salary')
28 print(res,type(res))
7.0 hashlib 模块
 1、什么是哈希hash
   hash一类算法,该算法接受传入的内容,经过运算得到一串hash值
    hash值的特点:
I 只要传入的内容一样,得到的hash值必然一样
II 不能由hash值返解成内容
III 不管传入的内容有多大,只要使用的hash算法不变,得到的hash值长度是一定


 2、hash的用途
 用途1:特点II用于密码密文传输与验证
 用途2:特点I、III用于文件完整性校验

 3、如何用
 import hashlib

 m=hashlib.md5()
 m.update('hello'.encode('utf-8'))
 m.update('world'.encode('utf-8'))
 res=m.hexdigest() # 'helloworld'
 print(res)

 m1=hashlib.md5('he'.encode('utf-8'))
 m1.update('llo'.encode('utf-8'))
 m1.update('w'.encode('utf-8'))
 m1.update('orld'.encode('utf-8'))
 res=m1.hexdigest()# 'helloworld'
 print(res)


 模拟撞库
 cryptograph='aee949757a2e698417463d47acac93df'
 import hashlib

 制作密码字段
 passwds=[
     'alex3714',
     'alex1313',
     'alex94139413',
     'alex123456',
     '123456alex',
     'a123lex',
 ]

 dic={}
 for p in passwds:
     res=hashlib.md5(p.encode('utf-8'))
     dic[p]=res.hexdigest()

 模拟撞库得到密码
 for k,v in dic.items():
     if v == cryptograph:
         print('撞库成功,明文密码是:%s' %k)
         break


 提升撞库的成本=>密码加盐
import hashlib

m=hashlib.md5()

m.update('天王'.encode('utf-8'))
m.update('alex3714'.encode('utf-8'))
m.update('盖地虎'.encode('utf-8'))
print(m.hexdigest())


 m.update(文件所有的内容)
 m.hexdigest()

 f=open('a.txt',mode='rb')
 f.seek()
 f.read(2000) # 巨琳
 m1.update(文见的一行)

 m1.hexdigest()
8.0subprocess模块
 1 import subprocess
 2
 3 obj=subprocess.Popen('echo 123 ; ls / ; ls /root',shell=True,
 4                  stdout=subprocess.PIPE,
 5                  stderr=subprocess.PIPE,
 6                  )
 7
 8 print(obj)
 9 res=obj.stdout.read()
10 print(res.decode('utf-8'))
11
12 err_res=obj.stderr.read()
13 print(err_res.decode('utf-8'))