HTML
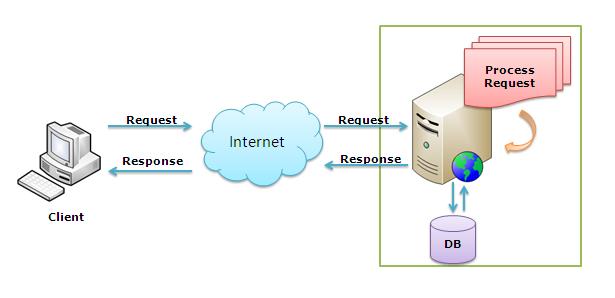
HTML是英文Hyper Text Mark-up Language(超文本标记语言)的缩写,他是一种制作万维网页面标准语言(标记)。相当于定义统一的一套规则,大家都来遵守他,这样就可以让浏览器根据标记语言的规则去解释它。
浏览器负责将标签翻译成用户“看得懂”的格式,呈现给用户!(例:djangomoan模版引擎)
标准模板:
<!DOCTYPE html>     #标准规范
<html lang="en">
<head>                  #html头
    <meta charset="UTF-8">      #字符编码
    <title>Title</title>        #页面头部显示内容
</head>
<body>
        <p>主体内容</p>         #页面内容主体
</body>
</html>
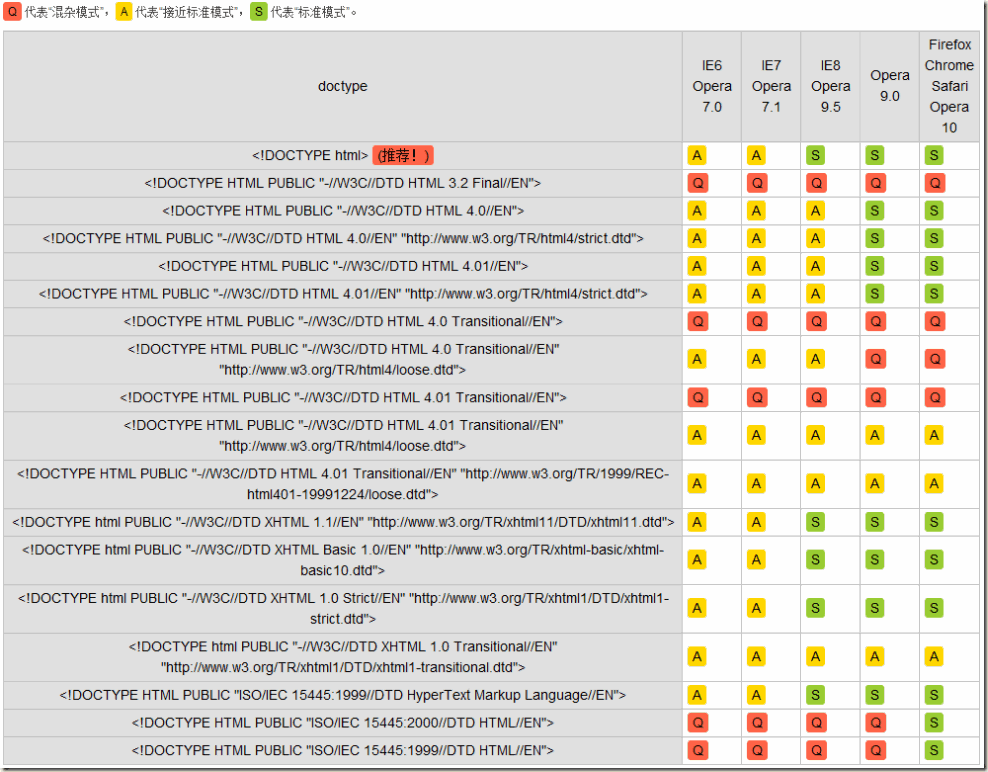
Doctype标准
Doctype告诉浏览器使用什么样的html或xhtml规范来解析html文档
有和无的区别
- BackCompat:标准兼容模式未开启(或叫怪异模式[Quirks mode]、混杂模式)
- CSS1Compat:标准兼容模式已开启(或叫严格模式[Standards mode/Strict mode])
这个属性会被浏览器识别并使用,但是如果你的页面没有DOCTYPE的声明,那么compatMode默认就是BackCompat,这也就是恶魔的开始 -- 浏览器按照自己的方式解析渲染页面,那么,在不同的浏览器就会显示不同的样式。如果你的页面添加了那么,那么就等同于开启了标准模式,那么浏览器就得老老实实的按照W3C的标准解析渲染页面,这样一来,你的页面在所有的浏览器里显示的就都是一个样子了
有,用什么?
- Doctype告诉浏览器使用什么样的html或xhtml规范来解析html文档, dtd文件则包含了标记、attributes 、properties、约束规则
<head>页面头部
meta(metadata information)
提供有关页面的元信息,例:页面编码、刷新、跳转、针对搜索引擎和更新频度的描述和关键词
页面编码(告诉浏览器是什么编码)
< meta http-equiv=“content-type” content=“text/html;charset=utf-8”>
刷新和跳转
< meta http-equiv=“Refresh” Content=“30″>        30秒刷新

< meta http-equiv=”Refresh“ Content=”5; Url=http://www.autohome.com.cn“ />
关键词
< meta name="keywords" content="星际2,星际老男孩,专访,F91,小色,JOY" >
描述
例如:cnblogs
X-UA-Compatible
<meta http-equiv="X-UA-Compatible" content="IE=EmulateIE7" />
微软的IE6是通过XP、Win2003等操作系统发布出来,作为占统治地位的桌面操作系统,也使得IE占据了通知地位,许多的网站开发的时候,就按照IE6的标准去开发,而IE6自身的标准也是微软公司内部定义的。到了IE7出来的时候,采用了微软公司内部标准以及部分W3C的标准,这个时候许多网站升级到IE7的时候,就比较痛苦,很多代码必须调整后,才能够正常的运行。而到了微软的IE8这个版本,基本上把微软内部自己定义的标准抛弃了,而全面的支持W3C的标准,由于基于对标准彻底的变化了,使得原先在早期IE8版本上能够访问的网站,在IE8中无法正常的访问,会出现一些排版错乱、文字重叠,显示不全等各种兼容性错误。
与任何早期浏览器版本相比,Internet Explorer 8 对行业标准提供了更加紧密的支持。 因此,针对旧版本的浏览器设计的站点可能不会按预期显示。 为了帮助减轻任何问题,Internet Explorer 8 引入了文档兼容性的概念,从而允许您指定站点所支持的 Internet Explorer 版本。 文档兼容性在 Internet Explorer 8 中添加了新的模式;这些模式将告诉浏览器如何解释和呈现网站。 如果您的站点在 Internet Explorer 8 中无法正确显示,则可以更新该站点以支持最新的 Web 标准(首选方式),也可以强制 Internet Explorer 8 按照在旧版本的浏览器中查看站点的方式来显示内容。 通过使用 meta 元素将 X-UA-Compatible 标头添加到网页中,可以实现这一点。
当 Internet Explorer 8 遇到未包含 X-UA-Compatible 标头的网页时,它将使用 指令来确定如何显示该网页。 如果该指令丢失或未指定基于标准的文档类型,则 Internet Explorer 8 将以 IE5 模式(Quirks 模式)显示该网页
title 标签
网页头部信息
link 标签
<!--css-->
< link rel="stylesheet" type="text/css" href="css/common.css" >

<!--icon-->
< link rel="shortcut icon" href="image/favicon.ico">
style 标签
在页面中写样式
例如:
< style type="text/css" >
.bb{
      background-color: red;
   }
< /style>
script 标签
<!--引进文件-->
< script type="text/javascript" src="http://www.googletagservices.com/tag/js/gpt.js"> </script >

<!--写js代码-->
< script type="text/javascript" > ... </script >
<body>页面主体
标签一般分为两种:块级标签 和 行内标签
- a、span、select 等
- div、h1、p 等
特殊符号
更多-》》http://www.cnblogs.com/web-d/archive/2010/04/16/1713298.html
p和br 标签
<p>段落</p>        <!--p表示段落,默认段落之间是有间隔的!-->
<br/>                <!--br是换行-->
a 标签
超链接:
<a href="http://www.baidu.com" target="_blank">点我</a>

href表示跳转的地址,target="_blank"表示新窗口打开,默认为当前页
锚:
<body>
    <a href="#1">第一章</a><br/>
    <a href="#2">第二章</a><br/>
    <a href="#3">第三章</a><br/>
    <a href="#4">第四章</a><br/>

    <div id="1" style="height: 600px;">第一章的内容</div>
    <div id="2" style="height: 600px;">第二章的内容</div>
    <div id="3" style="height: 600px;">第三章的内容</div>
    <div id="4" style="height: 600px;">第四章的内容</div>
</body>
h 标签
标题h1、h2、h3、h4、h5、h6、h7表示不同的大小
span 标签
行内标签-白板
div 标签
块级标签-白板,可以加属性然后可以变身
form 标签
form相当于一个表单,配合input标签submit可以把表单的内容提交到指定位置,提交内容以字典的形式提交{‘user’:xx,'email':xx,'pwd':xx},key值为name属性值
<form action="http://localhost:8888/index" method="post" >
</form>
action表示提交动作,把数据提交到指定的路径,methon指定提交类型,默认为get
post与get的区别:
method默认为get类型,数据会包含在html的头部进行提交,表现形式是点击提交后会在外部url路径上查看提交到的数据表单内容,效果如下
http://localhost:8888/index?user=lianzhilei&email=James%40123.com&pwd=123123
method如果指定为post类型的话,数据会包含在html的body内进行提交,从外部看不出来里面的信息
两者 没有谁安全之说,因为抓包都能抓到
input 系列标签
text、password 用户输入框
<body>
    <form action="http://localhost:8888/index" method="post" >
        <span>用户:</span><input type="text" name="user"><br />
        <span>邮箱:</span><input type="text" name="email"><br />
        <span>密码:</span><input type="password" name="pwd"><br />

        <input type="button" value="不能提交">
        <input type="submit" value="提交">
    </form>
</body>
配合使用的tornado脚本(数据提交地址)

#!/usr/bin/env python
# -*- coding:utf-8 -*-
#-Author-Lian

import tornado.ioloop
import tornado.web


class MainHandler(tornado.web.RequestHandler):
    def get(self):
        print("get")
        u = self.get_argument("user")
        e = self.get_argument("email")
        p = self.get_argument("pwd")
        print(u,e,p)

    def post(self,*args,**kwargs):
        print("post")
        u = self.get_argument("user")
        e = self.get_argument("email")
        p = self.get_argument("pwd")
        print(u,e,p)

application = tornado.web.Application([
    (r"/index", MainHandler),
])

if __name__ == "__main__":
    application.listen(8888)
    tornado.ioloop.IOLoop.instance().start()
页面效果:
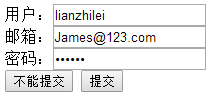
点击提交后tornado脚本显示效果如下:
post
lianzhilei James@123.com 123123
radio、checkbox 单选与多选
<body>
    <form action="http://localhost:8888/index" method="post">
        <div>
            <p>性别:</p>
            男: <input type="radio" name="gender" value="1" />
            女: <input type="radio" name="gender" value="2" />
            <p>爱好:</p>
            篮球: <input type="checkbox" name="favor" value="1" />
            足球: <input type="checkbox" name="favor" value="2" />
            排球: <input type="checkbox" name="favor" value="3" />
        </div>
        <input type="submit" value="提交" />
        <input type="reset" value="重置" />
    </form>
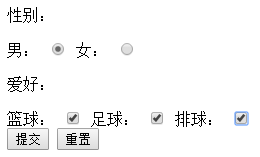
name表示提交字典里的key值,value为值,type=reset可以重置选项
显示效果:
file 上传文件
<form enctype="multipart/form-data">
        <div>
            <p>上传文件:</p>
            <input type="file" name="fname">
        </div>
        <input type="submit" value="提交" />
        <input type="reset" value="重置" />
</form>
上传文件时要添加enctype="multipart/form-data"参数
textarea 多行输入
<form action="http://localhost:8888/index" method="post">
        <textarea name="linearea">默认数据</textarea>
        <input type="submit" value="提交" />
        <input type="reset" value="重置" />
</form>
name指定key值,默认数据写中间即可
select 下拉框
<form action="http://localhost:8888/index" method="post">
        <select name="city" size="2" multiple="multiple">
            <option value="1">北京</option>
            <option value="2">上海</option>
            <option value="3">南京</option>
            <option value="4" selected="selected">邯郸</option>
        </select>
        <br />
        <input type="submit" value="提交" />
        <input type="reset" value="重置" />
</form>
city为提交表单的key值,value是提交值,size指定显示的个数,mothod表示可以多选

img 图片标签
<a href="https://www.baidu.com">
        <img src="i.png" title="大帅锅" style="height: 300px; 220px;" alt="索隆">
</a>
和a标签结合点击图片直接跳转,title指定鼠标放到图片后显示的内容,style定义宽高,alt指定图片不存在时的显示信息

ul、ol、dl 列表标签

    <ul>
        <li>qwe</li>
        <li>qwe</li>
        <li>qwe</li>
    </ul>

    <ol>
        <li>qwe</li>
        <li>qwe</li>
        <li>qwe</li>
    </ol>

    <dl>
        <dt>qwe</dt>
        <dd>qwe</dd>
        <dd>qwe</dd>
        <dt>qwe</dt>
    </dl>
显示效果:
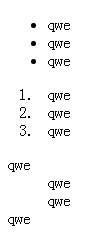
table 列表
简单单元格

<table border="1">
    <thead>
    <tr>
        <td>主机名</td>
        <td>IP</td>
        <td>详情</td>
    </tr>
    </thead>

    <tbody>
    <tr>
        <td>localhost</td>
        <td>127.0.0.1</td>
        <td>
            <a href="test3.html">点击</a>
        </td>
    </tr>
    <tr>
        <td>localhost</td>
        <td>127.0.0.1</td>
        <td>点击</td>
    </tr>
    </tbody>

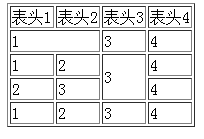
合并单元格

<!DOCTYPE html>
<html lang="en">
<head>
    <meta charset="UTF-8">
    <title>Title</title>
</head>
<body>
<table border="1">
    <thead>
    <tr>
        <td>表头1</td>
        <td>表头2</td>
        <td>表头3</td>
        <td>表头4</td>
    </tr>
    </thead>

    <tbody>
    <tr>
        <td colspan="2">1</td>
        <!--<td>2</td>-->
        <td>3</td>
        <td>4</td>
    </tr>
       <tr>
        <td>1</td>
        <td>2</td>
        <td rowspan="2">3</td>
        <td>4</td>
    </tr>
        <tr>
        <!--<td>1</td>-->
        <td>2</td>
        <td>3</td>
        <td>4</td>
    </tr>
        <tr>
        <td>1</td>
        <td>2</td>
        <td>3</td>
        <td>4</td>
    </tr>
    </tbody>
</table>
</body>
</html>
label 标签
    <label for="username">用户名</label>
    <input id="username" type="text" name="user" />
点击文字使其关联的标签获取光标
Python开发【前端】:CSS--》》http://www.cnblogs.com/lianzhilei/p/6046131.html
Python开发【前端】:JavaScript--》》http://www.cnblogs.com/lianzhilei/p/6071530.html
Python开发【前端】:DOM--》》http://www.cnblogs.com/lianzhilei/p/6072367.html
