各位泡芙们,大家好!
经过前两天的理论铺垫,相信你对深度滤波器有了一个感性的认识,今天,我们就通过流程图的方式来帮大家梳理一下单目稠密重建的代码。
主函数:
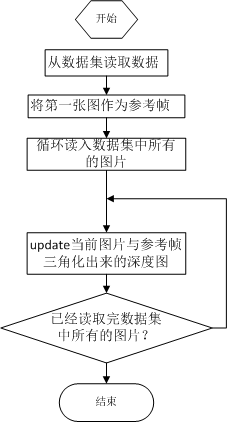
update:
 1 bool update(const Mat& ref, const Mat& curr, const SE3& T_C_R, Mat& depth, Mat& depth_cov )
 2 {
 3 #pragma omp parallel for
 4     for ( int x=boarder; x<width-boarder; x++ )
 5 #pragma omp parallel for
 6         for ( int y=boarder; y<height-boarder; y++ )
 7         {
 8             // 遍历每个像素
 9             if ( depth_cov.ptr<double>(y)[x] < min_cov || depth_cov.ptr<double>(y)[x] > max_cov ) // 深度已收敛或发散
10                 continue;
11             // 在极线上搜索 (x,y) 的匹配
12             Vector2d pt_curr;
13             bool ret = epipolarSearch (
14                 ref,
15                 curr,
16                 T_C_R,
17                 Vector2d(x,y),
18                 depth.ptr<double>(y)[x],
19                 sqrt(depth_cov.ptr<double>(y)[x]),
20                 pt_curr
21             );
22
23             if ( ret == false ) // 匹配失败
24                 continue;
25
26             // 取消该注释以显示匹配
27             // showEpipolarMatch( ref, curr, Vector2d(x,y), pt_curr );
28
29             // 匹配成功,更新深度图
30             updateDepthFilter( Vector2d(x,y), pt_curr, T_C_R, depth, depth_cov );
31         }
32 }
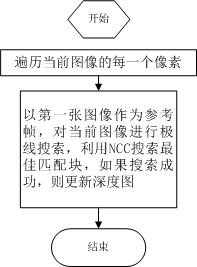
极线搜索:

 1 // 极线搜索
 2 // 方法见书 13.2 13.3 两节
 3 bool epipolarSearch(
 4     const Mat& ref, const Mat& curr,
 5     const SE3& T_C_R, const Vector2d& pt_ref,
 6     const double& depth_mu, const double& depth_cov,
 7     Vector2d& pt_curr )
 8 {
 9     Vector3d f_ref = px2cam( pt_ref );
10     f_ref.normalize();
11     Vector3d P_ref = f_ref*depth_mu;    // 参考帧的 P 向量
12
13     Vector2d px_mean_curr = cam2px( T_C_R*P_ref ); // 按深度均值投影的像素
14     double d_min = depth_mu-3*depth_cov, d_max = depth_mu+3*depth_cov;
15     if ( d_min<0.1 ) d_min = 0.1;
16     Vector2d px_min_curr = cam2px( T_C_R*(f_ref*d_min) );    // 按最小深度投影的像素
17     Vector2d px_max_curr = cam2px( T_C_R*(f_ref*d_max) );    // 按最大深度投影的像素
18
19     Vector2d epipolar_line = px_max_curr - px_min_curr;    // 极线(线段形式)
20     Vector2d epipolar_direction = epipolar_line;        // 极线方向
21     epipolar_direction.normalize();
22     double half_length = 0.5*epipolar_line.norm();    // 极线线段的半长度
23     if ( half_length>100 ) half_length = 100;   // 我们不希望搜索太多东西
24
25     // 取消此句注释以显示极线(线段)
26     // showEpipolarLine( ref, curr, pt_ref, px_min_curr, px_max_curr );
27
28     // 在极线上搜索,以深度均值点为中心,左右各取半长度
29     double best_ncc = -1.0;
30     Vector2d best_px_curr;
31     for ( double l=-half_length; l<=half_length; l+=0.7 )  // l+=sqrt(2)
32     {
33         Vector2d px_curr = px_mean_curr + l*epipolar_direction;  // 待匹配点
34         if ( !inside(px_curr) )
35             continue;
36         // 计算待匹配点与参考帧的 NCC
37         double ncc = NCC( ref, curr, pt_ref, px_curr );
38         if ( ncc>best_ncc )
39         {
40             best_ncc = ncc;
41             best_px_curr = px_curr;
42         }
43     }
44     if ( best_ncc < 0.85f )      // 只相信 NCC 很高的匹配
45         return false;
46     pt_curr = best_px_curr;
47     return true;
48 }
深度滤波器:

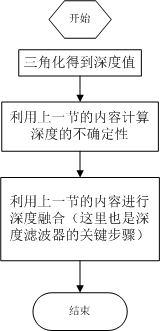
bool updateDepthFilter(
    const Vector2d& pt_ref,
    const Vector2d& pt_curr,
    const SE3& T_C_R,
    Mat& depth,
    Mat& depth_cov
)
{
    // 我是一只喵
    // 不知道这段还有没有人看
    // 用三角化计算深度
    SE3 T_R_C = T_C_R.inverse();
    Vector3d f_ref = px2cam( pt_ref );
    f_ref.normalize();
    Vector3d f_curr = px2cam( pt_curr );
    f_curr.normalize();

    // 方程
    // d_ref * f_ref = d_cur * ( R_RC * f_cur ) + t_RC
    // => [ f_ref^T f_ref, -f_ref^T f_cur ] [d_ref] = [f_ref^T t]
    //    [ f_cur^T f_ref, -f_cur^T f_cur ] [d_cur] = [f_cur^T t]
    // 二阶方程用克莱默法则求解并解之
    Vector3d t = T_R_C.translation();
    Vector3d f2 = T_R_C.rotation_matrix() * f_curr;
    Vector2d b = Vector2d ( t.dot ( f_ref ), t.dot ( f2 ) );
    double A[4];
    A[0] = f_ref.dot ( f_ref );
    A[2] = f_ref.dot ( f2 );
    A[1] = -A[2];
    A[3] = - f2.dot ( f2 );
    double d = A[0]*A[3]-A[1]*A[2];
    Vector2d lambdavec =
        Vector2d (  A[3] * b ( 0,0 ) - A[1] * b ( 1,0 ),
                    -A[2] * b ( 0,0 ) + A[0] * b ( 1,0 )) /d;
    Vector3d xm = lambdavec ( 0,0 ) * f_ref;
    Vector3d xn = t + lambdavec ( 1,0 ) * f2;
    Vector3d d_esti = ( xm+xn ) / 2.0;  // 三角化算得的深度向量
    double depth_estimation = d_esti.norm();   // 深度值

    // 计算不确定性(以一个像素为误差)
    Vector3d p = f_ref*depth_estimation;
    Vector3d a = p - t;
    double t_norm = t.norm();
    double a_norm = a.norm();
    double alpha = acos( f_ref.dot(t)/t_norm );
    double beta = acos( -a.dot(t)/(a_norm*t_norm));
    double beta_prime = beta + atan(1/fx);
    double gamma = M_PI - alpha - beta_prime;
    double p_prime = t_norm * sin(beta_prime) / sin(gamma);
    double d_cov = p_prime - depth_estimation;
    double d_cov2 = d_cov*d_cov;

    // 高斯融合
    double mu = depth.ptr<double>( int(pt_ref(1,0)) )[ int(pt_ref(0,0)) ];
    double sigma2 = depth_cov.ptr<double>( int(pt_ref(1,0)) )[ int(pt_ref(0,0)) ];

    double mu_fuse = (d_cov2*mu+sigma2*depth_estimation) / ( sigma2+d_cov2);
    double sigma_fuse2 = ( sigma2 * d_cov2 ) / ( sigma2 + d_cov2 );

    depth.ptr<double>( int(pt_ref(1,0)) )[ int(pt_ref(0,0)) ] = mu_fuse;
    depth_cov.ptr<double>( int(pt_ref(1,0)) )[ int(pt_ref(0,0)) ] = sigma_fuse2;

    return true;
}
相信有了上面的流程图,加上前面几章的理论铺垫,你能够比较轻松地看懂这些代码了。祝你阅读代码愉快!