
nodejs.org
https://www.npmjs.com/
https://github.com/
https://stackoverflow.com/
https://www.liaoxuefeng.com/wiki/001434446689867b27157e896e74d51a89c25cc8b43bdb3000
Sublime Text 3
webstorm
http://nodejs.cn/api/
http://www.runoob.com/angularjs/angularjs-tutorial.html
1.安装 Node.js 0.10.3x为例
win:略
linux(源码编译安装):


mac:
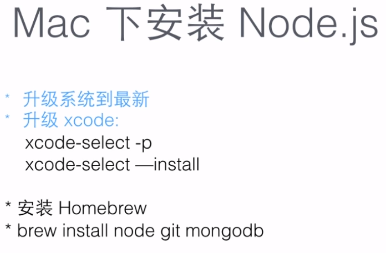
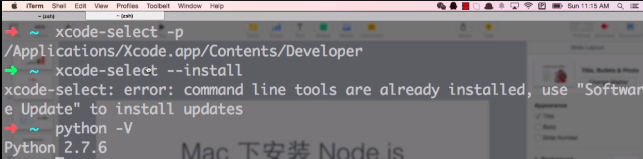

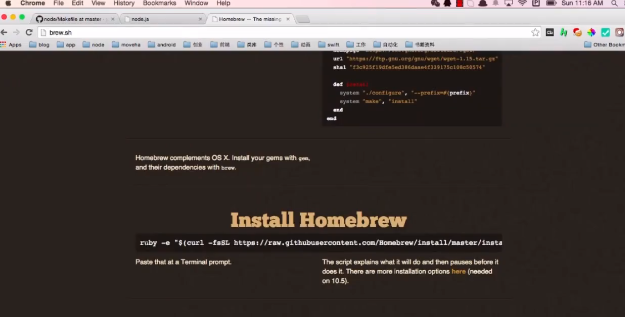


更新:

上下键切换

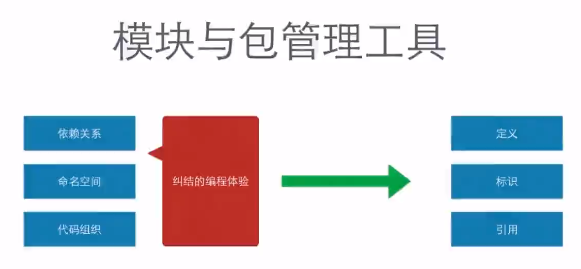
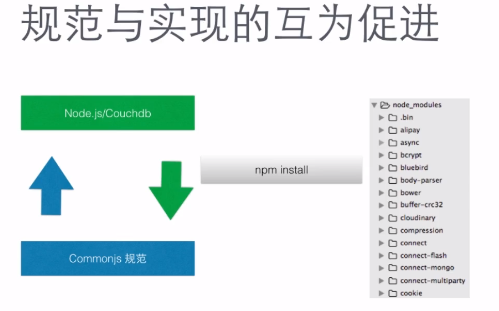
nodejs的模块与commonsj规范


https://nodejs.org/docs/latest-v0.10.x/api/
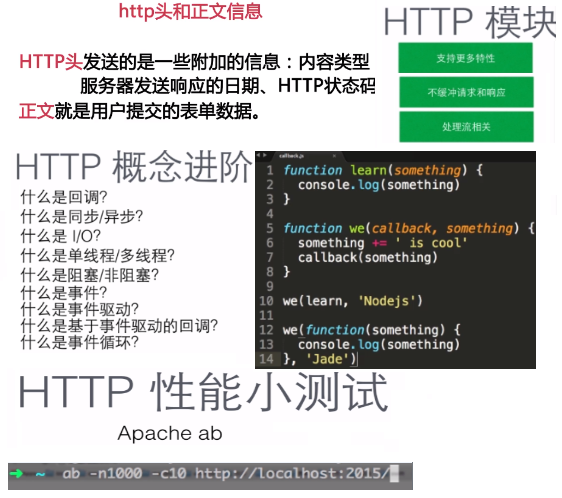
http
http://fex.baidu.com/blog/2014/05/what-happen/
chrome://net-internals/#dns
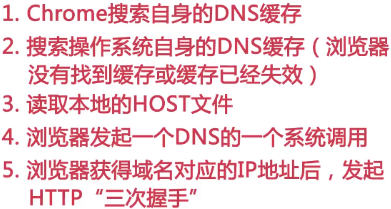

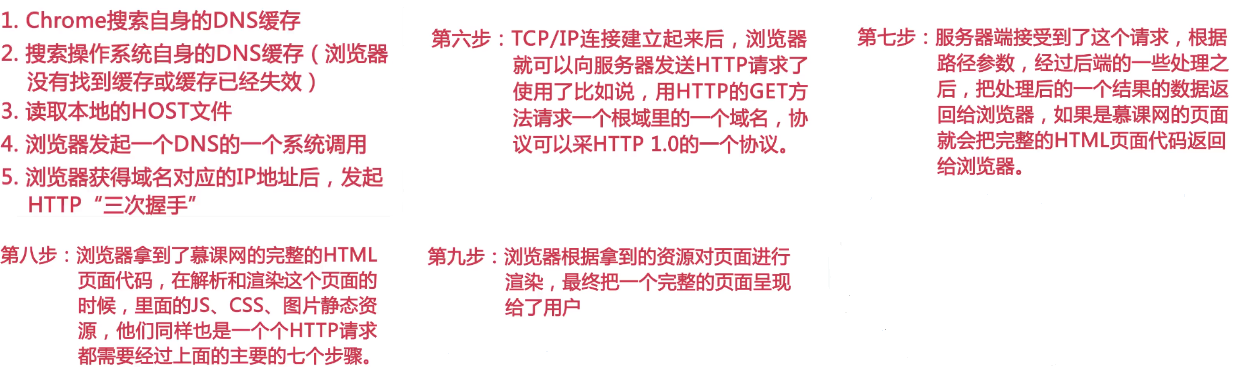


以下转自: http://www.cnblogs.com/haoyijing/p/6478742.html
nodejs学习(imooc课程笔记, 主讲人Scott)
课程地址:
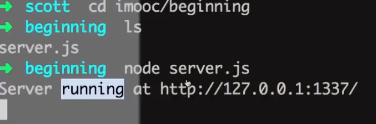
1. nodejs创建服务器

var http = require('http');        //加载http模块

//请求进来时, 告诉服务器做什么, 于是给createServer传递一个匿名回调函数.
//两个参数, 前面是请求体, 后面是响应体. 请求体用来获取请求相应信息,比如请求ip地址,请求的类型get/post,res用来返回响应
http.createServer(function(req, res) {
    res.writeHead(200, {'Content-Type': 'text/palin'});
    res.end('Hello World
');
}).listen(1337, '127.0.0.1');        //通过listen使服务器在1337端口监听请求
console.log('Server running at https://127.0.0.1:1337/');
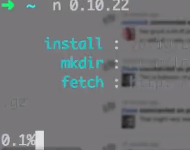
2. nodejs安装:
一开始直接使用sudo apt-get install node后, 安装好的node不能启动且node -v也没有输出. node.js的版本号是v0.10.25.但是用npm安装一些包时候却说node版本不够, 没搞明白node和nodejs区别在哪里.
于是卸载掉从nodejs.org上下了新版, 是node v6.10.0. 解压后, 直接在那个目录下可以启动node, 在网上查了使用了一个链接, 分别把node 和 npm设置了全局:
sudo ln -s /media/hao/3b6b3418-c087-4836-a75d-6d7a6023e495/Programs/node-v6.10.0-linux-x64/bin/node /usr/sbin/node
sudo ln -s /media/hao/3b6b3418-c087-4836-a75d-6d7a6023e495/Programs/node-v6.10.0-linux-x64/bin/npm /usr/sbin/npm
可以用了.
关于nodejs和node版本的区别,参考这个帖子吧: nodejs各版本的区别
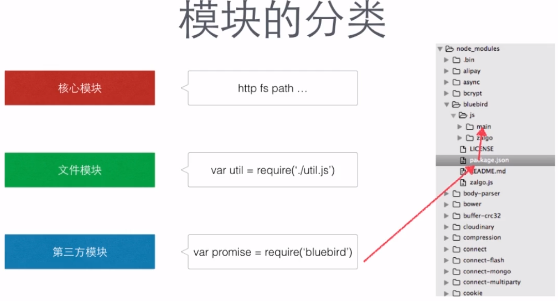
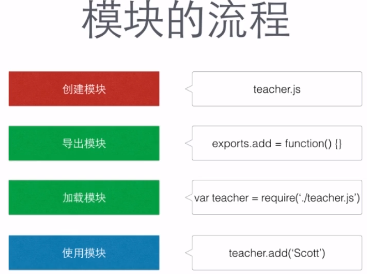
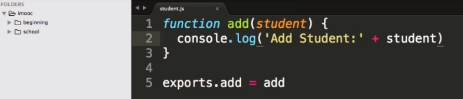
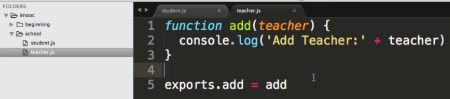
3. 模块: 从这里开始都是慕课网老师Scott进击NodeJS基础(一)(二)课程的笔记
- 创建模块
teacher.js
- 导出模块
exports.add = function(){ } - 加载模块
var teacher = require('./teacher.js') - 使用模块
teacher.add('Scott')
4. nodejs中一些api
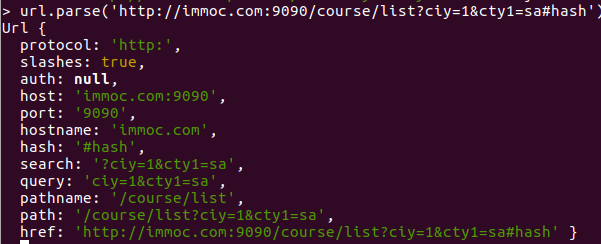
- url:
- url.parse
- url.format:
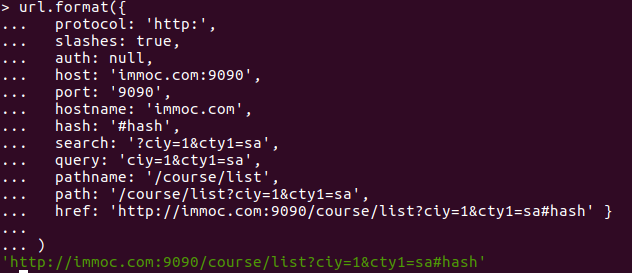
-
url.resolve

- url.parse
-
querystring

var http = require('http')
var cheerio = require('cheerio')        //npm install cheerio
var url = 'http://www.imooc.com/learn/348'

function filterChapters(html){
    var $ = cheerio.load(html)
    var chapters = $('.chapter')
    // [{
    //     chapterTitle: '',
    //     videos: [
    //         title:'',
    //         id: ''
    //     ]
    // }]
    var courseData = []
    chapters.each(function(item){
        var chapter = $(this)
        var chapterTitle = chapter.find('strong').text().trim('
').split('
')[0]
        var videos = chapter.find('.video').children('li')
        var chapterData = {
            chapterTitle: chapterTitle,
            videos: []
        }
        videos.each(function(item){
            var video = $(this).find(".J-media-item")
            var videoTitle = video.text().split(/s+/).slice(1,-2).join(' ')
            var id = video.attr('href').split('video/')[1]
            chapterData.videos.push({
                title: videoTitle,
                id: id
            })
        })
        courseData.push(chapterData)
    })
    return courseData
}

function printCourseInfo(courseData){
    courseData.forEach(function(item){
        var chapterTitle = item.chapterTitle
        console.log(chapterTitle + '
')

        item.videos.forEach(function(video){
            console.log('   [' + video.id + ']' + video.title + '
')
        })
    })
}
http.get(url, function(res) {
    var html = ''

    res.on('data', function(data){
        html += data
    })

    res.on('end', function(){
        var courseData = filterChapters(html)
        printCourseInfo(courseData)
    })
}).on('error', function(){
    console.log('获取课程数据错误')
})
6. 事件监听的一个小例子
var EventEmitter = require('events').EventEmitter
var life = new EventEmitter()

//addEventListener

life.setMaxListeners(6)     //设置事件最大监听数 默认为10. 超出这个数目会报警告

life.on('求安慰', function(who){
    console.log('给 ' + who + ' 倒水')
})

life.on('求安慰', function(who){
    console.log('给 ' + who + ' ...1')
})

life.on('求安慰', function(who){
    console.log('给 ' + who + ' ...2')
})

life.on('求安慰', function(who){
    console.log('给 ' + who + ' ...3')
})

life.on('求安慰', function(who){
    console.log('给 ' + who + ' ...4')
})

life.on('求安慰', function(who){
    console.log('给 ' + who + ' ...5')
})

life.on('求安慰', function(who){
    console.log('给 ' + who + ' ...6')
})


var hasBeenListener = life.emit('求安慰', '杠子')      //会返回值, 看是否被监听过

//要移除函数, 不能够使用匿名函数, 只能移除具名函数

console.log(life.listeners('求安慰').length)   //查询监听事件数
console.log(EventEmitter.listenerCount(life, '求安慰'))

life.removeAllListeners('求安慰')
life.emit('求安慰','gangzi')
7. Promise.js imooc
<!DOCTYPE html>
<html>
<head>
    <title>Promise animation</title>
    <style type="text/css">
        .ball{
             40px;
            height: 40px;
            border-radius: 20px;
        }
        .ball1 { background: red;}
        .ball2 { background: yellow;}
        .ball3 { background: green;}
    </style>
    <script type="text/javascript" src="/home/hao/node_modules/bluebird/js/browser/bluebird.js"></script>
</head>

<body>
    <div class="ball ball1" style="margin-left: 0;"></div>
    <div class="ball ball2" style="margin-left: 0;"></div>
    <div class="ball ball3" style="margin-left: 0;"></div>


</body>
<script type="text/javascript">
    var ball1 = document.querySelector('.ball1')
    var ball2 = document.querySelector('.ball2')
    var ball3 = document.querySelector('.ball3')

    function animate(ball, distance, cb){
        setTimeout(function(){
            var marginLeft = parseInt(ball.style.marginLeft, 10)
            if(marginLeft === distance){
                cb && cb()
            }
            else {
                if(marginLeft < distance){
                    marginLeft++
                } else {
                    marginLeft--
                }
                ball.style.marginLeft = marginLeft + 'px'
                animate(ball,distance,cb)
            }
        },13);
    }
    // animate(ball1, 100, function(){
    //     animate(ball2, 200, function() {
    //         animate(ball3, 300, function(){
    //             animate(ball3, 150, function(){
    //                 animate(ball2, 150, function(){
    //                     animate(ball1, 150, function(){

    //                     })
    //                 })
    //             })
    //         })
    //     })
    // })
    var Promise = window.Promise
    function promiseAnimate(ball, distance){
        return new Promise(function(resolve, reject){
            function _animate(){
                setTimeout(function(){
                    var marginLeft = parseInt(ball.style.marginLeft, 10)
                    if(marginLeft === distance){
                        resolve()
                    }
                    else {
                        if(marginLeft < distance){
                            marginLeft++
                        } else {
                            marginLeft--
                        }
                        ball.style.marginLeft = marginLeft + 'px'
                        _animate()
                    }
                },13);
            }
            _animate()
        })

    }
    promiseAnimate(ball1, 100)
        .then(function() {
            return promiseAnimate(ball2,200)
        }).then(function(){
            return promiseAnimate(ball3,300)
        }).then(function(){
            return promiseAnimate(ball3,150)
        }).then(function(){
            return promiseAnimate(ball2,150)
        }).then(function(){
            return promiseAnimate(ball1,150)
        })
</script>
</html>
- Promise就是对象,有三种状态: 未完成(pending), 已完成(fulfilled), 失败(rejected). 过程不可逆
- Promise A与A+不同点
- A+规范通过术语thenable来区分promise对象
- A+定义onFulfilled/onRejected必须是作为函数来调用, 而且调用过程必须是异步的
- A+严格定义了then方法链式调用时onFulfilled/onRejected的调用顺序
- 使用promise改进之前的爬虫代码:
var http = require('http')
var Promise = require('bluebird')
var cheerio = require('cheerio')        //npm install cheerio
var baseUrl = 'http://www.imooc.com/learn/'
var url = 'http://www.imooc.com/learn/348'
var videoIds = [728,637,197,348,259,75,134]

function filterChapters(html){
    var $ = cheerio.load(html)
    var chapters = $('.chapter')
    var title = $('h2.l').text()
    var number = $($('span.meta-value.js-learn-num')).text()

    // courseData = {
    //     title: title,
    //     number: number,
    //     videos: [{
    //         chapterTitle: '',
    //         videos: [
    //             title: '',
    //             id: ''
    //         ]
    //     }]
    // }
    var courseData = {
        title: title,
        videos: [],
        number:number
    }
    chapters.each(function(item){
        var chapter = $(this)
        var chapterTitle = chapter.find('strong').text().trim('
').split('
')[0]
        var videos = chapter.find('.video').children('li')
        var chapterData = {
            chapterTitle: chapterTitle,
            videos: []
        }
        videos.each(function(item){
            var video = $(this).find(".J-media-item")
            var videoTitle = video.text().split(/s+/).slice(1,-2).join(' ')
            var id = video.attr('href').split('video/')[1]
            chapterData.videos.push({
                title: videoTitle,
                id: id
            })

        })
        courseData.videos.push(chapterData)
    })
    return courseData
}

function printCourseInfo(coursesData){
    coursesData.forEach(function(courseData){
        // console.log(courseData.number + ' 人学过' + courseData.title + '
')
        console.log('### ' + courseData.title + '
')
        courseData.videos.forEach(function(item){
            console.log(item.chapterTitle);
            item.videos.forEach(function(video){
                console.log('   [' + video.id + ']' + video.title + '
')
            })

        })
    })
    // coursesData.forEach(function(item){


    // })
}
function getPageAsync(url){
    return new Promise(function(resolve,reject){
        console.log('正在爬取 ' + url)
        http.get(url, function(res) {
            var html = ''

            res.on('data', function(data){
                html += data
            })

            res.on('end', function(){
                resolve(html)
                // var courseData = filterChapters(html)
                // printCourseInfo(courseData)
            })
        }).on('error', function(e){
            reject(e)
            console.log('获取课程数据错误')
        })
    })

}

var fetchCourseArray = []

videoIds.forEach(function(id){
    fetchCourseArray.push(getPageAsync(baseUrl + id))
})

Promise
 .all(fetchCourseArray)
 .then(function(pages){
    var coursesData = []
    pages.forEach(function(html){
        var courses = filterChapters(html)
        coursesData.push(courses)
    })

    coursesData.sort(function(a,b){
        return a.number < b.number
    })
    printCourseInfo(coursesData)
 })
8. Buffer API
使用Buffer来读写图片的一个例子:
 1 var fs = require('fs')
 2
 3 fs.readFile('logo.png', function(err, origin_buffer){
 4     console.log(Buffer.isBuffer(origin_buffer))
 5     fs.writeFile('logo_buffer.png', origin_buffer, function(err){
 6         if(err) console.log(err)
 7     })
 8
 9     // var base64Image = new Buffer(origin_buffer).toString('base64')
10     var base64Image = origin_buffer.toString('base64')
11
12     console.log(base64Image)
13
14     var decodedImage = new Buffer(base64Image, 'base64')
15
16     console.log(Buffer.compare(origin_buffer, decodedImage))
17
18     fs.writeFile('logo_decodes.png', decodedImage, function(err){
19         if(err) console.log(err)
20     })
21 })
9. Stream API
//拷贝文件
var fs = require('fs')
var source = fs.readFileSync('../buffer/logo.png')

fs.writeFileSync('stream_copy_logo.png', source)
//拷贝图片
var fs = require('fs')

var readStream = fs.createReadStream('stream_copy_logo.js')
var n = 0

readStream
    .on('data', function(chunk) {
        n++
        console.log('data emits')
        console.log(Buffer.isBuffer(chunk))     //true
        // console.log(chunk.toString('utf8'))     //要读的文件的内容

        readStream.pause()
        console.log('data pause')
        setTimeout(function(){
            console.log('data pause end')
            readStream.resume()
        }, 3000)
    })
    .on('readable', function(){
        console.log('data readable')
    })
    .on('end', function() {
        console.log(n)
        console.log('data ends')
    })
    .on('close', function() {
        console.log('data close')
    })
    .on('error', function(e){
        console.log('data read error' + e)
    })
//拷贝视频
var fs = require('fs')

var readStream = fs.createReadStream('1.mp4')
var writeStream = fs.createWriteStream('1-stream.mp4')

readStream.on('data', function(chunk){
    //如果缓存区数据还在写, 那么暂停读数据
    if( writeStream.write(chunk) === false){
        console.log('still cached')
        readStream.pause()
    }
})

readStream.on('end', function(){
    writeStream.end()
})

writeStream.on('drain', function() {
    console.log('data drains')

    readStream.resume()
})
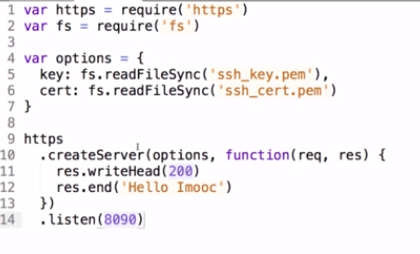
10. 流与pipe
网络请求与pipe:
 1 var http = require('http')
 2 var fs = require('fs')
 3 var request = require('request')
 4
 5 http
 6     .createServer(function(req, res) {
 7         //=====================常规做法
 8         // fs.readFile('./buffer/logo.png', function(err, data){
 9         //     if(err){
10         //         res.end('file not exist!')
11         //     } else {
12         //         res.writeHeader(200, {'Context-Type' : 'text/html'})
13         //         res.end(data)
14         //     }
15         // })
16
17         //===============使用pipe方法读取本地图片
18         // fs.createReadStream('../buffer/logo.png').pipe(res)
19
20         //从网络上获取一张图片 在不保存的前提下再返回给浏览器
21         request('http://www.imooc.com/static/img/index/logo.png?t=1.1').pipe(res)
22         //pipe会自动监听data和end事件. 可自动控制流量压力
23     })
24     .listen(8090)
使用pipe重构上面的copy视频的代码:
1 var fs = require('fs')
2 fs.createReadStream('1.mp4').pipe(fs.createWriteStream('1-pipe.mp4'))
总结:
- 可读流是为了读取外部数据, 并把数据缓存到内部的buffer数组
- 可写流是为了消费数据, 从可读流里获取数据然后对得到的chunk数据库进行处理.
 1 var Readable = require('stream').Readable
 2 var Writable = require('stream').Writable
 3
 4 var readStream = new Readable()
 5 var writeStream = new Writable()
 6
 7 readStream.push('I ')
 8 readStream.push('Love ')
 9 readStream.push('Imooc
 ')
10 readStream.push(null)
11
12 writeStream._write = function(chunk, encode, cb) {
13     console.log(chunk.toString())
14     cb()
15 }
16
17 readStream.pipe(writeStream)
一个自己定制的读写转换流的实现:
 1 var stream = require('stream')
 2 var util = require('util')
 3
 4 function ReadStream(){
 5     stream.Readable.call(this)
 6
 7 }
 8
 9 util.inherits(ReadStream, stream.Readable)
10
11 ReadStream.prototype._read = function(){
12     this.push('I ')
13     this.push('Love ')
14     this.push('Imooc
 ')
15     this.push(null)
16 }
17
18 function WriteStream(){
19     stream.Writable.call(this)
20     this._cached = new Buffer('')
21 }
22
23 util.inherits(WriteStream, stream.Writable)
24
25 WriteStream.prototype._write = function(chunk, encode, cb){
26     console.log(chunk.toString())
27     cb()
28 }
29
30 function TransformStream(){
31     stream.Transform.call(this)
32 }
33
34 util.inherits(TransformStream, stream.Transform)
35
36 TransformStream.prototype._transform = function(chunk, encode, cb){
37     this.push(chunk)
38     cb()
39 }
40
41 TransformStream.prototype._flush = function(cb){
42     this.push('Oh Yeah!')
43     cb()
44 }
45
46 var rs = new ReadStream()
47 var ws = new WriteStream()
48 var ts = new TransformStream()
49
50 rs.pipe(ts).pipe(ws)