如果你之前没了接触过Entity Framework Code First开发,建议先看一下这个帖:https://www.cnblogs.com/lucky-donkey/p/13532798.html
本文分两部分:
第一部分:实现Entity Framework对SQLite数据库做CRUD操作。
第二部分:由于Entity Framework默认并不支持SQLite数据库Migration,因此手动实现一个简单的Migration引擎。
废话不多说,动手做一遍再说。
第一部分:
1、创建一个控制台程序:EF.Sqlite.CodeFirst.Custom.Migration,如下图:

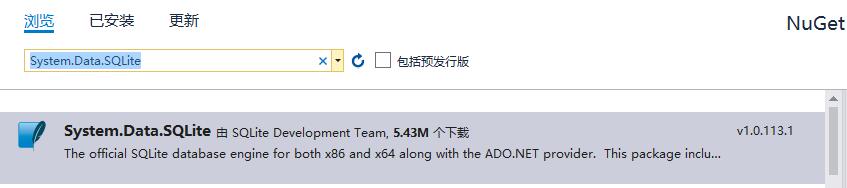
2、安装nuget包:System.Data.SQLite,如下图:
3、配置SQLite数据库连接,打开配置文件App.config,在</configuration>前面加上以下代码:


<connectionStrings>
    <add name="CourseraContext" connectionString="Data Source=|DataDirectory|Coursera.sqlite" providerName="System.Data.SQLite.EF6" />
  </connectionStrings>
(注:|DataDirectory| 表示项目的相对路径:/bin/debug 或 /bin/release。 如是webform,则为相对路径:/App_Data)
4、添加两个Model类,Course和Student
Course.cs
public class Course
    {
        public int Id { get; set; }

        public string Name { get; set; }

        public string Url { get; set; }

        //使用虚拟方法的作用是:将启用实体框架的延迟加载功能。
        //延迟加载是指在您尝试访问这些属性时,这些属性的内容将自动从数据库加载。
        public virtual List<Student> Students { get; set; }
    }
Student.cs
public class Student
    {
        public int Id { get; set; }

        public string FirstName { get; set; }

        public string LastName { get; set; }

        public int CourseId { get; set; }

        //使用虚拟方法的作用是:将启用实体框架的延迟加载功能。
        //延迟加载是指在您尝试访问这些属性时,这些属性的内容将自动从数据库加载。
        public virtual Course Course { get; set; }
    }
5、添加数据库上下文类CourseraContext,继承DbContext
CourseraContext.cs
public class CourseraContext : DbContext
    {
        public DbSet<Course> Courses { get; set; }
        public DbSet<Student> Students { get; set; }
    }
6、Program.cs加入以下代码:
public class Program
    {
        static void Main(string[] args)
        {
            EnterCourse();
        }

        private static void EnterCourse()
        {
            string name = "";

            while (name != "0")
            {
                Console.WriteLine("Enter name of course (0 to exit):");
                name = Console.ReadLine().Trim();
                if (name != "0")
                {
                    using (var db = new CourseraContext())
                    {
                        Course course = new Course();
                        course.Name = name;
                        db.Courses.Add(course);
                        db.SaveChanges();
                    }
                }
            }
        }
之后,直接运行程序,按提示输入课程名:English,按回车键,结果会报以下错误:
System.InvalidOperationException:“No Entity Framework provider found for the ADO.NET provider with invariant name 'System.Data.SQLite'. Make sure the provider is registered in the 'entityFramework' section of the application config file. See http://go.microsoft.com/fwlink/?LinkId=260882 for more information.”
是因为App.config需要修改System.Data.SQLite的引用配置,详情请看下一步。
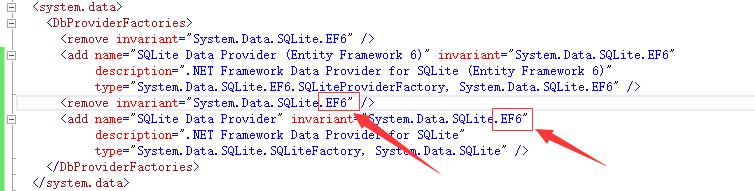
7、修改App.config,对System.Data.SQLite引用配置的invariant加上.EF6后缀,如以下代码所示:
修改App.config后,再次运行程序,按提示输入课程名:English,按回车键,结果竟然又报错了,仔细看错误代码如下:
SQLiteException: SQL logic error
no such table: Courses
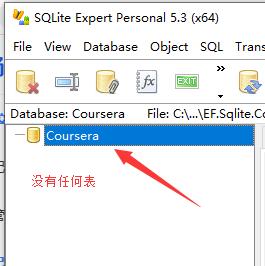
按提示来看,应该是找不到Courses表,在项目的/bin/Debug目录下看到数据库Coursera.sqlite已经自动生成了,但是查看数据库(我用的是官方提供的:SQLite Expert Personal 5.x 个人免费版,可以自行下载:http://www.sqliteexpert.com/download.html)里面却没有任何表,如下图:
原来是Entity Framework默认并不支持SQLite的Migration,只能通过以下三种方式来解决:
- 手动建表
- 自己写一个Migration引擎
- 使用第三方的SQLite Migration nuget package
下面先演示手工建表的方式。
8、手工建Courses和Students表,如下图:
(注:前面讲过了,Coursera.sqlite数据库已经自动生成并且保存在项目的/bin/Debug目录下)


再次运行程序,按提示输入课程名,点击回车按键,这次总算成功了,再打开数据库查看Courses表,刚刚输入的课程名也已经保存在里面了。
由于是手动建表,如果需要改动模型类或者新增模型类,都需要再次手动更新数据库架构。
下面看看怎么实现一个简单的自定义Migration引擎。
源码:https://github.com/LuckyDonkey/DotNet_Some_Samples/tree/master/EF.Sqlite.CodeFirst.Custom.Migration
第二部分主要用于学习,加深对Migration功能实现的理解,实际开发中很少会自己造轮子,如不感兴趣,可以直接跳过,进入下一篇:
https://www.cnblogs.com/lucky-donkey/p/13548017.html
第二部分:
1、修改App.config,将应用程序连接到一个新的数据库:CourseraMigration,代码如下:
<connectionStrings>
    <!--<add name="CourseraContext" connectionString="Data Source=|DataDirectory|Coursera.sqlite" providerName="System.Data.SQLite.EF6" />-->
    <add name="CourseraContextMigration" connectionString="Data Source=|DataDirectory|CourseraMigration.sqlite" providerName="System.Data.SQLite.EF6" />
  </connectionStrings>
2、新建模型类SchemaInfo,用于记录应用程序的数据库版本信息,代码如下:
SchemaInfo.cs
public class SchemaInfo
    {
        public int Id { get; set; }

        public int Version { get; set; }
    }
3、新建类:CourseraContextHelper,代码如下:
CourseraContextHelper.cs
class CourseraContextHelper
    {
        public CourseraContextHelper()
        {
            Migrations = new Dictionary<int, IList<string>>();

            MigrationVersion1();
        }

        public Dictionary<int, IList<string>> Migrations { get; set; }

        private void MigrationVersion1()
        {
            IList<string> steps = new List<string>();

            steps.Add("CREATE TABLE "Courses" ("Id" INTEGER PRIMARY KEY  AUTOINCREMENT  NOT NULL , "Name" TEXT, "Url" TEXT)");
            steps.Add("CREATE TABLE "Students" ("Id" INTEGER, "FirstName" TEXT, "LastName" TEXT, "CourseId" INTEGER)");

            Migrations.Add(1, steps);
        }
    }
4、新建数据库上下文类:CourseraContextMigration,代码如下:
CourseraContextMigration.cs
public class CourseraContextMigration : DbContext
    {
        public static int RequiredDatabaseVersion = 1;

        public DbSet<Course> Courses { get; set; }

        public DbSet<Student> Students { get; set; }

        public DbSet<SchemaInfo> SchemaInfoes { get; set; }

        public static void Initialize()
        {
            using (CourseraContextMigration courseraContext = new CourseraContextMigration())
            {
                int currentVersion = 0;
                if (courseraContext.SchemaInfoes.Count() > 0)
                    currentVersion = courseraContext.SchemaInfoes.Max(x => x.Version);
                CourseraContextHelper mmSqliteHelper = new CourseraContextHelper();
                while (currentVersion < RequiredDatabaseVersion)
                {
                    currentVersion++;
                    foreach (string migration in mmSqliteHelper.Migrations[currentVersion])
                    {
                        courseraContext.Database.ExecuteSqlCommand(migration);
                    }
                    courseraContext.SchemaInfoes.Add(new SchemaInfo() { Version = currentVersion });
                    courseraContext.SaveChanges();
                }
            }

        }
    }
5、修改Program.cs的代码,如下:
public class Program
    {
        static void Main(string[] args)
        {
            CourseraContextMigration.Initialize();

            EnterCourse();
        }

        private static void EnterCourse()
        {
            string name = "";

            while (name != "0")
            {
                Console.WriteLine("Enter name of course (0 to exit):");
                name = Console.ReadLine().Trim();
                if (name != "0")
                {
                    //using (var db = new CourseraContext())
                    using (var db = new CourseraContextMigration())
                    {
                        Course course = new Course();
                        course.Name = name;
                        db.Courses.Add(course);
                        db.SaveChanges();
                    }
                }
            }
        }
    }
修改后,直接运行程序,报出错误:
SQLiteException: SQL logic error
no such table: SchemaInfoes
先打开项目文件下的/bin/Debug目录,可以看到数据库文件:CourseraMigration.sqlite 已经自动创建,但由于没有SchemaInfos表,所以运行还是失败了,虽然自定义的Migration引擎已经实现,但SchemaInfos表还是需要手动去创建。
6、手动创建SchemaInfos表,表结构如下:
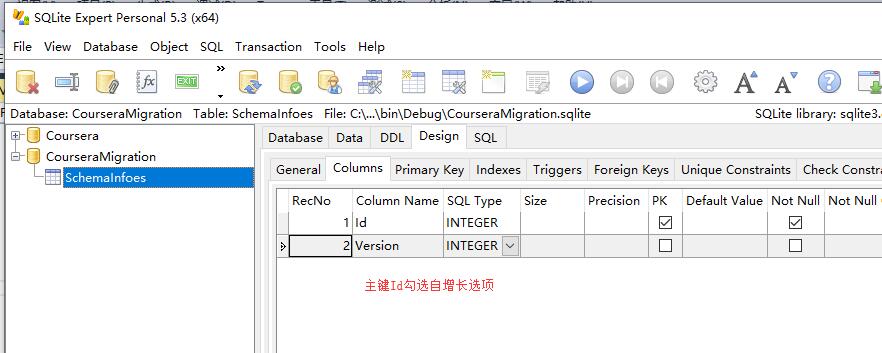
再次运行程序,根据提示输入课程名,点击回车按键,添加课程成功,这个时候再打开数据库看看,表Courses和Students都已自动创建,并且刚刚输入的课程名也已经保存到Courses表中,如下图:

至此,我们已经学习了如何用 Entity Framework 对SQLite进行CRUD操作以及实现了一个简单的自定义Migration引擎,实际应用中很少会自己去造轮子实现Migration引擎,
因为 已经有成熟的第三方nuget包可以直接使用,并且可以实现真正意义的Code First,无需任何手动创建数据库表的操作。
本文第二部分偏向于学习,实际开发中用途不大,主要用于加深理解Migration的实现,真正实现Entity Framework Sqlite Code First开发,请看下一篇:
https://www.cnblogs.com/lucky-donkey/p/13548017.html
源码:https://github.com/LuckyDonkey/DotNet_Some_Samples/tree/master/EF.Sqlite.CodeFirst.Custom.Migration
参考:https://hintdesk.com/2014/03/07/sqlite-with-entity-framework-code-first-and-migration/