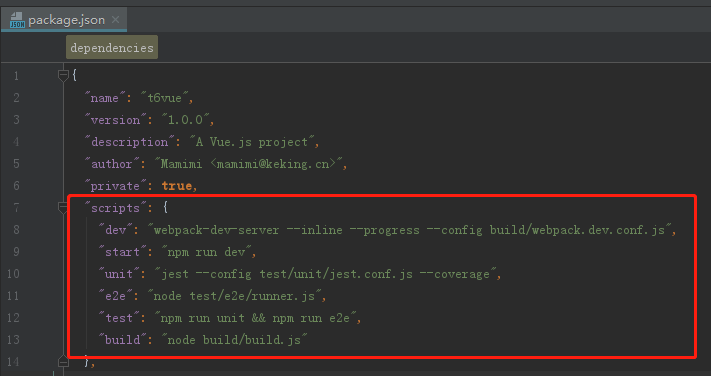
在自己的电脑下载了npm 与 node的情况下 可使用vue-cli快速构建vue项目执行命令如下:
# 全局安装 vue-cli
$ npm install -g vue-cli
# 创建一个基于 "webpack" 模板的新项目
$ vue init webpack my-project
# 安装依赖,走你
$ cd my-project
$ npm install
$ npm run dev
// 这个vuetest是你的项目名称 自己起个名字就好了
// 之后就可以按照页面提示 一直输入enter键即可
我自己在安装的时候 报了一个关于chromedriver版本错误的问题 可以使用以下命令来解决
// 这个原因是package.json 里面引入的chromedriver 版本与自己电脑里下载的版本是不一样的所导致
npm install chromedriver --chromedriver_cdnurl=http://cdn.npm.taobao.org/dist/chromedriver
// 或者是:
npm install chromedriver --chromedriver_cdnurl=http://cdn.npm.taobao.org/dist/chromedriver
// 运行结束之后 就可以直接使用
npm run  启动项目
下面来看一下项目结构吧
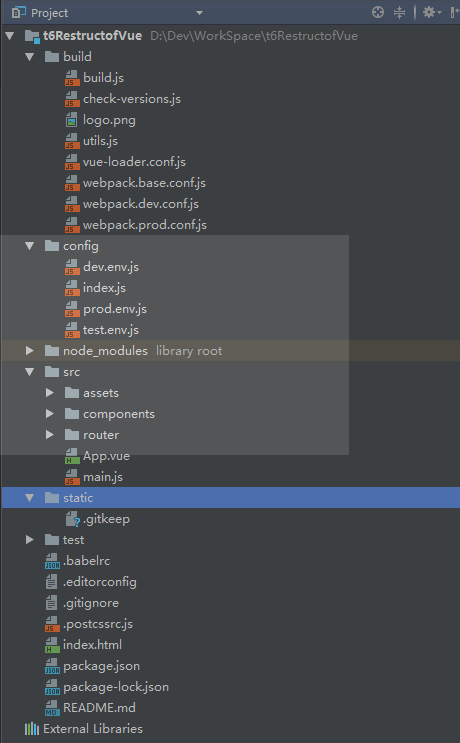
简单来介绍一下这个目录
bulid 构建服务和webpack配置 下面会有各个文件的详细介绍
config 构建项目的不同环境的配置 包括打包路径的配置 环境的声明 比如 生产环境 开发环境 测试环境。
src 项目目录
在开发环境下,我们首先考虑的是方便开发,方便代码调试,不需要考虑代码合并和css样式分离这些。
这里主要说三个 :1.css模块化;2.模块热替换功能;3.source-map(代码映射)
 webpack.dev.conf.js
首先需要知道的是,webpack的配置是通过module.exports导出一个node环境下全局的对象。然后这样再去就能更方便了解webpack 的写法。
主要代码在于:
const devWebpackConfig = merge(baseWebpackConfig, {}
//这个是将baseWebpackConfi与该文件里的配置进行结合。具体可以查看下merge的用法,也就是说 如果你想了解一些基本的配置,应该这时候去看下webpack.base.conf.js文件。
2:webpack.base.conf.js
先看代码注释
webpack.base.conf.js在这个文件里 配置了一些比如入口文件,打包与运行的文件路径,当然 这里都是在用变量去表示,最明显的栗子可以从

首先解释一下:process这个对象提供一系列属性,用于返回系统信息。
process.env:指向当前shell的环境变量,比如process.env.HOME 在我电脑里返回的是C:Userdell
process模块用来与当前进程互动,可以通过全局变量process访问,不必使用require命令加载。它是一个EventEmitter对象的实例。上面有很多的信息。
这里看出来,在dev.conf.js文件里 有进行判断是生产还是开发环境的判断,也许会有疑问,我们在代码里 怎么知道当前运行的是开发环境 还是生产环境呢,并没有直接去指明当前欲运行的环境。其实这个是在我们运行比如 npm run dev 或者 npm build 时 在运行命令上就已经带上了参数,指定了当前要运行的环境。这里也就不再进行细说。
3:webpack.prod.conf.js
当我们运行打包 npm run build命令时 运行的是build/build.js文件,可以看到该文件引入的是webpack.prod.conf.js另外在build.js文件里加了几个判断 还有删除打包文件的命令。
相比开发环境,生产环境打包是要最后发布到服务器部署的代码,我们需要尽量保持代码简洁,加载性能最优,不需要调试辅助工具。
我们从这几个方面优化 :1.公共模块拆分,单独打包;2. css文件分离,单独打包输出;3.代码压缩;

'use strict'
const path = require('path')
const utils = require('./utils')
const webpack = require('webpack')
const config = require('../config')
const merge = require('webpack-merge')
const baseWebpackConfig = require('./webpack.base.conf')
const CopyWebpackPlugin = require('copy-webpack-plugin')
const HtmlWebpackPlugin = require('html-webpack-plugin')  //帮做我们配置html文件中js文件的引入的
// css单独打包插件
const ExtractTextPlugin = require('extract-text-webpack-plugin')
const OptimizeCSSPlugin = require('optimize-css-assets-webpack-plugin')
// 压缩工具
const UglifyJsPlugin = require('uglifyjs-webpack-plugin')

const env = process.env.NODE_ENV === 'testing'
  ? require('../config/test.env')
  : require('../config/prod.env')

const webpackConfig = merge(baseWebpackConfig, {
  module: {
    rules: utils.styleLoaders({
      sourceMap: config.build.productionSourceMap,
      extract: true,
      usePostCSS: true
    })
  },
  devtool: config.build.productionSourceMap ? config.build.devtool : false,
  output: {
    path: config.build.assetsRoot,
    filename: utils.assetsPath('js/[name].[chunkhash].js'),
    chunkFilename: utils.assetsPath('js/[id].[chunkhash].js')
  },
  plugins: [
    // http://vuejs.github.io/vue-loader/en/workflow/production.html
    new webpack.DefinePlugin({
      'process.env': env
    }),
    new UglifyJsPlugin({
      uglifyOptions: {
        compress: {
          warnings: false
        }
      },
      sourceMap: config.build.productionSourceMap,
      parallel: true
    }),
    // extract css into its own file
    new ExtractTextPlugin({
      filename: utils.assetsPath('css/[name].[contenthash].css'),
      // Setting the following option to `false` will not extract CSS from codesplit chunks.
      // Their CSS will instead be inserted dynamically with style-loader when the codesplit chunk has been loaded by webpack.
      // It's currently set to `true` because we are seeing that sourcemaps are included in the codesplit bundle as well when it's `false`,
      // increasing file size: https://github.com/vuejs-templates/webpack/issues/1110
      allChunks: true,
    }),
    // Compress extracted CSS. We are using this plugin so that possible
    // duplicated CSS from different components can be deduped.
    new OptimizeCSSPlugin({
      cssProcessorOptions: config.build.productionSourceMap
        ? { safe: true, map: { inline: false } }
        : { safe: true }
    }),
    // generate dist index.html with correct asset hash for caching.
    // you can customize output by editing /index.html
    // see https://github.com/ampedandwired/html-webpack-plugin
    new HtmlWebpackPlugin({
      filename: process.env.NODE_ENV === 'testing'
        ? 'index.html'
        : config.build.index,
      template: 'index.html',
      inject: true,
      minify: {
        removeComments: true,
        collapseWhitespace: true,
        removeAttributeQuotes: true
        // more options:
        // https://github.com/kangax/html-minifier#options-quick-reference
      },
      // necessary to consistently work with multiple chunks via CommonsChunkPlugin
      chunksSortMode: 'dependency'
    }),
    // keep module.id stable when vendor modules does not change
    new webpack.HashedModuleIdsPlugin(),
    // enable scope hoisting
    new webpack.optimize.ModuleConcatenationPlugin(),
    // split vendor js into its own file
    new webpack.optimize.CommonsChunkPlugin({
      name: 'vendor',
      minChunks (module) {
        // any required modules inside node_modules are extracted to vendor
        return (
          module.resource &&
          /.js$/.test(module.resource) &&
          module.resource.indexOf(
            path.join(__dirname, '../node_modules')
          ) === 0
        )
      }
    }),
    // extract webpack runtime and module manifest to its own file in order to
    // prevent vendor hash from being updated whenever app bundle is updated
    new webpack.optimize.CommonsChunkPlugin({
      name: 'manifest',
      minChunks: Infinity
    }),
    // This instance extracts shared chunks from code splitted chunks and bundles them
    // in a separate chunk, similar to the vendor chunk
    // see: https://webpack.js.org/plugins/commons-chunk-plugin/#extra-async-commons-chunk
    new webpack.optimize.CommonsChunkPlugin({
      name: 'app',
      async: 'vendor-async',
      children: true,
      minChunks: 3
    }),

    // copy custom static assets
    new CopyWebpackPlugin([
      {
        from: path.resolve(__dirname, '../static'),
        to: config.build.assetsSubDirectory,
        ignore: ['.*']
      }
    ])
  ]
})

if (config.build.productionGzip) {
  const CompressionWebpackPlugin = require('compression-webpack-plugin')

  webpackConfig.plugins.push(
    new CompressionWebpackPlugin({
      asset: '[path].gz[query]',
      algorithm: 'gzip',
      test: new RegExp(
        '\.(' +
        config.build.productionGzipExtensions.join('|') +
        ')$'
      ),
      threshold: 10240,
      minRatio: 0.8
    })
  )
}

if (config.build.bundleAnalyzerReport) {
  const BundleAnalyzerPlugin = require('webpack-bundle-analyzer').BundleAnalyzerPlugin
  webpackConfig.plugins.push(new BundleAnalyzerPlugin())
}

module.exports = webpackConfig
常用的一些配置更改:看注释也就能看懂了
在config文件下的index.js文件
'use strict'
// Template version: 1.3.1
// see http://vuejs-templates.github.io/webpack for documentation.
// path是node.js的路径模块,用来处理路径统一的问题
const path = require('path')

module.exports = {
  dev: {

    // Paths
    assetsSubDirectory: 'static', // 编译输出的二级目录
    assetsPublicPath: '/',    // 编译发布的根目录,可配置为资源服务器域名或 CDN 域名
    // 下面是代理表,作用是用来,建一个虚拟api服务器用来代理本机的请求,只能用于开发模式
    proxyTable: {
      // '/api': {
      //   target: 'http://localhost:8082',
      //   pathRewrite: {
      //     '^/api': '/'
      //   }
      // },
      // '/pop-shared-web-components': {
      //   target: 'http://pop-shared-web-components.cn:3000',
      //   pathRewrite: {
      //     '^/pop-shared-web-components': '/'
      //   }
      // }

    },
    //下面是proxyTable的一般用法
    //vue-cli使用这个功能是借助http-proxy-middleware插件,一般解决跨域请求api
    // proxyTable: {
    //   '/list': {
    //     target: 'http://api.xxxxxxxx.com', -> 目标url地址
    //     changeOrigin: true, -> 指示是否跨域
    //     pathRewrite: {
    //       '^/list': '/list' -> 可以使用 /list 等价于 api.xxxxxxxx.com/list
    //     }
    //   }
    // }

    // Various Dev Server settings
    host: 'localhost', // can be overwritten by process.env.HOST
    port: 8080, // can be overwritten by process.env.PORT, if port is in use, a free one will be determined   // 运行测试页面的端口
    autoOpenBrowser: true,
    errorOverlay: true,
    notifyOnErrors: true,
    poll: false, // https://webpack.js.org/configuration/dev-server/#devserver-watchoptions-


    /**
     * Source Maps
     */

    // https://webpack.js.org/configuration/devtool/#development
    devtool: 'cheap-module-eval-source-map',

    // If you have problems debugging vue-files in devtools,
    // set this to false - it *may* help
    // https://vue-loader.vuejs.org/en/options.html#cachebusting
    cacheBusting: true,

    cssSourceMap: true
  },
// 下面是build也就是生产编译环境下的一些配置
  build: {
    // Template for index.html
    //path.resolve() 方法会把一个路径或路径片段的序列解析为一个绝对路径。
    index: path.resolve(__dirname, '../dist/index.html'), // 编译输入的 index.html 文件

    // Paths
    assetsRoot: path.resolve(__dirname, '../dist'),  // 编译输出的静态资源路径 是静态资源的根目录 也就是dist目录
    assetsSubDirectory: 'static',   // 编译输出的二级目录
    assetsPublicPath: '/',    // 编译发布的根目录,可配置为资源服务器域名或 CDN 域名

    /**
     * Source Maps
     */

    productionSourceMap: true,
    // https://webpack.js.org/configuration/devtool/#production
    devtool: '#source-map',

    // Gzip off by default as many popular static hosts such as
    // Surge or Netlify already gzip all static assets for you.
    // Before setting to `true`, make sure to:
    // npm install --save-dev compression-webpack-plugin
    // 下面是是否在生产环境中压缩代码,如果要压缩必须安装compression-webpack-plugin
    productionGzip: false,
    // 下面定义要压缩哪些类型的文件
    productionGzipExtensions: ['js', 'css'],

    // Run the build command with an extra argument to
    // View the bundle analyzer report after build finishes:
    // `npm run build --report`
    // Set to `true` or `false` to always turn it on or off
    // 下面是用来开启编译完成后的报告,可以通过设置值为true和false来开启或关闭
// 下面的process.env.npm_config_report表示定义的一个npm_config_report环境变量,可以自行设置
    bundleAnalyzerReport: process.env.npm_config_report
  }
}
以上算是对各个文件做了简单的介绍