只是一个demo,仅跑通上传和存储这一步。
as3的要点:
1、单个上传使用FileReference,一次可选择多张图片可使用FileReferenceList,在flash player 10+可使用load方法可实现预览图片
2、过滤选择文件,使用FileFilter,在调用browse时传入(参数为数组),其中FileFilter实例第二个参数,多个文件使用;分隔,如*.jpg;*.gif
3、监听上载完成可以使用Event.COMPLETE,但若需要获取后台返回的数据流,则需要监听UPLOAD_COMPLETE_DATA(在flash.net.DataEvent包中)
php:
1、接收上传参数,默认为(Filedata),可在as3中FileReference实例的upload第二个参数指定
2、在windows下上载图片,其中文名称,在保存时需要转成gb2312(不然会出现乱码),在判定图片是否存在是也需要使用gb2312(使用utf-8则不行)
as3的代码(大体思路,不完整版):
1: package {
2: 3: import flash.display.DisplayObject;
4: import flash.display.MovieClip;
5: import flash.display.Sprite;
6: import flash.display.StageAlign;
7: import flash.display.StageScaleMode;
8: import flash.events.Event;
9: import flash.events.IOErrorEvent;
10: import flash.events.MouseEvent;
11: import flash.events.ProgressEvent;
12: import flash.events.DataEvent;
13: import flash.net.FileFilter;
14: import flash.net.FileReference;
15: import flash.net.URLRequest;
16: 17: public class UploadImg extends Sprite {
18: 19: private var seltBtn:DisplayObject;
20: private var _file:FileReference;
21: 22: function UploadImg() { 23: stage.scaleMode = StageScaleMode.NO_SCALE; 24: stage.align = StageAlign.TOP_LEFT; 25: 26: init(); 27: } 28: 29: private function init():void {
30: seltBtn = getChildByName("selectBtn");
31: 32: seltBtn.addEventListener(MouseEvent.CLICK, selectClickHandler); 33: } 34: 35: private function selectClickHandler(evt:MouseEvent):void {
36: var fileRef:FileReference = new FileReference();
37: var fileFilter:FileFilter = new FileFilter("图片", "*.jpg;*.gif;*.jpeg;");
38: 39: fileRef.addEventListener(Event.SELECT, onSelectHandler); 40: fileRef.browse([fileFilter]); 41: 42: _file = fileRef 43: } 44: 45: private function onSelectHandler(evt:Event):void {
46: _file.addEventListener(DataEvent.UPLOAD_COMPLETE_DATA, onUploadCompleteHandler); 47: _file.addEventListener(IOErrorEvent.IO_ERROR, ioErrorHandler); 48: _file.addEventListener(ProgressEvent.PROGRESS, onProgresshandler);49: _file.upload(new URLRequest("http://meteoric.com/Example/upload/test.php"));
50: } 51: 52: private function onUploadCompleteHandler(evt:DataEvent):void {
53: trace('上传完成' + evt.data);
54: } 55: 56: private function ioErrorHandler(evt:Event):void {
57: trace(evt); 58: } 59: 60: private function onProgresshandler(evt:ProgressEvent):void {
61: trace(evt.bytesLoaded/evt.bytesTotal + "----" + evt.bytesLoaded + "--" + evt.bytesTotal);
62: } 63: 64: } 65: }php(需要先开启extension=php_exif.dll,同时要注意post_max_size参数的大小,如果上载的文件过大,可能获取不到FIledata了,需要先判定文件大小)
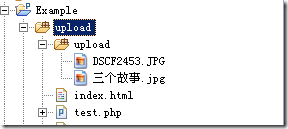
1、目录结构:
2、不完整示例代码:
1: <?php2: if ($_FILES ["Filedata"] ["error"] > 0) {
3: exit("Error: " . $_FILES ["Filedata"]["error"]);
4: } 5: 6: echo "<br/>----------存储图片--------<br/>";
7: 8: $fileName = iconv("utf-8","gb2312", $_FILES ["Filedata"]["name"]);
9: $reallyName = "upload/".$fileName;
10: 11: if (file_exists ($reallyName)) {
12: echo $_FILES ["Filedata"]["name"]. " already exists. ";
13: } else {
14: 15: if (!is_dir("upload")) {
16: mkdir("upload");
17: } 18: 19: move_uploaded_file( $_FILES ["Filedata"]["tmp_name"], $reallyName);
20: echo "Stored in: " . "upload/" . $fileName;
21: } 22: 23: ?>运行的效果:
上面的代码,仅是思路,写出实现上载功能较为核心的代码。若需要完成更复杂的应用,则要自己在此基础上进行封装一下,例如:多个文件上载,显示上载进度条…


