互联网项目中,安全与权限控制是不可回避的问题,为了解决这一些列问题,许多安全框架应运而生了。这些框架旨在帮我们解决公用的安全问题,让我们的程序更加健壮,从而让程序员全身心投入到业务开发当中。那么SpringSecurity出自于大名鼎鼎的Spring家族,同时能与SpringBoot,SpringCloud无缝集成,它也是业界流行的安全框架之一。
一、SpringSecurity的准备工作
注意:本示例是基于注解的springmvc构建,SpringBoot的版本对应的是2.0.3.REALEASE。Spring版本5.0.7REALEASE,SpringSecurity的版本是5.0.5
首先添加SpringSecurity的依赖:
compile('org.springframework.boot:spring-boot-starter-security')
紧接着按照如下目录规范创建
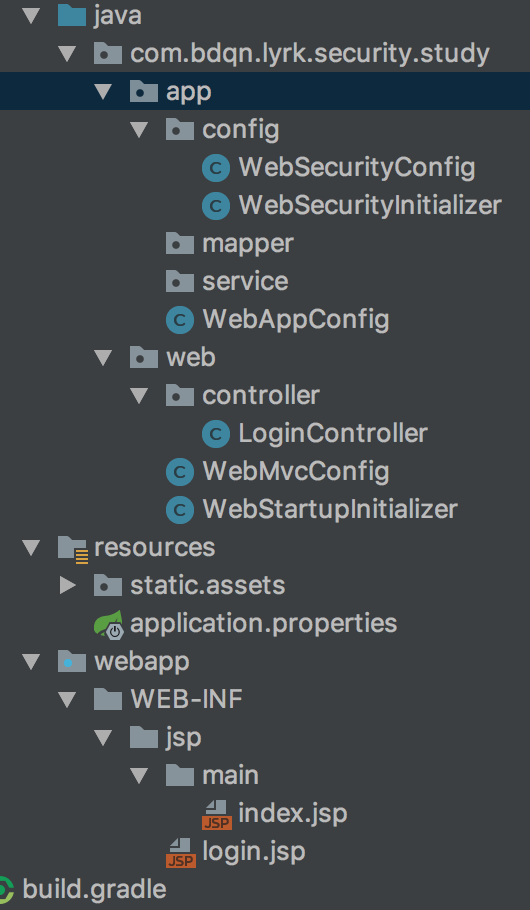
app包下主要为Root WebApplicationContext提供配置,而web包下主要是为servlet WebApplicationContext提供相关配置,这种方式更符合WebApplicationContext的层次化规范,同时也方便管理配置
二、实现app包下的配置
2.1、WebSecurityInitializer


package com.bdqn.lyrk.security.study.app.config;

import org.springframework.security.web.context.AbstractSecurityWebApplicationInitializer;

/**
 * 这个类可以在添加springSecurity核心过滤器之前或之后做一些我们需要的操作
 *
 * @author chen.nie
 * @date 2018/6/8
 **/
public class WebSecurityInitializer extends AbstractSecurityWebApplicationInitializer {
}
2.2、WebSecurityConfig
package com.bdqn.lyrk.security.study.app.config;

import org.springframework.security.config.annotation.authentication.builders.AuthenticationManagerBuilder;
import org.springframework.security.config.annotation.web.builders.HttpSecurity;
import org.springframework.security.config.annotation.web.configuration.EnableWebSecurity;
import org.springframework.security.config.annotation.web.configuration.WebSecurityConfigurerAdapter;
import org.springframework.security.core.userdetails.User;

/**
 * spring-security的相关配置
 *
 * @author chen.nie
 * @date 2018/6/7
 **/
@EnableWebSecurity
public class WebSecurityConfig extends WebSecurityConfigurerAdapter {

    @Override
    protected void configure(HttpSecurity http) throws Exception {
        /*
            1.配置静态资源不进行授权验证
            2.登录地址及跳转过后的成功页不需要验证
            3.其余均进行授权验证
         */
        http.
                authorizeRequests().antMatchers("/static/**").permitAll().
                and().authorizeRequests().anyRequest().authenticated().
                and().formLogin().loginPage("/login").successForwardUrl("/toIndex").permitAll();
    }

    @Override
    protected void configure(AuthenticationManagerBuilder auth) throws Exception {
        /*
            在内存中创建用户
         */
        User.UserBuilder users = User.withDefaultPasswordEncoder();
        auth.inMemoryAuthentication().withUser(users.username("admin").password("123").roles("ADMIN"));
    }
}
该类主要是设置安全配置注意使用@EnableWebSecruity注解,我们可以在这里设置Http的安全配置和最基本的认证配置等,其中在该代码里设置静态资源 登录页 和登录成功需要跳转的页面不用认证,另外基于内存设置了用户admin
另外:loginPage()里的值即为跳转页面的路径又为处理登录验证的路径。当get请求时为前者而post请求时为后者
2.3、WebAppConfig
package com.bdqn.lyrk.security.study.app;

import org.springframework.context.annotation.Bean;
import org.springframework.context.annotation.ComponentScan;
import org.springframework.context.annotation.Configuration;
import org.springframework.context.annotation.PropertySource;
import org.springframework.context.support.PropertySourcesPlaceholderConfigurer;

/**
 * 主配置类
 *
 * @author chen.nie
 * @date 2018/6/8
 **/
@Configuration
@ComponentScan
@PropertySource("classpath:application.properties")
public class WebAppConfig {


    @Bean
    public static PropertySourcesPlaceholderConfigurer propertySourcesPlaceholderConfigurer() {
        return new PropertySourcesPlaceholderConfigurer();
    }
}
三、实现WebMvc的配置
3.1、初始化DispatcherServlet配置
WebStartupInitializer:
package com.bdqn.lyrk.security.study.web;

import com.bdqn.lyrk.security.study.app.WebAppConfig;
import org.springframework.web.servlet.support.AbstractAnnotationConfigDispatcherServletInitializer;

public class WebStartupInitializer extends AbstractAnnotationConfigDispatcherServletInitializer {
    @Override
    protected Class<?>[] getRootConfigClasses() {
        return new Class[]{WebAppConfig.class};
    }

    @Override
    protected Class<?>[] getServletConfigClasses() {
        return new Class[]{WebMvcConfig.class};
    }

    @Override
    protected String[] getServletMappings() {
        return new String[]{"/"};
    }
}
在这里注意配置RootConfigClass为WebAppConfig,ServletConfigClass为WebMvcConfig
3.2、创建WebMvcConfig
package com.bdqn.lyrk.security.study.web;

import org.springframework.context.annotation.Bean;
import org.springframework.context.annotation.ComponentScan;
import org.springframework.context.annotation.Configuration;
import org.springframework.web.servlet.ViewResolver;
import org.springframework.web.servlet.config.annotation.EnableWebMvc;
import org.springframework.web.servlet.config.annotation.ResourceHandlerRegistry;
import org.springframework.web.servlet.config.annotation.WebMvcConfigurer;
import org.springframework.web.servlet.view.InternalResourceViewResolver;
import org.springframework.web.servlet.view.JstlView;

@Configuration
@ComponentScan
@EnableWebMvc
public class WebMvcConfig implements WebMvcConfigurer {

    /**
     * 创建视图解析器
     * @return
     */
    @Bean
    public ViewResolver viewResolver() {
        InternalResourceViewResolver viewResolver = new InternalResourceViewResolver();
        viewResolver.setViewClass(JstlView.class);
        viewResolver.setPrefix("/WEB-INF/jsp/");
        viewResolver.setSuffix(".jsp");
        return viewResolver;
    }

    /**
     * 处理静态资源
     * @param registry
     */
    @Override
    public void addResourceHandlers(ResourceHandlerRegistry registry) {
        registry.addResourceHandler("/static/**").addResourceLocations("classpath:/static/").setCachePeriod(60 * 2);
    }
}
3.3、创建Controller
package com.bdqn.lyrk.security.study.web.controller;

import org.springframework.security.core.context.SecurityContextHolder;
import org.springframework.security.core.userdetails.User;
import org.springframework.stereotype.Controller;
import org.springframework.ui.ModelMap;
import org.springframework.web.bind.annotation.GetMapping;
import org.springframework.web.bind.annotation.PostMapping;

@Controller
public class LoginController {


    @PostMapping("/toIndex")
    public String index(ModelMap modelMap) {
        User user = (User) SecurityContextHolder.getContext().getAuthentication().getPrincipal();
        modelMap.put("user", user);
        return "main/index";
    }

    @GetMapping("/login")
    public String login() {

        return "login";
    }
}
四、页面设置
4.1、登录页
login.jsp:
<%--
  Created by IntelliJ IDEA.
  User: chen.nie
  Date: 2018/6/8
  Time: 上午9:49
  To change this template use File | Settings | File Templates.
--%>
<%@ page contentType="text/html;charset=UTF-8" language="java" %>
<!doctype html>
<html>

<head>
    <meta charset="utf-8">
    <meta http-equiv="X-UA-Compatible" content="IE=edge">
    <title>Amaze UI Admin index Examples</title>
    <meta name="description" content="这是一个 index 页面">
    <meta name="keywords" content="index">
    <meta name="viewport" content="width=device-width, initial-scale=1">
    <meta name="renderer" content="webkit">
    <meta http-equiv="Cache-Control" content="no-siteapp" />
    <link rel="icon" type="image/png" href="assets/i/favicon.png">
    <link rel="apple-touch-icon-precomposed" href="assets/i/app-icon72x72@2x.png">
    <meta name="apple-mobile-web-app-title" content="Amaze UI" />
    <link rel="stylesheet" href="${request.contextPath}/static/assets/css/amazeui.min.css" />
    <link rel="stylesheet" href="${request.contextPath}/static/assets/css/admin.css">
    <link rel="stylesheet" href="${request.contextPath}/static/assets/css/app.css">
</head>

<body data-type="login">

<div class="am-g myapp-login">
    <div class="myapp-login-logo-block  tpl-login-max">
        <div class="myapp-login-logo-text">
            <div class="myapp-login-logo-text">
                Amaze UI<span> Login</span> <i class="am-icon-skyatlas"></i>

            </div>
        </div>

        <div class="login-font">
            <i>Log In </i> or <span> Sign Up</span>
        </div>
        <div class="am-u-sm-10 login-am-center">
            <form class="am-form" action="/login" method="post">
                <fieldset>
                    <div class="am-form-group">
                        <input name="username" type="text" class="" id="doc-ipt-email-1" placeholder="输入登录名">
                    </div>
                    <div class="am-form-group">
                        <input name="password" type="password" class="" id="doc-ipt-pwd-1" placeholder="设置个密码吧">
                    </div>
                    <p><button type="submit" class="am-btn am-btn-default">登录</button></p>

                </fieldset>
                <input type="hidden" name="_csrf" value="${_csrf.token}" />
            </form>
        </div>
    </div>
</div>

<script src="${request.contextPath}/static/assets/js/jquery.min.js"></script>
<script src="${request.contextPath}/static/assets/js/amazeui.min.js"></script>
<script src="${request.contextPath}/static/assets/js/app.js"></script>
</body>
注意:1)表单属性action为httpSecurity的loginPage()配置地址
2)表单为post方式提交
3)input的name属性分别为username,password代表用户名,密码
4)必须设置隐藏表单_csrf 如果不设置请http.csrf().ignoringAntMatchers()方法进行排除
4.2、 登录成功页
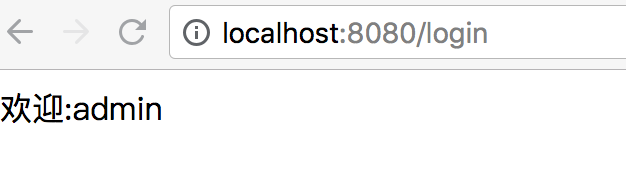
<%--
  Created by IntelliJ IDEA.
  User: chen.nie
  Date: 2018/6/8
  Time: 上午9:56
  To change this template use File | Settings | File Templates.
--%>
<%@ page contentType="text/html;charset=UTF-8" language="java" %>
<html>
<head>
    <title>Title</title>
</head>
<body>
欢迎:${user.username}
</body>
</html>
在成功页时打印出认证成功的用户.
随即当我们访问http://localhost:8080/toIndex时跳转至登录页:

登录成功时:
在实际应用中登录页可能要复杂的多,可能包括验证码或者其他业务。另外用户不可能都存在内存当中,关于更详细的验证问题,我们会在下篇讨论。