一、字节缓冲输入流
1、BufferedInputStream 概述
BufferedInputStream 是一个套接在字节输入流上面的处理流,能够提高写入速度。
2、BufferedInputStream 类结构
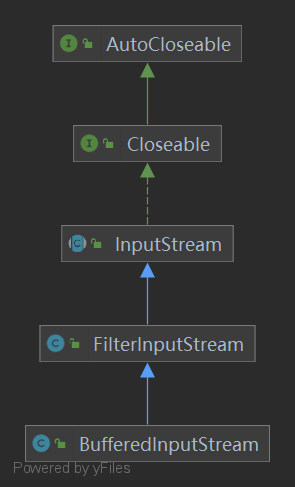
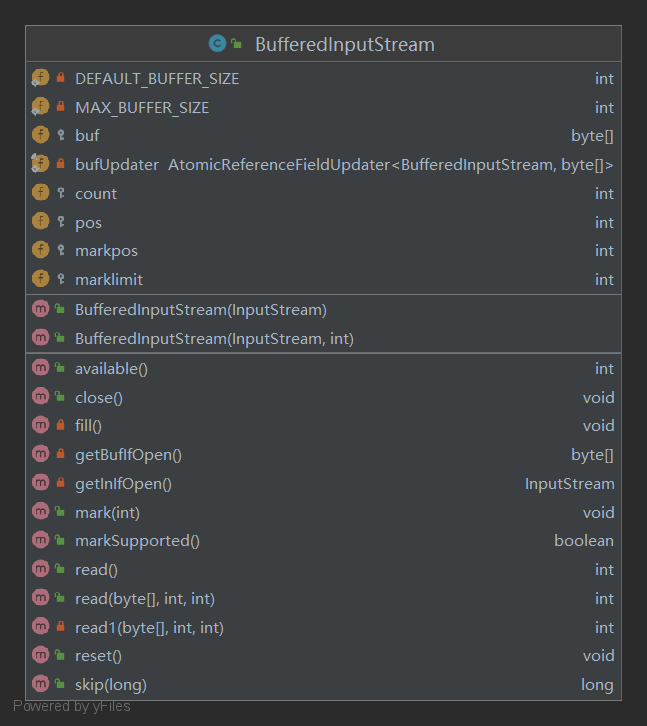
3、构造方法
BufferedInputStream(InputStream in) 创建一个 BufferedInputStream 并保存其参数,即输入流 in,以便将来使用。

BufferedInputStream(InputStream in, int size) 创建具有指定缓冲区大小的 BufferedInputStream 并保存其参数,即输入流 in,以便将来使用。
参数:
InputStream in:字节输入流,可以传递FileInputStream,缓冲流会给FileInputStream增加一个缓冲区,提高FileInputStream的读取效率
int size:指定缓冲流内部缓冲区的大小,不指定默认。
4、常用方法
int read()从输入流中读取数据的下一个字节。

int read(byte[] b) 从输入流中读取一定数量的字节,并将其存储在缓冲区数组 b 中。

void close() 关闭此输入流并释放与该流关联的所有系统资源。
5、使用步骤
① 创建FileInputStream对象,构造方法中绑定要读取的数据源;
② 创建BufferedInputStream对象,构造方法中传递FileInputStream对象,提高FileInputStream对象的读取效率;
③ 使用BufferedInputStream对象中的方法read,读取文件;
④ 释放资源;
6、案例
 1   public static void main(String[] args) throws IOException {
 2         //1.创建FileInputStream对象,构造方法中绑定要读取的数据源
 3         FileInputStream fis = new FileInputStream("10_IO\a.txt");
 4         //2.创建BufferedInputStream对象,构造方法中传递FileInputStream对象,提高FileInputStream对象的读取效率
 5         BufferedInputStream bis = new BufferedInputStream(fis);
 6         //3.使用BufferedInputStream对象中的方法read,读取文件
 7         //int read()从输入流中读取数据的下一个字节。
 8         /*int len = 0;//记录每次读取到的字节
 9         while((len = bis.read())!=-1){
10             System.out.println(len);
11         }*/
12
13         //int read(byte[] b) 从输入流中读取一定数量的字节,并将其存储在缓冲区数组 b 中。
14         byte[] bytes =new byte[1024];//存储每次读取的数据
15         int len = 0; //记录每次读取的有效字节个数
16         while((len = bis.read(bytes))!=-1){
17             System.out.println(new String(bytes,0,len));
18         }
19
20         //4.释放资源
21         bis.close();
22     }
二、字节缓冲输出流
1、BufferedOutputStream 概述
BufferedOutputStream 是一个套接在字节输出流上面的处理流,能够提高输出速度。
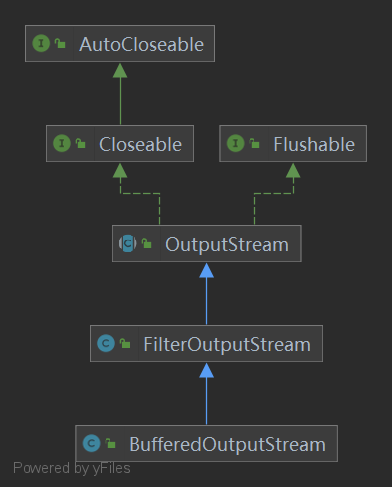
2、BufferedOutputStream 类结构
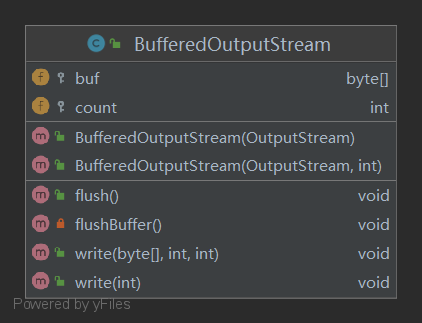
3、构造方法
BufferedOutputStream(OutputStream out)  创建一个新的缓冲输出流,以将数据写入指定的底层输出流。

BufferedOutputStream(OutputStream out, int size)  创建一个新的缓冲输出流,以将具有指定缓冲区大小的数据写入指定的底层输出流。
参数:
OutputStream out:字节输出流,可以传递 FileOutputStream,缓冲流会给FileOutputStream增加一个缓冲区,提高FileOutputStream的写入效率
int size:指定缓冲流内部缓冲区的大小,不指定默认。
4、常用方法
public void close() :关闭此输出流并释放与此流相关联的任何系统资源。

public void flush() :刷新此输出流并强制任何缓冲的输出字节被写出。

public void write(byte[] b):将 b.length字节从指定的字节数组写入此输出流。

public void write(byte[] b, int off, int len) :从指定的字节数组写入 len字节,从偏移量 off开始输出到此输出流。

public abstract void write(int b) :将指定的字节输出流。
5、使用步骤
① 创建FileOutputStream对象,构造方法中绑定要输出的目的地;
② 创建BufferedOutputStream对象,构造方法中传递FileOutputStream对象对象,提高FileOutputStream对象效率;
③ 使用BufferedOutputStream对象中的方法write,把数据写入到内部缓冲区中;
④ 使用BufferedOutputStream对象中的方法flush,把内部缓冲区中的数据,刷新到文件中;
⑤ 释放资源(会先调用flush方法刷新数据);
6、案例
 1   public static void main(String[] args) throws IOException {
 2         //1.创建FileOutputStream对象,构造方法中绑定要输出的目的地
 3         FileOutputStream fos = new FileOutputStream("E:\a.txt");
 4         //2.创建BufferedOutputStream对象,构造方法中传递FileOutputStream对象对象,提高FileOutputStream对象效率
 5         BufferedOutputStream bos = new BufferedOutputStream(fos);
 6         //3.使用BufferedOutputStream对象中的方法write,把数据写入到内部缓冲区中
 7         bos.write("我把数据写入到内部缓冲区中".getBytes());
 8         //4.使用BufferedOutputStream对象中的方法flush,把内部缓冲区中的数据,刷新到文件中
 9         bos.flush();
10         //5.释放资源(会先调用flush方法刷新数据,第4部可以省略)
11         bos.close();
12     }
三、案例
1、实现非文本文件的复制
 1     @Test
 2     public void BufferedStreamTest() throws FileNotFoundException {
 3         BufferedInputStream bis = null;
 4         BufferedOutputStream bos = null;
 5
 6         try {
 7             //1.造文件
 8             File srcFile = new File("a.jpg");
 9             File destFile = new File("b.jpg");
10             //2.造流
11             //2.1 造节点流
12             FileInputStream fis = new FileInputStream((srcFile));
13             FileOutputStream fos = new FileOutputStream(destFile);
14             //2.2 造缓冲流
15             bis = new BufferedInputStream(fis);
16             bos = new BufferedOutputStream(fos);
17
18             //3.复制的细节:读取、写入
19             byte[] buffer = new byte[10];
20             int len;
21             while((len = bis.read(buffer)) != -1){
22                 bos.write(buffer,0,len);
23
24 //                bos.flush();//刷新缓冲区
25
26             }
27         } catch (IOException e) {
28             e.printStackTrace();
29         } finally {
30             //4.资源关闭
31             //要求:先关闭外层的流,再关闭内层的流
32             if(bos != null){
33                 try {
34                     bos.close();
35                 } catch (IOException e) {
36                     e.printStackTrace();
37                 }
38
39             }
40             if(bis != null){
41                 try {
42                     bis.close();
43                 } catch (IOException e) {
44                     e.printStackTrace();
45                 }
46
47             }
48             //说明:关闭外层流的同时,内层流也会自动的进行关闭。关于内层流的关闭,我们可以省略.
49 //        fos.close();
50 //        fis.close();
51         }
52
53     }
2、复制文件的方法
 1   public void copyFileWithBuffered(String srcPath,String destPath){
 2         BufferedInputStream bis = null;
 3         BufferedOutputStream bos = null;
 4
 5         try {
 6             //1.造文件
 7             File srcFile = new File(srcPath);
 8             File destFile = new File(destPath);
 9             //2.造流
10             //2.1 造节点流
11             FileInputStream fis = new FileInputStream((srcFile));
12             FileOutputStream fos = new FileOutputStream(destFile);
13             //2.2 造缓冲流
14             bis = new BufferedInputStream(fis);
15             bos = new BufferedOutputStream(fos);
16
17             //3.复制的细节:读取、写入
18             byte[] buffer = new byte[1024];
19             int len;
20             while((len = bis.read(buffer)) != -1){
21                 bos.write(buffer,0,len);
22             }
23         } catch (IOException e) {
24             e.printStackTrace();
25         } finally {
26             //4.资源关闭
27             //要求:先关闭外层的流,再关闭内层的流
28             if(bos != null){
29                 try {
30                     bos.close();
31                 } catch (IOException e) {
32                     e.printStackTrace();
33                 }
34
35             }
36             if(bis != null){
37                 try {
38                     bis.close();
39                 } catch (IOException e) {
40                     e.printStackTrace();
41                 }
42
43             }
44             //说明:关闭外层流的同时,内层流也会自动的进行关闭。关于内层流的关闭,我们可以省略.
45 //        fos.close();
46 //        fis.close();
47         }
48     }
3、使用字节流实现图片加密操作
(1)加密
 1     @Test
 2     public void test1() {
 3
 4         FileInputStream fis = null;
 5         FileOutputStream fos = null;
 6         try {
 7             fis = new FileInputStream("爱情与友情.jpg");
 8             fos = new FileOutputStream("爱情与友情secret.jpg");
 9
10             byte[] buffer = new byte[20];
11             int len;
12             while ((len = fis.read(buffer)) != -1) {
13                 //字节数组进行修改
14                 //错误的
15                 //            for(byte b : buffer){
16                 //                b = (byte) (b ^ 5);
17                 //            }
18                 //正确的
19                 for (int i = 0; i < len; i++) {
20                     buffer[i] = (byte) (buffer[i] ^ 5);
21                 }
22
23
24                 fos.write(buffer, 0, len);
25             }
26         } catch (IOException e) {
27             e.printStackTrace();
28         } finally {
29             if (fos != null) {
30                 try {
31                     fos.close();
32                 } catch (IOException e) {
33                     e.printStackTrace();
34                 }
35
36             }
37             if (fis != null) {
38                 try {
39                     fis.close();
40                 } catch (IOException e) {
41                     e.printStackTrace();
42                 }
43
44             }
45         }
46     }
(2)解密
 1     @Test
 2     public void test() {
 3
 4         FileInputStream fis = null;
 5         FileOutputStream fos = null;
 6         try {
 7             fis = new FileInputStream("爱情与友情secret.jpg");
 8             fos = new FileOutputStream("爱情与友情2.jpg");
 9
10             byte[] buffer = new byte[20];
11             int len;
12             while ((len = fis.read(buffer)) != -1) {
13                 //字节数组进行修改
14                 //错误的
15                 //            for(byte b : buffer){
16                 //                b = (byte) (b ^ 5);
17                 //            }
18                 //正确的
19                 for (int i = 0; i < len; i++) {
20                     buffer[i] = (byte) (buffer[i] ^ 5);
21                 }
22
23                 fos.write(buffer, 0, len);
24             }
25         } catch (IOException e) {
26             e.printStackTrace();
27         } finally {
28             if (fos != null) {
29                 try {
30                     fos.close();
31                 } catch (IOException e) {
32                     e.printStackTrace();
33                 }
34
35             }
36             if (fis != null) {
37                 try {
38                     fis.close();
39                 } catch (IOException e) {
40                     e.printStackTrace();
41                 }
42
43             }
44         }
45     }