一.连接真机
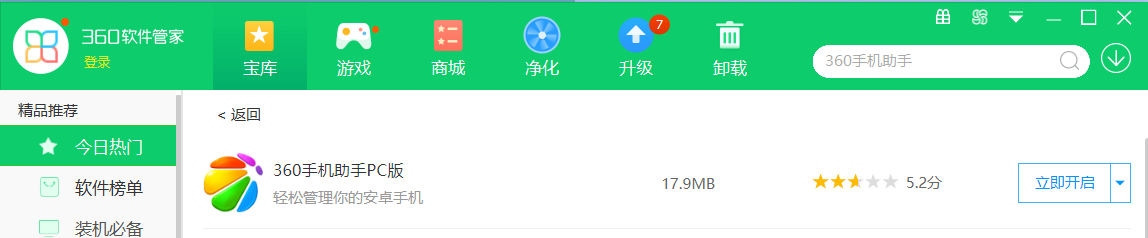
第一步:手机下载一个360手机助手,电脑下载一个360安全卫士,电脑下载后在360安全卫士的软件管家里下载360手机助手(电脑必须要先下载360安全卫士才能用360手机助手,单独下360手机助手是不行的)。书上说豌豆荚也可以,我试过了连接不上,不知道什么原因。
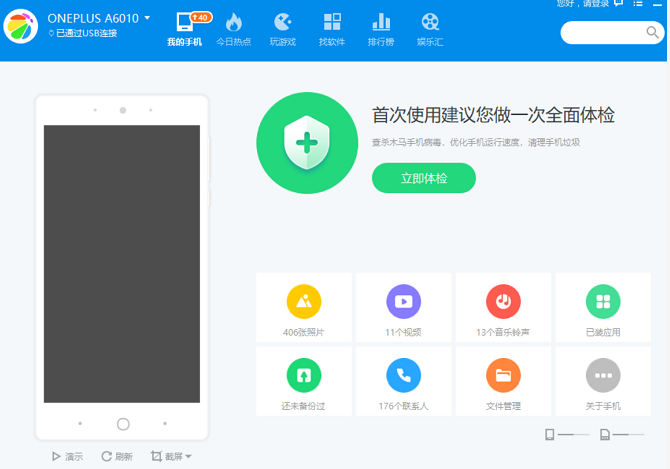
第二步:下载完360手机助手后,用数据线连接手机与电脑,手机打开 开发者选项与usb调试,我是一加手机,打开步骤:
https://jingyan.baidu.com/article/67508eb47b824a9cca1ce48b.html
第三步:然后电脑打开360手机助手,会叫你用手机的360手机助手去扫码连接的(网络一定要够好,不然会连接失败的),显示以下的图就是连接成功了:
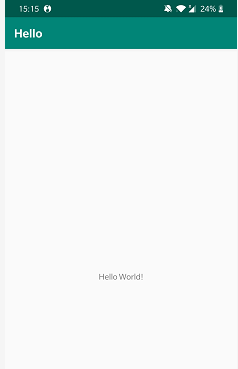
现在来测试一下吧,新建一个Hello项目。运行项目后,你的手机会相当于模拟器一样安装Hello软件。
二、使用通知
通知是Android中比较由特色的一个功能,当某个应用程序需要向用户发出一些提示信息时,而该程序由不在前台的显示,就可以借助通知来实现。
步骤:
首先要判断你的安卓API是多少,我们需要通过判断当前设备的API来针对性的进行发送通知栏。因为API26(Android 8.0)以后,引入了**通知渠道(Notification Channels)**这么一个东西来帮助用户管理通知。
if (Build.VERSION.SDK_INT >= 26) {
//这里是API26以上的方法
} else {
//这里是API26以下的方法
}
然后根据API的大小去写代码
API>=26:
if (Build.VERSION.SDK_INT >= 26) {

                    NotificationChannel mChannel = new NotificationChannel(id, name, NotificationManager.IMPORTANCE_LOW);//NotificationManager对象调用一下createNotificationChannel()方法并传入NotificationChannel对象
                    notificationManager.createNotificationChannel(mChannel);
                    notification = new Notification.Builder(this,id)
                            .setChannelId(id)
                            .setContentTitle("title")
                            .setContentText("This is content text")
                            .setSmallIcon(R.drawable.send)
                            .setLargeIcon(BitmapFactory.decodeResource(getResources(),R.drawable.ff))
                            .build();

                }
代码的解释:
1.一个NotificationManager来对通知进行管理,可以调用Context的getSystemService()方法获取到,getSystemService()方法接受一个字符串参数用于确定获取系统的哪一个服务,这里传入Context.NOTIFICATION_SERVICE即可
2.NotificationChannel的三个参数
id:通知渠道的 ID ,用户不可见,实例化Notification的时候需要用到,如果这个 ID 在实例化Notification的时候没有对应上,通知栏无效,系统还会Toast弹出一个错误*(软件不会闪退)*
name:这个是便于用户管理通知用的,用户可见
Importance:渠道优先级
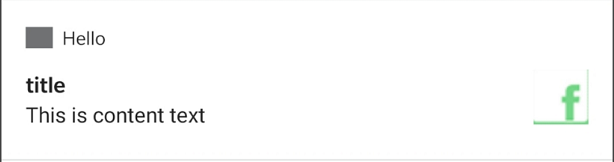
3.setContentTittle:用于指定指定通知标题的内容,下拉系统状态栏就可以看到这部分内容
setContentText:指定统治的正文的上下文
setWhen:指定通知被创建的时间
setSmallIcon:设置通知的小图标
setLargeIcon:设置通知的大图标,当系统下拉时能可以看到设置的大图标
API<26
notification = new Notification.Builder(this)
                            .setContentTitle("title")
                            .setContentText("This is content text")
                            .setSmallIcon(R.drawable.send)
                            .setLargeIcon(BitmapFactory.decodeResource(getResources(),R.drawable.ff))
                            .build();
完整的代码:
MainActivity.java代码:
public class MainActivity extends AppCompatActivity implements  View.OnClickListener{

    @Override
    protected void onCreate(Bundle savedInstanceState) {
        super.onCreate(savedInstanceState);
        setContentView(R.layout.activity_main);
        Button send=(Button)findViewById(R.id.send_button);
        send.setOnClickListener(this);

    }

    @Override
    public void onClick(View v) {
        switch (v.getId()){
            case R.id.send_button:
                String id = "my_channel_01";
                String name="panq";
                NotificationManager notificationManager = (NotificationManager) getSystemService(NOTIFICATION_SERVICE);
                Notification notification = null;
                //Notification在android 8.0以上设置时,需要设置渠道信息才能够正常显示通知。
                if (Build.VERSION.SDK_INT >= 26) {//判断API,API26以上的方法
                    /*NotificationChannel的三个参数
                    id:通知渠道的 ID ,用户不可见,实例化Notification的时候需要用到,
                          如果这个 ID 在实例化Notification的时候没有对应上,通知栏无效,系统还会Toast弹出一个错误*(软件不会闪退)*
                    name:这个是便于用户管理通知用的,用户可见
                    Importance:渠道优先级
                     */
                    NotificationChannel mChannel = new NotificationChannel(id, name, NotificationManager.IMPORTANCE_LOW);
                    //NotificationManager对象调用一下createNotificationChannel()方法并传入NotificationChannel对象
                    notificationManager.createNotificationChannel(mChannel);
                    notification = new Notification.Builder(this,id)
                            .setChannelId(id)
                            .setContentTitle("title")
                            .setContentText("This is content text")
                            .setSmallIcon(R.drawable.send)
                            .setLargeIcon(BitmapFactory.decodeResource(getResources(),R.drawable.ff))
                            .build();

                } else {//API26以下的方法
                    notification = new Notification.Builder(this)
                            .setContentTitle("title")
                            .setContentText("This is content text")
                            .setSmallIcon(R.drawable.send)
                            .setLargeIcon(BitmapFactory.decodeResource(getResources(),R.drawable.ff))
                            .build();
                }
                notificationManager.notify(111123, notification);
                break;
            default:
                break;
        }
    }
}
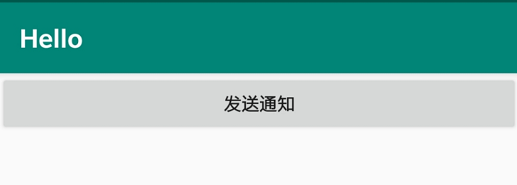
activity_main.xml:只定义了一个发送消息的按钮,当点击按钮时,会发送消息
<?xml version="1.0" encoding="utf-8"?>
<LinearLayout xmlns:android="http://schemas.android.com/apk/res/android"
    android:orientation="vertical"
    android:layout_width="match_parent"
    android:layout_height="match_parent">

    <Button
        android:id="@+id/send_button"
        android:layout_width="match_parent"
        android:layout_height="wrap_content"
        android:text="发送通知"/>

</LinearLayout>
运行程序,点击按钮:
此时的这个是没有点击效果的,也没有反应,如果要实现点击的设置需要涉及到:PendingIntent
PendingIntent可以简单地理解为延迟执行的Intent。
PendingInternet的用法:
提供了几个静态方法用于获取PendingInternet的实例,可以根据选择使用getActivity()方法、getBroadcast()方法、getService()方法
这几个方法有四个参数,参数都是相同的:
第一个参数:content
第二个参数:一般传入0
第三个参数:Intent对象,可以通过这个对象构建出pendingInternet,这里就可以通过构造出的一个延迟执行的意图,当用户点击时就可以跳转到该逻辑
第四个参数:用于确定PendingInternet的行为,FLAG_ONE_SHOT、FLAG_NO_CREATE、FLAG_CANCEL_CURRENT、FLAG_UPDATE_CURRENT,通常情况下传入0
NotificationCompat.Buolder这个构造器中还可以连缀一个setContentIntent()方法,接受的参数是一个PendingIntent对象
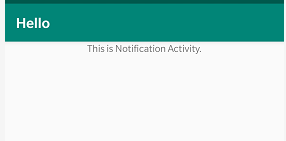
此时新建一个NotificationActivity活动:
<?xml version="1.0" encoding="utf-8"?>
<LinearLayout xmlns:android="http://schemas.android.com/apk/res/android"
    android:orientation="vertical"
    android:layout_width="match_parent"
    android:layout_height="match_parent">

    <TextView
        android:layout_width="match_parent"
        android:layout_height="wrap_content"
        android:text="This is Notification Activity."
        android:gravity="center"/>

</LinearLayout>
修改MainActivity.java代码(红色的代码是新增上去的)
public class MainActivity extends AppCompatActivity implements  View.OnClickListener{

    @Override
    protected void onCreate(Bundle savedInstanceState) {
        super.onCreate(savedInstanceState);
        setContentView(R.layout.activity_main);
        Button send=(Button)findViewById(R.id.send_button);
        send.setOnClickListener(this);
    }
    @Override
    public void onClick(View v) {
        switch (v.getId()){
            case R.id.send_button:
                Intent intent=new Intent(MainActivity.this,NotificationActivity.class);
                PendingIntent pendingIntent=PendingIntent.getActivity(this,0,intent,0);
                String id = "my_channel_01";
                String name="panq";
                NotificationManager notificationManager = (NotificationManager) getSystemService(NOTIFICATION_SERVICE);
                Notification notification = null;
                //Notification在android 8.0以上设置时,需要设置渠道信息才能够正常显示通知。
                if (Build.VERSION.SDK_INT >= 26) {//判断API,API26以上的方法
                    NotificationChannel mChannel = new NotificationChannel(id, name, NotificationManager.IMPORTANCE_LOW);
                    notificationManager.createNotificationChannel(mChannel);
                    notification = new Notification.Builder(this,id)
                            .setChannelId(id)
                            .setContentTitle("title")
                            .setContentText("This is content text")
                            .setSmallIcon(R.drawable.send)
                            .setLargeIcon(BitmapFactory.decodeResource(getResources(),R.drawable.ff))
                            .setContentIntent(pendingIntent)
                            .setAutoCancel(true)//点击通知后会消失在显示栏
                            .build();

                } else {//API26以下的方法
                    notification = new Notification.Builder(this)
                            .setContentTitle("title")
                            .setContentText("This is content text")
                            .setSmallIcon(R.drawable.send)
                            .setLargeIcon(BitmapFactory.decodeResource(getResources(),R.drawable.ff))
                            .setContentIntent(pendingIntent)
                            .setAutoCancel(true)//点击通知后会消失在显示栏
                            .build();
                }
                notificationManager.notify(111123, notification);
                break;
            default:
                break;
        }
    }
}
运行程序,点击通知后。跳转到另一个活动:
三、通知的进阶技巧
1、setSound():该方法可以在接收通知的时候发送一段音频,能够更好的告知用户通知的到来。接收一个Uri参数,所以在指定音频文件的时候还需要首先获取到音频文件对应的Uri。
2、setvibrate():该方法在接收通知的时候让手机震动,参数是一个数组,用于设置手机震动的时长,以毫秒为单位。
它是一个长整型的数组,用于设置手机静止和振动的时长,以毫秒为单位。下标为0的值 表示手机静止的时长,下标为1的值表示手机振动的时长,下标为2的值又表示手机静止的时 长,以此类推。所以,如果想要让手机在通知到来的时候立刻振动1秒,然后静止1秒,再振动1秒,代码就可以写成:
setVibrate(new long[]{0,1000,1000,1000})
想要手机震动还需要申请权限:<uses-permission android:name="android.permission.VIBRATE"/>
3、setLights():该方法用于设置收到消息时手机发出led光,接收三个参数:①LED灯的颜色指定;②LED灯亮的时长;③执行LED灯暗去的时长(以毫秒为单位)
4、setDefaults(NotificationCompat.DEFAULT_ALL):当你不想进行那么多繁杂的设置,也可以直接使用通知的默认效果,它会根据当前手 机的环境来决定播放什么铃声,以及如何振动
5、setStyle():该方法允许构建出富文本的通知内容。也就是说通知中不光可以有文字和图标,还可以包含更多的东西文本通知内容。setStyle() 方法接收一 个NotificationCompat.Style 参数,这个参数就是用来构建具体的富文本信息的,如长文 字、图片等。
当文字内容较多使用:setStyle(new NotificationCompat.BigTextStyle().bigText(" ........")
同时还可以设置图片进行方法:new NotificationCompat.BigPictureStyle().bigPicture(BitmapFactory.decodeResource(getResources() , R.drawable.big_image))
四、悬挂式通知
android 通知的四种形式: 普通通知 悬挂式通知 折叠式通知 锁屏通知。
推荐看一下:https://www.jianshu.com/p/8cec293cfa9a,以及郭霖对android 8.0系统的通知栏适配
直接上代码:
MainActivity.java:
public class MainActivity extends AppCompatActivity {
   private NotificationChannel channel;

    @Override
    protected void onCreate(Bundle savedInstanceState) {
        super.onCreate(savedInstanceState);
        setContentView(R.layout.activity_main);
        if (Build.VERSION.SDK_INT >= Build.VERSION_CODES.O) {
            String channelId = "chat";
            String channelName = "聊天消息";
            int importance = NotificationManager.IMPORTANCE_HIGH;
            createNotificationChannel(channelId, channelName, importance);
        }
    }

    public void sendChatMsg(View view) {
        Intent intent=new Intent(MainActivity.this,NotificationActivity.class);
        PendingIntent pendingIntent=PendingIntent.getActivity(this,0,intent,0);
        NotificationManager manager = (NotificationManager) getSystemService(NOTIFICATION_SERVICE);
        //如果聊天消息该渠道被关闭了,这里我们判断如果通知渠道的importance等于IMPORTANCE_NONE,就说明用户将该渠道的通知给关闭了,这时会跳转到通知的设置界面提醒用户手动打开。
        if (channel.getImportance() == NotificationManager.IMPORTANCE_NONE) {
            Intent intent1 = new Intent(Settings.ACTION_CHANNEL_NOTIFICATION_SETTINGS);
            intent1.putExtra(Settings.EXTRA_APP_PACKAGE, getPackageName());
            intent1.putExtra(Settings.EXTRA_CHANNEL_ID, channel.getId());
            startActivity(intent1);
            Toast.makeText(this, "请手动将通知打开", Toast.LENGTH_SHORT).show();
        }
        Notification notification = new NotificationCompat.Builder(this, "chat")
                .setContentTitle("收到一条聊天消息")
                .setContentText("今天中午吃什么?")
                .setContentIntent(pendingIntent)
                .setWhen(System.currentTimeMillis())//设置时间
                .setSmallIcon(R.drawable.send)
                .setLargeIcon(BitmapFactory.decodeResource(getResources(),R.drawable.ff))
                .setAutoCancel(true)//点击通知后会消失在显示栏
                .setVibrate(new long[]{0,1000,1000,1000})//设置震动
                .setNumber(1)//未读消息的数量
                .setFullScreenIntent(pendingIntent,true)
          .setDefaults(0)
                .setPriority(NotificationCompat.PRIORITY_MAX)
                .build();
        manager.notify(1, notification);
    }
    /**
     *创建通知渠道
     * @param channelId 通知渠道的id
     * @param channelName  通知渠道的名字
     * @param importance  渠道优先级
     */
    private void createNotificationChannel(String channelId, String channelName, int importance) {
        channel = new NotificationChannel(channelId, channelName, importance);
        channel.setShowBadge(true);//允许这个渠道下的通知显示角标
        NotificationManager notificationManager = (NotificationManager) getSystemService(
                NOTIFICATION_SERVICE);
        notificationManager.createNotificationChannel(channel);
    }

}
如果你要想弹出消息后自动消失,就必须要加这两句:
.setDefaults(0)
.setPriority(NotificationCompat.PRIORITY_MAX)
activity_main.xml文件:
<?xml version="1.0" encoding="utf-8"?>
<LinearLayout xmlns:android="http://schemas.android.com/apk/res/android"
    android:orientation="vertical"
    android:layout_width="match_parent"
    android:layout_height="match_parent">

    <Button
        android:id="@+id/send_button"
        android:layout_width="match_parent"
        android:layout_height="wrap_content"
        android:text="发送通知"
        android:onClick="sendChatMsg"/>

</LinearLayout>
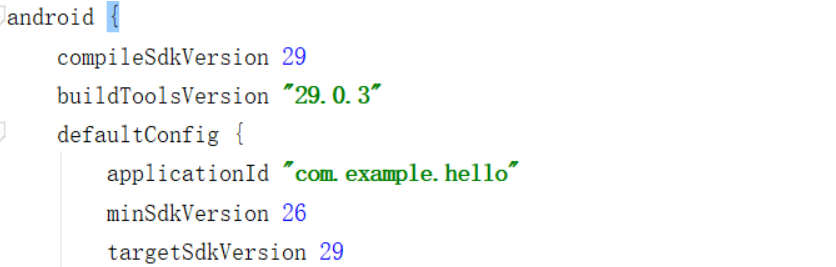
注意:使用NotificationChannel要保证你的minSdkVersion要在26以上,如果低于26可以自己改,去app--build-gradle改,低于26会出现错误:
运行程序,点击发送信息按钮,会弹出一条信息,弹出过几秒会消失,通知栏上通知还在。

五、调用摄像头与相册
1.摄像头的调用
这里直接进入主题,给出使用步骤:
第一步:创建一个存储照片的文件
第二步:根据这个文件,创建一个指向该文件的Uri对象实例
第三步:创建一个意图Intent,通过系统Action : android.media.action.IMAGE_CAPTURE初始化并通过putExtra()向意图中存入第二步获取的Uri对象实例
第四步:通过startActivityForResult()打开相机
第五步:在onActivityResult()中实现把相机拍摄照片保存到Intent中的Uri实例对象指向文件里即可
2.获取手机相册
直接进入主题,给出使用步骤:
第一步:创建一个意图,通过设置系统Action为:android.intent.action.GET_CONTENT 用于打开手机资源,并通过setType(“image/*”)来限定只查看图片资源。
第二步:根据打开资源的路径创建指向对应路径的Uri实例对象
第三步:获取选择图片路径(难点)
第四步:显示图片
详细的解释可以看这个:https://blog.csdn.net/hyperprogram/article/details/70284539
示例代码:
(1)activity_main.xml
<?xml version="1.0" encoding="utf-8"?>
<LinearLayout xmlns:android="http://schemas.android.com/apk/res/android"
    android:orientation="vertical"
    android:layout_width="match_parent"
    android:layout_height="match_parent">

   <Button
       android:id="@+id/button"
       android:layout_width="wrap_content"
       android:layout_height="wrap_content"
       android:text="拍照上传"
       android:onClick="takePhoto"/>
    <Button
        android:id="@+id/chose_button"
        android:layout_width="wrap_content"
        android:layout_height="wrap_content"
        android:text="从相册中选择"
        android:onClick="choosePhoto"
        />

    <ImageView
        android:id="@+id/picture"
        android:layout_width="wrap_content"
        android:layout_height="wrap_content"
        android:gravity="center"/>

</LinearLayout>
(2)MainActivity.java(其实都是跟着《第一行代码》打的)


  1 public class MainActivity extends AppCompatActivity {
  2     private Uri imageUri;
  3     private ImageView  picture1;// = (ImageView) findViewById(R.id.picture);
  4     public  static final  int TAKE_PHOTO = 1;
  5     public  static final  int CHOOSE_PHOTO = 2;
  6
  7     @Override
  8     protected void onCreate(Bundle savedInstanceState) {
  9         super.onCreate(savedInstanceState);
 10         setContentView(R.layout.activity_main);
 11         picture1 = (ImageView) findViewById(R.id.picture);
 12     }
 13     //从相册中选择照片
 14     public void choosePhoto(View view){
 15         if(ContextCompat.checkSelfPermission(MainActivity.this,
 16                 Manifest.permission.WRITE_EXTERNAL_STORAGE)!=PackageManager.PERMISSION_GRANTED){//若没有权限就申请权限
 17             ActivityCompat.requestPermissions(MainActivity.this,new
 18                     String[]{Manifest.permission.WRITE_EXTERNAL_STORAGE},1);
 19         }else{
 20             openAlbum();
 21         }
 22     }
 23
 24     private void openAlbum() {
 25         Intent intent=new Intent("android.intent.action.PICK");
 26         intent.setType("image/*");
 27         startActivityForResult(intent,CHOOSE_PHOTO);
 28     }
 29
 30     //拍照
 31     public void  takePhoto(View view){
 32         //创建File对象,用于存储拍照后的图片
 33         File outputImage = new File(getExternalCacheDir(),"output_image.jpg");
 34
 35         try {
 36             if (outputImage.exists()){//文件存在就删除
 37                 outputImage.delete();
 38             }
 39             outputImage.createNewFile();//文件不存在就创新
 40         }catch (Exception e){
 41             e.printStackTrace();
 42         }
 43
 44         if (Build.VERSION.SDK_INT >=24){//android版本7.0以上
 45             //将File对象装换为Uri对象
 46             imageUri = FileProvider.getUriForFile(MainActivity.this,"com.example.cameraalbumtest",outputImage);
 47         }else {//android版本7.0以下
 48             //将File对象装换为Uri对象
 49             imageUri = Uri.fromFile(outputImage);
 50         }
 51         //启动相机
 52         Intent intent = new Intent("android.media.action.IMAGE_CAPTURE");
 53         intent.putExtra(MediaStore.EXTRA_OUTPUT,imageUri);//指定输出地址
 54         startActivityForResult(intent,TAKE_PHOTO);//startActivityForResult(Intent intent, int requestCode),第一个参数是intent,第二个是请求码
 55     }
 56
 57     /**
 58      *启动其他界面并返回数据。拍照完或选择完相册会调用此方法
 59      * @param requestCode 请求码,对应startActivityForResult(Intent intent, int requestCode)的requestCode
 60      * @param resultCode  返回码,通过该参数判断子activity返回的状态,有OK,CANCELED,RESULT_FIRST_USER等,
 61      * @param data  用来传递数据,对应子Activity的一个实例变量Intent mResultData,初始化为null,可通过setResult(int resultCode, Intent data)修改。
 62      */
 63     @Override
 64     protected void onActivityResult(int requestCode, int resultCode, Intent data) {
 65         super.onActivityResult(requestCode, resultCode, data);
 66         switch (requestCode) {
 67             case TAKE_PHOTO:
 68                 if (resultCode == RESULT_OK) {
 69                     try {
 70                         //显示照片
 71                         Bitmap bitmap = BitmapFactory.decodeStream(getContentResolver().openInputStream(imageUri));
 72                         picture1.setImageBitmap(bitmap);
 73                     } catch (Exception e) {
 74                         e.printStackTrace();
 75                     }
 76                 }
 77                 break;
 78             case CHOOSE_PHOTO:
 79                 if(resultCode==RESULT_OK){
 80                     //判断手机版本号
 81                     if(Build.VERSION.SDK_INT>=19){
 82                         //4.4及以上系统使用这个方法处理图片
 83                         handleImageOnKitKat(data);
 84                     }else {
 85                         handleImageBeforeKitKat(data);
 86                     }
 87                 }
 88                 break;
 89             default:
 90                 break;
 91         }
 92     }
 93     //手机系统版本大于4.4
 94     @TargetApi(19)
 95     private void handleImageOnKitKat(Intent data){
 96         String imagePath=null;
 97         Uri uri=data.getData();
 98         if(DocumentsContract.isDocumentUri(this,uri)){
 99             //document类型的Uri处理方式
100             String docId=DocumentsContract.getDocumentId(uri);
101             if("com.android.providers.media.documents".equals(uri.getAuthority())){
102                 String id=docId.split(":")[1];
103                 String seletion=MediaStore.Images.Media._ID+"="+id;
104                 imagePath=getImagePath(MediaStore.Images.Media.EXTERNAL_CONTENT_URI,seletion);
105             }else if("com.android.providers.downloads.documents".equals(uri.getAuthority())){
106                 Uri contentUri= ContentUris.withAppendedId(Uri.parse("content://downloads/public_downloads"),Long.valueOf(docId));
107                 imagePath=getImagePath(contentUri,null);
108             }
109         }else if("content".equalsIgnoreCase(uri.getScheme())){
110             //content类型的Uri处理方式
111             imagePath=getImagePath(uri,null);
112         }else if("file".equalsIgnoreCase(uri.getScheme())){
113             //file类型的Uri,直接获取路径即可
114             imagePath=uri.getPath();
115         }
116         Log.i("MainActivity",imagePath);
117         displayImage(imagePath);
118     }
119     //ApI<19
120     private void handleImageBeforeKitKat(Intent data){
121         Uri uri=data.getData();
122         String imagePath=getImagePath(uri,null);
123         displayImage(imagePath);
124     }
125
126     private void displayImage(String imagePath){
127         if(imagePath!=null){
128             Bitmap bitmap=BitmapFactory.decodeFile(imagePath);
129             picture1.setImageBitmap(bitmap);
130             //Log.i("MainActivity",bitmap.toString());
131         }else{
132             Toast.makeText(this,"没有找到对应的图片",Toast.LENGTH_SHORT).show();
133         }
134     }
135
136
137
138     private String getImagePath(Uri uri,String selection){
139         String path=null;
140         //获取真实的图片路径
141         Cursor cursor=getContentResolver().query(uri,null,selection,null,null);
142         if(cursor!=null){
143             if(cursor.moveToFirst()){
144                 path=cursor.getString(cursor.getColumnIndex(MediaStore.Images.Media.DATA));
145             }
146             cursor.close();
147         }
148         return path;
149     }
150
151
152     @Override
153     public void onRequestPermissionsResult(int requestCode, @NonNull String[] permissions, @NonNull int[] grantResults) {
154         super.onRequestPermissionsResult(requestCode, permissions, grantResults);
155         switch (requestCode){
156             case 1:
157                 if(grantResults.length>0&&grantResults[0]==PackageManager.PERMISSION_GRANTED){
158                     openAlbum();
159                 }else{
160                     Toast.makeText(MainActivity.this,"您已关闭访问相册的权限",Toast.LENGTH_SHORT).show();
161                 }
162                 break;
163             default:
164                 break;
165         }
166     }
167 }
(3)AndroidManifest.xml(要特别注意加第15行,如果没加会报错:Unable to decode stream: java.io.FileNotFoundException...........open failed: EACCES (Permission denied))
 1 <?xml version="1.0" encoding="utf-8"?>
 2 <manifest xmlns:android="http://schemas.android.com/apk/res/android"
 3     package="com.example.cameraalbumtest">
 4     <uses-permission android:name="android.permission.WRITE_EXTERNAL_STORAGE"/>
 5     <uses-permission android:name="android.permission.READ_EXTERNAL_STORAGE"/>
 6     <uses-permission android:name="com.android.launcher.permission.READ_SETTINGS" />
 7
 8
 9     <application
10         android:allowBackup="true"
11         android:icon="@mipmap/ic_launcher"
12         android:label="@string/app_name"
13         android:roundIcon="@mipmap/ic_launcher_round"
14         android:supportsRtl="true"
15         android:requestLegacyExternalStorage="true"
16         android:theme="@style/AppTheme">
17         <activity android:name=".MainActivity">
18             <intent-filter>
19                 <action android:name="android.intent.action.MAIN" />
20
21                 <category android:name="android.intent.category.LAUNCHER" />
22             </intent-filter>
23         </activity>
24         <provider
25             android:name="androidx.core.content.FileProvider"
26             android:authorities="com.example.cameraalbumtest"
27             android:exported="false"
28             android:grantUriPermissions="true" >
29             <meta-data
30                 android:name="android.support.FILE_PROVIDER_PATHS"
31                 android:resource="@xml/file_paths" />
32         </provider>
33     </application>
34
35 </manifest>
运行程序:
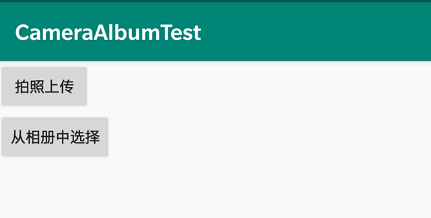
点击拍照上传按钮,会跳到相机程序,拍一张图片就会显示到程序界面上:
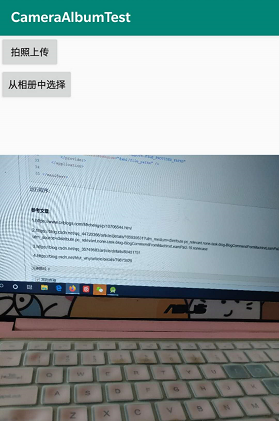
点击从相册中选择按钮,会跳到相册程序,选一张图片就会显示到程序界面上:

六、播放音频
在Android中播放音频文件一般都是使用MediaPlayer 类来实现的,它对多种格式的音频文件 提供了非常全面的控制方法,从而使得播放音乐的工作变得十分简单。下表列出了 MediaPlayer 类中一些较为常用的控制方法。
(1)播放本地音频文件步骤
第一步:先把音频文件放到sd卡存储文件中,步骤—>android 如何把电脑文件导入到真机或虚拟设备中

第二步:通过setDataSource()为该实例对象设置数据源
第三步:调用该实例对象的start(),pause(),reset()等方法来执行相应的动作
示例代码:
activity_main.xml:只是定义了三个按钮,分别是播放音乐、暂停播放、停止播放
 1 <?xml version="1.0" encoding="utf-8"?>
 2 <LinearLayout xmlns:android="http://schemas.android.com/apk/res/android"
 3
 4     android:layout_width="match_parent"
 5     android:layout_height="match_parent">
 6
 7     <Button
 8         android:layout_width="wrap_content"
 9         android:layout_height="wrap_content"
10         android:text="播放音乐"
11         android:onClick="startMusic"/>
12
13     <Button
14         android:layout_width="wrap_content"
15         android:layout_height="wrap_content"
16         android:text="暂停音乐"
17         android:onClick="pauseMusic"/>
18
19     <Button
20         android:layout_width="wrap_content"
21         android:layout_height="wrap_content"
22         android:text="停止播放"
23         android:onClick="stopMusic"/>
24
25
26
27 </LinearLayout>
MainActivity.java
 1 public class MainActivity<startMusic> extends AppCompatActivity {
 2     private MediaPlayer mediaPlayer=new MediaPlayer();
 3
 4     @Override
 5     protected void onCreate(Bundle savedInstanceState) {
 6         super.onCreate(savedInstanceState);
 7         setContentView(R.layout.activity_main); if(ContextCompat.checkSelfPermission(MainActivity.this,Manifest.permission.WRITE_EXTERNAL_STORAGE)!=
 8                 PackageManager.PERMISSION_GRANTED){
 9             ActivityCompat.requestPermissions(MainActivity.this,new String[]{
10                     Manifest.permission.WRITE_EXTERNAL_STORAGE},1);
11         }else{
12             initMediaPlayer();//初始化MediaPlayer
13         }
14
15     }
16
17     private void initMediaPlayer() {
18         try{
19             File file=new File(Environment.getExternalStorageDirectory(),"music.mp3");///storage/emulated/0/music.mp3
20             mediaPlayer.setDataSource(file.getAbsolutePath());//指定音频文件的路径
21             mediaPlayer.prepare();//进入到准备状态
22         }catch (Exception e){
23             e.printStackTrace();
24         }
25     }
26
27     //开始播放音乐
28     public void startMusic(View view){
29         if(!mediaPlayer.isPlaying()){
30             mediaPlayer.start();
31         }
32
33     }
34     //暂停播放
35     public void pauseMusic(View view){
36         if(mediaPlayer.isPlaying()){
37             mediaPlayer.pause();
38
39         }
40
41     }
42     //停止播放
43     public void stopMusic(View view){
44         if(mediaPlayer.isPlaying()){
45             mediaPlayer.reset();
46             initMediaPlayer();
47         }
48
49     }
50
51     @Override
52     public void onRequestPermissionsResult(int requestCode, @NonNull String[] permissions, @NonNull int[] grantResults) {
53         super.onRequestPermissionsResult(requestCode, permissions, grantResults);
54         switch (requestCode){
55             case 1:
56                 if(grantResults.length>0&&grantResults[0]==PackageManager.PERMISSION_GRANTED){
57                     initMediaPlayer();
58                 }else{
59                     Toast.makeText(MainActivity.this,"拒绝权限将无法使用程序",Toast.LENGTH_SHORT).show();
60                     finish();
61                 }
62                 break;
63             default:
64                 break;
65         }
66     }
67
68     @Override
69     protected void onDestroy() {
70         super.onDestroy();
71         if(mediaPlayer!=null){
72             mediaPlayer.stop();
73             mediaPlayer.release();
74         }
75     }
76 }
代码解释:可以看到,在类初始化的时候我们就先创建了一个MediaPlayer的实例,然后在onCreate() 方 法中进行了运行时权限处理,动态申请WRITE_EXTERNAL_STORAGE 权限。这是由于待会我们 会在SD卡中放置一个音频文件,程序为了播放这个音频文件必须拥有访问SD卡的权限才行。注 意,在onRequestPermissionsResult() 方法中,如果用户拒绝了权限申请,那么就调 用finish() 方法将程序直接关掉,因为如果没有SD卡的访问权限,我们这个程序将什么都干 不了。 用户同意授权之后就会调用initMediaPlayer() 方法为MediaPlayer 对象进行初始化操 作。在initMediaPlayer() 方法中,首先是通过创建一个File 对象来指定音频文件的路 径,从这里可以看出,我们需要事先在SD卡的根目录下放置一个名为music.mp3的音频文件。后 面依次调用了setDataSource() 方法和prepare() 方法,为MediaPlayer做好了播放前的准 备。接下来我们看一下各个按钮的点击事件中的代码。当点击Play按钮时会进行判断,如果当前 MediaPlayer没有正在播放音频,则调用start() 方法开始播放。当点击Pause按钮时会判断, 如果当前MediaPlayer正在播放音频,则调用pause() 方法暂停播放。当点击Stop按钮时会判 断,如果当前MediaPlayer正在播放音频,则调用reset() 方法将MediaPlayer重置为刚刚创建的 状态,然后重新调用一遍initMediaPlayer() 方法。 最后在onDestroy() 方法中,我们还需要分别调用stop() 方法和release() 方法,将与 MediaPlayer相关的资源释放掉
(2)播放项目下raw文件的音频
1.把本地音频文件放入res/raw文件夹,如果没有raw文件夹就创建一个。
2.播放代码:只是initMediaPlayer()方法变了,其他都一样
 1 public class MainActivity<startMusic> extends AppCompatActivity {
 2     private MediaPlayer mediaPlayer=new MediaPlayer();
 3     @Override
 4     protected void onCreate(Bundle savedInstanceState) {
 5         super.onCreate(savedInstanceState);
 6         setContentView(R.layout.activity_main);   if(ContextCompat.checkSelfPermission(MainActivity.this,Manifest.permission.WRITE_EXTERNAL_STORAGE)!=
 7                 PackageManager.PERMISSION_GRANTED){
 8             ActivityCompat.requestPermissions(MainActivity.this,new String[]{
 9                     Manifest.permission.WRITE_EXTERNAL_STORAGE},1);
10         }else{
11             initMediaPlayer();//初始化MediaPlayer
12         }
13
14     }
15
16     private void initMediaPlayer() {
17         AssetFileDescriptor file = getResources().openRawResourceFd(R.raw.music);
18         try {
19             mediaPlayer.setDataSource(file.getFileDescriptor(), file.getStartOffset(),
20                     file.getLength());
21             mediaPlayer.prepare();
22             file.close();
23         } catch (IOException e) {
24             e.printStackTrace();
25         }
26         mediaPlayer.setVolume(0.5f, 0.5f);
27         mediaPlayer.setLooping(true);//循环播放
28     }
29
30     //开始播放音乐
31     public void startMusic(View view){
32         if(!mediaPlayer.isPlaying()){
33             mediaPlayer.start();
34         }
35
36     }
37     //暂停播放
38     public void pauseMusic(View view){
39         if(mediaPlayer.isPlaying()){
40             mediaPlayer.pause();
41
42         }
43
44     }
45     //停止播放
46     public void stopMusic(View view){
47         if(mediaPlayer.isPlaying()){
48             mediaPlayer.reset();
49             initMediaPlayer();
50         }
51
52     }
53
54     @Override
55     public void onRequestPermissionsResult(int requestCode, @NonNull String[] permissions, @NonNull int[] grantResults) {
56         super.onRequestPermissionsResult(requestCode, permissions, grantResults);
57         switch (requestCode){
58             case 1:
59                 if(grantResults.length>0&&grantResults[0]==PackageManager.PERMISSION_GRANTED){
60                     initMediaPlayer();
61                 }else{
62                     Toast.makeText(MainActivity.this,"拒绝权限将无法使用程序",Toast.LENGTH_SHORT).show();
63                     finish();
64                 }
65                 break;
66             default:
67                 break;
68         }
69     }
70
71     @Override
72     protected void onDestroy() {
73         super.onDestroy();
74         if(mediaPlayer!=null){
75             mediaPlayer.stop();
76             mediaPlayer.release();
77         }
78     }
79 }
注意:无论是播放哪里的音频,都要在AndroidManifest.xml声明权限:
<uses-permission android:name="android.permission.WRITE_EXTERNAL_STORAGE" />
运行程序之后可以正常播放。
七、播放视频
播放视频文件其实并不比播放音频文件复杂,主要是使用VideoView类来实现的。这个类将视频 的显示和控制集于一身,使得我们仅仅借助它就可以完成一个简易的视频播放器。VideoView的 用法和MediaPlayer也比较类似,主要有以下常用方法:
步骤其实跟播放音频差不多
第一步:先把视频放到sd卡存储文件中,步骤参照android 如何把电脑文件导入到真机或虚拟设备中
第二步:在布局中添加一个播放视频的VideoView控件
第三步:初始化该控件实例对象,设置播放视频的路径
第四步:调用该实例对象的方法实现播放,暂停,重放;
示例代码:
activity_main.xml
 1 <?xml version="1.0" encoding="utf-8"?>
 2 <LinearLayout xmlns:android="http://schemas.android.com/apk/res/android"
 3     android:orientation="vertical"
 4     android:layout_width="match_parent"
 5     android:layout_height="match_parent">
 6
 7     <LinearLayout
 8         android:layout_width="match_parent"
 9         android:layout_height="wrap_content">
10         <Button
11             android:id="@+id/play"
12             android:onClick="startView"
13             android:layout_width="0dp"
14             android:layout_height="wrap_content"
15             android:layout_weight="1"
16             android:text="开始播放"/>
17         <Button
18             android:id="@+id/pause"
19             android:onClick="pauseView"
20             android:layout_width="0dp"
21             android:layout_height="wrap_content"
22             android:layout_weight="1"
23             android:text="暂停播放"/>
24         <Button
25             android:id="@+id/replay"
26             android:onClick="reView"
27             android:layout_width="0dp"
28             android:layout_height="wrap_content"
29             android:layout_weight="1"
30             android:text="重新播放"/>
31     </LinearLayout>
32
33     <VideoView
34         android:layout_marginTop="10dp"
35         android:id="@+id/video"
36         android:layout_width="match_parent"
37         android:layout_height="wrap_content"/>
38
39
40
41 </LinearLayout>
在这个布局文件中,首先放置了3个按钮,分别用于控制视频的播放、暂停和重新播放。然后在 按钮下面又放置了一个VideoView,稍后的视频就将在这里显示。
MainActivity.java
 1 public class MainActivity extends AppCompatActivity {
 2
 3     private VideoView videoView;
 4
 5     @Override
 6     protected void onCreate(Bundle savedInstanceState) {
 7         super.onCreate(savedInstanceState);
 8         setContentView(R.layout.activity_main);
 9         videoView = (VideoView) findViewById(R.id.video);
10         if(ContextCompat.checkSelfPermission(MainActivity.this, Manifest.permission.WRITE_EXTERNAL_STORAGE) !=
11                 PackageManager.PERMISSION_GRANTED) {
12             ActivityCompat.requestPermissions(MainActivity.this, new String[] {
13                     Manifest.permission.WRITE_EXTERNAL_STORAGE
14             }, 1);
15         } else {
16             initVideoPath(); //初始化VideoView
17         }
18     }
19
20     private void initVideoPath() {
21         File file = new File(Environment.getExternalStorageDirectory(), "movie.mp4");
22         videoView.setVideoPath(file.getPath()); //指定视频文件的路径
23     }
24         //开始播放
25     public void startView(View view){
26         if(!videoView.isPlaying()){
27             videoView.start();
28         }
29     }
30     //暂停播放
31     public void pauseView(View view){
32         if(videoView.isPlaying()){
33             videoView.pause();
34         }
35     }
36     //重新播放
37     public void reView(View view){
38         if(videoView.isPlaying()){
39             videoView.resume();
40         }
41     }
42
43     @Override
44     public void onRequestPermissionsResult(int requestCode, @NonNull String[] permissions, @NonNull int[] grantResults) {
45         switch(requestCode) {
46             case 1:
47                 if(grantResults.length > 0 && grantResults[0] == PackageManager.PERMISSION_GRANTED) {
48                     initVideoPath();
49                 } else {
50                     Toast.makeText(this, "拒绝权限将无法使用程序", Toast.LENGTH_SHORT).show();
51                     finish();
52                 }
53                 break;
54             default:
55                 break;
56         }
57     }
58     @Override
59     protected void onDestroy() {
60         super.onDestroy();
61         if(videoView != null) {
62             videoView.suspend(); //将videoView占用的资源释放掉
63         }
64     }
65 }
注意:无论是播放哪里的音频,都要在AndroidManifest.xml声明权限:
<uses-permission android:name="android.permission.WRITE_EXTERNAL_STORAGE" />
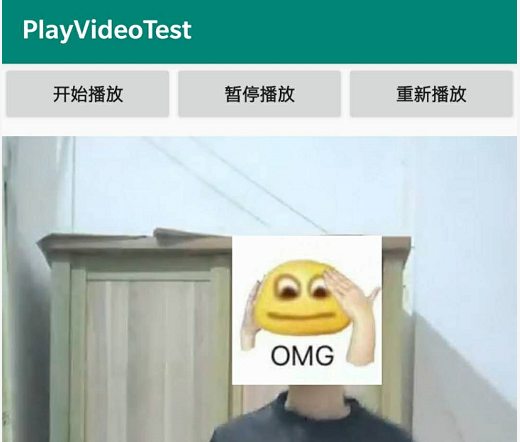
运行程序,允许访问权限后,点击按钮:
参考文章:
1.https://www.cnblogs.com/Mrchengs/p/10706544.html
3.https://blog.csdn.net/qq_35749683/article/details/80451791
4.https://blog.csdn.net/hfut_why/article/details/79873825
5.https://blog.csdn.net/qq1171574843/article/details/105432799
6.https://blog.csdn.net/hfut_why/article/details/79888985
7.https://blog.csdn.net/zung435/article/details/52918726
8.https://blog.csdn.net/firedancer0089/article/details/72866589