Mybatis-Generator插件极大地方便了我们的开发效率,不用每张表每个字段人工去敲,所以本文介绍使用Mybatis-Generator自动生成Dao、Model、Mapping相关文件
版权声明:本文为博主原创文章,未经博主允许不得转载。
原文地址:
https://www.cnblogs.com/poterliu/p/9254554.html
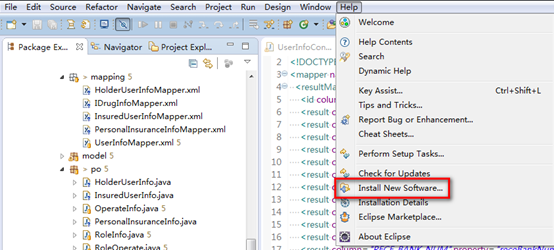
1、IDE安装Mybatis-Generator插件
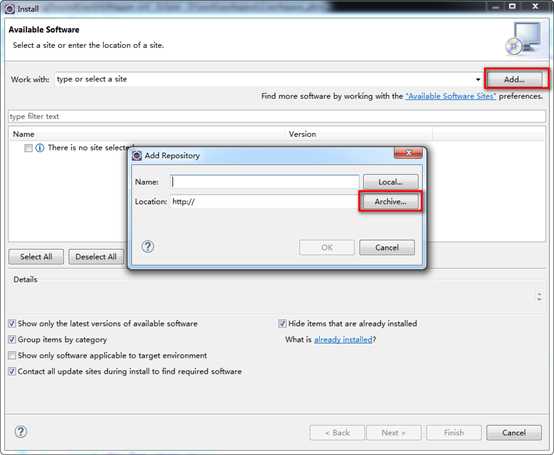
Eclipse插件安装,可以通过Eclipse插件市场的方式,但是速度很慢,下面通过本地插件的方式安装。
插件如下:
链接:https://pan.baidu.com/s/1Xkvafman8gHqbT4zStnWDw 密码:e0ws
1、Install New Software
2、Add->Archive
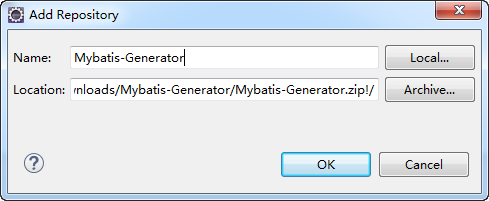
3、选择本地下载好了的Mybatis-Generator插件
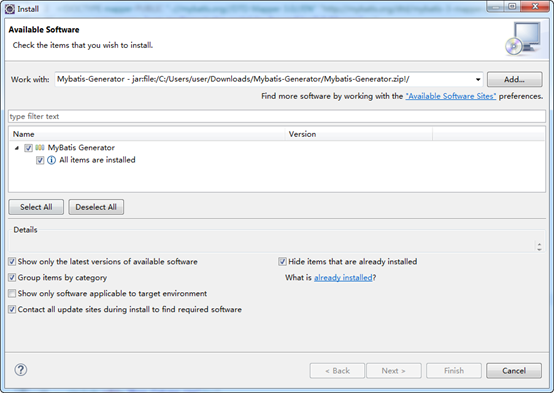
4、开始安装,最好把网络断开安装,这样就不会去检查更新,因为更新也很慢
2、配置generatorConfig.xml文件
这个文件主要用来配置基本的连接驱动位置、数据库连接信息要映射的表、生成文件存放文件、生成的dao方法等。不要包含中文,配置信息如下:
<?xml version="1.0" encoding="UTF-8"?>
<!DOCTYPE generatorConfiguration
  PUBLIC "-//mybatis.org//DTD MyBatis Generator Configuration 1.0//EN"
  "http://mybatis.org/dtd/mybatis-generator-config_1_0.dtd">
<generatorConfiguration>
    <classPathEntry    location="D:DevSoftwaremaven
epositorymysqlmysql-connector-java5.1.35mysql-connector-java-5.1.35.jar"/>
    <context id="DB2Tables" targetRuntime="MyBatis3">
        <commentGenerator>
            <property name="suppressDate" value="true"/>
            <property name="suppressAllComments" value="true"/>
        </commentGenerator>
        <jdbcConnection driverClass="com.mysql.jdbc.Driver" connectionURL="jdbc:mysql://10.129.0.182:3306/pbm" userId="medintl_appdata" password="zaq1@Wsx">
        </jdbcConnection>
        <javaTypeResolver>
            <property name="forceBigDecimals" value="false"/>
        </javaTypeResolver>
        <javaModelGenerator targetPackage="com.demo.pbm.portal.po" targetProject="pbm-websrcmainjava">
            <property name="enableSubPackages" value="true"/>
            <property name="trimStrings" value="true"/>
        </javaModelGenerator>
        <sqlMapGenerator targetPackage="com.demo.pbm.portal.mapping" targetProject="pbm-websrcmainjava">
            <property name="enableSubPackages" value="true"/>
        </sqlMapGenerator>
        <javaClientGenerator type="XMLMAPPER" targetPackage="com.demo.pbm.portal.dao" targetProject="pbm-websrcmainjava">
            <property name="enableSubPackages" value="true"/>
        </javaClientGenerator>
        <table tableName="insured_user_info" domainObjectName="InsuredUserInfo" enableDeleteByPrimaryKey="false"
        enableInsert="false" enableSelectByPrimaryKey="true" enableUpdateByPrimaryKey="false"
        enableCountByExample="false" enableUpdateByExample="false" enableDeleteByExample="false" enableSelectByExample="false" selectByExampleQueryId="false"></table>
    </context>
</generatorConfiguration>
3、运行generatorConfig.xml文件
右键运行,注意只有第一步插件安装成功并重启后才能看右键的Generate MyBatis….

全文完